
 This post may contain affiliate links which won’t change your price but will share some commission.

From Jar to Genius: Mastering Fermentation with Our Ultimate Sauerkraut Guide. This step-by-step guide to making sauerkraut in a jar doesn’t just leave you with a delicious batch of sauerkraut; it equips you with a skill set that transforms everyday vegetables into probiotic, gut-healing wonders. Dive deep into our detailed instructions, complete with expert tips and helpful notes, and emerge not just with a jar of tangy sauerkraut but with fermentation skills that will last a lifetime.
Reader Jennifer commented: “Just wanted to thank you for sharing your knowledge and recipes. I just finished making sauerkraut—using sauerkraut cabbage, carrots, and garlic from a local farm. I got five jars from a 10lb cabbage! The way you lay everything out makes it so accessible. You answer questions I didn’t even know I had.” ★★★★★

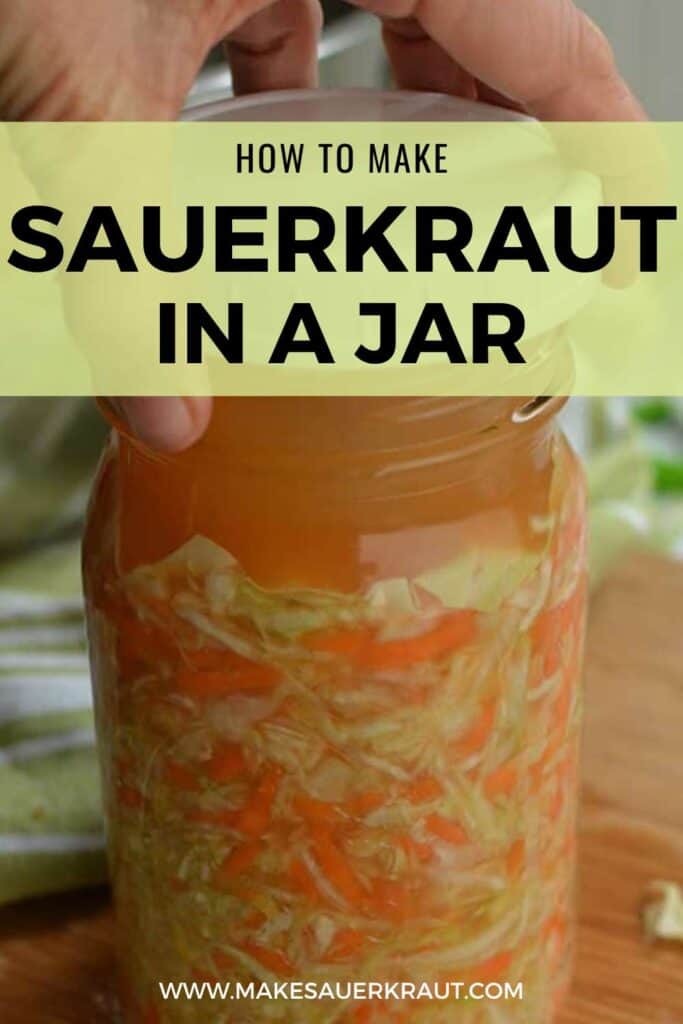
Welcome to ‘How to Make Sauerkraut in a Jar – The Ultimate Beginner’s Guide,’ your gateway to mastering the art of fermentation right in your kitchen.
Since its original publication in 2014, this guide has evolved beyond a mere recipe into a comprehensive fermentation masterclass, perfect for novices and seasoned pros.
With over 20 years of experience in making sauerkraut and having taught thousands the fine art of its creation, I bring a wealth of expertise to this guide.
This website is dedicated to transforming beginners into confident fermenters. My deep-rooted passion and extensive knowledge of fermentation are woven into every part of this comprehensive guide.
This guide is tailored to everyone—whether you’re a young enthusiast at 7, a senior at 77, someone still mastering kitchen skills, or an accomplished gourmet chef. You’re about to embark on a transformative culinary adventure that will:
- Quickly boost your confidence in fermenting sauerkraut.
- Make the process of enjoying this flavorful ferment feel effortless.
- Help you unlock the myriad health benefits, including enhanced digestion.
So, roll up your sleeves, and let’s dive into the fascinating process of turning ordinary vegetables into probiotic-rich sauerkraut. Your journey from jar to fermentation genius starts now!
Done with failed batches? Ready to turn on YOUR Fermentation Ninja skills?
Then, download a PDF copy of my expanded recipe: How to Make Sauerkraut in a Jar, AND… enroll in my Mini-Email Course. Ten days of bite-sized lessons on how to make sauerkraut in a jar.
Guaranteed success! All for FREE!
Contents
Here are the seven steps in our ‘How to Make Sauerkraut in a Jar – The Ultimate Beginner’s Guide,’ the most effective way to transform ordinary cabbage into mouthwatering sauerkraut. Really! 💥


STEP 1: SET UP. Gather Supplies & Set Up Scale
For this first step, you buy the vegetables you need (cabbage, carrots, garlic) and put together the necessary fermentation equipment: jar, weight, and lid.
Although there are many fancy—and quite effective—weights and airlocks to make fermentation easier, you can start with readily available items.
If you own fermentation weights and airlocks, use them. If not, wait until you have fermented a few batches. Then, you’ll know what additional equipment will work for your household needs and your fermentation preferences.
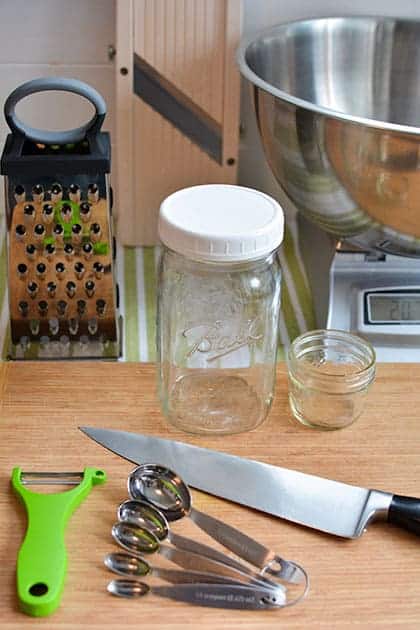
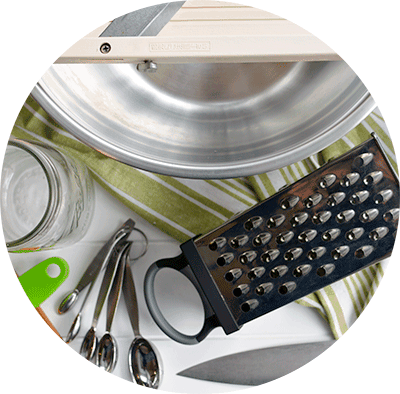
Gather Equipment
Here’s a list of what you’ll need. If you need to buy anything, there are recommendations below.
- Digital scale
- 1-quart (1 L) wide-mouth canning jar or similar-sized jar
- 4-ounce (125 ml) canning jar (jelly jar) or other fermentation weight
- Wide-mouth plastic storage cap or canning jar rim and lid
- Cutting board and chef’s knife
- Large mixing bowl
- Vegetable peeler, measuring spoons, and grater
- Kraut pounder (optional)
Purchase Ingredients
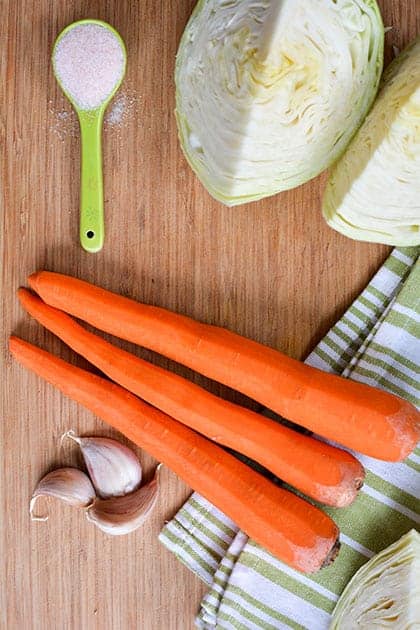
In this recipe, we make Sweet Garlic Sauerkraut: cabbage lightly seasoned with carrots and garlic. It’s a popular flavor, even for children.
If you prefer to ferment cabbage on its own, follow the recipe, omitting the carrots and garlic, though the carrots are nice to include. They add moisture and reduce the chance of your sauerkraut ending up dry.
- 1 medium head fresh green cabbage, approx. 2–3 pounds (approx.1 kg)
- 2–3 carrots (200 grams grated)
- 2–3 cloves garlic (20 grams minced)
- 1 level tablespoon iodine-free salt (16 grams)
- And, most importantly…
- Microbes (Naturally present on vegetables. The bacteria responsible for transforming humble cabbage into mouthwatering sauerkraut.)
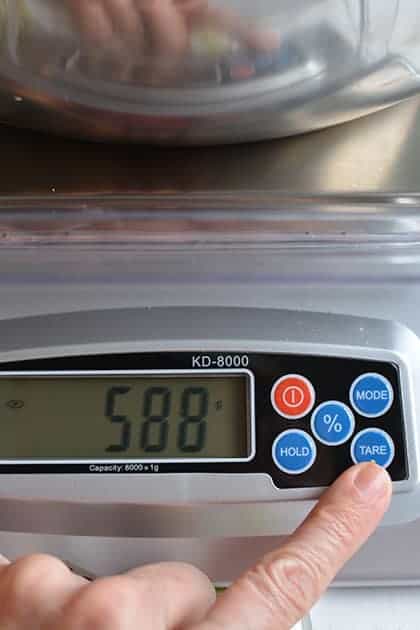
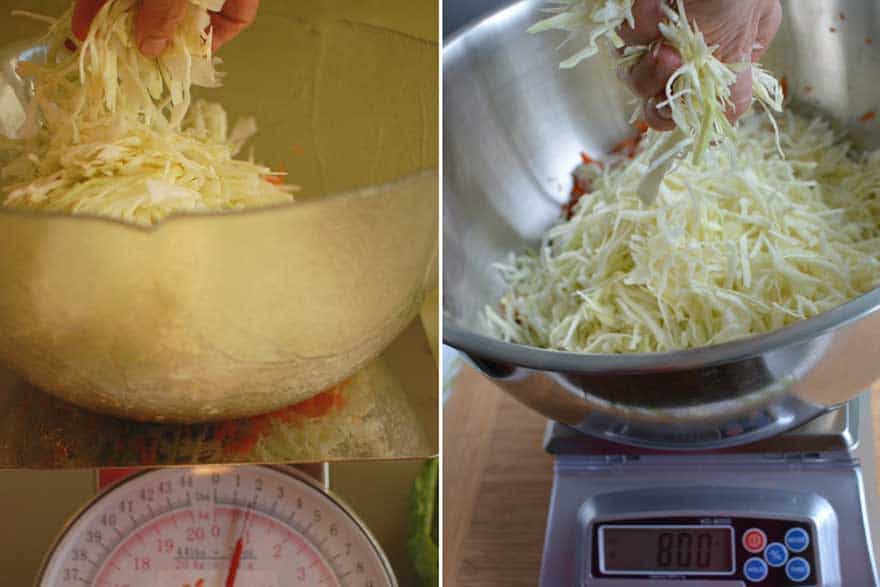
Since you don’t want to include the weight of your bowl in your measurements, you need to know its weight.
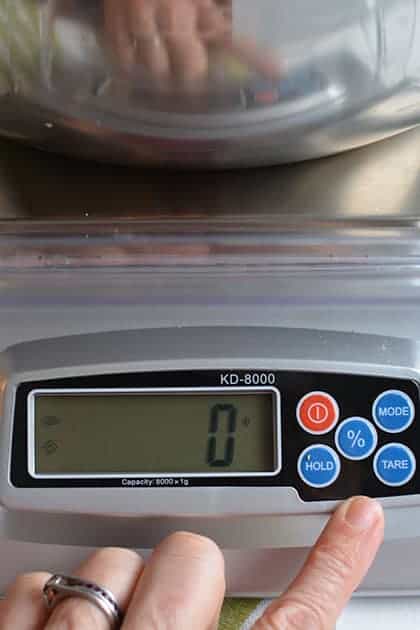
Place your empty bowl on the scale and write down its weight. Press the “tare” button to zero out the scale.
Note: If your digital scale automatically shuts off after a few minutes, as most do, remember to subtract the weight of the empty bowl when adding cabbage in the next step.
SET UP Notes and Tips
- Use green cabbage. You’ll have the greatest success if you use the traditional round-headed green cabbage for your first few batches of sauerkraut.
- Use a digital scale and work in grams. The correct amount of salt is essential for safe and successful fermentation. You must weigh your cabbage and vegetables before adding salt.
- Write down the weight of your bowl. In STEP 2: PREP, add 800 grams (28 ounces) to this number. My favorite scale is the My Weigh KD8000.
- What should you use as a fermentation weight? If you can’t access the small 4-ounce (125 ml) “jelly” canning jar, see Fermentation Weights: Keep Your Ferment Below the Brine.
- Other lid options. If you can’t find the white plastic storage caps, you can use the rim and lid that comes with canning jars. I prefer the white plastic caps because they don’t discolor like the metal ones do when coming in contact with the sauerkraut.
- Make sure your salt does not contain iodine, sugar, or anti-caking agents that may interfere with the fermentation process. What is the Best Salt for Making Fermented Sauerkraut? I use Himalayan Pink Salt in all my recipes.
- You do not need to sterilize your jar; just wash it with dish soap and rinse thoroughly.
Special Fermentation Tools
If you don’t have the equipment you need in your kitchen, the following jars, weights, and lids are my top recommendations.
Fermentation Jar
Canning jars have endless uses around your home, so don’t be afraid to have more on hand than you need for fermentation. I like the Ball brand because the measurements (standard & metric) are stamped on the side.
Table could not be displayed.Fermentation Weight
A fermentation weight holds your packed sauerkraut below the brine.


Fermentation Lid
A fermentation lid prevents excess air from entering your jar but also allows gases to escape.


Scale & Salt
The bacteria that make fermentation happen work best in a set range of salinity. Weigh your cabbage and vegetables on a scale so that you can add the correct amount of salt.


FUN FACT:
Sauerkraut contains live and active probiotics that act as your first line of defense against various harmful bacteria or toxins that might enter your body.
Step 2: CHOP. Chop Your Vegetables & Cabbage
In Step 2: CHOP, you prepare and weigh your ingredients. Your bowl should contain 800 grams (1¾ pounds or 28 ounces) of vegetables and cabbage.
When making sauerkraut, you first prepare the flavoring ingredients—carrots, ginger, radish, caraway seeds, or whatnot—then add sliced cabbage. This allows you to add as much sliced cabbage as necessary to hit 800 grams on the scale.
Why?
800 grams (1¾ pounds or 28 ounces) is the perfect amount of cabbage and vegetables to mix with 1 tablespoon (16 grams) of salt to create the right saltiness of brine to ensure perfectly fermented sauerkraut.
And it’s the perfect amount of sauerkraut to pack into a 1-quart )1-liter) jar. So, we always slice just enough cabbage to have 800 grams of vegetables AND cabbage.

First, peel and grate two to three carrots (about 200 grams grated). Add these to your bowl. Finely mince two to three garlic cloves (20 grams works well), and add these to your bowl.
Then, prepare your cabbage. Discard any limp outer cabbage leaves, setting aside one of the cleaner ones for use at the end of STEP 5: SUBMERGE & SEAL.
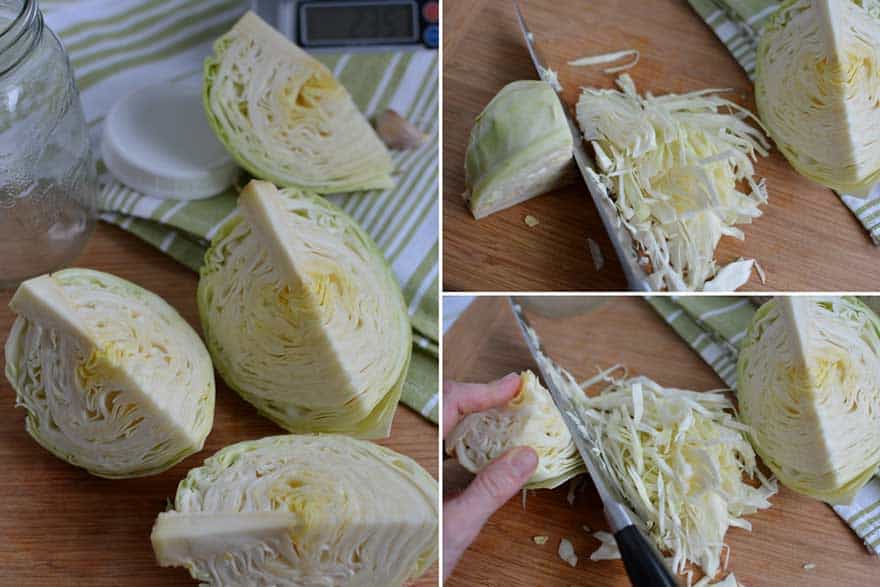
Quarter the cabbage, leaving the core in. The core helps hold the layers of cabbage together, making the slicing job easier.
Place a cabbage quarter on one of its sides and slice the cabbage crosswise into thin ribbons.
When you get to the core, turn it as necessary and slice until only the core remains. (I don’t use the core; I feed it to the worms in my compost pile.)
Other Ways to Slice Cabbage
Check out my post, How to Slice Cabbage [Which is the BEST for Perfect Sauerkraut?] for a thorough coverage on the topic. Here are some basic guidelines.
Can I use a food processor? I don’t find a food processor helpful for slicing cabbage. By the time I set it up and cut the cabbage into just the right-sized chunks to fit in the feed tube, I could have finished slicing with my mandoline.
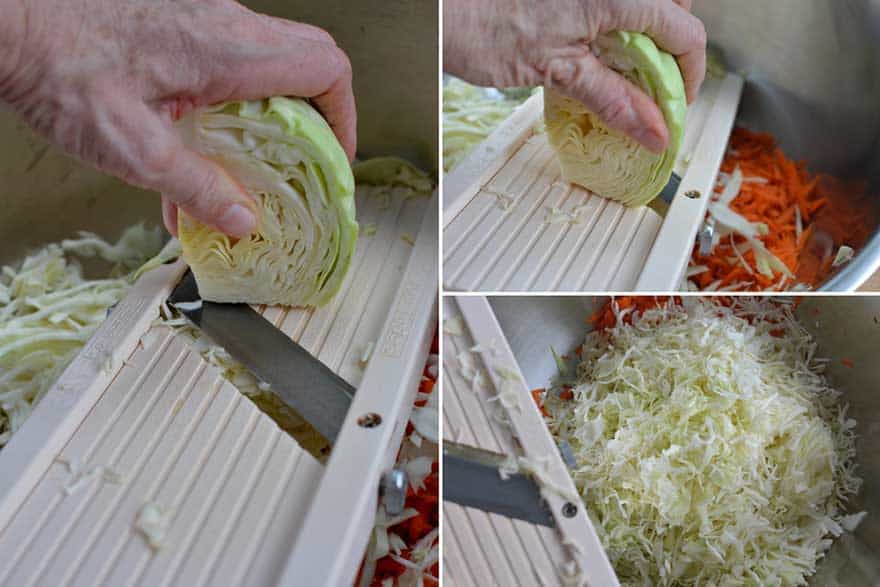
I highly recommend buying a wide mandolin for effortlessly slicing cabbage into beautiful, thin slices. I bought one a few years back, and it’s how I slice all my cabbage now.
See Fermenting Supplies for Sauerkraut & Vegetables [The Classics, The Latest, The Greatest] for a recommended brand along with “No-Cut” safety gloves that make slicing safer when working with such a sharp blade.
Add the sliced cabbage to your bowl until the weight of vegetables and cabbage is:
- 800 grams,
- 1¾ pounds,
- 28 ounces, or
You are now ready for the magic.
CHOP Notes and Tips
- Leave the core in. It holds the layers of cabbage together and makes slicing easier.
- Slice towards the core until it gets too thick, and then toss the core. Often, the core is not as sweet as the rest of the cabbage and can be a bit tough, so I compost the cabbage core.
- Food processor? Some fermenters love to use a food processor to slice their cabbage. If you do, the feed tube will result in nicer slices than the S-blade. If you use the S-blade, be sure not to over-process the cabbage.
- Consider a mandolin for thin, ribbon-like slices. I recommend the wide-body Benriner. Here is a quick video on how to use it. I leave the core in; there is no need for the ice bath.
- When to use the food processor? When making large batches, the food processor is handy for grating large amounts of carrots, mincing lots of garlic, and prepping quantities of other vegetables in your recipe.
- Follow the 75-25 Rule. For a healthy ferment, keep at least 75% of the weight in cabbage and no more than 25% of the total weight as “flavoring” ingredients.
FUN FACT:
Sauerkraut is high in digestive enzymes that help to break down starches, proteins, and fats.
STEP 3: SALT. Create Your Brine
In Step 3: SALT, you add salt to the prepared vegetables and sliced cabbage to create the brine in which your sauerkraut will ferment. Believe it or not, that big bowl of sliced cabbage will fit into your jar.
Salt pulls water out of the cabbage and vegetables to create an environment where the good bacteria (mainly lactobacillus) can grow and proliferate, and the bad bacteria die off.
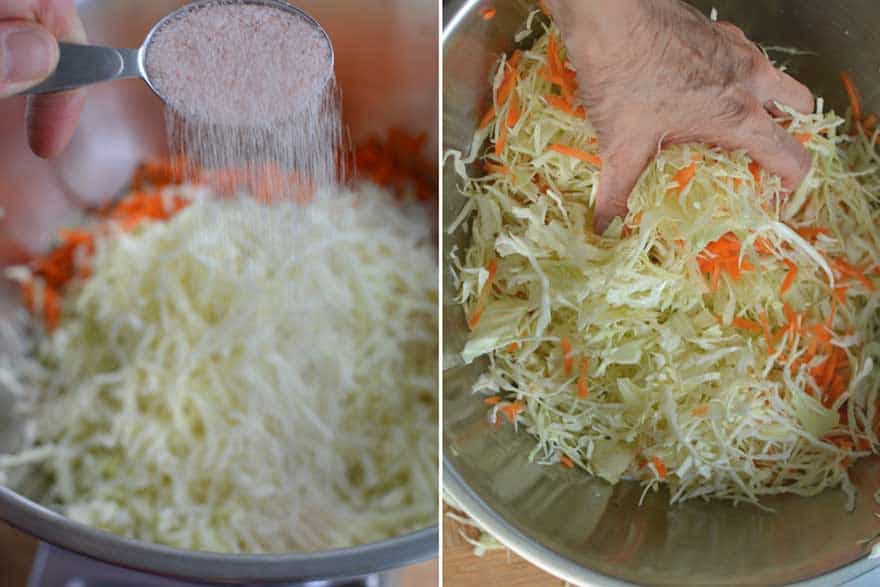
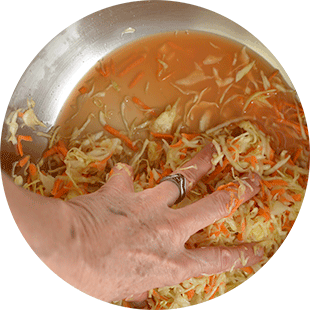
Sprinkle vegetables and cabbage with 1 tablespoon (16 grams) of salt and mix well.
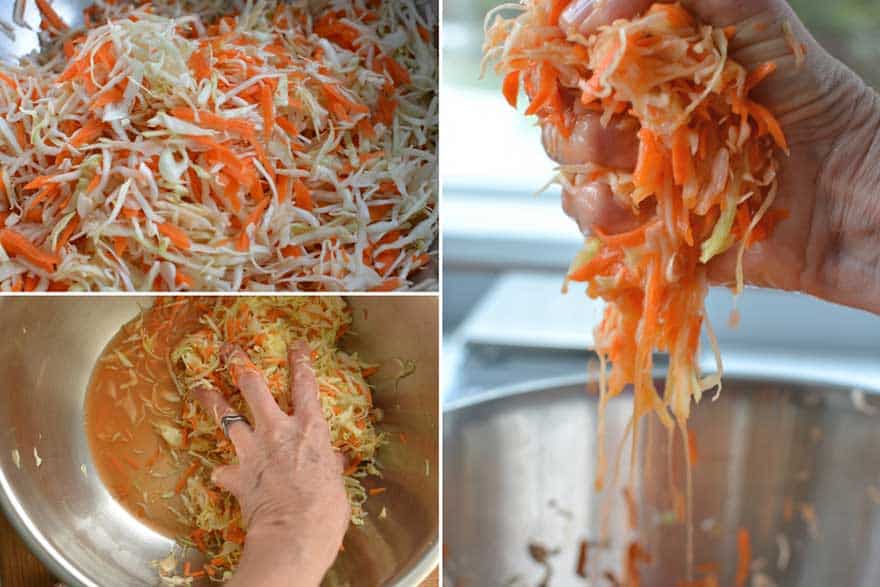
Massage and squeeze the vegetables with strong hands until moist, creating the brine. You should be able to tilt the bowl to the side and see a good-sized puddle of brine, about 2–3 inches in diameter. This process can take anywhere from 2 to 10 minutes.
Salt Notes and Tips
- No-Pound Sauerkraut. If you want the salt to work for you, leave the salted cabbage alone for 20 minutes to an hour. Return later, and you’ll notice the cabbage is glistening with “sweat.” You will not have to massage the cabbage much at all.
- Are your hands not strong enough to massage the cabbage? One of my readers shared that she uses the dough hook of her KitchenAid mixer to massage the salted cabbage slowly.
- Age of cabbage and brine amount. The fresher the cabbage and the higher the moisture content, the quicker the brine will be created. If you’re making sauerkraut in the fall with fresh cabbage, you’ll see this for sure. On the other hand, if you’re making sauerkraut with cabbage that has been stored for months, you’ll find it harder to create the brine, and there’ll be less of it.
- Weigh your salt. If you have a digital scale and the personality for exactness, you can use your scale to weigh the correct amount of salt. Salt by Weight for Delicious Sauerkraut… Batch after Batch
FUN FACT:
Sauerkraut has high levels of Vitamin C for collagen production and as a natural antioxidant for immune system support.
STEP 4: PACK. Pack Mixture into Jar
In Step 4: PACK, pack the cabbage mixture into your jar.
Your big bowl of cabbage and carrots has shrunk to a manageable, moist mass. The brine that was created will keep your sauerkraut safe from harmful bacteria while it is fermenting.
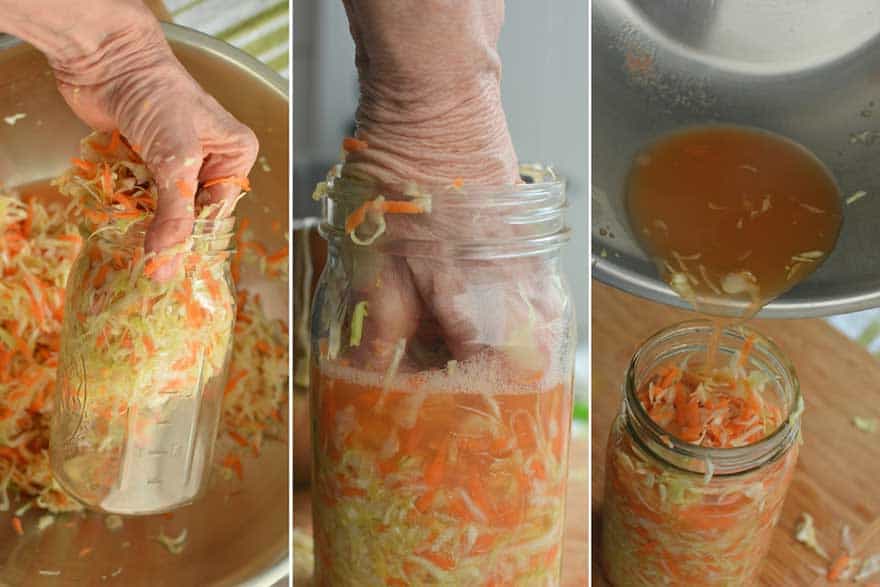
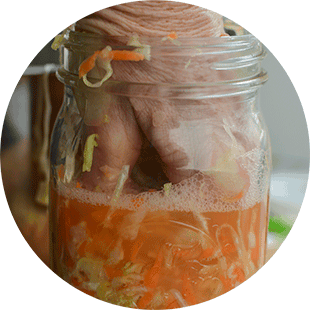
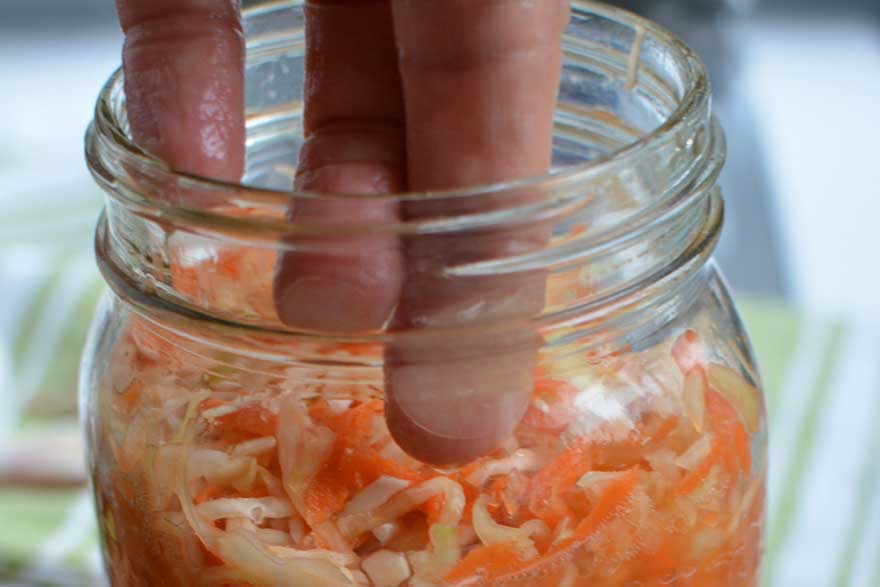
Grab handfuls of the salty, juicy cabbage mixture and pack it into your quart-sized wide-mouth canning jar, periodically pressing the mixture down tightly with your fist or a large spoon so that the brine rises above the top and no air pockets remain.
To keep the mess to a minimum, hold the jar in one hand—my clean hand—and pack with the other hand, holding everything over the bowl.
Use firm pressure, just enough to remove large air pockets but not so hard as to possibly break the jar.
Be sure to leave at least 1 inch of space between the top of the cabbage and the top of the jar. This should happen automatically because we weighed the right amount of cabbage to fit in your jar.
Pour any brine left in your mixing bowl into the jar and scrape out any loose bits stuck to the sides of the bowl.
Lastly, wipe down the outside of the jar and push down any tidbits on the inside that may remain above your packed ferment. Remember: “Under the brine, makes it fine!” 🙂
PACK Notes and Tips
- Kraut Pounder. If your hand is too large to fit into the jar (or if your hands are irritated by the salty brine), use a Kraut Pounder, a large spoon, the end of a rolling pin, or a meat pounder. I share some options on my fermenting supplies page.
- Funnel. One of my readers shared how useful a funnel has been for filling her jars.
FUN FACT:
Sauerkraut is rich in fiber for bowel health, lowering blood cholesterol, and controlling blood sugar levels.
STEP 5: SUBMERGE AND SEAL. Hold Below Brine
In Step 5: SUBMERGE AND SEAL, you use a Floaties Trap, a weight, and a lid to keep your fermenting mixture submerged in the brine and not exposed to air.
Air is bad for the fermenting sauerkraut and can enable the bad bacteria to grow and proliferate, creating mold and other undesirable by-products.

Floaties Trap. Take that cabbage leaf you saved in Step 1, and tear it down (Or, be a bit obsessive. Trace the jar lid and cut it to size.) to fit in the jar.
Did you forget to save a cabbage leaf? No problem. You can fold a narrow piece of parchment paper to size or even cut an old plastic lid to size.

Place your torn cabbage leaf over the packed cabbage’s surface to prevent bits from floating to the surface.
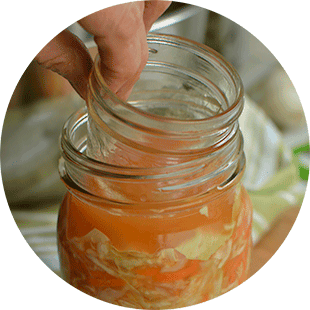
To hold the vegetables below the brine, place the 4-ounce jelly jar on top of the cabbage leaf, right side up, with its lid removed. The jar might stick out of the top of the jar a bit. Don’t worry: when you screw on the lid, it will get pressed down into place.
Lightly screw the white plastic storage lid onto the jar. By leaving the lid somewhat loose, CO2 gases that will build up during fermentation can escape.
If the jar has a lot of brine, you may have to remove some to put the lid on without the liquid overflowing.
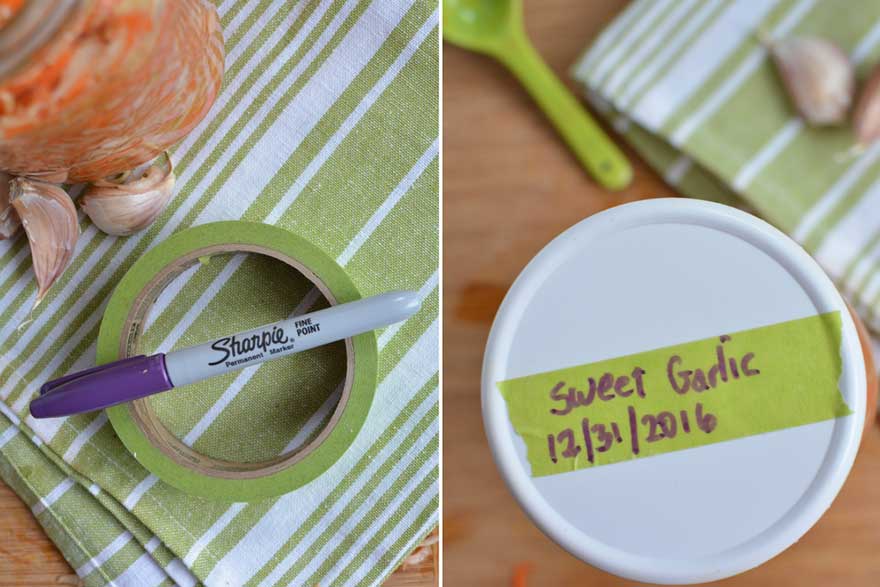
I like to label my jars using painter’s tape and a permanent marker. I note the flavor of the sauerkraut I made and the date I started fermenting.
SUBMERGE Notes and Tips
- Floaties Trap. If you forgot to save a few cabbage leaves for your Floaties Trap, sift through your cabbage scraps and see if you can retrieve some. If that doesn’t pan out, a piece of parchment paper, cut to size, works well. Wax paper should also do the trick.
- Other ideas for Weight? If you don’t have access to the small “jelly” jar for a weight, search your house for other small jars: a shot glass or perhaps a small mushroom jar. Some use a clean rock. You can also use a food-grade freezer bag filled with salt water (1 tablespoon salt to 2 cups water). More ideas in Fermentation Weights: Keep Your Ferment Below the Brine.
- If there is not enough brine to cover your packed cabbage mixture by 1 inch, go ahead and put the lid on your jar and check it the next day. If there is still not enough brine, dissolve 1 tablespoon salt in 2 cups water and pour this in.
- If all the brine does not fit in your jar, pour it into another small jar, cap it, and leave it on your counter. Use to add brine to the jar later in the fermentation process, if needed.
FUN FACT:
The Germans gave sauerkraut its popular name, but the Germans did not invent sauerkraut.
STEP 6: FERMENT. Ferment for 2 to 4 Weeks
In Step 6: FERMENT, the friendly bacteria work for you while you watch and wait. They know how to make sauerkraut FOR YOU! 🙂
Now sit back and relax as the friendly bacteria eat the sugars in the cabbage and carrots, multiply, and release copious amounts of lactic acid, which creates an environment inhospitable to pathogenic bacteria, acts as a natural preservative for your ferment, and gives your sauerkraut that familiar tang.
Can you wait seven days to taste the tangy crunch?
During this time, the friendly bacteria that live on the vegetables will eat the sugars in the cabbage and carrots, multiplying and releasing copious amounts of lactic acid that act as a “poison” for any bad bacteria. Let them work while you rest.
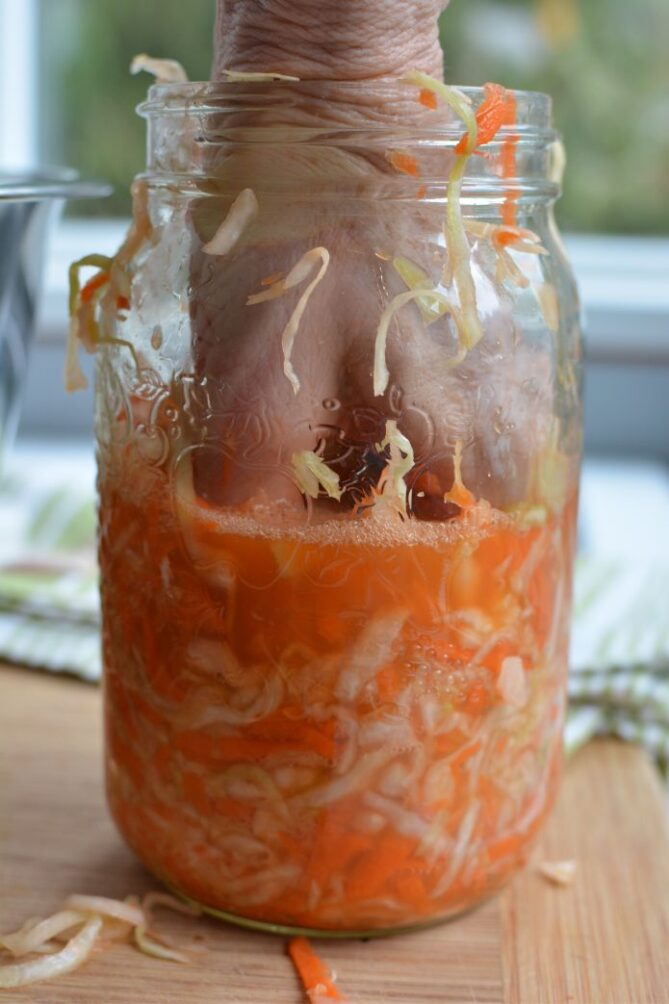
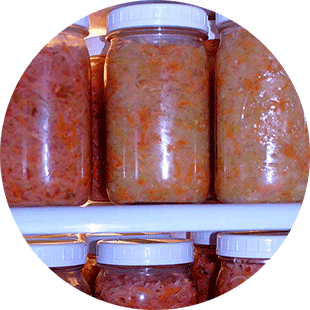
Place your jar of fermenting sauerkraut in a shallow bowl (to catch the brine that may leak out during the first week of fermentation) out of direct sunlight.
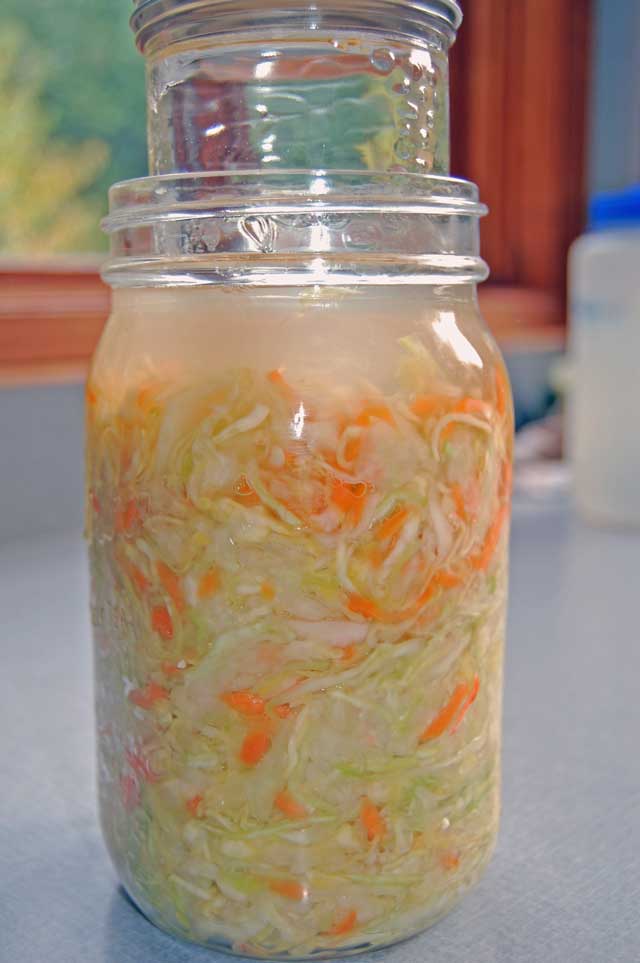
You can cover it with a towel if you’d like, although I don’t. I enjoy watching the changes my beautiful kraut artwork undergoes over the ensuing days or weeks. I just finished packing the jar on the left; the jar on the right shows how much brine was created in just 24 hours.
The ideal fermentation temperature is between 65 and 70°F (18–21°C). The lower the temperature, the slower the fermentation. The higher the temperature, the faster the fermentation. Ideally, you want the temperature to be somewhat stable, not fluctuating more than 5 degrees in either direction.
For what to expect as your sauerkraut ferments, see SALTY Cabbage to SOUR Sauerkraut: Fermentation Signs to Monitor
The first week is when you’ll see the most action in the jar. The mixture will get bubbly and the brine will rise in the jar, likely seeping out from under the lid. Your home may even start to smell like sauerkraut! During this first week, keep an eye on the level of the brine. It will rise and fall with the temperature in the house.
If the lid is bulging or you don’t see brine seeping out, carefully loosen the lid just a tad, stopping the second you hear gases escaping or see liquid seeping.
Should the brine level fall (very unlikely) and remain below the level of the sauerkraut during this first week, dilute 1 tablespoon of salt in 2 cups of water.
Pour some of this brine over the sauerkraut (removing the little jar first) until it just covers the mixture. Put the little jar back in, screw the lid on lightly, and let the fermentation continue.
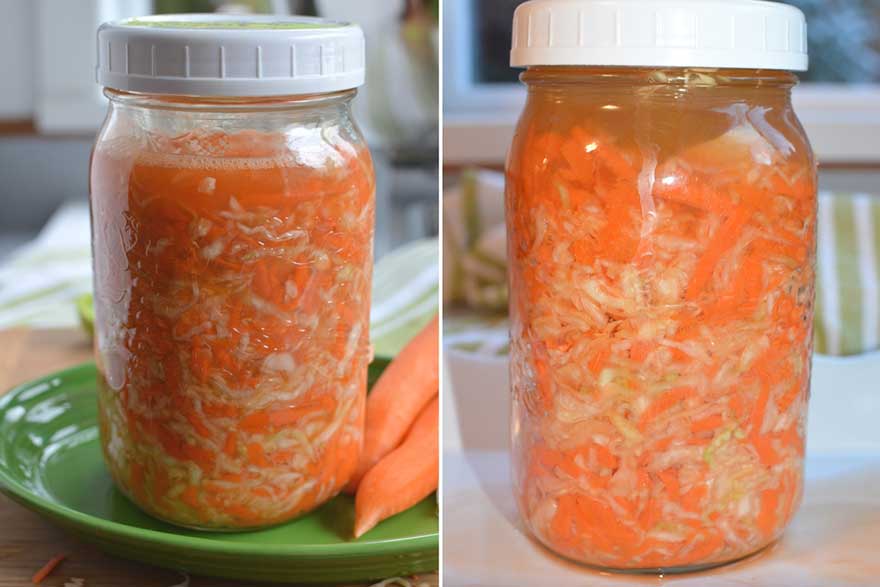
Don’t worry if the brine disappears after the 7- to 10-day mark. By this time, you’ve created a safe environment in which the bacteria that would cause mold or slime have been chased away by the beneficial bacteria produced during fermentation. Here’s how my jar of sauerkraut looks over time:
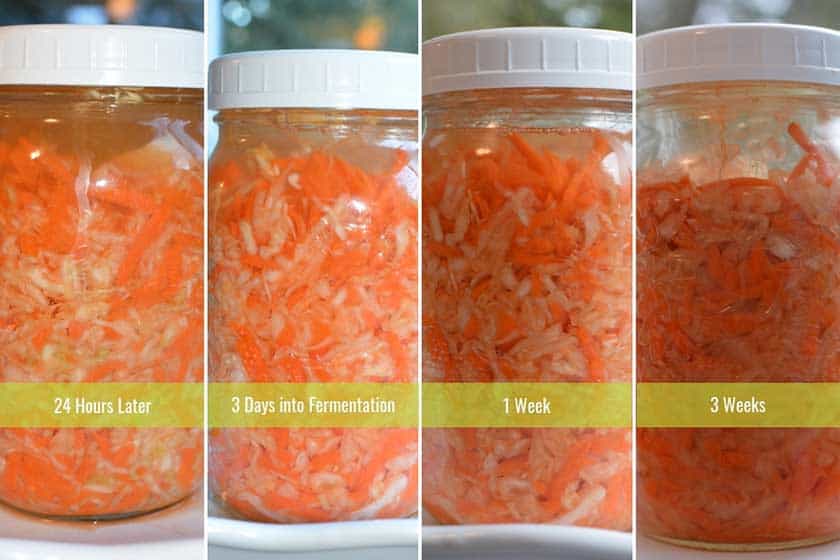
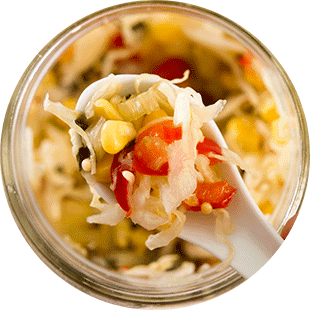
At the 1-week period, open the jar, pull out the small jar, and smell and taste your sauerkraut. At this point, you can start eating it or let it ferment for a bit longer.
You can ferment your sauerkraut for up to 4 weeks. The longer you ferment it, the greater the number and variety of beneficial bacteria that can be produced. Research I’ve come across indicates that bacteria numbers peak at 21 days. Keep that in mind, but ferment for flavor. You have to like the stuff to eat it. 😀
I suggest that people ferment their first jar for 1 week, and then the next jar for 2–4 weeks, tasting it at 1-week intervals to determine the level of tang and crunch they personally prefer. See How Long to Ferment Sauerkraut?
FERMENT Notes and Tips
- If the brine in your jar seems to disappear suddenly, don’t panic. This is due to a few things. Cooler temperatures can pull the brine back into the sauerkraut. When the house warms up, brine levels usually rise again. Atmospheric pressure will also affect brine levels.
- Should the brine level fall (very unlikely) and remain below the level of the sauerkraut during the first week, dilute 1 tablespoon of salt in 2 cups of water and pour some of this brine over the sauerkraut (removing the little jar first) until it just covers the mixture. Put the little jar back in, screw the lid on lightly, and let the fermentation continue.
- Keep your fermenting jar in a shallow dish to protect your kitchen counter and avoid cleaning up a mess.
- Don’t worry if the brine disappears after the 7- to 10-day mark. By this time, you’ve created a safe environment in which the bacteria that would cause mold or slime have been chased away by the beneficial bacteria produced during fermentation. I’m finding that there can be so many air bubbles mixed in with the fermenting sauerkraut that it expands, making it look like there is no brine. Pushing down on the weight, sliding a butter knife along the inside of the jar, or poking the sauerkraut with a bamboo skewer will release all the air bubbles and allow the sauerkraut to condense back down into the jar and brine to recover the top of it.
- Music and Bubbles. You will hear an occasional fizzy sound of air escaping the jar. This is normal and is caused by carbon dioxide escaping the jar. It is one sign that fermentation is happening.
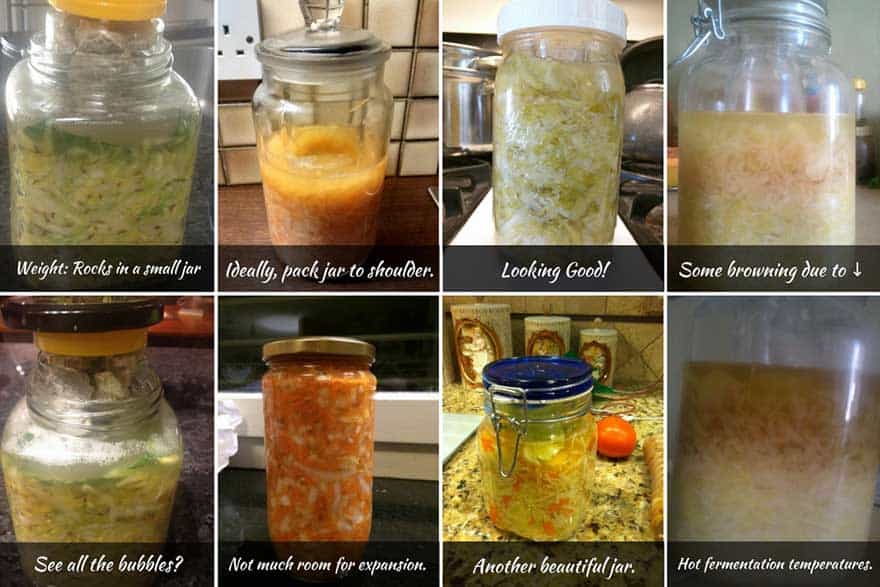
What follows are some images readers left in the comments below for you to see the many ways that your jar of sauerkraut may look.
FUN FACT:
Sauerkraut originated nearly 2,000 years ago in ancient China. In summer, slaves building the Great Wall of China lived on cabbage and rice. In winter, the cabbage was preserved with rice wine, which soured the cabbage to keep thousands of laborers healthy in the worst of conditions.
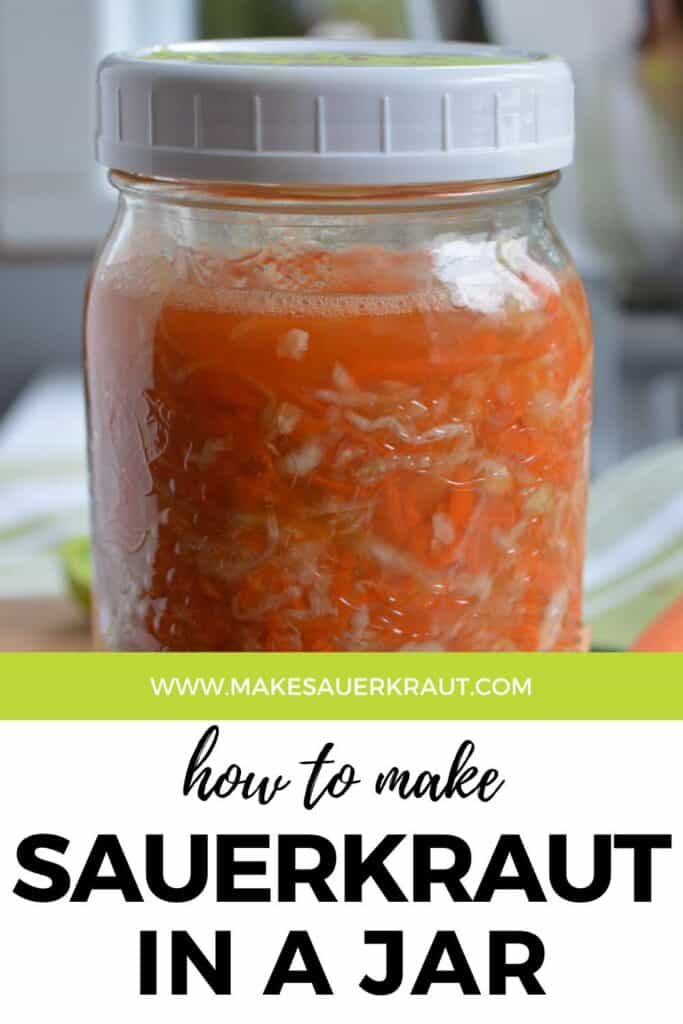
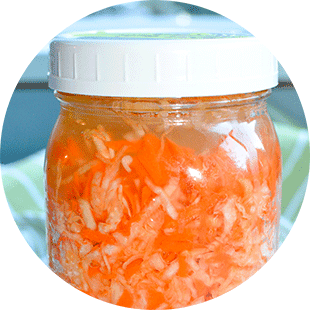
STEP 7: STORE. Store in Refrigerator for up to One Year
After your sauerkraut has fermented to your liking, it’s time to move it to cold storage until you are ready to add its probiotic-rich flavors to your meals effortlessly.
Refrigeration slows the fermentation process to the point where you won’t notice significant changes in texture.
Rinse off the outside of the jar. You can take the little jar out. Clean the rim if necessary (sometimes it can get sticky from the brine that overflows), and screw the lid back on tightly.
Add to your label how long you fermented the contents.
Enjoy a forkful or two of your sauerkraut with your meals. It will continue to ferment – aging like a fine wine – but much slower than before. If the flavors are too intense, leave it – in your refrigerator – for a month or two and then sample it. You will be amazed at how the flavors have changed.
If successfully fermented (tastes and smells good), your sauerkraut can be kept in your refrigerator for up to a year.
STORE Notes and Tips
- The ideal temperature at which to store sauerkraut is 35-38°F (2-3°C), which happens to be the typical temperature of a refrigerator. With these temperatures, you won’t notice much change in the texture over 12 months, the typical storage length for sauerkraut. If you store your sauerkraut in a cool basement at 55°F (12.7°C), you will notice your sauerkraut getting softer as the months progress.
- Not enough room in your refrigerator? Consider a second refrigerator – even a small dormitory-sized one – if you have a place for it.
- Clean up your refrigerator. Doing so makes for a less expensive solution. There is more room in there than you realize. Toss out old or moldy mystery jars and organize them. With today’s deeper refrigerators, you’ll find a goldmine of space at the backside. This is where I can store 7-10 jars of sauerkraut.
- Canning is not recommended for fermented foods. The high heat destroys most, if not all, of the beneficial bacteria.
- Does your refrigerated jar of sauerkraut look dry? You may notice that there is not always brine covering your jars of sauerkraut in the refrigerator. This leaves the top portion of your sauerkraut exposed to air and possible loss of nutrients. I notice this happens when the sauerkraut is cold, as it seems to contract and “drink” up all the brine. You may add more brine as I used to, but it dilutes the flavors and may cause browning.
- DIY Root Cellar? Freeze? Dehydrate? See: 5 Ways to Store Fermented Sauerkraut [One is Controversial]
FUN FACT:
The heat processing of canned sauerkraut destroys live probiotics and viable digestive enzymes.
The Best Part. ENJOY! ENJOY! ENJOY!
With a jar of sauerkraut at the ready in your refrigerator, you will be able to add an extra dimension to any meal effortlessly, unlocking flavors you never knew existed and reaping the added bonus of improved digestion to supercharge your health.
When trying to incorporate sauerkraut into your diet, keep it simple. And remember, if you want to take advantage of the benefits of lacto-fermented sauerkraut, don’t destroy the good enzymes and probiotics by heating your sauerkraut.
It’s fine to stir sauerkraut into a warm bowl of soup or sprinkle some on the top of your meal. You just don’t want to cook or bake with it.
Or… if your favorite recipe calls for sauerkraut, just be sure to serve some uncooked sauerkraut alongside it. The best of both worlds.
Here are a few ways to enjoy your tasty, probiotic-rich sauerkraut!

A condiment to the Main Meal
The easiest way to add sauerkraut to your diet is as a condiment. It pairs well with almost anything.
Don’t like cold sauerkraut? Try to remember to pull it out of the refrigerator as you begin to prepare the meal.
Almost Instant Salad
In a bowl, mix lettuce, a few forkfuls of sauerkraut, some brine, a splash of olive oil, a squeeze of lemon, and fresh ground black pepper. For a more filling salad, add chunks of cheese or leftover meat.
Quick Pick-Me-Up
Have that afternoon slump and wish you could take a nap? Try a few bites of sauerkraut – yes, you can eat it right out of the jar – and see if you are soon re-energized.
Hot Dog!
Last but not least: add sauerkraut to that hot dog for the classic combination, and for a bit of heat, add a sprinkle of red pepper powder, the same powder that is used to make kimchi.
For more ideas, see: 50 Tasty Ways to Enjoy Sauerkraut {Simple Snacks to Yum Dishes}
ENJOY Notes and Tips
- Keep it simple. You can come up with all sorts of creative ways to eat sauerkraut, but the simplest is either as a condiment with your meal or mixed into a salad.
- Serve straight from the jar. Place a couple of jars of sauerkraut on the table and let each member of your family use their clean fork to put some of their favorite sauerkraut on their plate. If you’re lucky enough to have brine still when you get to the bottom of the jar, drink its probiotic-rich goodness or pour it into another finished ferment in your fridge.
- Don’t like to eat cold sauerkraut? Either remove it from the refrigerator an hour before or at the beginning of your meal, place it on your plate, and give it some time to come to room temperature. Placing it on a warm dish is another way to take the chill out.
- Eat your probiotic-rich sauerkraut within a year. If properly fermented, it can last much longer, but you’ll start to see browning in the top layer of the jar, especially with sauerkraut containing beets. This browning indicates a loss of vitamins, mainly Vitamin C.
- Enjoy the subtle health benefits. Improved digestion, better energy, and a stronger immune system can all be yours as you nourish your body with sauerkraut, the fermented foods Superstar.
- If this is the first time for you to eat sauerkraut, go slow, especially if you have compromised digestion. You can start with just a sip or two of the brine and then move on to eating a small bite of the sauerkraut, watching for symptoms. Take about a month to work your way up to two small (1/4 cup) servings per day.
- Are you experiencing gas, diarrhea, or other digestive symptoms? You’ve most likely introduced more bacteria and fiber into your diet than your body can handle. See the previous tip and scale back your consumption.
- Salty sauerkraut? The type of salt you use will determine how salty your finished sauerkraut tastes. I use Himalayan Pink Salt, a mineral-rich salt, in all my recipes.
FUN FACT:
In the 18th century, explorers like Captain Cook used sauerkraut to prevent scurvy during long sea voyages, bringing as much as 25,000 pounds of the Vitamin-C-rich ferment along on voyages.
FAQs
In this section, I answer some of your most frequent questions about fermentation.
What is the best temperature to ferment at?
The ideal fermentation temperature for producing sauerkraut with the most complex flavors is between 65 and 70°F (18–21°C). Ideally, you want the temperature to be somewhat stable, not fluctuating more than 5°F (3°C) in either direction.
If you live in a warm climate, many are able to create a cooler space using an ice chest with frozen jugs of water. See 11 Cool Fermentation Tips for Hot Weather for further details.
Is my home-fermented sauerkraut safe to eat?
Yes. Very.
During fermentation, the bacteria eat the sugars in the vegetables and cabbage and make lactic acid, the vinegar-like tang you taste when you eat fermented vegetables. As this happens, the pH of your jar of sauerkraut is lowered to a range at which harmful bacteria cannot survive. The result is a safe, preserved, ready-to-eat ferment containing trillions of beneficial bacteria.
As long as the color of your cabbage has faded from bright to dull green, there are no noxious, knock-your-socks-off odors (you’ll know), and it tastes tangy (somewhat like vinegar), it is perfectly safe to eat.
How do I protect my sauerkraut from mold?
Mold grows from mold spores everywhere in the air and begins growing when they land on a wet surface with nutrients (such as your bits floating on the surface of your ferment). They can actually survive in acidic foods, so it’s not necessarily the acidity that deters them.
To reduce the chances of mold growing on your sauerkraut, keep it under the brine, use the right amount of salt, and ferment at ideal temperatures. Here are some ideas for how to keep your ferment below the brine:
3 Key Items for Keeping Your Ferments Safe [BELOW THE BRINE]
Why is my sauerkraut dry?
You can end up with a batch of dry sauerkraut for many reasons, the most common ones being fermenting with old cabbage, not including moisture-rich vegetables in your sauerkraut, and fermenting in the smaller environment of a jar (a good way to learn) vs. a large crock.
I have a complete post devoted to this—Dry Sauerkraut? 17 Transformative Tips—with many more tips and suggestions. Here are a few:
Use fresh cabbage. Even though cabbage is approximately 92% water, if it is June and you’re about to make a batch of sauerkraut, that cabbage has most likely been in cold storage for six months and will have lost much of its moisture.
Loss of moisture means less brine. The closer to harvest that you purchase your cabbage—and make sauerkraut—the more brine it will produce and the less chance there is of dry sauerkraut.
Add moisture-rich vegetables. The carrots in this recipe add valuable moisture—and flavor. When packing your jar, if you don’t have enough brine, that’s the time to add moisture. You could add the juice from one lemon or some grated radish.
Graduate to fermenting in a water-sealed ceramic crock. I love the ease and simplicity of fermenting in a jar, but the larger environment of a crock can be a game-changer, both in flavor and moisture.
In addition, brine levels ebb and flow throughout the fermentation process and with temperature fluctuations. There will be copious brine during the first active phase of fermentation and less during the later, quiet stages. Water is naturally pulled back into the cells of the cabbage in the cold of your refrigerator.
How will I know when my sauerkraut is done fermenting?
The easy answer is when the taste and crunch are to your liking. Taste along the way to understand how the flavors evolve over time.
You are introducing air into your jar, but this is a learning process. Wait until you’re past the 7-day mark to avoid disturbing the crucial first stages. When you’re done tasting, repack and push everything below the brine.
You do want to ferment for at least 7-10 days to ensure the bacteria have produced enough lactic acid and the pH of your ferment has dropped to a safe level (below pH 4.0).
If you’re trying to “maximize” the probiotic count—and I’m not sure exactly how/if this is done—one study points to 21 days when numbers peaked.
Can I ferment without salt or make a low-sodium sauerkraut?
Salt is used to establish a safe fermentation environment. You cannot ferment without it.
When you mix salt with your sliced cabbage, the good guys (the salt-tolerant bacteria) grow, thrive, and convert sugars naturally present in vegetables into lactic acid, the preservative. This lactic acid then lowers the pH of your ferment to create an environment in which the salt-phobic, pathogenic bacteria cannot live.
Microbiologists have studied the growth of pathogenic—harmful—and beneficial bacteria in fermentation and have determined that this process safely unfolds at a salinity range (created by the amount of salt you add) of 1.5% to 2.5%.
This is why I have you use a scale to weigh your vegetables and cabbage and then add the right amount of salt to create this recommended salinity range.
Calculating the amount of salt you add by using a measuring spoon generally works but is dependent upon the accuracy of your measuring spoon and the type of salt you’re using. Weighing your salt is even better. For instructions on how to do so, see:
Salt by Weight for Delicious Sauerkraut… Batch after Batch
A low-sodium sauerkraut can be made at the low end of this range (1.5%). For a safe fermentation environment, I do not recommend going any lower.
How long will my sauerkraut last in the refrigerator?
A jar of sauerkraut should easily last a year or longer. That’s the beauty of fermentation. You can enjoy the fruits of your labor—and the work of the microscopic bacteria—for many months.
You can stock your fridge with vegetables fermented at their peak of freshness and then enjoy them throughout the year. Traditionally, sauerkraut was made in the fall for consumption throughout winter when fresh vegetables were scarce.
Now It’s Your Turn. What was the most helpful thing you learned?
- The importance of weighing your ingredients?
- How to keep your ferment below the brine?
- Simple ways to add sauerkraut to your diet?
- Or, maybe you have a question about something you read.
- Either way, let me know by leaving a comment below right now.
Recipe Card (Quick Version)
Please note: This recipe card is a quick summary of my recipe. For my step-by-step guide with detailed instructions, expert tips, and helpful notes, jump back to the beginning.
How to Make Sauerkraut in a Jar [THE COMPLETE GUIDE]
INGREDIENTS
Ingredients
- 1 medium head fresh green cabbage, 2 ½–3 pounds (1 kg)
- 2-3 carrots
- 2-3 garlic cloves
- 1 level tablespoon (15 ml) iodine-free salt (fine-grain)
Supplies
- Kitchen scale, ideally digital
- Cutting board and chef’s knife
- Large mixing bowl
- Vegetable peeler,, grater and measuring spoon
- 1 quart 1-quart (L) wide-mouth canning jar or similar sized jar
- 4 ounce 4-ounce (125 ml) canning jar (jelly jar), or other “weight”
- Wide-mouth plastic storage cap,, or use the lid and rim that comes with jar
INSTRUCTIONS
- SETUP: GATHER SUPPLIES & SET UP SCALEUsing a scale to make your sauerkraut will ensure that you add the correct amount of salt for a safe fermentation environment.Pull together all the ingredients and equipment listed above. You don’t want to include the weight of your bowl in your measurements, so either zero out the scale (usually done with a button on a digital scale or a knob under the tray on a mechanical scale) or write down the weight of your bowl (tare).
- PREP: CHOP YOUR VEGETABLES AND CABBAGENow that you have everything you need on hand and your scale is ready for weighing, it’s time to prepare those vegetables for fermentation. You will end up with 1¾ pounds (28 oz or 800 g) of vegetables and cabbage in your bowl. Prep carrots and garlic. Peel and grate two to three carrots. Add these to the bowl. Finely mince two to three garlic cloves and add these to the bowl, too. zSlice your cabbage. Quarter the cabbage, leaving the core in, though you won’t end up actually slicing the core. Place a cabbage quarter on one of its sides and slice the cabbage crosswise. Aim for narrow ribbons, which will produce liquid faster—and ferment more quickly—than wider-cut ribbons. Slice until just the core remains. Add sliced cabbage to your bowl until the weight of your vegetables and cabbage is 1¾ pounds (28 oz or 800 g). I find it easiest to work in grams
- SALT: CREATE YOUR BRINEThis is the stage where you create the brine in which your sauerkraut will ferment. Believe it or not, that big bowl of sliced cabbage really will fit into your jar. Sprinkle vegetables and cabbage with 1 tablespoon (15 ml) of salt—16 grams, if weighing—and mix well. Don’t rush this step. You want to ensure that the salt is evenly distributed. For me, once I’m sure it is well mixed, I stop and clean up my workspace. By leaving the salted cabbage to sit in the bowl while I do so, I’m letting the salt start to pull the moisture out of the cabbage, making the next task simple and rather pleasurable.Massage and squeeze the vegetables with strong hands until moist, creating the brine. The mixture will shrink in size and want to clump together. You should be able to tilt the bowl to the side and see a good-sized puddle of brine, about 2–3 inches (5–8 cm) in diameter. This process can take anywhere from 2 to 10 minutes.
- PACK: PACK MIXTURE INTO JARYour big bowl of cabbage and carrots has now shrunk to a manageable, moist mass. Now that you have a puddle of brine, it’s time to pack the cabbage mixture into your jar.Grab handfuls of the salty, juicy cabbage mixture and pack it into your 1-quart (1 L) wide-mouth canning jar, periodically pressing the mixture down firmly with your fist or a large spoon so that the brine rises above the top of the mixture and no air pockets remain.Be sure to leave at least 1–2 inches between the top of the packed cabbage and the top of the jar.Pour any brine left in your mixing bowl into the jar and scrape out any loose bits stuck to the sides of the bowl.Lastly, wipe down the outside of the jar and push down any tidbits on the inside of the jar that may remain above your packed ferment.
- SUBMERGE & SEAL: HOLD BELOW BRINENow that your jar has been packed with that beautiful cabbage mixture, you need to make sure it remains submerged in the brine throughout fermentation, safe from harm.Floaties trap. Take that cabbage leaf you saved earlier and tear it down to just fit in the jar. Place over the surface of the packed cabbage.Fermentation weight. To hold the vegetables below the brine, place the 4-ounce jelly jar (or your weight of choice) on top of the cabbage leaf, right side up with its lid removed. It might stick out of the top of the jar a bit, but don’t worry—when you screw on the lid, it will get pressed down into place.Lid. Lightly screw the white plastic storage lid onto the jar. Leaving the lid a bit loose allows for the escape of the CO2 gases that will build up during the first few days of fermentation.
- FERMENT: FERMENT FOR 1-4 WEEKSNow sit back and relax as the friendly bacteria eat the sugars in the cabbage and carrots, multiply, and release copious amounts of lactic acid, which creates an environment inhospitable to pathogenic bacteria, acts as a natural preservative for your ferment, and gives your sauerkraut that familiar tang.Label your artwork. Label your jar with the flavor of sauerkraut you made and the date you started fermenting it.Place your jar of fermenting sauerkraut in a shallow bowl to catch any brine that may leak out during the first week of fermentation.
- STORE: STORE IN REFRIGERATOR FOR UP TO 1 YEARAfter your sauerkraut has fermented to your liking, it’s time to move it to cold storage until you are ready to effortlessly add its probiotic-rich flavors to your meals.Rinse off the outside of the jar and remove the little jar, or whatever weight you used. Leave the cabbage leaf in place until you start eating from your jar of sauerkraut. Clean any sticky brine off the rim and jar, and screw the lid back on tightly. If you used a special airlock lid, replace it with a simple lid.Add the fermentation time to your label. It is always nice to know how long a batch fermented, so you can adjust for future batchesPlace at a handy location in your refrigerator. Seeing your jar of sauerkraut when you open the refrigerator is a nice reminder to add it to your meals.
- ENJOY! ENJOY! ENJOY! ENJOY! ENJOY!Enjoy a forkful or two of your sauerkraut with your meals. It will continue to ferment—aging like a fine wine—but at a much slower rate than before.
Nutrition
Done with failed batches? Ready to turn on YOUR Fermentation Ninja skills?
Then, download a PDF copy of my expanded recipe: How to Make Sauerkraut in a Jar, AND… enroll in my Mini-Email Course. Ten days of bite-sized lessons on how to make sauerkraut in a jar.
Guaranteed success! All for FREE!
Ready to go from jar to genius? If you need assistance with crafting your perfect jar of tangy sauerkraut or want to hone your fermentation skills for a lifetime, feel free to ask in the comments!
Last update on 2026-06-06 / Affiliate links / Images from Amazon Product Advertising API

Perfect, just what I was looking for. Very clean and organized tutorial and I particularly appreciate the part on different salts (that’s how i found your post). I cant wait to get started! I’m going to the store now! <3
Hello Reya, Thanks for taking the time to comment. I appreciate the feedback. Good luck with your sauerkraut. Let me know how it works for you. = Holly
Very informative–thank you! I wish I would have come across your tutorial a week ago upon attempting my first mason jar kraut ferment. The use of a smaller jam jar as a weight over a cabbage leaf is the missing piece I needed as I now see a couple of runaway pieces of cabbage floating in my brine and I’m worried I may have ruined this batch. After reading your step by step, I’m excited to try it your way!
Hi Mandy, Apologies that I didn’t catch your comment until now. Was migrating the website and notifications can get lost in the process…
Don’t worry about a few runaway pieces of cabbage floating in the brine. They should be just fine. Hopefully, by now you’re enjoying some delicious sauerkraut.. With proper salt ratios, it’s very hard to ruin a batch of sauerkraut.
All the best, Holly
Hi I am 4 days into my first jar. I made a brine with water, and apple in a blender and a “starter” pack. I am wondering what to do with the cabbage I rolled and put on top to keep cabbage under the brine? do I toss it, also can I assume it is safe to eat as long as it smells ok? THANK FOR YOUR site!
Hi Anne,
Congrats on your sauerkraut! Yes, you can eat the cabbage leaf but I tend to toss mine into the compost heap.
With the sugars in the apple and your “starter” pack, fermentation may progress faster than usual. Taste at 7 days and then weekly after that to make sure you don’t over ferment it. It might need just one week.
If you want to keep the fermentation process simple, try next time without your “magic” brine, though it does sound yummy.
You’re welcome. I’m wanting sauerkraut in every home, so I’m glad I could help!
I am so stoked! I just tasted my first ever batch of sauerkraut (on day 8) & it’s delicious 🙂 I followed your easy instructions & am really happy that my family & I can enjoy this amazing, health giving goodness with so little expense or fuss. We will find a place on our plates for some sauerkraut every day! Next mission…to explore kombucha. Any recommended websites?! Blessings on all you fellow yummy good food enthusiasts.
CONGRATULATIONS! So little expense or fuss is exactly my goal.
Kombucha. Check towards the end of my post: http://www.makesauerkraut.com/fermented-foods-ultimate-guide/ where I give recommended websites. I make mine in a gallon jar. I put 2 quarts of water in the jar. Make my tea in a concentrated 1 quart batch. Pour that into the gallon jar (containing the 2 quarts water) to instantly cool it, then add the starter tea and SCOBY. Not as much detail as you might need but check out the recommend websites on my post and you’ll be sipping refreshing Kombucha soon.
For Future Fabulous Ferments
Great, thank you. I’ll check out the recommended websites 😀
Hi Holly, after your help earlier this year following my failed attempt at saukerkraut, my latest batches using your recipes, tips and salt/cabbage ratios are perfect. We are loving it. thanks again for your help
You are more than welcome! Thanks for taking the time to let me know it all worked so well. – Holly
Hey, your website is great! Thanks for all the info and resources! So i have a question, lets say I want to measure my salt a little bit more accurately in a case where I have 4 lbs of cabbage or 6 pounds of cabbage. Then what would I do? Is there an amount like in grams or something that I could use? Thanks!
Good question David,
Yes. Work in grams. Weigh you cabbage in grams and multiply by .02. (2%) and that number is how much salt to use in grams. Weigh the salt.
For example: 3000 grams of cabbage
Multiplied by .02 = 60 grams of salt
This method – both cabbage and salt by weight – is more accurate than using the measuring spoon since all salts are different weights but it’s only an issue when working with large industrial batches.
For a quart jar: 800 grams cabbage
Multiplied by .02 = 16 grams of salt
Which is approx. equal to 1 tablespoon.
Also covered in my post: http://www.makesauerkraut.com/how-much-salt-use-to-make-sauerkraut/
Happy Fermenting!
Thanks Holly! Made 2 jars Friday. Looking forward to seeing how it goes.
Excellent David. You should have some scrumptious sauerkraut in 1-3 weeks.
Hey Holly,
So I bought the japanese mandolin from your resources guide. I received it the other day and was looking at it…i wanted to know if this was normal or i got a defective one. The plastic part that moves up and down from turning the screws on the back, i noticed when i bring out the screws all the way to allow for maximum thickness, only one side of that plastic part comes down flush. The other side seems to have a little gap that has to be flexed to get it all the way down but it just flexes right back?? Looking at it you would think that once both screws are turned out, both ends of the plastic would both be flush up against the landing plastic. Just wondering if that was normal or not. Seems like there is a little flexure in the part that goes up and down when both screws are turned out all the way out. Thanks!
I just lent mine out so I don’t have it to look at. However, it should stay level if both screws are at the same level. If you bought it through Amazon, I would call or email them. I’ve been pleasantly surprised with their customer service. Use it until you get the new one. You’ll want it pretty thin so maybe it won’t be an issue until the replacement comes.
Hi there just wondering if it matters what type of cabbage I use as I have savoy cabbage growing but also the only organic cabbage available here in Scotland is the seasonal cabbage which is slightly different from the usual white cabbage
Type of cabbage should not make a big difference. Use what you have access to in your neck of the woods. Any cabbage will work. I’m guessing that the savoy might ferment a little faster – thought I have never fermented with it – because it’s a thinner leaf. I like the usual white/green cabbage because it’s easy to get here in north america and it’s not full of little slugs/bugs more common with looser leaf cabbages. – Happy Fermenting
Hi
Great post! You have mentioned that the ideal temperature range is 65-75F. I live in a place where the temperature is around 90F. Do you have any suggestions for how I can make Saurkraut here? Do you recommend that I put it in the refrigerator?
A couple suggestions:
Just ferment for 3 days at the 90F and then put in the refrigerator for to ferment for a month. Will continue to ferment, but very slowly.
Go a little heavy on the salt and ferment for a week (or 2? – taste) on the counter. Salt slows down the fermentation process. I’m thinking a heaping tablespoon.
Set up a cooler with a small ice block (small frozen juice bottle) and see what temperature you have. Might need to play around with how much ice and how often you replace it.
Do you have a cooler spot – closet – crawl space – somewhere in the house?
The Korean’s bury their sauerkraut at the beginning of their Kimchi-making season. At the beginning, it’s warm enough for fermentation then as the ground cools, the fermentation slows and it’s then stored in the ground as if in the fridge.
Wait until the weather cools? If it does. Here in Canada where we have 80F days during the summer, I wait until fall to ferment.
Hope this helps. – Holly
Hi Holly,
Great website to find especially after my MD wants me to eat at least a half cup of sauerkraut a day! I have a question: I have both quart jars and a German style air locked maker that holds 5 quarts. The problem with the German maker is that I have to transfer it to quarts when it’s done. (I just made 13 quarts total using both) So which does a better job of making the sauerkraut? Both taste the same. Any advantage one way or the other? If not, I’ll go with the easier way. Thanks.
Quarts are a great way to start. They give you a chance to master the process and figure out what flavors you like.
If you’re talking the German style crock with the water trough (see my resource page), that is the best. In the larger environment, you just get better microbial action and more stable temperatures with the stoneware. Yes, it’s a hassle to transfer into quarts but you can make a lot all at once, even seasonally to store for the year. If your talking the glass jar with the beer/wine airlock, I agree the quart jar is easier.
Go with what works and when you’re ready you’ll take the next step. I do feel there is greater depth to the flavor in the crock. I can fit 15#s of cabbage mixture into the 5-liter stoneware crock and end up with 7-8 liters of sauerkraut.
Happy fermenting and enjoy the health benefits. Work your way up slowly to that half cup. 🙂
I put my cabbage in 5 gallon bucket with salt & after 2 weeks I put into quart jars! then store in our basement. It gets mushy and browner after awhile, what am I doing wrong??
Mushy and brown is no fun. So things to consider… Did you add the right amount of salt? 2% of total weight of ingredients mixed and massaged in the cabbage to create a brine? No need to add your own brine which can cause the browning.
Two, what temperature did you ferment at? Ideal is 65-70F. Too warm and the stages of bacteria do not ideally unfold.
Did you see bubbles and smell a tangy aroma? And, 2 weeks is short for fermentation length unless it was super warm and again that can create the browning.
I just made my first quart jar batch of sweet garlic using your recipe, so we’ll see how I did! I do have a question. I got a 2 qt crock for making krauts, and it comes with some weights to keep the kraut under the brine, as well as a lid, of course. My question is this: do I have to fill the crock to near the top or can I do a smaller amount with space at the top between the brine and the top of the crock – or would that allow air???
Hi Jyoti, Congrats on your first batch of sauerkraut. Enjoy it! You’ll love your kraut crock, especially if it has a water moat.
Ideally, you want to fill it to close from the top, including the weights. Like you thought, this decreases the amount of air in the crock. You could make a triple batch of one of my recipes, 5 pounds of cabbage/vegetables and 3 tablespoons of salt. See if that amount works. If it’s too much, pack the extra into another jar and try just a double batch the next time. In my 5-liter crock, I can pack 15 pounds of cabbage. Good Luck.
Holly,
I started a large cabbage from the garden, fermenting a week ago. I tried it today and it does not taste at all sour. It still tastes fairly strongly for cabbage. I’m thinking I did not use enough salt, as I did not have a kitchen scale and guessed at the weight. Can I fix this a week in by adding more brine or salt? There is no mold or yeast growing and the cabbage is completely under the brine. Thanks!
My guess is that you used too much salt so that fermentation is progressing at a slower rate than usual. You also have no mold/yeast and still a cabbage taste, also indicating high salt. All just a guess. If you measured how much salt you put it, you should have ended up with 1 tablespoon for the amount of cabbage you can pack into a approximate quart-sized/liter-sized jar.
I would let it continue to ferment and taste it again in a few more days. Try another batch, and if you’re not using a scale, before you salt it, pack tightly what sliced cabbage and vegetables you can into a quart jar all the way to the top, dump that back into a bowl, add an extra handful of cabbage (for shrinkage) then sprinkle with a tablespoon of salt, mix and massage to get your brine and repack into the jar. It should come up to just below the rim. Don’t give up. The rewards are worth the lessons.
Hello, I am in the process of making my first batch of sauerkraut. Within the first couple of days we had a little heat wave come through and my brine started to rise and bubble. Now that the temperature is back to normal the bubbles went away but they left a light layer of scum at the top of my jar above the brine. How should I deal with this without contaminating my entire batch? Thanks! Vina
Hi Vina, No worries. I wouldn’t open the jar until the 7 days have passed, then give it a taste. With the heat, you may not need to ferment it much longer than the 7-14 days. The brine rising and bubbling is normal and it can be quite “active” around the 2-5 day stage, especially with the extra heat. Once you open it, you can scoop the scum off and all should be fine. Congrats and enjoy that first batch! Holly
Awesome, thanks so much!
Holly, my fermented cabbage brine had discolored brown on top, but clear on the bottom. No slime or mold, do you think it is safe to eat?
Hello Midori, It should be fine to eat, especially if there is no strong offensive odor. At times, you do end up with brown brine due to air exposure, too warm fermentation temp? Enjoy it and congrats on your sauerkraut! Holly
Hello Holly. I am so excited to report that my fermented cabbage came out perfect. My husband loves sauerkraut, but I am not a fan of the commercial vinegar pickled sauerkraut. My husband and I love the way the homemade naturally fermented and healthy version tastes. Thank you so much for being there to ease my mind about the clear brown liquid on top.
Hi Midori, Thanks for sharing your success! I could never eat that canned vinegary stuff either. Enjoy and try some of the other flavors on my website. They’ll get you hooked for sure. http://www.makesauerkraut.com/sauerkraut-recipes/
Thank you. I’m starting again this afternoon, and I’m using your recipe.
Great website and directions! This afternoon I finished making my first batch of sauerkraut using a head of red cabbage, carrots, Alaea Hawaiian pink sea salt, and caraway seeds.
As I was slicing and weighing the cabbage I realized I had enough to make two quart-sized jars of sauerkraut. So I shredded a couple more carrots and doubled the salt (so one TBSP salt per jar). I was surprised by the amount of liquid released from the vegetables; I had nearly a cup extra that wouldn’t fit!
I don’t have plastic lids for my jars yet, so I just used the regular old fashioned metal lids screwed on to fingertip tight. The only weights I could come up with were shot glasses.
Looking forward to trying other variations! Sauerruben (fermented turnips) sounds good. I really like those bags of brocolli slaw in the grocery store, I bet that would make a nice “sauerkraut” (sauerbrocolli?).
Hello Andrew, Congrats on your fermentation adventures and thanks for the compliment! Yes, at times there can be a lot of liquid, especially with freshly harvested cabbage that hasn’t been drying out in storage. Yes, 1 tablespoon salt per quart jar.
You can also use a stone/rock for a weight. Clean well and bake in the over at 200 for an hour to “sterilize.” Shot glasses do the trick too. Keep fermenting and enjoying the goodness. Sauerruben… Sauerbroccoli…
Hi. I am very new to this. I tried my first batch of sauerkraut 17 days ago. I used the special Kraut Kaps, so that I wouldn’t have to think about burping the jar (or having an explosion!). I had 2 jars full to the shoulder. There was just enough brine to keep things submerged by about an inch. I put a whole cabbage leaf and a fermentation weight in and sealed the jars. I did see some bubbling in the 4-7 days (I think; didn’t count). Then I noticed the level of liquid was diminishing. I decided to let it be. Well, a few days ago, they were looking pretty dry, and I noticed that the first several inches deep, the cabbage acquiring a tan color. I decided to add brine. I mixed 2 cups water with 1 Tbs sea salt. When I opened the jars, the mixture smelled sour, like old-fashioned pickles, certainly not unpleasant at all. I added brine and re-sealed everything. I was still bothered by the higher layers of cabbage having a darker hue than the lower ones, so I decided to end the fermentation today (day 17). I took off the weights and the large leaves from the top and tasted the sauerkraut. It tastes quite sour. I’m not accustomed to eating this, so I don’t think I’d call it pleasant, but It is certainly not offensive. Any thoughts on safety, however, given the color change? I have read so much conflicting information (discoloration is always unsafe, only red/pink discoloration is unsafe, etc). Also, it might just be too sour for my taste. I’ve read confliction info on that too. Some say taste it in a week, so it doesn’t get too sour; others say that it takes several weeks to get the probiotic benefit. Another question: did I change the beneficial nature of my natural brine by diluting it with the added salt water? And finally, I used Morton iodized sea salt, oops! I later read that I should have used non iodized sea salt with no other ingredients. Thoughts? Thank you in advance for any feedback and help.
Sandra
Hello Sandra, Though you’re very new to sauerkraut fermentation, it sounds like you’re learning the art. Yes, the level of liquid does diminish after the first week at times. You’ll even see it move up and down with the temperature in the house.
The tan color is coming from air exposure when it wasn’t below the brine. No “safety” issues to worry about.
Sour taste? Sour is not a flavor we grew up consuming, so it may take awhile for taste buds to adapt. Ferment for a shorter period next time. Maybe just a week and then gradually work your way up to 3 weeks. Also, you can leave it alone in the fridge for a month or two for flavors to mellow. Eventually, you can get a longer ferment (and a greater level of probiotics), but you have to like it first. Try another batch with some added carrots or beets for some sweetness to balance the sour. http://www.makesauerkraut.com/sauerkraut-recipes/
To eat, mix it into a salad where the flavors can be masked with a simple salad dressing. For other easy ways on how to eat sauerkraut, see: http://www.makesauerkraut.com/easy-ways-to-eat-sauerkraut/
Diluted brine. No worries. My biggest complaint with adding brine is that it dilutes the flavors. The good bacteria are still there.
Iodized sea salt. Live and learn. Sando Katz, the “Johnny Appleseed” of fermentation has used iodized without issue. I stay away from it to stack the deck in my favor. Happy Fermenting!
Holly, Thank you SO much for all of your expertise. I am so happy to hear that it is safe to use. I’ve really been looking forward to it. Can’t wait to get started on my next ferment. Thanks again.
So one more question then:
Next time, if I see the top is dry and no longer under liquid, should I add saltwater brine, or should I just leave it be?
Thank you again
If I’m past day 5 or 6, I tend to leave it be, because I don’t want to dilute the flavors. I’ve also noticed that different varieties of cabbage “behave” differently. So if you can make it to a farmer’s market, you might be able to try some different varieties. Be sure to follow my SureFire Sauerkraut recipe for the correct salt ratio. That is key… in my humble opinion 🙂 http://www.makesauerkraut.com/sure-fire-sauerkraut-in-a-jar/
Hi Holly. Today, I have a new problem. I hope you can help me.
I started a new ferment (your basic sauerkraut with the garlic and corrot) last night using a Kraut Kap (I hope you are familiar with those. I didn’t have all that much brine (or so I thought). By today, some brine had risen up into the lid apparatus. I eased the valve apparatus up farther out of the lid of the jar in order to make sue that the bottom end of it was not submerged in brine but rather in the open air above the brine. Some bubbles came out, and it seemed all was well (except that the chamber in the apparatus is no longer filled with only distilled water, because it still has some brine in it. A few hrs later, again I see the fluid in the apparatus way above the fill line, even though the bottom of the tube is above the liquid in the jar, but just barely (and still the apparatus has some brine in it, because I never removed the whole apparatus from the hole in the lid). Should I remove the apparatus and empty off the fluid and refill it with distilled water to the fill line and replace it into the hole on the lid? Or should I leave it alone? I can’t imagine how the jar is so much more full than when I packed it in. the good news is that the vegetables are certainly submerged.
thank you
Hi Sandra, Congrats on a very active batch of sauerkraut. It’ll settle down in a few days. Me, I would remove the apparatus, clean it all out and refill with distilled water. That way, in a few days when the brine level isn’t as high, you have a clean pressure release valve. Keep the enthusiasm going!
ok, thank you. And is it normal with this recipe to see orangy-brown particles in the brine? I’d describe it as “sediment” however, it’s neither sinking nor floating. It’s just all evenly suspended in the liquid I see above the veggies. I’d think it’s from carrots, but what do I know?
I would agree that it’s most likely from the carrots. You know a lot more than you did just a few days ago!
Well, thank you, but that’s quite a low bar 🙂
Hey Holly, I agree with everyone that your website, as well as you, are excellent. I have read a good part of the Art of Fermentation, which I like for all the information, and other sites. I find yours very useful and I think it is great how you respond to all the questions and comments. I am presently in Shanghai so it presents challenges not found other places. I do have one question now that I think about it, I wonder why you cant put say an extra inch of water into the jar ie one inch above the vegetables? I know of course it is essential to keep the vegs. covered so I wondered why a little extra might not be a good idea. I havent seen this addressed elsewhere though I have searched for it. Thanks and take care.
Richard, Thanks SO MUCH for your wonderful feedback. Much appreciated. What fermentation challenges does Shanghai present?
You can put extra SALTY water (brine made with 1 tablespoon salt to 2 cups water) into the jar, but I don’t find a need to. If your sauerkraut produces enough brine with just the salt added to the cabbage, you’ll have enough brine to cover the cabbage. After the first week, when the brine can magically just disappear, some people do add brine. I tend not to because it dilutes the flavors and by that stage the good bacteria have won over the bad bacteria and enough lactic acid has built up to preserve the sauerkraut.
If you add just water – without any salt – you won’t have that magic 2% brine that works so well for making SureFire Sauerkraut. Hope this makes sense and is what you were asking. – Holly
is it necessary to make the cabbage sweat? can you just place the cabbage in a jar and add saltwater? Thanks
Hello Justin, I haven’t tried making sauerkraut by just pouring over a brine. My concern is keeping the 2% ratio which I believe is key to successful sauerkraut. Also, the water would dilute the flavors which I work so hard to create.
And, really you don’t have to massage/pound it much – or at all. Just mix in the salt and let it sit for a few hours, or even overnight, and then pack into the jar. In Korea, when they make Kimchi, they soak the leaves in a salt water and then drain and pack with other spices. An area to delve into for another approach.
Hi again and thanks for your previous reply, Holly.
I said I am in Shanghai, it is often hard getting various supplies that you suggest, such as a Ball jar. But I think it isnt that big a deal, it is more the contrast of when I am in the US to get things so easily.
I made a batch of kim chi before I read your site, using recipes from what seemed reliable sites, and I believe I used a lot more salt than your recipes call for. My batch has sat for 7 days now and I didnt observe much activity and when I tasted it after the 7 days it didnt seem very fermented.
My question is whether I can do anything to remedy this other than letting time do it’s thing? I am thinking, for eg., maybe of draining the liquid and adding in just water, though there would still be a lot of salt left in the jar. Thinking about it a little, last thought probably not a great idea. Any thoughts very appreciated, thank you very much.
Good question Richard. Think 3 variables you have to work with: SALT, TIME and TEMPERATURE.
SALT: The more salt you use the longer it takes to ferment. Too much, never ferments. Not enough, bad bacteria can get a hold. So, if you went heavy on the salt, it will take longer to ferment. I don’t think you used so much that it would not ferment.
TIME: Since you’re high on the salt, you would need to ferment longer. So with that in mind you could let it go a few weeks and see if you’re getting the sour tang.
TEMPERATURE: The warmer it is, the quicker it will ferment. Conversely, cooler temps will slow down the fermentation process. So for your jar if you find a warmer spot, that might help speed things up.
Or, you can do as you suggested and drain some of the salty liquid. I have no idea if that would stop fermentation altogether, or whether it might work just fine. Does it taste SUPER salty? If not, I wouldn’t worry and just let it ferment longer. Good Luck – Holly
Nice instructions and good feedback. I have been making kimchee and kraut for a while. I find that not placing a lid on the jar at all works best for me. Instead I take a coffee filter and rubber band it onto the jar. The kraut is of coarse weighted down under the brine. The coffee filter protects the jar from contamination and insects and does not allow pressure to build up. Whenever I test the kraut I just change the coffee filter.
Also, I use a ziplock bag of marbles to weight the kraut down. works well and we have never lost our marbles (smile). With regard to Kraut caps…as long as the jar is sealed, the pressure will force the gasses out through the air trap. It does not harm anything to have the trap water become inoculated with the brine, however be sure next time to leave me head space , you want an air gap between your kraut (or beer) and the trap, and the trap keeps outside air from coming into the fermentation chamber.
Hello, Thanks for taking the time to share all your great tips with readers. There is more than one way to make delicious sauerkraut, thank goodness. People from all over the world are entering the wonderful world of fermentation and they have to get creative with what is locally available.
Kraut caps are great, but I suggest just using available lids and saving your money to eventually purchase a new-style ceramic crock, complete with water moat, my preferred method for fermenting sauerkraut. Happy Fermenting!
Hi. I”m new to fermenting. I’m making sauerkraut juice in jars. The sauerkraut is floating in the jars, so some is exposed to air at the top and as of today has some white mold on it. What should I do?
Hi Karen, Did you mean sauerkraut “juice”? I would skim off the white mold, make sure you have a lid on it and find a way to hold the cabbage down in the jar. Do you have a smaller jar you can put inside? A clean rock? Good Luck.
Yes. I meant sauerkraut “juice” not Kraut itself. I followed a recipe that just allows the kraut and water to sit in a jar for about 10 days. It’s in my fridge now, but I’m leery. I don’t really know what it’s supposed to taste like. I usually drink the kraut juice that’s in my saurkraut, not juice that was made differently……….. thank you for your response.
Hi Karen, I’ve never made the juice but would love to try so. I lurk to 2 good Facebook groups that discuss fermenting all sorts of stuff. You might find answers there. “Fermenting Frenzy” and “Fermenters Kitchen.”
I understand the “leeriness” and experience it myself when I delve into a new ferment. Trust your gut instinct… and nose! Did you add salt and create a brine for the juice? 1 tablespoon salt for 2 cups waters to a good brine ratio.
Hey there! Great site and very helpful info! I used 1/4 cup of brine from my previous pickle ferment- it was a little dark and I only poured it on the top (I thought I needed to fill the entire jar, now I know better!). Now the entire jar has that dark color (1 week later) but it is bubbling through the airlock like crazy!! Am I ok with this? Is the color likely due to the brine I added? I hate to discard- I think it is very active and the airlock seems to be pushing lots of CO2 (and liquid) through.
Hi Bryan, Sorry for not getting back to you sooner… Bubbling like crazy is fine, especially during the first week. Hard to guess where the brown color came from, though uneven salt, too warm or air exposure are the common culprits. I wouldn’t worry about the color – though not ideal – and wait and taste it around week 3 and see if you like the taste. Learn and try again 🙂
Thanks so much Holly, for the facebook tips and also the tip about the brine. I do make a brine by massaging the cabbage, but I’m not always sure exactly how much salt to use.
For your sauerkraut juice: Maybe weigh the cabbage and then use 2% salt. For example, 100 grams cabbage = 2 grams salt. Then add enough brine (1 tablespoon salt to 2 cups water) to fill your jar. Then, everything is at the right salt ratios. Make sense?
Thanks for the great site. I was looking to find out if I could use my Celtic sea salt for sauerkraut. Not only did I find that you recommend complete salt, but I found much help otherwise and a new zeal to try sauerkraut again. (My first attempt at sauerkraut was last year–and a flop.) I’ve made up a number of jars of various combos. My question: On day four I saw the brine level had dropped below the surface of veggies, the top layer was light brown, and the glass from there to the top was covered in scum. I took off the lid and little jar, wipe the glass with a hot wet cloth, and screwed the lid on a little more tightly. The brine has come back to a good level. This is day seven. That top layer is still brown, though it is submerged. Is it safe to sample? Should I scape away the discoloured part?
Hello Nancy, Yes the brine can drop below the surface after the first few days. Not ideal, but can happen, especially after the first few days. Brown kraut still safe but not as high in vitamins as the stuff below it. I would go ahead and toss the discoloured and enjoy the rest.
Holly, thanks for the tip on the cabbage-to-salt weight ratio. It seems much more accurate than using teaspoons and tablespoons, which can vary in size. As well, the coarseness of salts can vary greatly, which affects how much can fit into a measuring spoon.
Question: When using Himalayan Pink Salt, do you grind it first, or use it in its coarse form?
Hello, You’ll want to use in as “fine” because it will dissolve better. I would just buy it “fine” if you can. If not grind it or if that’s too much of a hassle, experiment with a batch and see if it will work for you weighed out as coarse.
Yes, weighing is more accurate (you’re right with coarseness varying greatly) but for the jar-sized batches or even a 5-pound triple batch, the tablespoon seem to be accurate enough.
I haven’t been able to find a fine-grind Himalayan salt — or any other “whole” salt — locally, so I’ll get it by mail order. I always make my sauerkraut in a one-gallon crock. This last batch (on Nov. 6) was made with Hain’s sea salt, which I realize contains an anti-caking agent. I’ll use a better salt next time. I’ve recently invested in a digital scale, and I’ve started measuring in metric units for more accuracy. Only time will tell if greater accuracy makes better sauerkraut.
Sounds like you have all the makings/skills for some superb sauerkraut. Just do the best you can on the salt. Enjoy the fermentation journey and best of luck.
Holly, on your recommendation I went to the SaltWorks website and ordered 5 lbs. of fine-grained Pink Himalayan salt. Can’t wait for it to arrive, and thanks for the tip!
It’s my favorite! Enjoy it.
Hi I was wondering do you have a great pickling recipe
Hello Dee Ann, I’ve never been a pickle eater so have not done much in the way of pickles. Partway down this post of mine (http://www.makesauerkraut.com/fermentation-books/) under the book “Real Food Fermentation” is a video by Sarah Pope on making pickles. You might find that helpful.
Hi holly yesterday I made my first batch of sauerkraut and I was told to just use a cheese cloth on top do I need to put a lid on it loose this was before I found your sight
Hello DeeAnn, Ideally, you want a lid on. Sauerkraut is an anaerobic (no air) process. By keeping the air out (with a lid of some sort) there is less chance for surface molds and yeasts to grow on the surface of your ferment. So, I recommend a lid over cheesecloth.
So, do what you can with the batch you just made and then work through my recipe and see how that works for you. http://www.makesauerkraut.com/sure-fire-sauerkraut-in-a-jar/
Thank you so much your site is so helpful love it
You’re more than welcome. Let me know how your next batch of sauerkraut turns out :-).
Starting my new batch found the pink salt at Walmart I’m excited so I have four head of lettuce 1607 ml 1600 ml 1377 ml and 2206 ml I know you said a tablespoon for every 1500 but mine very so what is the best way to get the salt right and can I use a little johnnys season salt for a little kick thanks again
DeeAnn, Are you doing a big batch in a crock or smaller batches in a crock? I assume you bought CABBAGE and not lettuce 🙂 as you said in your email.
It is 1 tablespoon for every 800 grams. So, check that you can put your scale in grams or pounds then let me know what size batch you’re making.
I have four heads of cabage not lettuce sorry two green and two purple about 14 pounds all shereded up feels my big water bath pan I can’t get my scale to grams sorry
OK. Pounds is fine. At close to 15 pounds and figuring 3 tablespoons salt for 5 pounds cabbage, I would add 8-9 tablespoons of salt in and mix well, let sit for about 30 minutes. Then, massage well until you have your brine. Pack into jars and use some sort weight to hold below the brine and lightly screw lid on. Make sense?
Makes perfect sense got it my first batch I made did not call for this much salt will it go bad before it torments should I add more salt it look great but it don’t tadt as salty thank you for all your help
DeeAnn, Just leave your first batch alone. You won’t need to ferment it as long because of using less salt. Taste it and if you like it, put it in the fridge.
Hi holly something went wrong my cabbage in my jars look great but when I opened one of the jars wow the smell was herific nothing was in side the jars little dry on top but the lids was covered around the sides with black mold it looks like and a rotten sewage smell
TOSS! Learn from your mistakes and try again. We can try to trouble shoot on what happened with that jar. Maybe share how much salt and how it was packed.
Hi Holly, I have tried making sauerkraut several times and have yet to actually dare to eat any of it. I have never seen any mold or kahm yeast but fir some reason, I never get any bubbling action. I have a jar going now and have opened it a few times to push the brine back up . A few days ago I opened it and it had kind of an off smell, not really a horrible smell but not a sauerkraut smell either. I covered it back with the lid and just checked it again today, it smells like it should now but still no sign of bubbles, it has a lot of brine. I really want to eat it but don’t want to get sick from it.. ?
Hi Judy, Ahh the fears of eating something left on our counter to rot! Yet… we have no fear eating a can of something made by a stranger in a huge factory. You’re not alone.
Are you sure you never had any bubbles? Most of the bubbling action happens in the first few days.
Was it too cold? You need room temperature for the lactic-acid bacteria to start their work.
If you got lots of brine and the brine level moved up the jar during the first week, fermentation is happening.
Did you follow my recipe? And, put in salt? Then, you should be fine. The bacteria lower the pH in the jar and prevent – along with the salt – any of the bad bacteria from growing. If it smells fine – pungent, but not unappealing – then taste a bit. You’ll be pleasantly surprised.
Hi Holly, I’m about to start my first batch following your instructions and I’m wondering–is there a reason I should not use a jar larger than 1 quart for the 1¾ pounds (28 ounces, 800 grams) vegetables? Would the extra empty space pose a problem to proper fermentation? Thanks so much.
Nana, A larger jar won’t hurt. The reason why I use the quart jars is they are readily available and inexpensive.
Also, the 1¾ pound matches perfectly with 1 tablespoon salt and fits into the jar nicely. Truthfully, a bit bigger jar would be better. Often, the brine overflows and you loose some of that nice moisture. So, I went with a balance between jar size and salt amount. Keeping it under the brine is important, too so you might have to come up with another idea for a weight or just do a bigger batch of sauerkraut.
Thank you, Holly, I think I’ll use a larger glass jar filled with water and fitted with a lid as a weight. Also, on a separate note, my daughter, who is abroad, wants to make sauerkraut and she does not have access to plastic lids. Is it okay to just use a large glass jar (like the ones marinated artichokes come in) with whatever lid it has as long as the sauerkraut does not touch the lid? In this case, since a metal lid is less flexible, should the lid be left loose so gas can be released? Thank you very much again.
No worries Nana, Have your daughter use what she has available. I just have a personal preference for the white lids.I like their clean lines and that they are one piece… As the metal lids get older, the acidic component of the sauerkraut corrodes the lid. Yes, leave the lid slightly looses for the gases to escape. Happy Fermenting!
Holly, I’m happy to report that your technique is truly fool-proof. I’m on my third week of fermentation and sauerkraut is doing beautifully. Plenty of brine since the beginning. That was never a problem. I take a picture every day and the brine is clear with some bubbling. So far I’ve only tried the juice and it is just delicious. I have a few questions for you. What’s the appropriate way to store sauerkraut for gift giving? Do I put it in glass jars and remove the juice or should the juice always stay with the cabbage through the life of the sauerkraut? How long do I say they have to eat it once refrigerated? Thank you!
HI Nana, Fool-proof sauerkraut! Just what I love to hear. Thanks for letting me know.
Gift giving? I would pack it into glass jars, 8 oz (500 ml) are a nice size. This is when I would use the canning lid and rim or something that seals well so the jars don’t leak during transport.
Leave the juice in; keep it with the sauerkraut as you pack it. I use a slotted spoon to pack the jars and then divvy up the leftover brine among the jars. Will last up to one year stored in the refrigerator. Hope your lucky friends and family enjoy it!
Hello Nana, Thank you for your kind words. Truly fool-proof. 🙂 For gift giving – it’s great you’re sharing the goodness! – pack into the size jar you want to gift it in. The pint jars are nice. Pack with its juice. You’ll find it mixes with the fermented cabbage and you don’t end up with much at the bottom of your jar. If you have some brine left over when you finish eating the contents of the jar either drink it or pour it into another finished jar.
You might want to use the metal lid and rim to prevent brine leaking out during transport. It’s OK if it’s not refrigerated for a few days. But the lucky recipient will want to store it in the fridge for up to a year, except the beet ones that should be eaten within 6 months. (Colors fade.)
Holly, can potassium chloride or sylvite (natural mineral rich potassium chloride) be used in the place of salt (sodium chloride)?
Hi Robert, I’ve never heard of using potassium chloride. Not sure why you would want to use it instead of salt.
Salt is necessary to keep the good bacteria multiplying and the bad bacteria at bay. If you’re worried about eating too much salt, use a mineral-rich salt (Himalayan Pink) and understand you are eating sauerkraut in small quantities. Hope this helps. Fill me in on the reason for the potassium chloride. Always wanting to learn…
Love your website. Thanks for advocating digital scales and metric system in general. It’s so much darn easier. I bake bread and when I see volume measurements, I sigh.
Question: Mineral rich salts, such as Sel Gris, Himalayan, Hawaiian, etc, have a slightly reduced amount of NaCl in them. I’ve read that Hawaiian Sea Salt is as much as 17% non NaCl minerals. If you use one of these tastier salts, do you slightly jack up your salt ratio, e.g. 1000 grams cabbage to 24 grams salt? (instead of a strict 20 grams per your guidelines) Do you ever use kosher salt? Some people use kosher salt for everything, some people hate it. Thanks
Digital Scales. Yes, once I bought a quality digital scale (My Weigh KD8000) in which I can program it to NOT shut off automatically, my life has changed. Now, when I do big batches in a crock, it is sooo much easier to get the amounts right, especially with grams.
Mineral-rich salts. I now use only Himalayan Pink salt (or similar mined salt), a dry salt. I no longer recommend Sel Gris or any of the other “wet” salts due to sea water impurities, chance of molds and variance in NaCl percentages from the evaporation process. (Oops, need to update my Salt post – after I get my eBook out :-).
Even though these salts are not 100% Sodium Chloride, the numbers I share work just fine and are what is still recommended. I need to make a batch with a 100% NaCl salt, just a processed salt from the grocery store, to see what the end product tastes like. My guess when people complain of their sauerkraut tasting way too salty, is that they used pure NaCl.
If you want to try the 24 grams, you shouldn’t notice much difference. As salt is increased, fermentation is slowed.
Kosher salt. I never use because it too is a processed salt and I like to include the extra minerals in the Himalayan Pink in my ferments. Also, the larger grain takes longer to dissolve and I want all my salt dissolves before I pack my jar.
Thanks, for this post. I’ve been trying several methods for a couple of months now with varying success. I even bought an air lock and I have one going with that. Now I’m glad to read that gas can escape if the lid is not screwed tight. But how do we know air does not enter the jar if the lid is not tight? And I’m glad to read that after 7-10 days good bacteria has taken over and there is no chance of mold. I was always worried that after opening to taste some mold would form. I would also like to share a trick that I tried in order to press the cabbage down without a weight. I don’t use a cylindrical jar but a square jar. I cut the cabbage in quarters and save the quartered cores. After covering the sauerkraut with a wide leaf, I press the cores down on each corner of the jar. This pushes down the top leaf below the brine. So far, after a few days everything is under the brine. And one more thing. I am planning to try fermenting in oak barrels. I’m curious to know if that would make a difference in taste. Thanks again for this inspiring post.
Happy New Year Zeynel, Air entering jar? I assume it does, unfortunately, which is why there are people who won’t ferment in a mason jar. I’ve never had concerns. The jar method is inexpensive, doable and works.
Opening to taste? Fermentation is a beautiful process and tasting along the way to determine the best length of time for your taste buds is part of the process. Once I used proper salt ratios, I found it stable and very forgiving.
Cabbage core as weight trick. Love it. Will try it. The one thing I don’t like about using the small jar as a weight is that is takes up space and decreases the amount of space for brine. I now have a drill press and will try drill a hole in the bottom of the jar (so brine can flow into it) and see it that helps prevent brine overflow. Cabbage cores as weights might also serve the same purpose, and far simpler, and gives us something to use the core for :-).
Fermenting in oak barrels. I would assume it would impact the flavor – in a good way – just as happens with wine. Enjoy the wild and wonderful world of fermentation.
I usually use green cabbage, but will try with some red cabbage also !
http://earthlychow.com/the-easy-foolproof-way-to-make-your-own-probiotic-fermented-sauerkraut
It’s fun to try different cabbages. You might find that your sauerkraut takes a bit longer to ferment with the red cabbage. Nice tips on your recipe.
Hi Holly. I DO use a food processor when making kraut. I don’t like mandolins….except in bluegrass bands. Anyway, thanks again.
I’m glad the food processor works for you. Do you use the feed tube or the s-blade? I guess it would be better to add some tips on how to use the food processor to slice cabbage for those that prefer it.
It’s an old cuisinart. THirty years old. Definetly not the s blade. It cuts from the top. Wish I could be more specific. But it’s VERY fast. No bloody knuckles.
Two comments: I always do a red/green cabbage combo. The red is such a pretty red when it bleeds out. And two, I do cook with my kraut, as I like cooking pork and sausage in a kraut stew. Am I losing all the probiotic goodies when I do that? It sure tastes good nonetheless. On a cold winter night, sausage braising in kraut….yum…..
Artwork! Yes, I too like the colors of my sauerkraut.
Cooking with kraut. I have a favorite recipe with red cabbage, apples and pork. Yes, you do loose the probioitc goodies when you cook it. To make up for it, just add a spoonful of your sauerkraut to the top of the dish when serving.
Thank you for all of the info you put together on this site. Just a comment…On a recent visit to Germany last week, we dined at one of the oldest German restaurant in Heidelberg, built in 1706, and which has also been under the same family and most of the same recipes for 170 years. They cook their sauerkraut after they ferment it and it is SO much easier to eat and the taste was amazing. Although you lose probiotic benefits of cooking sauerkraut, the acetic acid and lactic acid which are produced are still retained and the cooking may even break down the kraut even further to allow our bodies to absorb even more nutrients. So, I actually see a benefit to both the cooked kraut and the raw kraut and I believe implementing cooked kraut to dinner meals may have benefits that are different from raw kraut and which raw kraut cannot duplicate. I see benefits to both and I’m beginning to believe that it may be beneficial to incorporate cooked kraut or cooked fermented veggies into weekly meals for different benefits from those obtained from the raw. Again, there may be different benefits from both raw fermented and cooked fermented veggies. Any thoughts?
Lived in Germany.. many years ago and long before I fell in love with sauerkraut. I REALLY appreciate you sharing this perspective. With all of our food journeys, this is a gentle reminder not to get fixated on any one dogma and be open to fresh ideas. Yes, you probably are getting a broader range of benefits by varying the types – and ways of adding “cooked” foods into your diet. We need to be able to enjoy our meals – and awaken taste buds in many ways – instead of worrying if all is done perfect.
Hello Holly…i already posted a letter but do not see it here. Just trying again to get through
Hello again Holly… good it worked this time.
Well it was a long letter with several questions, but at this point I seem to be doing good and want to thank you for clear information…and beautiful pictures. I am using your system with a little jar inside the mouth of the big one. I filled the small one with brine (salted water)…is this ok? My first batch is looking fabulous after 4 days, bubbles good and smell yummy. I am hooked, and will certainly vary the plain recipe…would you share ideas about flavoring seeds and vegetables (or fruits) that may be (or not be) suitable to use in combination with cabbage. Will try lovage seeds next time…these can be killer with pickles so possibly with sauerkraut too…will let you know……. Gisèle
Hello Gisele, Apologies about the posting challenge. All is good now. You’re welcome! I’m glad to help.
Filling jar with brine? Fine, just put the lid on it and make sure the larger jar has a lid on it, too. Many do this if they are using a plastic bag as a weight. It’s in case the bag leaks, you’re keeping the brine ratio constant. I just put in the empty jar because as it pushes against the lid, all is kept under the brine, if that all makes sense.
Flavoring seeds and other vegetables/fruits to ferment? I give some basic guidelines here: http://www.makesauerkraut.com/vegetables-used-to-make-sauerkraut/
You can ferment just about anything, just keep the base to about 75% cabbage and all should be fine.
The Facebook Group “Fermenters Kitchen” is also great. It’s a Closed Group so you have to ask to join.
At, last but not least, my eBook has 12 recipes with a variety of flavorings. http://www.makesauerkraut.com/sauerkraut-recipes-ebook-sp/
received your reply…thank you and i will check out the sites you mentioned
Hi Holly – thank you for these clear instructions.
I would like to check one thing. When the sauerkraut is in the fridge,
is it still necessary to add brine if it is not fully submerged?
Hello Mark, I used to add brine to the jars in my fridge that weren’t fully submerged and found that it diluted the flavor I worked so hard to create. So, I stopped doing it. Ideally, you want it under the brine but I have not seen enough loss in color (and nutrients) in the top section that is not covered in brine to warrant it.
Thank you very much, Holly
Hello Holly…it is me again…started my first batch 10 days ago. I thought the cabbage could ferment for several weeks, but although there were bubbles at first there does seem to be any activity now or in the last few days ,,,just moved it from a location that got a little too warm, so perhaps it fermented fast??? can it be done this quickly? Please help me clarify this: i though fermentation can go on and on (unless refrigerated)
Yes, Gisele fermentation is always happening. Generally, it’s only during the first week that you see a lot of activity. After that, it gets pretty quiet. Taste it and if you like the texture and tang, call it done. Warmer it is, the faster it ferments. Cooler it is, the slower it ferments. In the fridge, it is still fermenting but at a very slow rate.
good answer………..now i am on to making a batch of Kim Chi…….this is sooohh much fun!
Great to hear you’ve caught the “bug!”
Hi Holly, My jar is now week 2 into the fermentation. And we’ve been sampling spoonfulls of sauerkraut daily to add our dinner since week 1. Though the contents are below the brine, there are bits of cabbage that get stuck to the sides of the jar above the brine level. Possibly because of the way we scoop out the sauerkraut out of the jar each day.
Now should we be concerned about the small pieces that are left on the sides of the jar (still inside the jar, but above the brine level)? Could mold begin to form on these and contaminate the contents?
Thanks
No worries. I find if all is below the brine that first week, a good fermentation environment has been established and you won’t see mold after that, even with the bits that cling to the jar. Once you decide it’s done fermenting, keep it in the fridge. Eventually, you’ll have enough jars and won’t have to dig into the one you’re fermenting, but it’s a good way to know how long you like your kraut aged.
Hello Holly
It is me again….i harvested the 10 day old batch today and there is no liquid at all inside the jar (which was packed very very tightly) Now i am thinking i could have just left the jar in fermentation while picking some kraut to eat from time to time like Ravin is doing….i am a little afraid of tasting it although it has no undesirable sign….looking good but no liquid. Should i make a brine to keep it in the fridge for a while?
Hi Gisele, Thanks for all your questions. I need to update the post to clarify these bits… You’re fine. If you push down on the kraut with a fork you’ll get some brine coming to the surface. As long as you used the proper amount of salt (not exact, but in the ball park) , you’ve established a safe environment and lactic acid has built up and is preserving your kraut.
Have fun with it, as you are. It’s OK to grab a taste. It’s how you learn what it tastes like throughout the various stages of fermentation. You can cover it with a brine, as I used to, but I find it dilutes the flavors.
Hi Holly – I feel like you may have already answered this question but I just want to be sure… It’s about the 5th day of my current kraut. I check everyday to make sure everything (except some random “floaters”) are below the brine. I also check because I love the smell! So here it is day 5, and the cabbage pushed itself to the top of the jar. Not just a few pieces – all the cabbage so it was almost dry. There is no mold or brown pieces and It smells good. This is my second time experiencing this issue – the first time was with an apple kraut I attempted. I threw that batch away. Is it safe? I share my krauts with friends and family because I’m so excited about the taste and health benefits. I don’t want to get anyone sick. Thank you!
“Love the smell.” Spoken by a true sauerkraut aficionado! 🙂
By day 5, you’re close to having a rather stable environment and it is sometimes dry be usually a few days later in the game. This also depends upon the temperature in the house – and how old your cabbage is. When it’s colder, the brine seems to disappear.
Most likely all is good and yes, you don’t want to get anyone sick. Do the smell test. Cheesy, musty, moldy = not good.
Thanks for your quick response! the house is quite chilly overnight. Maybe that’s what happened. As far as the smell test – I used jalapeños and garlic in this batch so that’s mostly what I smell :). Any other way to make sure all is well? I pushed it back under the brine right away.
I’m so happy I found this site while searching for an answer to this issue! You are great!
Thanks!!!
Thank YOU!
Fermentation is a very safe way of preserving foods. As long as you’re using the right amount of salt and keep things under the brine as best you can, you should be fine.
You can use pH paper to test the acidity. Below 4.0, it’s safe to consume. Keep in mind, fermenting foods makes them safer to eat than the vegetables you started with. It’s a process that kills off any bad bacteria hanging out on the vegetables and cabbage.
Well tonight I made my very first quart jar of hope full goodness. My jar actually resembles the one shot of yours so it looks so far that I did it right. One change I did, I used a SS bowl and a old potato masher and mashed like a machine. Watching the brine be created was awesome.
I did find a small mushroom jar that fit inside the jar, but I could not put the lid on, so I put the cap ring on to help guide the smaller jar and keep it in the center, it rose the brine just to the top of the quart jar and no floaters. I put a small towel over it to keep it from any dust or critters to get in. But it is winter time and no critters are inside at the moment. Can’t wait to taste it already!. I did use Himalayan salt, tried to match the grind from your picture on the web site as it is very course in the jar.
Just made, I will update you in a week. If I post in T I’ll send a link. Really excited about this simple process to make good healthy Good Eats!
Already thinking of the next project!
Great to hear! Good idea on the small mushroom jar. I’ll add it to my ongoing list for alternatives to the jar I suggest. I look forward to seeing the finished yumminess! Time for me to get the KrautStars page done for you all to post pictures on.
Hello Holly, its a week now since I made my first batch of sauerkraut. It’s sitting 1 inch under brine. Cannot wait to get a taste. I want to start another batch going. My question to you is – can I decant the sauerkraut to another container/jar so I can start my next batch? Many thanks.
Hello Sherilyn, I would not recommend disturbing all the good action going on in that jar right now. Get creative, resourceful and see what you can do to get more jars. You will need them once you fall in love with the taste of what you’re fermenting.
I guess I should ask, what you’re fermenting in?
Hi Holly, thanks for your reply. I like the jar so wanted to use the same again. It is an all glass sweet jar which is perfect. I’ve attached a picture. Any bits on the side of the jar are because I have dug in.
Such a sweet jar. I totally understand the attachment :-).
All looks good. It probably wouldn’t hurt after the 7-10 day mark to transfer.
Next time, I would use more cabbage (looks like you could use 2 1/2 pounds and 1 1/2 tablespoon salt) to fill the jar closer to the top and use a smaller jar as a weight.. if you want. Makes for less air space. Thanks for the picture. It sure helps!
Thank you for that! I did think I could use more next time but wasn’t sure of quantities. Now I know thank you. Tastes good. Thank you for your step by step recipe. It gave me the confidence to go for it
Very happy I found your site!
Your instructions are clear and concise.
Can’t wait to get started!
Good to hear Justin. Thank you. Let me know how it goes.
You might want to also read through the SureFire Sauerkraut in a Crock post. That post is newer and has more helpful tips in it that should mostly relate to fermenting in a jar. I need to redo this one, just haven’t gotten around to it.
http://www.makesauerkraut.com/surefire-sauerkraut-in-a-crock/
Ugh…I’m trying kraut for the first time using your recipe and I’m not sure if I botched it or not. 🙁 It’s on day 9 now and I just realized that the brine had gone down below the cabbage leaf ‘lid’ on top of the kraut, but I don’t know when that happened. I opened it up and added some more brine (as per your 2c water, 1tbsp salt directions) and had a sniff – it just smells like garlic and dill to me…nothing vile like the onions I ruined at the same time in the same fashion (they were *definitely* putrid!). Is there a chance I could still end up poisoning my husband and I with the kraut? Desperately hoping to hear that it’s probably alright! lol
Hello, You are fine!
I often have the same problem after the first week of furious and expansive activity. After that, everything gets quiet and it appears that all the brine has disappeared. Press down with a fork and you’ll see brine rise to the surface.
During that first week, a safe and balance environment was created and all is safely preserved. You can keep adding more brine, but I hate to dilute the flavors by doing so. Enjoy your sauerkraut.
Thank you so much for the speedy reply! ^_^ Soooo glad all that effort wasn’t wasted! Losing the onions was bad enough. 😉
You’re welcome! Here’s a link for how to do the brine ratios for onions (I need to make my own char!):
http://www.probioticjar.com/brine.html
I also have a pickled onion recipe – that uses lime juice – in my ebook, if you’re ever interested :-),:
http://www.makesauerkraut.com/sauerkraut-recipes-ebook-sp/
Oh, hey! That sounds really good! Thanks, Holly! 🙂
By the way, I tried the sauerkraut yesterday and it was fantastic! Soooo much better than anything I’ve bought at the store! Lots of garlic and dill. :p~ I’ve left it out another night to see what it tastes like one day later. 😉 What’s the longest you’ve left it out before refrigerating it?
So good to hear. Nice combo. Garlic and dill. The longest I’ve fermented a jar? Probably 6 weeks. Test about every 5 days until you find just the flavor you want. 🙂
Hi Holly, I have tried making sauerkraut as per your instructions. Today it is the 9th day, and I am not sure whether it is going fine or not. I have used a clamp jar. It is air tight, but I do keep it loose for some time every day for carbondioxide to gush out. I am sending you its pic, plz tell me whether its going fine or not. Also plz, comment on the different coloured patch seen in the jar.
Amand, Lovely! All is going fine.
I wouldn’t worry about releasing gases anymore. The bulk of gas-producing activity happens during the first 5 days, so you shouldn’t see much more now.
Hard to say what caused that pinkish patch. You have lots of brine. One guess would be uneven salt distribution or perhaps an air pocket. More likely just the variances of fermenting, but nothing to worry about. Congrats on your beautiful – edible – artwork!
Thanks Holly, Now I am bit relaxed. So I need not be opening it now on regular basis? Also, when is it ready for eating?
No more need to open the jar. It is ready for eating when you like the taste.
You could take out the jar, taste it and then either put it in the fridge or repack the jar with the little jar and let it ferment for 3-4 weeks total. If it’s been warm, I’d stop at fewer days; if it’s been cooler, you can let it ferment on the longer side.
Hi Holly,
As per instructions, I let it get fermented for total 23 days. And it looks like this…
(the temperature here is quite warm) What should be my next step??
Hello Anand, Sorry for the delay in getting back to you. I would go ahead and put it in the refrigerator and enjoy it. If you want, you can remove and toss that top browned bit, most likely from fermenting in extra warm temperatures.
Thanks Holly, I followed your instructions. It is now in the refrigerator. I have removed the upper brown portion. I am not sure if it is properly fermented. I tasted it…. It is crunchy, just like raw cabbage…..only taste is salty and sour. Really Confused!! Please tell me, how does a sauerkraut tastes??
Hi! Thanks for the great article. I am going to start next week and am scared! My question is, because exposed to some air, won’t the circular piece of cabbage form mold? Also, if using a metal lid, do I just lightly screw it on? I want to leave enough room for the gasses to escape, but don’t want oxygen to get in.
Thanks!
Hello Lauren, Yes, making sauerkraut for the first time can be a nerve racking experience. The circular piece of cabbage – or floaties trap – will end up under brine, so it won’t mold.
Yes, just lightly for the metal lid to let gases escape. Best of luck and if you weigh your cabbage and have the salt right, everything will be just fine. Congrats on making the plunge into the wonderful world of fermentation.
Hello Holly, What an amazing amount of valuable information. You are a wonderful teacher. Everything broken down in easy to follow steps. Your pictures are beautiful as well.
I wanted to know your thoughts on using folded collard greens to use to keep the cabbage under the brine? I have an abundance in my garden. Also I wanted to know if you are concerned about lead when using glass as a weight to hold down the cabbage? I do use glass weights specifically made for fermenting.
Will the probiotic availability be much more intense if I let the ferment stay at room temperature for a longer period. I read the longer the better.
I wish I would have found your site a year ago when I first started making my first batch. I did lots of research before I began and am still learning. I have done cabbage with carrots, onions, celery seeds. Fermented Jalapeño peppers (produce lots in my garden). Interested in learning about using other vegetables. Not sure if collards will make a good ferment. Want to learn about Kombucha. Looking forward to reading your whole site and joining your newsletter. Thank you….
Thank YOU, Thank YOU, Thank YOU!
Folded collard greens should be fine though I’ve never done so. They can be intense flavor wise, but just for a “floaties trap” should work. If you want to try fermenting with them, I would go 50/50 with cabbage as an experiment.
Lead in glass weights. Yes, that is a concern for me which is why I stay away from non-food items (marbles, large flat glass “jewels”) and use the canning jars. And, even then I don’t buy the cheaper made-in-China jars.
Probiotic count. I’ve read that day 21 is when it peaks. Longer is not necessarily better. But, I feel you have a better environment when fermenting in a 5-liter crock or larger and thus better probiotics (no specific research to back this up).
Kombucha. No post on that topic yet, but tomorrow I will be posting about Fermented Coconut Water. Probably better for you and easier to make. You’ll get notified if you’re on my list, else just look for it.
Keep on learning. Fermentation is a great way to use up garden goodies.
First jar of Sauerkraut done thanks to this blog. Great and easy to follow (even for an Aussie male) and looked amazing.
Can’t wait for a week but know l must for the fermentation.
Thanks so much
Congratulations! Now time to watch the show! Or, what little there is… bubbles rising to the surface.
You’re welcome. First jar of many… I hope.
I never leave comments on anything, but I just have to say that this is the clearest and most useful site I’ve found on sauerkraut! Thank you 🙂 I have a batch of cabbage and one of turnip fermenting (hopefully well!) in the pantry for almost a week now (first attempt), and looked at so many sites and Youtube videos to try and find the right method! Wish I’d found your site before! I have a sandwich bag filled with baking beads as my weight on top of my leaf (best thing I could find at home!)
My question is this: I didn’t seal my Kilner jar lid, just left it loose and covered the lid with a clean cloth and band. I’ve opened it a few times and given it a push down. There doesn’t seem to be any mold but the cabbage leaf catcher is a bit soggy. Should I seal the Kilner lid now or just leave as is with the cloth over it? So much conflicting info online about this particular point. Thank you!
Hello Anne, I am honored! Thank you for the compliments. They make my day!
Pie weights/baking beads will do the trick. Being creative is part of the fermentation process.
On the Kilner jars. Less air the better. Sauerkraut fermentation is an anaerobic process, meaning no air. Some are concerned about gases getting trapped in the jar and causing an explosion. You are past the first few days when the most gases are produced so I would push everything down and then clamp the lid and leave it to finish fermenting without letting in anymore air.
If the turnips end up being too strong, mix them in with cabbage the next time.
You’re always welcome to email if you want to avoid the comment system. 🙂 Happy Fermenting!
Thank you so much Holly! I can’t wait to try it in a couple of weeks 🙂 Keep up the good work… I’ll enjoy browsing your site.
Major success! Sauerkraut turned out yummy not scummy….thanks Holly x
Wonderful! Love that description… yummy, not scummy. Enjoy the goodness.
This is fantastically clear, step by step. Thank you so much for helping us beginners. Speaking of which, right now my jars are at the 24 hour mark for first attempt fermenting. I made a couple of mistakes, I think. First, my weight jars did not sink as much as I thought they would. So just now I pressed down and tons of bubbles came up from down inside the jars of cabbage. So I just now tried the bamboo stick method of retaining down. But because the liquid levels fell when I removed the weight jars, I topped off with the salt water. What do you think? I know time will tell, but do you think my mistakes were caught in time, or too many strikes? Thank you for any insights. I am determined to successfully ferment regardless of how many attempts it takes, and then teach my kids.
You’re quite welcome! I’m glad to help anyone interested to learning to make delicious fermented food. All sounds just fine.
Weight jars. Don’t know exactly what you used for jars, but they can always be filled with salt water – for some extra weight – and a lid secured. Topping off with salt water is fine. I assume you used the 1 tablespoon salt to 2 cups water ratio.
It’s great to teach your children. They are always much more likely to eat something they’re had their hands in – literally – preparing.
Hi Holly. I’ve another question please- regarding turnip-kraut this time. I made it with 2 large turnips and added about 10 tablespoons salt (I think….can’t remember exactly. This was done before I found your site!!) Fermented about 3 weeks. It tastes excessively salty, it’s unpalatable. I drained off the excess brine and topped up the jar with still water thinking that might water it down a bit. Still horrible salty. Any suggestions? I’m not sure if it’s even properly fermented or just sitting preserved in the over-salty brine at this stage!! I didn’t want to rinse it in case that rinsed off the probiotics (I’m a bit clueless here still!) Anne x
Oh never mind Holly…. I’ve done my calculations properly this time and realise I used WAY too much salt (maths clearly isn’t my forte!). Back to the drawing board with a lovely new batch!
No worries Anne, If you have a digital scale you can set to grams, weigh what you plan to ferment, multiply by .02 and add that much salt in grams.
For example: 1200 grams of goods x .02 = 24.00. Add 24 grams of salt.
With the too salty kraut, mix it in with lettuce – or pasta – or something similar to distribute the saltiness.
Thank you Holly! Just made a lovely batch of your cabbage, carrot and garlic kraut today to make up for it 😉
Hi Holly, thank you for these wonderful instructions! I started my first batch of Kraut six days ago, so it should be ready for testing tomorrow. It looks and smells great, though I’m kind of nervous about trying it! I’ve never had raw, living Sauerkraut before! I’ve attached a photo of what my jar looked like this morning. Have a wonderful day!
oh yeah, I just used cabbage in this recipe, as I wanted to try the kraut in it’s purest form.
Hello Matthew, Congratulations on your first batch of raw, living sauerkraut! Now, time to enjoy the powerful goodness. It looks fantastic. Sample away. Even one thin strand is a good place to start.
P.S. I’ve never made the pure stuff. 🙂
Would you advise that I put the floatie catcher cabbage leaf and small jar back in after I’ve tried it, if I decide to keep fermenting it?
Hello Matt, I do just to keep things safe. However, the most active first few days is when it is most crucial. After that, the less active bacteria that are working don’t seem to push the kraut up the jar as happens in the first few days.
Thank you! I tried it and it is very interesting, and very different from store sauerkraut, I like it though! I decided to refrigerate this batch, and make another this weekend, with a longer fermentation time.
Good to hear, Matt. Store sauerkraut – especially canned & cooked stuff – does have a very different taste. Just wait until you try some the different flavored recipes…
Holly, I used many of your techniques making sauerkraut yesterday (4/30/16). But, I filled my jar too full. After 24 hours, is it best to leave well enough alone, or can I open the jar and remove some of the contents into a smaller jar? Thank you for this very useful and informative article.
Frankie, Glad to hear you’ve made some sauerkraut. Getting the amount just right in the jar can be a challenge. Usually you don’t want to disturb in the first few days, but I would probably go ahead and remove some. Have to give those little guys room to work.
Thank you Holly. The problem was seepage. Now that this has stopped, I’ll leave it to ‘note to self’ for future sauerkraut making. I thought I had left enough room in the jars (I only filled them to 75-80%). But I suppose the little jar holding the veggies under the brine factors in here as well. The liquid that leaked from under the lid smells delicious, BTW!!
Seepage! I’m still trying to solve that without going out and buying expensive weights. Yes, the jar does take up space – more than I would like. But, everything does settle down after the first few days. Enjoy the aroma.
Hi Holly. I started my first jar of sauerkraut about 3 weeks ago and I think I jumped the gun a little! I tasted a little and thought it was ready so I put it in the refrigerator last night. For lunch today I ate some and it was good but it’s not as sour as I thought or would like. Can I just return it to the counter? Or do I need to eat this jar like it is? I removed it with a clean fork but threw away the floatie catcher away.
Hi Sandy, It should be fine if you bring it back out to ferment. In the fridge, it is still fermenting, just at a much slower rate than on your counter. And, you’re OK without a floatie trap. Just push everything down with a fork. You may not be completely covered in brine but at this stage in the game, that is fine.
Thanks Holly! I’ve tried to make sauerkraut before (from another site) it was a complete fail. I appreciate your simple but detailed instructions. I think I’m going to try kimchi next!
Wonderful to hear and thank YOU, Sandy. Enjoy the Kimchi. No stopping you now!
Hi Holly: after opening to check the progress: is it best to remove the ‘floatie-trap’ and ’empty jar’ used to weight it down? I checked mine this afternoon (8 days after making) and it is not ready. Temp-wise I’m keeping it between 72° – 77°, though I had to move it twice, to keep a lower temperature during that first week.
As always, thank you for all your help.
Hello Frankie, By the end of the first week, there is not the activity – forcing the sauerkraut to bulge and move up – as there was in the first week, so the “floatie trap ” and weight is not as crucial, so it’s fine not to put it back in. With the warm temps, if should be done closer to 2 weeks.
Hi Holly and everyone. I have 10 heads of cabbage going the old style in a crock but also wanted to try in the jars as per your recipe. What if I wanted a longer shelf life then didn’t have to be stored in the frig? What would be your suggestion for a finished product? From the days of my mother, they used zinc lids with the porcelain insert and a flat rubber ring and processed them in a hot water bath.
Hello Linda, Good to hear you have some sauerkraut fermenting. Shelf life? It’s a trade off between finding a cold place to store sauerkraut that is alive and improving your digestion – and health – and “canning” sauerkraut which kills most, if not all of the good bacteria.
I opt for careful organization of my fridge to find the room to store the sauerkraut. You could also make the size batch that you have room to store in your fridge and then make the next batch as your stockpile is about gone if you want the benefit – and taste – of unprocessed sauerkraut.
Holly, I’m making a jar of sauerkraut and one of kimchi. They are at about 2 weeks and I noticed something that looks like bubbles around the weight jar above the float trap. Some look almost dry if that makes any sense. Is this ok?
Sandy, Looks great to me!!! Be proud of your accomplishment. The bubbles are normal and mean it is fermenting just fine. Brine levels are fine. It can look a bit dry as temperatures fluctuate in your home and once it passes the first week or so.
This is all nicely detailed — except for the salt. You don’t say anywhere whether to use finely milled salt (like pickling salt, no additives), or coarse salt (like kosher). The picture looks like you’re using Pink Himalayan Salt, but other than warning not to use salt with anti-caking ingredients or iodized.
Hello, Thank You. Salt details are here: http://www.makesauerkraut.com/best-salt-for-making-fermented-sauerkraut/ I’ll double check and make sure that is referenced and discussed in the recipe. Thanks for alerting me to this omission.
Hi, made first batch using Walmart’s “Marketside” Cabbage / carrot mix. Seems to be fermenting nicely after 1 day.
Did you know a Tupperware lid from a sippy cup works perfectly as a floaty trap in a 1qt mason? -Roy
Hello Roy, Nice to hear of your success! Tupperware sippy cup lid? Who Knew! Enjoy.
Hi Holly,
Attached is a photo of my first hopefully successful batch of Sauerkraut! But I’m still (mortally) afraid of eating it. I was hoping to get a green light from you!
It’s been 11 weeks at about 65-75 degrees. I know it’s a little warm, but it still looks pretty green (much greener than bubbies!)
I’m wondering though, it’s been above the brine the whole time. No matter what I do I can’t get the cabbage to stay down. But it doesn’t look like it went bad. I used a pickl-it airlock jar.
Do you have any insight for me? I would love your opinion!
Best regards,
Jaden
Hello Jaden, It is so sad we all didn’t grow up a with a crock of sauerkraut in our basement. Then we would all know how to ferment and have no fears enjoying the goodness! And don’t worry, you’re not the only one afraid to eat it.
It looks just fine! Dig in and enjoy!
Next time a large cabbage leaf will help trap the bits floating to the surface. More ideas here: http://www.makesauerkraut.com/fermentation-weights/
With the Pickl-it airlock jar you have the deck stacked in your favor. No way for air to get it which is why you don’t see mold. Also, though it’s not completely submerged, it’s coated in the brine and was probably under the brine during the first few days of fermentation.
This is awesome!! Can’t wait to try it!!
Grab your supplies and you’ll be off and running.
Do I drain the brine from the jar before storing in the fridge, or leave it full of brine until it’s all eaten? The small picture at the top of the page marked “store” looks as if the brine has been drained out .Thanks 🙂 It’s my first attempt, it’s been fermenting for four days. Ive had chronic fatigue syndrome form18yrs and I’m sure it’s Candida overgrowth, probiotics are helping so I’m trying fermented foods now. Hopefully they will help .
I don’t drain the brine. Leave it. The juices are full of probiotics and I’ve found it kind of dries out itself over the course anyway.
Thanks Anne.
As Anne says, don’t drain the brine. Brine in sauerkraut can be mysterious, disappearing at times. It’s related to temperature. Contracts in the fridge. Expands when warm. Ideally, there would be lots of brine and it would cover the sauerkraut.
Thanks Holly.
The specific carbohydrate diet helped a daughter with candida overgrowth. Fermented cabbage is allowed and has provided much healing for her.
Thanks, I am doing a low carb diet and it does help. I still have a small amount of potato daily and a banana every other day though. It’s very hard to cut all carbs out. I can go completely free of the spuds and banana but i miss them in my diet.
Hi Holly. I hope you’re well! I’ve a question about my latest batch. I made 2 jars. One smells and tastes like normal (the smaller jar). The other has a very fruity almost pineapple-ish smell, doesn’t really smell like sauerkraut…and tastes a bit fruity too. It’s a pleasant smell, just not like sauerkraut. I do notice it’s very dry too, I think most of the brine fizzed up in the early stages. Should I top it up with some brine and pop in the fridge, or discard? Thanks, Anne x
Hello Anne, Dry sauerkraut? You can add brine, but I find it dilutes the flavors I work so hard to achieve. I used to add brine, but found it also found it would “disappear” being pulled back into the cabbage in the jar. I just leave them now and they seem fine even up to a year.
Holly, Your site is amazing! What is the advantage of using a water sealed crock vs the canning jar? Just wondering if there is a larger amount of beneficial enzymes produced with the longer fermentation?
Thank you! I always feel honored when one takes the time to pass on a compliment. Makes running this site all the more enjoyable.
I have only come across “opinions” and not any hard evidence, but yes there is greater microbial activity in a large water-sealed crock than in a jar. You can just feel and “see” the difference when opening your crock. But, many love the quart-jar fermentation method and stick with that. And, as the methods for keeping a jar anaerobic improve, the bacterial activity in a jar will improve but I don’t think ever surpass a large crock. My experienced opinion!
I wonder if one reason for that is that mason jars are clear and all crocks are opaque? Other than that it would seem that a 2 gallon glass jar with airlock and gasket setup would be able to duplicate the volume of the larger crock. Just curious. I like experimenting 🙂
Yes, darkness plays a factor but I think size is important too. I’m thinking of a 5-liter crock as a minimum size for ideal action. I’ve never seen a 2-gallon glass jar? Keep on experimenting!
And also, the thicker walls of a crock allows for a cooler and more constant temperature for fermentation.
Thanks for all the replies to my first question, now I have another 🙂 I’ve just moved my first ever jar of sauerkraut from the pantry to the fridge, I’ve removed the small jar that was pushing down on the saurkraut and the round piece for cabbage that was stopping the bits from float up. Do I have to worry about the cabbage that has floated to the surface and may be in contact with the air? Or is it OK now that the cabbage has been fermented and is refrigerated. Thanks.
Do nothing more :-), Properly fermented, those little bits and bobs seem to do fine. Enjoy the fermented goodness of your first-ever jar of sauerkraut. I hope I have you hooked!
Thanks Holly. I am hooked, off to find more jars today and buy some red cabbage, carrots and beetroot 🙂 First time is difficult though, I think might have over salted and because I’ve never tried sauerkraut before I really have no idea if it smells right, tastes right or has even fermented. All part of the learning process I’m sure. Thanks for your help 🙂
If I caught you in time, hold off on the red cabbage. I’m hearing too many reports of it not fermenting as nicely as the green cabbage. Get a few jars under your belt first and then try the red. It tends to be a bit tougher and seems to take longer to ferment. And, weigh your ingredients and then you’ll know you’re adding the right amount of salt.
Will do. Thank you.
On to my second jar, less salt this time. Is there a maximum temperature that the good bacteria in Sauerkraut can handle before they die. I’ve been mixing mine in with my meals but am worried I’m killing all the good guys with the heat of the meal. Thanks.
As long as the dish is not piping hot you – or the good guys! – should be fine. I mix mine in with pasta or stir into warmed soup.
ThaThanks Holly. Anyone have any reactions to the Sauerkraut? If I have too much I get what I think are candida die off symptoms, red face, itchy, feel unwell for about half an hour. I’m pretty sure it’s the good killing off the bad. Knocking my intact down a little and will build it up slowly.
U could have histamine intolerance. It is my understanding that fermented foods are high in histamine.
Dear Holly, you can add us, in the far north of Scotland, to your pin board of 10k fermenters! Very useful and interesting information on your site, thank you. I read on a blog the other day, posted by a Korean person, that he/she salts the kimchi, leaves it for 12 hours then rinses off the salt and continues the fermenting process. Is this possible? It would be a very good alternative for people who are salt sensitive. Have you tried something like this or heard of this method of fermenting kimchi?
Welcome Scotland Fermenters. Now to just get my pin board of 10K fermenters in operation!!!
Salting the cabbage leaves in a brine solution is a common practice with Kimchi – though I have no direct experience… yet! The rinsed off leaves are still salted. They absorb the salt just as shredded & salted cabbage would. If you’re salt sensitive I would use only a mineral-rich salt and then play around with the 2% ratio, slowing lowering it until you still get a decent ferment without mold or texture issues.
Hello Kiwi, I read on Summer’s sauerkraut website that eating too much sauerkraut too soon causes dieback issues and make you feel quite poorly. She recommended a forkfull, two forkfulls and up to a quarter cup, in increments, over the period of a month or two to have controlled dieback of bad bacteria that your body can detox safely.
Hi Holly, tried a batch a sauerkraut using a vague recipe that resulted in me not covering my container leaving the brine exposed to the air. I noticed a few little bubbles on the top and am on day five. Can’t really smell anything. Will the fact that the jar is not covered prevent the process from working?
Hello Kevin, No, not covering your fermenting sauerkraut won’t stop fermentation but will allow molds and yeasts to possibly grow on the surface. You won’t always see a lot of action and if you do, it is usually during the first 3-5 days.
Lack of action can be due to using too much salt or fermenting at too cool of temperatures. Try my recipe next; it’s not “vague” 🙂 and I’m sure you’ll be pleased with the results.
Thanks Holly. We’ll see how it works out. Your recipe is next on the agenda.
Thank you so much for taking the time to pass on your knowledge to the rest of us.
I’m in the midst of making my first batch. I’m about a week and a half in to the fermenting process. I got some bubbles over the first few days and things seem to be going well. So the problem is, last night I took the lid off to remove the little jar and found that I couldn’t get the little jar out without upending the big jar and pouring all of my brine/lactic acid out in the sink!! ACK!!! So after I got the little jar out, I made a few more cups of brine (using your ratio of 1tbsp salt/2 cups water) and filled it back up and put the lid back on. Have I ruined the whole batch? Any advice at this point is appreciated.
Hello Rick, It sounds like you put the little jar in upside down!!! I did that my first time, too. I do have a note in the instructions on that, but it must of been missed. 🙂
You did just fine with you troubleshooting and I doubt you have ruined the batch. Just let it ferment and see how it is in a week or two. Might take a bit longer to ferment due to messing with the original bacteria.
Hi there, I’m trying fermentation for the first time ever, making kimchi using kale from my garden. Kale is pretty dry compared to white cabbage, so it doesn’t release a lot of moisture to make a good brine. I made just a small batch (2-3 inches’ worth in my 9-inch tall crock) and have weighed it down using a freezer bag filled with water. As it’s in a stoneware crock I can’t see the fermentation progress, and my primary question is whether I should add additional brine (1T salt to 2 c. water) or not. Will it still work without the additional brine, given it’s totally covered with the bag of water? It’s warm here in Switzerland – 90s F during the day, and about 78-80 in the house. Thank you for taking the time to help so many of us learn this new skill!
Hello and happy to help first-time fermenters. You’ll be a pro soon. Kale Kimchi! A few things…
Brine. I would add brine to come up over the bag a bit. The liquid does a better job sealing than the plastic from your bag.
Filling your crock. For future reference, it is better to fill the crock to within a few inches of the top to prevent exposing your ferment to much air. You want the size of your ferment to match the container chosen. Small jars work well for experimental batches.
Warm temps. Ferment for a shorter than usual time period. With your temps, not much longer than 10 days…
And… don’t be surprised if the Kale Kimchi is too strong to your liking. It is a strong green to ferment and I’ve yet to hear of anyone raving about the results, sadly. So, don’t swear off fermenting if it doesn’t turn out, but try a batch with cabbage.
Hey holly. I did two large batches of krout…94 QTS and its pretty and white and crunchy like I want but it just tastes like cabbage in water. Can I fix this or is it all bad? Thanks!
94 quarts!!! Did I read that right. That is a lot of sauerkraut. You’ll be right up there with the Koreans on consumption: 1 quart per person per week.
What were the recipe directions you followed? In your email, you said 1 tsp of salt. For how much cabbage?
I tsp per jar….I was told to pack the jars then put my salt in and then fill with water let set for 10 days then give hot water bath for 10mins
A very different method than I teach. You are following a recipe for hot-bath canning. This explains why it tastes just like cabbage in water. That’s all it is. 1 tsp of salt is not enough to ferment cabbage and I’m wouldn’t know numbers for hot bath canning. But, maybe once it is process in a hot water bath, the flavors will shift.
Grab another head of cabbage and try this recipe. You’ll be amazed at the taste difference.
Thanks for the help!!! I also washed all my cabbage that I had already canned and added 1 cup salt 1 cup vinegar and 1 gallon of water it done about 9 jars then I put a pinch of sugar on top put the lids on it and now have it in a dark cooler room….how long should it set? My neighbor said 4-6weeks???
Again, new territory for me with which I have no experience. Vinegar is for tang and interferes with fermentation. But, it sounds like your neighbor has done this process before.
OK thanks !!! 🙂
I have tried a couple times to make a batch of sauerkraut in a plastic food grade bucket and each time I had to skim off mold for the first 3 to 4 weeks. And for whatever reasons had to eventually throw them out because they did not smell right. My question is..does a mold form using this method in a jar or does keeping the jar closed prevent this from happening? Thank you.
Hello Ryan, Sauerkraut is best done anaerobically, that is WITHOUT air. So, in an open bucket, you have the whole surface exposed to all the bacteria that love air, which are molds and yeasts. Hence, easy mold growth.
In a closed jar, with everything kept below the brine, molds and yeast can’t grown and the lactic-acid bacteria that make the sauerkraut take over and keep everything free of molds and yeasts.
Thank you. I believe I will be trying the closed jar method next. Thanks for your tutorial. It perfectly explains the process and what is needed to make perfect kraut. Thanks again!
You’re welcome. Let me know how it works for you.
I was wondering about the fermentation time. You say it is ready in about 7-10 days. I was wondering what would happen if you went longer, say 4-6 weeks. Would it go bad? The reason I am asking is my father-in-law made his kraut in a ceramic crock and it made a bunch. It was open to the air, he had the liquid over the cabbage, and he held it down with a plate and brick. He did have to remove bloom, but it always turned out right. That is why it was so disappointing that my “kraut in a bucket” did not turn out right. I basically did the same thing, but only on a smaller scale and in a bucket. I helped him can 40 quart one time. But he left it for 4 to 6 weeks. It seemed to have the right flavor after a month. So I don’t know about just fermenting for one week. Does having it in a closed container make the difference. Thanks again.
Fermentation time ideally is past the 21 day mark. But, there is ideal and there is first-time anxious-fermenter. When first fermenting (in a jar), it nice to know all is proceeding properly so that’s why I say taste at 7 days and then decide how much longer to ferment. Also, someone eating sauerkraut for the first time may not like the more pronounced flavors from a longer ferment.
Fermenting for 4-6 weeks or longer is fine. Think of time and temperature. Cooler, the longer it can go. Warmer, the shorter. Ideal for me – with a water-sealed crock (well worth the investment to avoid skimming bloom which can interfere with the flavor) – is one week around 68-70, then 8 weeks plus around 60-65. I ferment it in my dining room for the first week and then move it to my garage for the remainder. The closed container really does help.
Size of container does make a difference. You have a different of microbial activity in the larger fermentation vessel.
I made this yesterday using your instructions and it was so easy. This morning it has brine and bubbles so looking good so far. I can,t wait to taste it next weekend which will be the 7 days done! I will take the little jar out and put the lid on once the brine covers everything well. Thanks for the clear and full descriptions.
It look’s beautiful. Love those rocks in the little jar! Let us know how it tastes on Day 7. Thanks for sharing you picture. It lets others see that there is more than one way to put together a jar of fermenting sauerkraut.
https://uploads.disquscdn.com/images/2dad377b74e7fc08b8f1fbef7e346d6040537f651815cda94c264091a987db98.jpg
Day 3 and lots of bubbles
Lots of wonderful action. It may soon get quiet, which is normal, so no worries.
Tastes really good I’m so happy.
Great to hear. Enjoy!
I started mine last week and will be eating a bit on my hotdog, today. I no longer buy sauerkraut from the store.
So good to hear Lisa, Hope you many ways to enjoy it. Congrats on your – first? – fermentation.
No, second. This one is so much better. I put it on sandwiches and today I made a salad with it. My daughter and my adopted daughter hate sauerkraut but loved mine.
I wonder if I could ferment it using Himalayan salt?
If your daughter loves it, you’ve done GREAT! Yes, Himalayan Pink is my favorite – and now only – salt I ferment with. http://www.makesauerkraut.com/best-salt-for-making-fermented-sauerkraut/
Hello, thank you for the great sauerkraut making advice, I made my first batch, excited but then about the 2nd day the brine started oozing out of the lid, I lost about 2 cups worth my yummy flavored juices, was there something I did to have lost so much?
You’re welcome! Brine bubbling over. This happens, especially with nice fresh cabbage. You did everything just fine. The bacteria that create CO2 – and make your jar anaerobic – were extra active and caused the overflow.
For quart jars, I’m starting to use Pickle Pebbles or the Ultimate Jar Packer. They both take up less space in the jar, leaving more room for brine. After day 3, it should all settle down.
Thank You
My grandmother made sauerkraut many years ago, and I don’t remember her putting it in the fridge ever. Seems like she used to mix vinegar & water to pour warmed over the cabbage, cap it lightly. Allow to set and ferment, when fermentation process was complete, she called it tighter, after washing off hard. Do you know any of this method? It wss the best tasting kraut I’ve ever eaten, and anyone else said the same that ever ate and tasted of it.
Yes Bette, I’m hearing of more and more people who don’t put it in the fridge. Years ago, many kept it in a cool root cellar.
Using the vinegar gives it the “tang,” pickles the cabbage and makes it shelf stable, but does not allow the growth of beneficial bacteria, which is what I want when I eat sauerkraut. You can get a similar flavor with naturally fermented sauerkraut, but will be a different taste than what you are used to.
My entry toward your 100,000 jars and for your clickable world map (Louisville, Kentucky). This is actually my fifth jar and second for this sweet garlic recipe, YUM!
Photo was correctly oriented, don’t know why it changed when uploaded????????
Looks lovely, even on its side. A couple of posts to get finished up and THEN on to implementing our 10,000 SureFire Sauerkraut homes clickable map. I need more time! But, don’t we all.
Hi! Thank you for your awesome instructions!! I have some questions. Last night (at the 12-day mark) we pulled out about 1/4+ Cup of sauerkraut from our quart jar to taste-test it and decided to let it ferment longer. I pushed as much as I could to get everything submerged under the brine but it seems like there is less brine than at start, and I have some cabbage pieces that are slightly sticking above the brine around the periphery (around the outside of the glass weight). My question is: is this okay or should I add some of your prescribed salt water to create more liquid? I’d hate for my batch to be ruined when it’s done so well this far! My other question is: is it normal to have a creamy sort of film develop on the top of my glass weight? I’m using a mason glass weight instead of a jelly jar and I noticed last night when I opened the quart jar for the first time that the top of the glass weight has a creamy film on the top side. Should I wash the weight off before putting it back in to ferment he cabbage longer? Thank you for your help!
Hi! I’m not sure if you received my posted questions above.
Yes, just now getting caught up :-). You’re fine. Often, when one gets past the first week or so, the brine gets pulled back into the sauerkraut. I used to add more brine, but stopped because I felt it diluted the flavors and I found if I had a good ferment that first week with all below the brine and the right amount of salt, no mold grew at the stage you’re at. Yes, wash off that weight before putting it back it. Or, go ahead and open it now to do so.
Thank you for your help!! I really appreciate it! And thank you, again, for your detailed how-to on sauerkraut making. It definitely has given me the confidence to try this out!
Hi Holly, I just made my first batch of your sweet garlic sauerkraut (after my failed kale kimchi attempt a couple weeks ago 😉 and am so excited to see how it goes. Question: I had exactly 800g of the good stuff, and a nice brine, but it seems to be too much for my liter-jar. As in, I really had to squeeze it down hard and it just BARELY all fit with the brine on top, and I had to press it down with just a flat rock under the lid instead of the shot glass I’d planned on. Is this too much for one jar? Do you think I’ll run into mold problems, since the sauerkraut almost fills the jar? (it’s not under an inch of brine, it’s just barely being held under by the floaties trap and the rock/lid combo). Thank you so much for the time you devote to sharing your passion and helping so many other people develop this skill!
https://uploads.disquscdn.com/images/8d1abd78ab87ddedd2c197a3d44917bef891194ffebc47de4c013f545468673c.jpg
Hi again,
So I checked my kraut this morning, and saw that plenty of brine had bubbled out into the dish I’d put below the jar, so it seems to be working! I pressed it down a bit more and added one more flat stone on top beneath the lid to keep everything nice and submerged. My house is starting to smell yummy, and 6 more days feels like so long to wait before I get to taste. 😉
Sounds like you have it all under control. 🙂
Hello Audrey, Sorry for the delay in getting back to you. Next time you encounter a too-full jar, I would probably take a bit out to give room for expansion. But, if you didn’t it won’t be the end of the world. It still looks like it will ferment fine. You are now past the most active stage with all the bubbling. If you still have an overflow problem, go ahead and take a bit out and pack it all down again and put back in the weight that fits to finish off the ferment.
I went to Whole Foods on Tuesday and bought a smaller bag of non-processed sauerkraut to see if it would ease my digestive issues that I have been having for about 2 months. It’s only Friday and I can’t believe the difference that it has already made. The bloating is gone and my BM’s are amazing. I can’t wait to make my own. It’s strange that as a child (decades ago) I would get in trouble at school for refusing to eat it, but now, I love it! Thanks for the great article.
SO GOOD to hear! It’s amazing the impact of just a bit of fermented foods. Now that you know it works, you’ll be motivated to ferment your own. Enjoy the journey.
Thanks Holly. I will and let you know.
Hello Holly, love your post! Definitely the most comprehensive sauerkraut how-to I’ve read. My batch developed foamy looking bubbles at day two and I’m opening it tomorrow at day seven, hoping it will be okay. I made it in one of those French wire lever closure jars with the rubber seal, so it’s not possible to put the lid on lightly so air can escape. Do you think it will be okay? Thank you!
Thank YOU! It’s comprehensive to ensure success!!! The ball-clamp jar you’re using is just fine. It’s on tight enough and any gases can escape by the pressure gently pushing up on the lid.
Thanks Holly! 🙂
Tried my first fermentation and checked today on day 7 and whoa! waay too salty for my taste. Here are my corrections, tell me what you think. I had two qt jars going. One jar I poured out all the contents and added more cabbage and returned to two jars since I now had double the content and added enough water to cover the top of the cabbage. The second jar I poured out all the brine and added enough water to cover the kraut. I’m thinking there was still enough salt on the fermenting kraut to continue fermenting process? I plan on leaving all three jars on the counter for at least another week to continue fermenting. Let me know what you think…. I’ll try to remember to post about how it turns out.
Hello Julie, Sounds like a perfect solution but time will tell. You’re restarting the fermentation process 7 days in and reintroducing a different set of bacteria but that doesn’t mean the microbes won’t work wonders for you. I’ll be anxious to hear how it turns out.
On the saltiness. Use Himalyan Pink or another mineral-rich salt – if you aren’t already – for it’s not as salty. Then, use a digital scale and play around with gradually decreasing your salt percent until you still have a nice crunch and texture but not too much saltiness. Try 1.5% for example and see how that tastes for you. See here for more info: http://www.makesauerkraut.com/salt-by-weight/
Hi, I love your easy to follow guide and enthusiasm! I’m ready to start making my first batch of sauerkraut, but my kitchen gets to 30 Centrigrade when I’m not home and the air-conditioning is off! That can’t be good for it, can it? I don’t want it to explode. Any ideas how to keep it cool without putting it in the fridge?
Hello Suzie, Happy to hear your enjoying the site. Thank YOU!
Hot kitchen? Ferment for just 3-7 days – or check it then and see how long you can ferment. Don’t put the lid on tight. And, understand how temperature impacts fermentation: http://www.makesauerkraut.com/how-long-to-ferment-sauerkraut/
And/or try some of the pointers here: http://www.makesauerkraut.com/fermentation-tips-hot-weather/ Best of luck.
Thanks Holly! You’ve given me confidence to go ahead -I’m happy I won’t have to wait so long to try my first batch 🙂 May my family’s gut health be improved! Welcome back lovely little friendly bacteria!
I made my first batch of Sauerkraut about 5 days ago, into 2 pint jars. When I salted the cabbage, it tasted too salty, before putting into jars. I used a 2 1/2 pound head of cabbage before removing the core and outer leaves. I read to use 1 1/2 teaspoons of salt per pound. I used canning salt, but feel maybe it was too much salt? I never saw any bubbles. I kept the jars out of the sun, in about 78 to 80 degree house temperatures. I opened one jar yesterday and smelled the sauerkraut. It tasted awful, and had no smell. I am so disappointed. What happened?
Hello Cathryn, Glad to hear you’ve jumped in and made your first sauerkraut but sorry to hear it tastes awful. Do try again. Once you get it right, it really is delish!
I would follow my recipe here, but a few things… I would ferment in larger quart jars. They allow for a bit more microbial activity with the larger container. You fermented on the warm end of the spectrum and with about half as much salt as I would recommend. I know you said it tasted too salty, but without enough salt, the proper environment for the bacteria to do their work never gets established. For 2 1/2 pound head – before waste – I would guess at least a tablespoon of salt.
I probably used almost 3 Tablespoons of canning salt, total. Would too much salt stop the bacterial growth? I’ll try a quart jar next time. Thank you for responding to my request and being so helpful. Do you think because my house temperature was too high, it stopped bacterial growth also? Thank you.
Yes, too much salt will stop bacterial growth. Salt numbers are like Goldilocks and the Three Bears, not too much, not too little, but just right.
Too high of home temps can speed up the process and sometimes miss some of the flavor development, but if your salt is right, you just ferment for a shorter time period. Do consider a digital – even a inexpensive one. It really takes the worry away when you have the salt numbers correct. Without a scale, you can go by taste: Salty but no offensively, gag-me so.
I live in nz where climate control isnt really a thing in houses. Our ‘room temp’ fluctuates every day from anywhere between 25 – 10 degrees Celsius, depending on the time of year and whether or not the fire is stoked. I’d love to make sauerkraut, but am reluctant due to this problem. Any tips?
Warm climate challenges! Play with fermentation length, shortening it. Many successfully ferment in your climate but for a much shorter time period. Follow this recipe, use a bit more salt (rounded tablespoon, 2.5% or 20 grams – reply if that doesn’t make sense) and just test your jar of goodness at 5 days, 10 days and so on. Also, check out this post for some temperature control ideas: http://www.makesauerkraut.com/fermentation-tips-hot-weather/
Thank you for that. I am actually more cooncerned about the temperay drops that happen at night, rather than a warm climate. Inside temps are between 10-18 when I wake in the morning. Im wondering how i can keep the sauerkraut temp from dropping over night. Thanks!
Hello Again Katherine, Good question and worth trying to stabilize temps. I’ve heard of some using a “seedling mat.” Here’s a blog on that. http://www.picklemetoo.com/2015/01/13/frickin-freezing/ She also talks about hot water bottles in a cooler. If you have some old non-led Christmas lights, you could wrap those around the jar.
You could also play around with making a warming cabinet. Low wattage incandescent light bulb/lamp in a cupboard. Be safe!
Kombucha brewers run into the same issue and you might be able to use some of their tips. http://www.fermentedfoodlab.com/10-tips-for-making-kombucha-in-cold-weather/
I have a post in the works, just not ready to publish…
Hi Katherine. Holly, I hope you don’t mind my intrusion.
I am from Ukraine. We make kraut in fall and winter. No climate control there Either! We don’t ferment it for long 5 – 7 days max. Then keep it in the fridge. I never remember my mom or grandma fussing about the right temp for the kraut, I don’t pay much attention either. If you really worry, you could keep it overnight in the oven with the pilot light on.
Holly, when the kraut gets aged, mama would add freshly shredded cabbage, slices of red or spring onion, parsley (we use lots of parsley in salads) and sunflower seeds oil. I found that toasted walnut oil has a perfect flavor match. Thank you for your step by step picture recipe!
Hello Iryna, Thanks so much for sharing your experience. I think – myself included – we can work too hard to make it all turn out just so… Were your mother/grandma fermenting in large crocks? Love your “salad” idea. Sounds delicious. I’ll have to try the walnut oil.
Thanks for the in-depth instructions for making cabbage kraut. I am going to be making collard kraut with your recipe so wish me luck. 🙂 I have loads of beautiful collards and they are so good made into kraut. My Mom and Dad did it every year but you know how kids are, I never paid attention to them when they were making it. Luckily my Mom is still with me and although she is 88, she remembers how to make it but I have been reading a lot of sites to get an idea of what to do and not to do. In the old South, I think they just did it and worked with the results they got without complaining.
Thanks again.
Let us know how you like collard-kraut. I’ve hear it could be quite strong. You might want to consider try fermenting some 50/50 with cabbage.
Hi Holly.
I have eaten collard-kraut for most of my life here in North Carolina so the taste is wonderful to me. 🙂 I was just looking for a real recipe to make it and taking the guess work out, which your recipe will provide. I have read more than 50 recipes so far and I am thinking this will be a labor of love and maybe something for my children, grandchildren and great grandchildren if they like it.
I will do straight collard kraut to ferment the first batch and maybe mix with cabbage on the second round.
I will definitely let you know how it turns out however.
Hello, Holly! I am preparing to begin my first batch of sauerkraut using your failsafe recipe. For my very first try at fermenting, I used your technique and tips for a simple kimchi recipe that I found on MasonTops. (I wanted to try something with a very short fermenting time first, to see if that would be successful whilst waiting on the sauerkraut to ferment.) However, the kimchi recipe had enough leftover to fill a third of another quart mason jar. I went ahead and packed the leftovers into a second jar, submerging it under the brine with a pickle pebble, but was worried that so much “airspace” in the jar might affect the ferment. I didn’t have any smaller size jars that would work with the wide mouth pickle pipes. Do you think the kimchi will be allright in this “roomier” jar?
Hello Mia, Usually, i will be alright, especially if it is under the brine and also a short ferment time. Congrats on your first jar of sauerkraut. I hope you find it delicious.
Thank you, Holly. 🙂 The ferment time is only 3-5 days for napa cabbage, so I’m keeping my fingers crossed. In the meantime, I’m making your SureFire sauerkraut recipe next!
I have a question on the finished product. I just finished fermenting my cabbage for two weeks. I burped it the first couple days but after that the ball jar lid was tightly sealed so I could not burp it any more. When I went to open the jar today the top was a bit misshapen, probably due to the pressure. It took a lot of effort to open the lid. When it did finally open a lot of liquid poured out over the top of the jar, again likely due to the pressure. The sauerkraut smells fine and I tasted two very small slivers and they tasted crunchy and had a pretty familiar sauerkraut flavor. No obvious signs of mold or anything along those lines and like I said it smells fine. I just want to make sure it is fine to eat. Any advice is greatly appreciated.
ENJOY! All is good. Like you said, pressure build up. For future batches, wait until day 5 to totally tighten the lid, unless you’re using an airlock and then it can be tightened on day 1 since you have a way for the gases to escape.
Hello Holly! You must wish these Help Me! emails would stop soon in this very busy Holiday season! Here’s a short request for advice: I want to give a jar of my sauerkraut to my daughter. But even though it had liquid over the top when it finished fermenting, now that it has been in the fridge for a couple weeks, the lovely red juice seems to have gone down and the top 1″ is discoloured. I don’t mind it, but she has never had sauerkraut and may not find it attractive enough to try it! 🙂
I have leftover deep red sauerkraut juice from another jar I just finished eating. Can I add it to this jar I want to give, as I said, it finished fermenting a few weeks ago and been in the fridge.
Thanks a bunch for your generous help to all of us newbies, and have a wonderful Christmas!
Anne in Prince Edward Island, Canada
Hello Fellow Canadian, Prince Edward Island! On my list to visit one day. I’ve just lived in BC for 9 years; California prior to that. So much to explore. Thanks for your understanding on the emails. Thankfully, they tend to slow down around the holidays.
I would remove the discoloured section – you can eat it. Repack in the right-sized jar – 500 ml are nice for gift giving – and pour your leftover juice in. Yes, that’s fine to do. In the cold environment of the fridge, the brine gets pulled back into the sauerkraut, hence the top dry section. Look for an upcoming post on dry sauerkraut. Happy to help you newbies and thank you. A wonderful Christmas to all!
Awesome as always, Holly! Thank you for your super quick response. Going to visit my daughter in B.C. actually for Christmas! Didn’t know you were Canadian! Which part of the continent are you living in now?
You’re welcome. Vancouver Island. Cold right now, but I do like to feel the winter. Just need some snow.
Hello, I am just starting out at this, and am finding that my brine appears to get soaked up by the cabbage as it is fermenting. The cabbage seems to swell up taking up more space in the jar, and my brine seems to disappear. What are your thoughts on this?
Hello Jane, Perfectly normal. I’m trying to come up with a work around. But, as long as everything was under the brine for the first 5-7 days, the good bacterial environment has been established and no mold should develop. You can add brine (1 tablespoon salt – 2 cups water) but I find it dilutes the flavors. I’m playing around with fermenting a watery sauerkraut to pour into the jar.
Hi. I’ve made kraut before and I love adding caraway seed, onion, and dill. But, I’m out of dill and not sure if I can use frozen dill. I read one time that you can open a probiotic and mix in. Have you ever done this? Kim
PS I’m from Nelson, BC
Hello Kim, I don’t see a problem with the frozen dill. I’m against mixing in probiotics. Different bacteria than occur on the vegetables you’re fermenting. See more here: http://www.makesauerkraut.com/starter-cultures-not-used/
Nelson! Love your town. We ALMOST moved there 10 years ago. Ended up on Vancouver Island instead. Enjoy all the great skiing. 🙂
Hi Holly, I purchased a 5 ltr fermenting crock last year and LOVE making sauerkraut. But sometimes I’m not sure about the quality of the finished product. The colour of my most recent batch was nice and white at the top, but toward the bottom it became a little pinkish/brownish. As well, the kraut had floated up from the bottom of the crock. I made six pounds of cabbage with the right weight of salt per pound of cabbage. I used Windsor coarse canning and pickling salt. I added extra brine at 1 Tbsp per 2 cups water. I used the weights that came with the crock and the kraut was still submerged, but had floated a lot. Is it safe to eat? And any ideas about why it sometimes turns out pinkish or brownish? I’m thinking the counter I ferment on, beside my fridge, may be a little too warm. Thanks for your great site.
Hello Leslie, Good to hear you are LOVING making sauerkraut! I think you answered your own question in the last line… too warm. Another thought is the coarse salt. I find fine (regular grind) salt is easier to more thoroughly disperse and then have it dissolve faster due to smaller size of grain.
Floating? If it’s above 72-75F, you might have ended up with a real active ferment and lots of air bubbles being produced and the weight not heavy enough.
When fermenting in a crock, I like to have it around 68-70 for a week and then more to a cooler spot 60-65 to slowly ferment. You’ll find that you end up with a greater depth of flavor this way. If you haven’t see this post, check it out for more: http://www.makesauerkraut.com/surefire-sauerkraut-in-a-crock/
Thanks, Holly. For the next batch I’ll try a cooler location, a different salt and heavier weights. Just found your recipe for a Kimche style kraut in the link, which I have been wanting to try. Any idea whether you could add some store-bought fish sauce to the recipe?
Leslie
Good luck with the next batch. I haven’t used fish sauce in a recipe but I’ve seen many recipes call for it. You should be fine. 🙂
Hi Holly, I am from India and rock salt ( I guess it is called Himalayan Pink Salt ) available easily not kosher or others. can it work ? second, I have just an idea can adding a spoon of Bragg’s Apple Cider Vinegar speed up the process ?
Hello Amit, Himalayan Pink Salt is my favorite – and only – salt I ferment with. You’ll just have to grind it to a find grain for best dispersion and dissolving. Here’s my post on salt: http://www.makesauerkraut.com/best-salt-for-making-fermented-sauerkraut/
Speeding up fermentation. No need to add vinegar or other “starters.” it’s best to let the bacteria work as they do best. More here: http://www.makesauerkraut.com/starter-cultures-not-used/
Hey Holly, my quart jars all have the metal lids and rims. I can’t use those?
They are FINE to use. Just don’t put them on too tight. (Gases created during the first few days need a way to escape.) The metal lids can corrode due to the acid levels in the brine. I used them for years before switching to the white ones. Take it a step at a time. Happy Fermenting.
Thanks Holly. That makes sense! Maybe I should just buy some plastic ones. You have a source?
I have an Amazon link on my Fermenting Supplies page: http://www.makesauerkraut.com/fermenting-supplies/
But, any big box store (WalMart, Target, Canadian Tire) that sells canning supplies tends to have them, though some it may be seasonal.
I just put up 12 pints of kraut that is 12 weeks fermented. Really tastes good and wil be good with pork and mashed potatoes. All fresh green cabbage from our local farmers market. Bob Young – http://boisefoodieguild.wordpress.com
Beautiful! Thanks for sharing. Enjoy the goodness through our winter months.
Thanks again for your efforts. We really appreciate the hard work you put in for OUR benefit.
Just wanted to let you know I have set up my second batch and on both used the cabbage leaf with cut wooden skewers crossed to hold the leaf in place. Works like a charm. Thanks for the idea.
You’re MORE THAN WELCOME. Good to hear the wooden skewer trick is working for you. It’s nice to keep things simple.
Hi Holly. I just finished a 21 day fermentation process of kraut, in a 64 oz. Fido jar. I moved the finished kraut into smaller jars, but there is no longer enough brine to cover the kraut in the smaller containers. What to do? Thanks for your help.
Hello, They are fine without the brine. Just cap tightly and enjoy. Keep an eye out for my upcoming post on “Dry Sauerkraut.”
Thank you, Holly!
This is so helpful thank you Holly! I have organic cabbage, is it ok to use conventional carrots and garlic? What about conventional cabbage?
Hello Sarah, Ideally you would use the best quality ingredients you can find/afford. The greater the nutrient levels, the more food for your microscopic friends. If you are using conventional and doing everything right and ending up with bad batches, then I would pursue that variable. And rest assured, there are studies out there that show how powerful bacteria are. They have been found to erase/degrade levels of insecticides in Kimchi.
Happy, happy! Oh so happy! Started the class with my daughter and son-in-law and made 4 quarts of kraut, 2 quarts for each family. I am through the first quart and I was so happy and excited that I started another quart last night!!
Got your blog post today and I can’t wait to eat through another jar so I can try the beets!
Thank you so much for providing such a wonderful resource!!
You are so, so welcome. Watching Mighty Microbes work for us and then enjoy the delicious results is rather addicting. A good addiction. Happy to hear you’ve helped fermentation happen in so many homes. Enjoy the action ahead.
Hi,, glad to have found your local site (Vancouver Island, the banana belt!) I made my first batch of kraut today, using a very large and similar-to Fido jar with a clamp lid (its definitely NOT a Fido or Le Parfait). After doing some reading, I’m not feeling so comfortable with this, and leaving the lid closed. The kraut is totally covered with brine, I have a weight in there,,, but I’m wondering if I should burp it to prevent an explosion. I appreciate your advice,,,
To be on the safe side Fellow Islander, 🙂 go ahead and burp it for the first 3 or 4 days. After that, the CO2 production should have dropped. Or, just leave the lid unclamped for this same time period. Enjoy!
Dear Holly,
I made a batch of Fantastic beet,cauliflower, caraway seed and garlic sour kraut, like you said I tried it after a week fermentation and it was glorious, (its very hot here in Australia so it didn’t take long/ I kept the jars in an esky with an iceblock at one end to cool them down and religiously gave them a new freeze block everyday) at the end of the week I took the weights out as you say and tasted them they were amazing, I then left the weights out and replaced the pipe pot burpy lids with proper ones and put them in the fridge, at this stage there was heaps of brine, ( it was kind of lightly browny bubbly at the top though)?. I then a week later went to check on them and the tops for about 2 inches were brown and disgusting, I was so horrified I couldn’t even open the lids I threw them out jar and all! What did I do wrong??? Should I have left the pipe lids on in the fridge with the weights in them?… if so when do I take them out?
Please advise?..
Kind regards Heidi
PS I love your book, but am afraid to make sour kraut again!…
Hello Heidi, That is sad to hear. Jar and all got tossed! Usually, you can just remove the browned top and the rest is delicious.
Out of curiosity, what are the current household temperatures in Australia? What would you guess were the temps in the esky. You fermented for just a week? And, I think you followed my recipe on salt amounts?
The brine disappearing when you moved the jars to the fridge is normal. Osmosis forces the brine back into the cells of the cabbage. We pulled it out to create our brine when you mixed the salt it. The browning is most likely from the warmer weather so it would be good to know what temps are though I know you had it in an esky – cooler/ice box. That’s a new term for me. 🙂 Get back to me and I’ll help you through this. And… it will help others fermenting in the heat. Another option would be to just ferment out on the counter for maybe just 5 days.
And yes, you did right to remove the weight and pipe lid.
Thank you Holly for your reply, it is way too hot I think to leave it out on the bench here in Sydney Australia, it can get up to 36deg Celsius here! My esky with a cold freezy pack in it is the only way to go here, I put it in the hallway which is the coolest place in the house https://uploads.disquscdn.com/images/5e9fc1e52bfbbbb3ae14329a6934ff70057095a10f8f619869d50554805f46f4.jpg ! I just don’t know how I can do it again without it going off? I tell you it looked so disgusting there is no way you could even open the jar let alone scoop off the top without being sick!… any suggestions would be greatly appreciated!…
This photo was taken obviously before the sour kraut went off, strangely enough the fermented snow peas are fantastic!
Hello Heidi, A few insights, though it sounds like you did everything “correctly.” Yes, the cabbage could have been “bad,” but that seldom is an issue. But, maybe try a different source or organic if you can get it.
What’s the temp in the esky/cooler? You do need a few days of “warmth” 20C to get the first stage bacteria active, then it can be cooler. See more in this post: http://www.makesauerkraut.com/how-long-to-ferment-sauerkraut/
Do try another batch. Sometimes, one can’t pinpoint why a batch was off. In Korea, they’re fermenting in warm temperatures – like yours – but for a much shorter time period.
Is there anyway the cabbage could have had a bug in it?…
Holly, I have a question concerning the fermentation process, please. I made 1 pint of the sweet garlic sauerkraut the other day and I was wondering if there should be any “bubbling” during the fermentation process.
I ask this because I made a quart of red cabbage and it began bubbling the day after I processed it.
Thanks!
I haven’t been able to pinpoint why some batches are more active than others. They all seem fine in the end. I would look into temperatures. You want around 68-72 for the first few days for the bacteria that work at stage one. Sometimes if you press down with a fork, or run a knife along the inside edge of the jar, you’ll see the bubbles escaping.
Thank you Holly I will give it another go, I’ll let you know ❤️
Hi Holly!
A HUUUUGE thank you for your time / site / how to’s, it’s by far the most expansive and balanced/broad range of help and advice I’ve found online after heaps of hours of research, finding much conflicting info as ever with the interweaving of wonder…I found your site and now it’s my go to!
I do have some questions for you though please if I may trouble you further?
I have fermented my first ever batch of KRAUT, was SO exciting! Followed your surefire recipe and guidelines exactly so have yielded a fab first batch with no concerns along the way, in a fido jar, two types of cabbage and carrot I used with caraway and garlic for flavour. Didn’t touch the jar til day 22 as wanted to allow those lovely beauties the best chance to grow and do their thang! Tasted on day 22 (first ever taste of Sauerkraut also!) Delicious! But my only shock I guess was how it was ever so salty, I do have a palette that loves rich and flavourful foods as I’ve always cooked very rich meals packed with herbs, spices and garlic etc. So I am used to very rich flavour and so originally I thought wow this is great, used some of the bring for our salad dressing that night and it was lovely but niggling me at how salty it was. Anyway following day today I’ve had a couple forkfuls again and found the odd mouthful to have this insanely fizzy flavour! And the next mouthful not so fizzy, but the next one SOOOO fizzy and sour? What do you think this indicated please?
I wonder if it needs much longer?
The ferment has always been in my larder cupboard in our kitchen in the UK, our kitchen is the coolest room of the house and even cooking barely heats the room up as we have issues with a draft from the back door of three house being in the kitchen so I wonder if despite being at day 22 the ferment is actually still very immature?
I remember reading somewhere about fizzy ferments in fidos due to co2 buildups if not burned daily….I never did burp the jar as was paranoid about letting air in and it spoiling? But I guess even as I write that I realise thats not a sufficient reason not to being that the brine level always having been correct would have protected this from happening get anyway? So much to learn! I also read somewhere about histamine levels not lowering significantly until around the 10 wk mark / and also the vital levels seeming to really peak then also? I guess this is something I want to aim for if this is true as I’ve had digestive issues forever now and would really like to use fermented foods to not only enjoy the lovely depth and addition to our yumay meals but also to hopefully restore some balance/healing within!
I also wonder now at this stage where I have opened the jar a few times in two days – already having used some of the brine too, am I OK to pack it all back down / stones etc and continue its ferment or have I possibly contaminated things?
So sorry for the essay – there’s so much to learn hey and I really do feel a bit out of my depth! 🙂 so chuffed to have gotten this far with the batch though and no probs as a newbie had feared! 🙂
And a BIG WELCOME to you, Lizzie, And happy to help further.
Too salty? One tip is to use a mineral-rich salt, if you aren’t already. Himalayan Pink and Real Salt are both rich in other minerals which results in the sodium portion being 84% instead of 98% as in most other salts. You can rinse the kraut a bit. You will lose some, but not all of the probiotics. You can also disperse the saltiness by mixing the sauerkraut into a salad. Or, use a bit less of a pure sodium salt.
The fizziness? How many carrots did you use? If you ended up with too much “sugar” in the batch you might have a bit of an alcohol buzz in there… just a thought.
Length? I don’t think that will change the fizziness, though leaving it sit in the fridge for a few weeks can. What temperatures did you ferment at? I find it very helpful to have the first few days around 20-21 (68-70) for the bacteria that work at the first stage like it a bit warm. Then, cooler temps – 18 (65) – for the remainder.
Burping jars and fizz? A new one for me. I’ll keep my eyes open for more on that. With the Fido jars, they technically burp on their own. The metal clamp moves with air buildup. Yes, it if fine to repack and continue to ferment. I’m finding it is not as easily contaminated as one would think.
Congrats on your first successful batch and continue with all your learning!!!
Thank you so much for this recipe! We are so grateful!
In case it is helpful to anyone else, we found the easiest way to make the cabbage sweat is to use our mixer. We put one batch at a time in the bowl with the paddle attachment and turn it on the lowest setting. I tried letting it sweat overnight, putting casserole pans over it and standing on it to smoosh it, pressing and pressing it with a meat tenderizer – it either didn’t work well or was tiring for us when we make so many batches at a time. We were concerned it was going to discourage us from making it, then we tried this, and it’s great. I can be cleaning up the kitchen or playing with my kids while it does the hard work!
https://uploads.disquscdn.com/images/454affb2386608092b5479efbcf1f6b92bed6eef45aa24c6cba36bfe92f582a9.jpg
Thank you for sharing and thank you for the picture. I’m sure others will find this helpful. I’ll try to add it to my SALT tips section.
Hi Holly, thank you for the recipe, sounds wonderful, I just made a batch for the first time and not having a proper jar I used one of my Food Savor containers to create an air free environment and a short cocktail glass as a weight. Should I release the seal daily to allow gases to escape?
Hello Dawn, I would for the first 3-5 days if there is no release valve doing it automatically for you. After the first 3-5 days, there should be lest buildup of gases. You’re Welcome!
I am going to start up some batches today but I am wondering if you’ve ever added whey to make your recipe? I’ve done it both ways before, but the last couple of times I just used salt like your recipe and its turned out great. Would I keep the salt the same?
Hello Ronda, I did add whey when fermenting sauerkraut for the first time and had mixed results. Some research helped be figure out why and is explained in the following post. http://www.makesauerkraut.com/starter-cultures-not-used/
Here’s more on how much salt to use: http://www.makesauerkraut.com/how-much-salt-use-to-make-sauerkraut/ Happy Fermenting.
Fantastic taste and a great write up.. My favorite serving so far (besides just a fork in the jar) would be in egg salad. It makes a great alternative to pickles or celery. 3 batches so far (1 went bad- and when it goes bad,, ugh). Many more batches to come!
Thank you! The egg salad idea sounds delish. Enjoy the many batches ahead.
I just tried to make my first batch of sauerkraut. I mixed the chopped cabbage with a tablespoon of salt. I let it it and there was no brine produced. So I made some brine with the 2 cups water and 1 tablespoon salt that you recommended. Now I have salty cabbage with no fermentation in sight. What did I do wrong?
Hello Diane, Did you massage and work the cabbage some after letting it sit? If even with working it, you still had no brine sometimes the cabbage may be the culprit. Too old and all the moisture has evaporated? How long has it been fermenting? If it has been at least 10 days, it should be sour and tangy. And… temperature? If it has been on the cold side, fermentation can be slow to happen. Let me know if any of this helps to troubleshoot what may be wrong.
I just opened a mason jar of homemade sauerkraut that has been refrigerated for a couple of weeks. It looks good and smells fine. However when I unscrewed the lid fro the mason jar the lid covering the opening burst off the top. I have never had this happened before. Is my sauerkraut safe to eat?
Hello Alice, Our ferments are still alive, even in the fridge. When you opened your jar, you released a buildup of gases that are produced by the lactic acid bacteria. Usually, they are not so active in the cold of the fridge, but all is fine. Did you open your finished ferment before putting it in the fridge? No matter either way, but if you didn’t those gases could have been from when it was fermenting on the counter. If not, it’s a buildup from more produced during fermentation in the fridge. I always store with the white plastic lids that do allow for gas to escape. For future jars, leave the lid a tad loose. Perfectly safe to eat.
Thanks so much, I hated to throw it away. It is so delicious.
I am using a fermentation kit that seals out the air while letting the gases from inside the jar vent. It’s like one of those kits for wine making, where the top part has water in it in a plastic container. I did my best to place a leaf of cabbage on the top and keep it down with weights. But nonetheless, cabbage bits floated to the top of the brine. While it’s fermenting, is it bad to have these bits floating on the top even if I am using a fermentation kit to keep out the air? There is only a centimetre of air in the jar at the top, which I am thinking is now mostly the gases of the fermentation. Are the floating bits okay in this situation?
Floaties! Yes, it is nearly impossible to trap them all. No harm done. Just leave them be. If any of them do get moldy, just pick them out and toss.
I wish I had seen your website first before I started making my first batch of sauerkraut. I’m 7 days into my batch but I encountered a problem, I think. I did the cabbage leaf trap at first, but I didn’t cut it to size initially so some of the leaf was curled above the brine. After a few days it started to get kinda nasty so I decided to replace it with something else. I tried the plastic bag filled with water. Seemed to work ok at the time, a few days later I needed to press things down and I went to rearrange/change the bag and discovered that the bag was open, so some regular tap water had mixed in with the brine. Now I’m worried that it diluted my brine. Is it ruined?
Possibly diluted brine? I would go ahead and give it a taste. If it tastes fermented and salty like a potato chip, you’re OK. You can stop or repack and let it continue to ferment.
If not, let it ferment for another week and see how the taste and texture is then.
Hello HOlly, I am one week into the first two jars…. they have this white foam that floated up….. I can not find anymore if you wwrote something about it could you tell me if I should remove it? thanks for all the tips
Hello Kasha, White foam is fine. From all the microbial action. Leave it be. … You’re welcome! 🙂
I tried this recipe a few weeks ago. We just finished off the first batch and the second one started fermenting three days ago.
First I want to say thanks for the recipes and all of the advice.
With both batches I had to add more brine because the brine did not cover the ingredients in the jar. Am I doing something wrong? I’ve used mostly cabbage plus carrots and garlic for exactly 800g and then I add 15g of Real Salt(first time) and 13g Real Salt(second time). I then need to add another 13-15g of Real Salt with 2 cups of water after 24 hours. I used less salt the second time because the first batch was a bit more salty than we would have liked. The second time I waited 48hrs to see if some more brine would be produced.
You are most likely having to use cabbage that has been stored awhile and has lost some of its moisture. Check this post out for some tips on how best to deal with it: https://www.makesauerkraut.com/dry-sauerkraut-gut-shots-recipe/
There are some tips in there to help you avoid adding more salt.
Hi Holly, just a hint about cutting yourself on a mandolin. I did recently and it was bad. I immediately went on Amazon and ordered the “no cut” gloves for $11.99…..ok, $12. They are so amazing and I feel much more comfortable using the mandolin now. I will never use it again without my gloves. They are thick but limber enough to work with them easily. Just my 2 cents!
Hello Pat, Ouch, I hate to hear that. I’ll add the reference to the “no cut” gloves in a few more spots. They are on my shopping page but not in my recipes.
Hello! A few questions if you don’t mind.
So I’m doing my first jar ever, but a few things first. I am in Phoenix, so it’s 79 degrees inside (but dry, maybe that helps?). And I believe I may be a little short on salt (maybe not). My first jar began last Monday, here is the progress: On Wednesday, I burped it, and lots of gas came out. But since then there really has been no action! Is this bad? It literally looks the same as it did Monday, basic cabbage color. I opened the jar today (4th) and it smells sauerkraut-y, definitely not foul. So thats good, right? Now I understand I have a few days to go, but does it sound like everything is going ok? In other words, besides the day 2 burp, everything has been pretty uneventful. Is that normal? Btw, I’m using green cabbage, kosher salt, and an old clean marinara sauce jar with the metal lid. The brine is just below the lid, and I’m using the core to weigh the cabbage down. Thanks!
Most of the action – visible – is in the first few days when copious amounts of CO2 is formed, hence the release when you burped it. All is fine. Uneventful is normal. You might end up with mold on the top of the cabbage core where it is exposed to air. Just toss when you’re done fermenting. With the warmer weather, you’ll probably want to shorten your ferment by a week or so. Go by taste and texture – to your liking.
Would like to let any fellow southwest folks know that our dry heat may not hurt the fermentation. I tasted mine after one week, fermenting in 79 degrees, and it couldn’t have turned out better! Very crunch and delicious. No slime, no mold, no off color, etc. The only thing that happened was a bit of a tummy ache after a forkful, but I”m hoping that’s a good sign in the long run. Thanks Holly.
Thank you for letting us all know. You can fiddle with trying to cool the environment (http://www.makesauerkraut.com/fermentation-tips-hot-weather/) but it is probably much easier just to shorten fermentation time. Go slowly on consumption until your digestive system is reading for all the goodness. 🙂
Everything worked great, thank you. Do you know if the brine that remains (almost one third of the jar) is good for preparing dressing or have I to throw it?
Any brine that remains after you’ve eaten to the bottom of the jar can be used for making a salad dressing, drinking or topping off a jar of sauerkraut that you’ve finished fermenting and is a bit dry. Enjoy!
Thank you. Could you tell me how long does the brime remain “alive”? Because I am not sure to understand if the bacterias are in the vegetable or in the brine. If they are in the brine, should I feed them until I am ready for the second pot. I will try to add radish and rose pepper (I have a tree in my garden).
There’s much to learn and we currently are making many assumptions about our microbial world. From what I understand, the bacteria are in both the vegetable and the brine. When you move sauerkraut/vegetables/brine to the fridge, fermentation slows waaay down. No feeding necessary. Bacteria are still in there working away though different active strains at the end than at the beginning. I briefly cover the stages in this post and need to do a more thorough coverage. http://www.makesauerkraut.com/how-long-to-ferment-sauerkraut/
I love, love, love your page!!! So I am trying sauerkraut for the first time ever, and it’s about 7days now. Didnt know what to do next but I think I will taste it first. I put it in the fridge though… Brine and all. Or do I remove the brine to store? Can I use the brine for other stuff? I did a carrot, cabbage and caraway kraut. And the water was orange at the beginning but it is clear now…. Is that okay? Thanks
Thank YOU! I’m happy to hear you have a jar of goodness fermenting away. Go ahead and taste it. It can ferment for a couple more weeks yet, but some enjoy tasting the shift in flavor as time goes on. Leave the brine in. It protects the sauerkraut from air exposure. If there is still some left when you get to the bottom of the jar, use it to make a salad dressing or just drink it.
The orange water came from the carrot and the coloring particles have probably just settled out returning the brine to clear. All is good. Enjoy this jar at its “young” age and let your next jar ferment longer.
Hi Holly. I have taken about half a fork daily for 4 days now. I am on a fast, so what I do is eat the half fork full and wait 30mins before taking fruit. Then I can take a light meal and go to bed in the night. Now I noticed I am a bit constipated and bloated. Is that good or bad?
It could be that your body is just not ready for it with the bloating. Wait perhaps until you are not fasting and then enjoy a small amount with a meal instead of on an empty stomach.
OK. Thank you for the reply
Thanks for your very informative fermenting articles and lessons.
The salt content is too high for me. Can I use half the salt and then starter culture. The reason many people use starter culture is to use less salt. The taste may be different from your recommended amount of salt, but we can acquire the taste after eating it for a couple of weeks. Some of us avoid too much salt for health reasons.
Thank you and keep up the good work in educating us.
Sab
Hello Sab, Thank you for taking the time to share the issues with salt for some of my audience. It is much appreciated and I will explore the use of starters as one way to do a “low-sodium” recipe. A couple of tips: Do use an unrefined salt (Himalayan, Real Salt). Your body is better able to deal with it because its chemical structure hasn’t been altered by processing and they taste less salty. Try 1.5% salt. Use a gram scale. For a regular 800 gram batch in my recipe, that would be 12 grams of salt. Add starter according to package directions. And… let me know how it works for you.
Hello Holly,
Last time I asked if I could make the sauerkraut with less salt as I find the recommended quantity of salt too salty for me. You encouraged me to give it a try. I started the fermentation two weeks ago and was a bit worried that it may not go well since I am using less salt, though I added probiotic powder. To give myself hope that the result will not be a disaster, I bought and used fermenting lids and glass fermenting weights. To make the long story short, I decided to test my sauerkraut today… after fermenting for two weeks. RESULT: whaoo!!!… beautifully tasty, strongly sour and tangy with a sparkling feel on my tongue. Tasted far much better and fresher than the sauerkraut I buy from health food stores. And the salt taste was just right… not too salty like the ones I buy from stores. I really feel excited about the result… was not expecting it to be this good.
Things I used:
1 tablespoon Himalayan salt
5 lb cabbage (I used Korean cabbage)
100 billion (2 x 50 billion capsules), 16 strains probiotic powder.
The easy fermenter lids
Pickle pebbles plus glass weights.
I have been taking probiotic supplements, now I will save my capsules for only making sauerkraut.
Again, thank you very much. If I did not come across your articles, I would not have had the courage to make my own sauerkraut. Thank you.
WOW! So great to hear of your success. I’ll keep your recipe notes for a future low-salt sauerkraut recipe.
Thank you Holly.
I will try the 1.5% salt and starter, I will surely let you know of the outcome.
can I use Hard plastic jars with a clamp down lid, and a no 7 reading on the bottom?
I would stick to #2, #4 and #5 which are designed for use with food and are BPA free. #7, from my understanding is not BPA free. Perhaps you have an old food or canning jar that you can use?
is it possible to make sauerkraut by shredding the cabbage, coarser, place it in a jar and a brine till the brine covers the cabbage over the top, and the brine is 2 tablespoons of uniodized salt dissolved in 1 quart of distilled water at that ratio? weigh down cabbage below the brine, lid it, and wait 3-7 days for fermentation. Your thoughts/
You can, but… it will have a less-developed taste. By massaging in the salt and breaking down the cells in the cabbage you develop a totally different flavor profile.
There are two aspects to the sauerkraut – taste and texture. When I do what you have described, the typical procedure you would use to pickle a variety of vegetables, I end up with a distinct pickled raw cabbage taste with a really crunchy texture. Experiment around to find what suits your taste and mood.
Well said!!! It is so great that we can play with the variables and end up with something to match our unique desires.
also do you have a recipe for lacto fermentation of salsa, that uses whey from daisy sourcream?
No, I don’t. Here’s one from Wellness Mamma. https://wellnessmama.com/2643/fermented-salsa/ that calls for whey. Whey was originally used in most modern fermentation recipes but gradually fermenters are moving away from its use in vegetable ferments as we better understand that most vegetables come with the bacteria necessary for fermentation.
I have tried making sauerkraut as you do here. It starts to ferment but them when it should be done it is spoiled. What am I doing wrong? Susan Pavlish
Hello Susan, Thank you for trying to ferment some sauerkraut. If you give be a bit more info, I can help you ferment a successful batch. When you say it is spoiled, what does it look and smell like? What type of salt did you use? What are the temperatures you’re fermenting at?
It smells spoiled and is very mushy. I have been using canning salt. I have tried it in several different places including the basement which is cool, up in my kitchen which is also cool and on my summer porch which would be classified as hot.
If it smells spoiled, then I would toss it. Mushy sauerkraut usually means too warm of temperature or not enough salt. Canning salt is fine, but my guess is that all the different spots/temps you tried started/stopped the fermentation process. I would try a new batch and probably ferment it in your kitchen where you can keep an eye on it. Mix the proper amount of salt in thoroughly. If your kitchen is cool, it will progress slowly but still ferment. You should see the colors start to fade in the first week and then by the end of the first of second week, it should taste tangy.
I love the format you used to present this recipe, and all the pictures. Thank you for all the work you put into this, and your heart to share with others. I’m excited to go out and buy the ingredients and make my first batch of sauerkraut!
Hello Sarah, Thank YOU! It’s that teaching background of mine. Have you started your first batch?
7-5-17 The very clear instructions here have inspired me to try my own (very small) batch of sauerkraut with shredded carrot. The only thing I did different was used a baggie with water (knotted closed) on top of the cabbage leaf round to press it down. If this turns out, I’ll be investing in some proper tools (that I don’t already have). Thank you, Holly Howe!
Thank YOU! You’re quite welcome and I look forward to hearing about the many batches of fermented goodness that are in store for you.
I have made many batches of sauerkraut with and without carrots. I have never added brine but this one jar I did. It was 12 days fermenting. It tastes different to me. It has a slight bitter taste. It’s cabbage , carrots and Himalayan salt, same salt as always. I’ve eaten half the jar so it’s not bad. Our house is 78 and I keep it in the same place in the kitchen. It was always under brine. Just tasted one of the other jars. It’s a little better with 2 more days fermenting. What could cause that? Thnx
Good question, but nothing I can pinpoint of why it would taste bitter. Warner temperatures – 78 – however impact flavor. I find the best flavor when fermenting around 65 – after the first few days at 68-60. Maybe, with the warmer temps you have, cut back on length. 7-10 days? Taste along the way until you pinpoint the perfect length for you.
Why do you peel the carrots?
Personal preference, though I know I’m peeling off some of the beneficial bacteria. With fresh carrots, one doesn’t need to, but with carrots that have been stored for months they can look a bit grungy. I write more about this in my Fermented Carrots recipe: http://www.makesauerkraut.com/fermented-carrot-sticks/
Thanks!
I’ve spent most of my life under the illusion that sauerkraut is my *least* favorite food on earth. Memories of being forced to eat the disgusting stuff my mother served with kielbasa, which I also detested. In middle age I’ve been ‘blessed’ with digestive issues. My husband urged me to try naturally fermented sauerkraut, and to my surprise, I liked it. No, loved it! (I also discovered that not all sauerkraut is flavored with caraway, which is another flavor I’m not fond of.) It’s rather expensive at Whole Foods, so today, thanks to your comprehensive, easy-to-follow instructions, my first batch has started its ferment in a cool corner of our kitchen. Can’t wait to try it next weekend. Thank you for your tips — I like to weigh everything so knowing the precise amount of salt to add was extremely helpful. 🙂
I likewise detested sauerkraut growing up, but even now I would not want to eat that nasty canned stuff. I’m happy to hear you’ve moved beyond childhood memories and now know that there are many ways to flavor sauerkraut. 🙂 Enjoy your first batch.
Aftter my sauerkrautt sat on the counter for 10 days fermenting, I opened the jar and there was black mold growing on the inside of the little jar I had used for a weight. It doesn’t look like there is any in the sauerkraut, but now I am afraid to eat it. Has anyone else had this happen and am I being over cautious?
Thank you so much for all the detailed information! I’ve spent countless hours reading your site and I am encouraged to try making sauerkraut again (the first time was a desaster). However, I have two issues: I have a VERY SMALL kitchen and very limited space to store things. I don’t want to purchase a scale. I have purchased “quart” size mason jars, if I leave 1 inch on the top as recommended, wouldn’t that be close enough to the 1 3/4 lb to1 tb of salt rule?
Issue 2: do the vegetables NEED to be organic?? my local grocery has some organic produce but never has any organic cabbage. I would like to be able to make your recipes without having to drive an hour to the closest Whole Foods or farmers market.
If you’re using the 1 tablespoon in a 1 quart jar, you should be good. Taste it too. You’re looking for a pleasant salty chip level. Just use the best quality veggies you can find even if not organic. Make it work for your situation.
I thought I would pop in with an update on my sauerkraut adventure. The first jar was too salty (I tried to guess measurements) but after I got a kitchen scale, I went for round two. I tasted it today and am proud to say it came out delicious. It even got my husband’s approval. I think I’ll also try a jar of just cabbage. Your information has been very helpful!
What a wonderful update!!! And, the husband’s approval makes it all the better. Happy to get you started on this flavorful journey.
Hi, I am a newbie at making sauerkraut. After fermenting and then I wanted to store it in the refrigerator, do I remove all the brine and then place it in refrigerator or i store the brine and all in the refrigerator? Thanks.
Leave the brine it. It is just as precious – all full of probiotics as the sauerkraut itself. Just remove your weight, clean up the jar, screw the lid on snug, label and put in your fridge.
great. Thanks for the advise. Can’t wait to taste it.
I watched my Oma and mother make sauerkraut as a child. This week is my turn. We recently were in a brewery in Oregon where they also made fermented cabbage flights. I had a red cabbage ferment that was not only beautiful, but very good. Would you make any changes to red cabbage or use same measurements as white cabbage? Glad I found you.
Fermented Cabbage Flights! Now that sounds delicious – and trendy. Good to see sauerkraut making it to the menus. Yes, you can just substitute red cabbage and use the same measurements. Red cabbage will take longer to ferment and is sometimes a bit tougher. Just give it time. Did they add any seasoning to the red cabbage?
Not that I was aware of. White cabbage plain, with caraway, red cabbage, kim-chi (which I learned to make years ago from a Korean neighbor,) and a white cabbage with apples which was interesting. I will be experimenting. Thanks. Forgot to add, the ferment flights were served in small hand carved wooden bowls along with a 2 inch thin pancake which you placed the kraut on. Delightful.
The think pancakes are a great idea. Enjoy trying to duplicate the experience.
Hi, I have to make bulk sauerkraut for our local beer fest at the end of the month. 1. Do I keep to the ratio of 800gr to one tablespoon of salt and 2. Can I store it in plastic buckets?
Ps – your instructions are awesome!
Hello Erica, WOW! And, Thank YOU! See my recipe for fermenting in a crock: http://www.makesauerkraut.com/surefire-sauerkraut-in-a-crock/
You might find it easier to switch to % for calculating salt. This recipe uses 2.0% and many like the less-salty 1.5%. Read more here and comment again for more help after reading the articles. http://www.makesauerkraut.com/salt-by-weight/
Yes, you can store it in food-safe plastic buckets. Good LUCK! Glass gallon jars would be another option.
Opted to weigh in portions of 800gr and salt. Used 30 cabbages – sealed in buckets and in a closed room. Must I leave it for a week before checking brine levels?
I checked it on day three and none of the cabbage was covered by the brine. I have now added 2Ts salt and 1l water to each ! When should I check it again? I’m afraid that the cabbage rots and then I’m in big trouble with the time frame.
I would error on the side of comfort and check daily until it’s staying below the brine. Sorry, I didn’t get back to you sooner but we took off for the weekend. What are you using for a weight? Do press down on the mixture to force bubbles up and pack the mixture.
Hi Holly. It’s my 3rd fermenting now for Saturday’s function and it tastes a bit salty. Do I rinse or just mix before serving?
Rinsing is fine. You will lose some but not all of the beneficial bacteria. How is the sauerkraut being served? On a hot dog, as a side? If not, you could also disperse the saltiness by mixing with lettuce/salad. Or, you can mix your different batches together. Congrats!
Hello Holly
My question is this…. How do I keep my jar from getting spoilt once I tart eating from it.. Thus is the second time I am halfway through a jar and then it starts to produce mold and my cabbage core also produces white mold. I threw that out yesterday. I usually open the jar, take my fork full and close the lid tightly. I didn’t keep the second jar in the fridge cos my fridge is spoilt and the weather is a bit cool. What am I doing wrong with taking from the jar each day. Thanks
Once I start eating from a jar, I remove and toss any Floaties Trap /cabbage leaf on top and weight – sounds like a cabbage core in your case. Since you don’t have a fridge – though not totally necessary – you might want to repack into 2 smaller jars, eating from one and then moving to the second one when that is finished. I keep half-full jars in my fridge all the time and they don’t mold so I’m thinking you’re battling warmer and a bit unstable temps. See if keeping contents in smaller jars helps.
Will try that, thanks.
Holly, I love your site and have been going nuts for the homemade kraut! My fist few batches turned out great but I got a lot of brown discoloration on the top 1/3 of the jars over the summer so started letting the jars ferment in the basement (about 65deg) and still getting browning and the kraut smells bad. I did notice that the brine was getting sucked up into the small jar or shot glass I was using as the weight. I’m wondering if the discoloration is due to the brine not covering the top of the veggies adequately. Haven’t had a good batch in a couple months. What do you think? Thanks!
It is so good to hear that sauerkraut has found a spot in your home and yes, there is a depth of flavor that is hard to not “go nuts for.” “Summer” is the key word and it was good to try the basement. And, yes you do want to find a way to keep it under the brine for the first week. That will prevent the browning. Look at my post on Dry Sauerkraut for some ideas: https://www.makesauerkraut.com/dry-sauerkraut-gut-shots-recipe/ You can also try a few days first in your kitchen – closer to 68/70 to get a good start on the 1st bacteria and then move it to the basement.
Hi Holly. Thanks for a great website. I have made about 6 batches of sauerkraut totalling about 25x1Ltr jars. All have been successful and I am having trouble keeping supplies up to Kids and now Grandchildren. My only real issue is lately the pickle pipes are being pulled down into the jar after a few days. I am in Sydney, Australia and it is just starting to warm up. I am not sure if its OK to just pull them back to where they should be or if this is indicating a problem. The last batch still tasted OK.
The photos on your site are great for us newbies to see how our concoctions should look. I don’t know if you have caught the English Dr Michael Mosley on TV? He is becoming a great public advocate for Gut health. Thanks
Hello Terry, WOW! What lucky children and grandchildren you have! I usually see the Pickle Pipes pull in when temperatures drop – or with changes in barometric pressure. The cold forces the pipes to contract. I would leave them be UNTIL you think the seal might break and then just open the lid to let some air in and the pipe will go back to the correct positioning. Also, realize that those pipes are really only needed for the first 7 days when excess CO2 is being produced. Will look up Dr. Mosley. Thanks for sharing.
Hello Holly, my question: I weighed sea salt very carefully, 2% by weight, but find my kraut to be too salty for my taste. Can I reduce the salt a bit for my next batch? I have followed other recipes which are not so salty, and there seemed to be no problems with the results.
By all means. I’m finding that salinity anywhere between 1.5% and 2.5% works well and will need to update the recipe to indicate this.
Thanks! I will try a lesser amount next time. Mine is still early in its fermentation process, so my perception of saltiness may change.
Yes, though salt levels don’t decrease during fermentation, flavor development will make it taste less salty.
Holly, Can you make sauerkraut in a jar using an airlock on the top instead of leaving the lid a bit loose? I am thinking it is similar to a crock with a water moat letting off gases….
Thanks for a great site.
You’re welcome! and YES, airlocks work great but most just starting off don’t have them or don’t want the expense until they have first fermented a few jars.
I have tried three different recipes from your site – kimchi, sweet garlic, and passion pink – and loved them all! They came out marvelously – crunchy and tart and salty – and I keep finding new ways to incorporate them in my diet. Just wanted to thank you for the great (and very specific) info. Worked a treat! I just wish I wasn’t the only one at my house who liked the stuff. I’d love to be able to share the fun, but my family would rather have Oreos. Lol!
You are VERY welcome!!! I’m glad to hear you’re enjoying them all. You can always “sneak” sauerkraut into dishes, especially salads. Fermented Carrot Sticks might appeal to them??? http://www.makesauerkraut.com/fermented-carrot-sticks/ Best of luck and continue to enjoy the goodness!
I can’t wait to try the sweet garlic sauerkraut. I’ve done the plain and plain with carraway. The both turned out great in a pint and a quart resoectively. I’m going with the quart this time. Thanks for inspiring me to try fermenting again!
Happy to inspire! Let us know how you like it compared to the caraway. I do use caraway seeds in this recipe, a regular favorite: https://www.makesauerkraut.com/passion-pink-sauerkraut/
Hi Holly and thank you for your superbly informative website. After my first sauerkraut escapade, made from instructions in a book on gut health, ended up in the bin, I had a look online for more advice and happily found it here. So Sauerkraut the Third was made with red cabbage (I know you’re not a fan), beetroot, an apple and the all-important salt. There have been bubbles! There have been truly unique and earthy smells! And when I tasted the brine, it’s promising to be quite delicious after two weeks on the kitchen counter. I will definitely be trying some of your own recipes. Thanks again for creating this site, my tiny corner of the UK is most grateful.
Your are quite welcome. I’m happy to hear of your successes! You can tell from just tasting the brine how good it’s going to be. Enjoy sharing the goodness in your little corner of the UK!
Made my first batch and it came out great. If I want to make three times the amount and fill three 1-quart ball jars, can I just triple all the ingredients?
Yes! See also my post on fermenting in a crock: http://www.makesauerkraut.com/surefire-sauerkraut-in-a-crock/
Thanks. I tripled the recipe and it’s been five days and I’m wondering if something’s gone wrong. The fragrance from the three jars is getting to seem off, strong and sickly-sweet, almost pungent if you get close. And looked at from the outside the sauerkraut looks too soft, unlike my first batch which looked wonderfully fresh during the week that I let it ferment. I’ve noticed also that particles of cabbage (the floaties?) have floated up from under the cabbage leaf floaties trap. So …. Is it ok to take the top and the weight off one of the jars to have a look inside and taste to see if everything’s ok? In thinking what might have gone wrong, I’m remember that after the first day I noticed that it was packed too tight and the plastic lids were no longer able to screw on fully. So I re-opened them all, removed the 4 oz. jelly jars, took some of the cabbage out and also poured some of the brine out. But maybe that wasn’t a good idea? Maybe it’s best to not open it once fermentation has started, and my attempt to correct it let in too much air? Thanks for any help.
UPDATE: I did just open one of the three jars now, six days after I made the batch, and there was a very thin layer of white scum on top but not too bad. But the smell was not good, and I did taste the sauerkraut and it does have an off taste. I have an idea what might have happened. As I opened them just now, I noticed that there was a layer of air around the sides of the jelly jar weight in the top inch or so of the jar. On day #1 when I corrected for there being too much brine on day #1, maybe I poured out too much, causing that inch or so of air on the sides of the jelly jar. Maybe that allowed bad bacteria to get in and spoil the taste?
Anyway, I am NOT giving up! So I just stirred some salt into some new water to make a bit of brine and poured it in to all three jars so there’s now no air on the side of the jelly jars. I’ll see if that can improve it. Thanks for any thoughts or advice.
It sounds like you have an imbalance dominated by yeasts, the white filmy stuff. Letting a bit of air in is not going to ruin the batch. You had it back under the brine. What are your temps that you’re fermenting at? With the soft texture and Kahm yeast, it sound like you’re on the warm side. Let me know and we’ll go from there.
Thanks much. I’m near Boston and I keep the temperature inside maybe 65-68, so I don’t think that would be the problem. Also, I think I was wrong in suggesting that the sauerkraut is soft. That was just based on a view from outside. Once I tasted it, it wasn’t really soft. Interesting addendum: since I added brine last night to fill up the air space, today it’s not nearly as smelly as it has been. My thought is that something I did allowed the growth of too much bad bacteria (the taste when I tried it last night was not good), but I wonder if maybe filling in the air gaps as I did last night can get the lacobacillus bacteria pumping out enough lactic acid to kill the bad bacteria that’s built up? I don’t know if sauerkraut can be slightly bad in its first week but then made better once the bacterial balance is corrected? Well, a man can dream, can’t he? 🙂
You are right. I’ve experienced the same. Give them time and the bacteria can rebalance everything. It’s how the pathogenic bacteria are killed. With some of my brine ferments, I “stir” them daily so that mold spores sitting on top are mixed in and killed off.
I’ve been worried that opening up the jar, removing the weight and the floaties trap, and tasting or stirring would let in too much air and offer a window to the bad bacteria. No?
You are right and I try not open my sauerkraut. But, when I make more of a liquid ferment – Gut Shots – or fermented soda or Beet Kvass, I “stir” it with the lid on, by gently turning the bottle upside down and then upright again. With other ferments, once you are past the 5-7 day mark, the bacteria have created an acid enough environment that opening it, if you must, doesn’t seem to ruin the batch.
I wonder if it was what I did on day #2 — opened the jars, removed the floaties trap, the weight and then some cabbage, which clearly let in air on the sides of the jelly jar — that led to the bad taste I experienced at day #6. Well, I added some brine back then to make up for the air and now week #3 is coming up next week. I’ll do the GREAT UNVEILING and will see if I was able to re-generate enough good lactobacillus to create more lactic acid to kill the bad bacteria and bad taste that I experienced. All is a mystery anyway. Stay tuned…
And, sometimes a mystery beyond our control. 🙂
Yay yay yay! This batch of three jars turned out fine. If my opening and disturbing the contents on day 2 did foster the growth of some bad bacteria, you wouldn’t know it from the taste now. I’m guessing the extra brine I added to push everything back down below the brine fostered the growth of enough lactobacillus which then produced enough lactic acid to kill the bad bacteria (there must be a more scientific term for these fellows) so that the taste is very nice. I had faith and it was rewarded. Very happy about this. Thanks for the help, Holly.
YAY! Congrats! Pathogenic (bad) bacteria. Those little Mighty Microbes are very forgiving and work well, even when their home is torn asunder.
Postscript: I’ve been really enjoying the sauerkraut from this batch of three jars. But I just checked my second and more recent batch and I notice the same thing is happening as with the first batch: air space has appeared on the sides of the jelly jar. Now I see the pattern and why it’s happening: though I pack everything in tightly when I first make it, and the brine is up to the top when I press the lid down on the jelly jar, over the next few days as fermentation continues the brine starts dripping and oozing out from the loosely-screwed-on plastic lid, and this opens up air spaces at the top of the jar. And potentially cabbage bits can float up into this space.
It seems that this might be a basic problem with the jelly-jar-and-plastic-lid method. I’m curious if this happens to others (I don’t see how it can’t!) and what can be done about it. Thanks.
Yes, that is a drawback with the jelly jar. Doesn’t always happen, but enough to have many graduate to other fermentation weights. See this post: https://www.makesauerkraut.com/dry-sauerkraut-gut-shots-recipe/ Tip #10 and #11.
Can I add onions to my sauerkraut? I read somewhere that onions don’t ferment so will it ruin the batch if I add them or encourage more flavor?
I was first alerted to onions not fermenting by Shockeys in their Fermented Vegetables book. They lack intrinsic lactic-acid bacteria. They don’t ferment on their own but work great – and add a nice depth of flavor – mixed into ferments. I do have a recipe where I pickle them on their own in lemon juice. So, add them to your sauerkraut. Experiment around with how much you like in a one-jar batch. I would start with 1/2 to 1 smallish onion, diced or finely sliced.
Oh thank you, Holly! I adore onions and find they just make everything…better. I have a nice sweet onion from the farmer’s market so I’m gonna add a bit to the cabbage, along with some organic carrots. I will use the amount you advised.
I also would like to know what you think about fermenting cherry tomatoes? I made up a jar last night of variously coloured cherry toms, with some basil, jalapeño, green onion and a couple cloves of garlic. I made the brine with 2 teaspoons of sea salt in 2 cups of filtered water. Here is a picture right after I made it late last night…so you can see. Today I notice some bubbles coming to the surface. I now have some pink Himalayan sundhed fine salt to make my kraut…just got it this evening. Love how it tastes by the way. I found out about it through you. 😊
So back to the tomatoes…
I was thinking of fermenting them for about a week but I wondered what your thoughts are about this. I’m willing to wait even longer if you advise. I’m very patient. This is the very first jar I’ve ever done and the sauerkraut will be my second. Thanks for all you’re help, Holly. You are an exceptional lady. ♥️ https://uploads.disquscdn.com/images/bac66790b1fd9bd250080fc82570a0eca4fe43a522faf48aaa254a8d7f30b59e.jpg
Enjoy those onions in your next batch of sauerkraut. I have yet to ferment tomatoes – just not my favorite fruit… My understanding is that one does not end up with the best texture when fermenting tomatoes and they are better off enjoyed fresh. Prove them wrong.
I’m planning to use them as a base for salsa. Can’t wait to taste them. 😊
For future reference. The Shockeys – Fermented Vegetables book – ferment the salsa flavorings (onions, garlic, peppers, etc.) and then add that to fresh tomatoes. Options as you make your way down this fermentation path. 🙂
Good idea. Thank you.
You know, I got wondering about something that occurred to me last night while laying in bed trying to get to sleep. My head was filled with thoughts and ideas about fermenting. Lol. You know how they say that garlic has anti-bacterial properties? So then would using garlic in your ferments, prevent the good bacterias from growing? 😮
By the way, here is a picture of a small jar of salsa I made up last night before getting your reply…so the tomatoes are in there. I’ll likely ferment this for about 3 days.
Whooops, I don’t think the picture loaded. Here it is… https://uploads.disquscdn.com/images/5f27af00714e083f0eb9271eec21fb6f3d66061d75539f79c887a249f6d5512f.jpg
Beautiful! Nice colors developing! Why the holes in the rim?
Thanks! Is the reason why most people seem to only ferment salsa for 2 to 3 days because of the sugars in the tomatoes and wanting to avoid getting 3 sheets to the wind with a boozey type salsa? Lol. 😂
Can you not ferment it for 3 or 4 weeks?
Oh those are not holes my dear…lol…they are actually just sticky embellishment strips I stuck on, to pretty up the jars. 😉
Yes, the alcohol production along with texture issues. Pretty jar!!!
Ok got it. Thanks about the jar! 😊
Good question, but not to worry. It still ferments just fine and I read about why somewhere. Will try to locate the source.
Cool! Good to know. 👍
By the way, some of the brine is seeping out of my cherry tomato jar and I can’t believe how amazing it smells! It’s infused with basil, green onion, garlic and jalapeño. It smells so good, I want to drink it. Haha! I hope this indicates how tasty the tomatoes will be. Can’t wait to try. Today I’m making sauerrubin with nothing but golden turnip! I hope if turns out fabulous. 💛
Simple pleasures in life! No stopping you, now. Thanks for inspiring the rest of the group.
It’s YOU who has inspired me! I guess we are all encouraging each other. I just can’t believe I haven’t done this before now. What was I ever thinking, buying the vinegar-ladened junk from the grocery stores! 🤢
I wish we were neighbours, so we could sit around sipping tea and tasting each other’s ferments! Lol.
I guess inspiration is a 2-way street. You could, however, convert the neighbors you have! 🙂
Hahaha…I’ve already spread the fermentation bug to some unsuspecting friends! Lol.
Hi Holly. Thanks so much for all the effort and care you put into your work in teaching others how to ferment. It’s outstanding. I’ve learned a lot from you. Still waiting on a reply about my onion question below…don’t wanna start the batch until you say it’s alright. I’m hoping to add a sweet onion to my kraut. This will be my very first time ever making anything fermented and I want it to be perfect. I have pickle pebbles and pickle pipes to start a batch in a large mason jar. Thanks so much. ♥️
You are so welcome and it’s readers like you that continue to make it happen. I sure appreciate your appreciation! 🙂
Did you see my two new posts? One about tomatoes with a picture, and the other with a picture of the first batch of sauerkraut I did up last night? 😊
YES! Congrats on all your beautiful, edible artwork. Now, the hard part. Waiting.
By the way, check out my first batch of sauerkraut I made last night!!! 🤗
Omg I’m so excited! It has organic cabbage, carrots, sweet onion and caraway seeds. I couldn’t believe how much brine I got after massaging the veggies! Wow! 😮 I remember you saying something about using cabbages shortly after the harvest because they have more water content. This must be why things were so delightfully juicey. I weighed my veggies and had a little more than 2 pounds so I added just a little more than 2 & a half tablespoons of pink Himalayan salt….hope this sounds about right. I think you said add 3 tablespoons per five pounds of cabbage but I’m not a real math wizard so I hope I got it right. It tasted amazing when I tried it before adding to the jar. I wanted to eat it all right then and there. Lol. I’m gonna ferment it in my pantry for about three or four weeks. 🙃. I did leave a little space in the neck of the jar even though it’s pretty full. My pickle pebble is keeping things perfectly below the brine. Does all this meet your approval?
Tonight, I’m gonna make some more kraut, using cabbage, carrots, sweet onion and gold turnip! I can just imagine it with ham and mustard! 😮
https://uploads.disquscdn.com/images/e6b80b3ce49e3e16809f557e7a11983eec7be5f70951dbe7dd5cf49dcc28618c.jpg
You are on a roll, Sherry! Looks quite lovely. Look at all that rich color. Be sure to place it in a shallow bowl to catch any brine that may spill out. Enjoy the fruits of your microbes labor!
Thank you! 🤗
I wonder, what are your thoughts about fermenting a little sugar pumpkin with some pumpkin pie spices added…maybe some apple in it too? I happen to have a mini pumpkin pie pumpkin in my fridge and thought it might be unusual and delicious to ferment it.
Also, have you ever made sweet potato kraut? This is another one I’m interested in trying soon.
OMGosh, there are so many great possibilities.
I also saw a video of a german lady making sauerkraut with green cabbage and cranberries for Christmas! 🎄♥️
I can clearly see that this is gonna become an addictive hobby….if not a downright obsession! Haha! 😜
So, it seems that any veggie can be fermented using this general process?
I was THRILLED with my first jar that I made a few months ago. It got eaten up and I made a second one. My regret is that I waited until the first was gone, and I am determined to let it ferment three weeks this time instead of two. Patience! It was delicious at two weeks, but I want to try three. What a pleasurable process!! Who knew– I have some domesticity in me after all! 🙂 Thank you, Holly–and Sherry and all the other posters here!! What a supportive community.
I am spreading the love by gifting a sauerkraut loving friend, and also spending a few hours making a few batches with my sauerkraut loving mom! This will be an amazing way for us to connect. 🙂
Sauerkraut is a self-brining ferment. Most other are brine ferments, where you chop the vegetable and pour brine over: http://www.makesauerkraut.com/fermented-carrot-sticks/ https://www.makesauerkraut.com/fermented-beets/
Pastes and chutneys are slightly different than sauerkraut: http://www.makesauerkraut.com/fermented-vegetables-book-review/
LOVE, LOVE, LOVE your idea of making sauerkraut with your mom. Our culture is so devoid of making food together – such a great way to connect.
Thanks, Holly, for the links. I have a smile on face…new healthy hobby and support with it thanks to your passion!
You are sooo welcome!
Thanks, Holly. 🙂 I just followed your recipe but added 1/2 a beet with 2 carrots. Will this be okay?
You’ll be just. Don’t be surprised if the brine changes color and you have a bit of dark brown on the surface of the brine from the beet.
thank you!
You’re so welcome, Autumn! 🙂 At least I hope you were thanking me! Lol. I’d feel like an idiot if you weren’t. Haha! 🙃
I know exactly what you mean about regretting letting yourself run out! I did this too and I am just now getting around to making my second round of batches. It’s all I can think about since after Christmas when I ran out. I haven’t been able to stop thinking about making more but I just didn’t make the time until now…because I can stand the withdrawal symptoms no more! Lol. So now I have five fresh new jars in the pantry…see new pictures above…and tomorrow I’m making three more!
My mom wants to watch me make it too! I also would love to give some away as gifts but I’m honestly not sure how I’ll ever be able to part with it! Haha! 😂 Seriously though. I’d rather just show people how to make it so they can do their own. I hate to sound so selfish and greedy but when it comes to this stuff, frankly I can’t help it. 😜
I hope you are still making lots of ferments and enjoying yourself. I love how creative sauerkraut making is. I have made a few unique concoctions and now thinking about doing an orange/apple/cranberry kraut next! Yum! Be sure to check out my new shots above. The colors are so beautiful! Cheers and have fun, Autumn! ♥️
Hi Holly!
I’ve been using your method for a while and everything has always turned out great. Two and a half weeks ago I changed my jar for a bigger one (two liters) and my seal needed to go a bit lower. It didn’t seal as well and after a few hours you could see a couple of pieces floating. More stuff came up to the surface in the following days but I decided to not disturb the kraut. I’m now opening the jar and the brine on top is “jelly” and gooey. The kraut smells and tastes fine and I skimmed quite a bit of the top and now added brine… My question is: have you ever experienced anything similar? Would you eat it and feet it to the kids?
Thank you so much for your amazing website!
I think what you have is slimy brine, which can happen periodically. “Extremely dextranous or slimy growth of the leuconostoc bacteria. Difficult to remove the dextran formed. Formed during the early stages of fermentation. If it is left in the crock for completion of fermentation, the dextran is fermented and the product is no longer slimy. (Dextran is made from glucose molecules.)”
I would either leave it to ferment longer, or stash it in your fridge for a few weeks during which time it should rebalance and the slime “disappear.” Fine to eat, just a texture issue for many. But, since I never want to turn the hesitant off, I would avoid serving something that might lead to your kids hating sauerkraut for life. And… YOU’RE WELCOME!
Thanks so much for a great website. This is my first batch of kraut, and with all the holiday madness, I forgot about the jar I started fermenting right before thanksgiving. It is beyond the 4 weeks. It’s been in our dark pantry. It stopped oozing over into the bowl after the first week or so. Do you think it would still be okay to move to fridge/eat? What kind of smell indicates it is bad?
It should be just fine. Open it and give it a whiff. It should smell tangy and fresh. You’ll know if it has “gone south” by a noxious, musty smell. Intuition would tell you not it eat it. Many ferment for longer than 4 weeks.
Thank you for the quick reply! My guy will be so excited to try it! 🙂 Thanks again!! Cheers to a fermenty 2018!
Hi Holly I found your website last year and have been making sauerkraut in a jar. its been fun, easy, delicious and healthy. I have read recently that fermented turmeric is the best way to take turmeric as it is absorbed better. Most comments about taking turmeric recommend adding black pepper to help make it more absorbable. Do you have any experience with turmeric? It would take a ton of those little roots to make enough for a jar full. Perhaps adding it to sauerkraut would work?? Your thoughts??
Thanks much!
Nancy
You are up to “full” speed on the turmeric. I have one sauerkraut recipe to which I add some grated turmeric and haven’t experimented much beyond that. Yes, the roots are small AND the root stains everything bright yellow, a stain that lasts forever. So, I enjoy the 1-2 tablespoons in a jar of sauerkraut but probably wouldn’t want to ferment a whole jar. Thankfully, there is “Truly Turmeric.” Wild crafted, organic and ready to use straight out of a jar which I add to my morning lemon water – honey drink. https://www.naledo.com/
Very interesting!!! I’ll have to check into Truly Turmeric! Thanks for the info. I’ll also check out your sauerkraut recipe with the turmeric too. Thanks very much for you quick response!!!!
Is the 5 degree range you suggest less important at lower temperatures? What would happen if I was patient enough to ferment at say 55 degrees for 5 or 6 weeks, would I get all the bacteria I want? I’ll find out more eventually.
It is currently 50 degrees in South Florida! I’m trying to start my new batch (jars 7&8 of my new passion) at 50-60 degrees for a week or so to let the first guys really get established. I’m also figuring that will let me use 1% salt (pink of course!) I’ll find out. During the day, and on nights when it isn’t so cool, I keep it in an ice chest with a blue freezer freezer pack. It tends to chill down to about 50 and by the time I get home at night it is up to 59-62 (12 degree range, not 5!!!!). I might want to use the small ice chest to start my next batch so even with the t-shirt swamp cooler method I’ll probably be doing the later stages at 70-72 (yikes 22 degree range!)
I’ll report back how it turns out but I wanted to get feedback now and not in a few weeks. Also, maybe I’ll wait until this is done before using the cooler for my next batch, if you think a 20 degree range between 50 and 70 is unpromising.
Yes, I think your guess is right. Fluctuations at the low end are not as detrimental as those at the high end – my guess. All controlled research shows best sauerkraut at 65ish with cooler being better than warmer. With temps in the 50’s, things happen very slowly. I find that fermenting in summer temps of 70-75 is when my sauerkraut lacks the wonderful depth of flavor. Al you can do is try it and then adjust for the next batch. Sometimes trying to control the temps may be more work than it is work and just shortening fermentation time if you have a lot of high temps is easier. Report back and let us know.
So far so good. With 1% pink salt and keeping the temperature in the range 50-60 for week 1 and 60-65 for week 2 there is vigorous fermentation within 2 days and a nice sour taste on a sample. A couple of times I threw my half gallon jars in the fridge for a few hours (getting down to 45 degrees) when I needed to be out for several hours and my ice packs needed refreezing. Maybe I’ll even try no salt (I have a pressure valve so no oxygen problem)
My takeaway is that it is very robust, you can do a wide variety of things and have good results.
Nice to hear how your ferment is bubbling along. I would be hard pressed to support <1% (or maybe even below 1.5%… ) because of the greater chance for mold and yeast growth, but you may prove us wrong. I know some use seaweed for as part of their "salt."
I wonder if I put filter water if I didnt make enough salty brine for the packing stage?
If you don’t have enough brine to cover your sauerkraut after your jar is packed, then yes, it is a good idea to add enough brine to cover it. Here are some other tips. https://www.makesauerkraut.com/how-much-sauerkraut/
https://www.makesauerkraut.com/dry-sauerkraut-gut-shots-recipe/
I’ve just made sauerkraut yesterday; my very first sauerkraut. This afternoon, some brine spilled out of the jar. I got so curious to see what it looks like inside. I can already see some clear bubbles on the surface. I tasted it a bit and it’s a little sour already. I’m guessing these are OK? And is it ok to open the jar just a day after making it? I read somewhere I should wait 3 days to “burp” it… but my curiosity earlier made me forget 🙁
Congratulations on the start of your sauerkraut adventure! Bubbles are perfect and a sign that the bacteria are working. Ideally, you would not open it for a week, but I hate to discourage eager fermenters. If the lid is on tight, you’ll want to burp it daily for about a week. You’ll notice when the gases stop. Nor worries. Soon, this will become “old hat” and you’ll be able to leave the microbes alone to do their work.
I just made Lemon Dill sauerkraut….consisting of lemon slices, cabbage, carrot, fresh dried dill…and a smidgen of lemon rind for a rich lemony flavor. 🍋 Gonna ferment this one for 3 months. 💛 Check out my picture…
https://uploads.disquscdn.com/images/30e08dc8c8b78c29653740f38ad41f4ceeb7744230ffa0223632f75b7f54da47.jpg
LOVELY! I don’t think I could wait 3 months to eat that. 🙂 Do check along the way to make sure the texture and flavor remains to your liking. I don’t have any studies to verify that fermenting that long is delivers “better bacteria for your buck,” though I’m looking for it. Thank you for sharing you pictures.
I will definitely let you know, Holly. 🙂 It’s not for the bacteria, why I would ferment for so long…but for the flavor. I heard that like fine wine, the sauerkraut flavor deepens and gets richer with age. One guy on YouTube said he left for vacation for 5 months, forgetting all about the sauerkraut he had fermenting in a 5 gallon pail in his closet….said it was the best kraut he ever had in his life!
Wonderful! Flavor is king and always my first priority, too and is what got me going – and having so much fun – creating flavorful recipes.
I should tell you Holly…my previous and very first batches of sauerkraut came out fabulous! ♥️♥️♥️ So utterly delicious in fact, I was licking the rims of the jars when I finished each one! Haha! I fermented 5 weeks but this time I’m going 3 months and possibly even longer.
Here is a ginger beet kraut I did up tonight…consisting of cabbage, sweet onion, beet root and beet stems, plus a smidgen of fresh grated ginger. The color is spectacular! Omg I can’t wait. Only 12 weeks to go! Lol. https://uploads.disquscdn.com/images/867c981e9ac1f90060d94da0c15be6de98d7935c1b020f7d09b2fa8d9ad081b3.jpg
I love that combination, especially with the ginger. Let us know how the beet stems work. A great idea to include those.
“Licking the rims of the jars.” I know exactly what you mean. Just how my ferments taste to me, especially when I’ve been away from home and my body is missing all the goodness.
I am never gonna be without sauerkraut again. I’ve had enough of these long stretches in between batches. I’m gonna work out a system of a perpetually fermenting pantry of jars so I will always have some onhand! I feel like an addict who needs a quick fix! Lol. Every time I open the pantry and see my jars, I feel like a salivating dog! 😂
A good addiction! Your body knows what it needs. 🙂
Next, this is a spicy kraut I did up this afternoon, consisting of cabbage, radicchio, beet greens, sweet onion, hot red pepper, garlic and a fresh bay leaf from my tree! 😊https://uploads.disquscdn.com/images/caebc7982d28f800e9b04e015f496f53f247336ad0238ed6c5dfd01e7cd827f7.jpg
Time for you to write a recipe book with all these fun combinations. Let me know how the radicchio and beet greens ferment. Sometimes, they can get a bit strong – at lease with kale.
Hahaha….maybe! I just enjoy experimenting, being creative and having fun. 🙃
I only made one jar of each of these new concoctions….until I see what I really like…then I’ll make double and triple jars of my favorites. Hoping they all turn out nicely. Time will tell. I’m thinking about a nice orange flavoured kraut next!
One thing I wanted to mention. After I ate my first two batches of sauerkraut that fermented five weeks, I started noticing a dramatic change in my facial skin. It was much brighter and almost glowing. At first I thought it was my imagination but it was so striking, I started doing some research and found out that fermented probiotics, do in fact have a profound effect on the skin! 😮 I was shocked when I found out because prior to researching, I thought I must be some silly fool who was imagining the whole thing! 😂 This stuff is the best skin care I’ve ever used. All you gotta do is eat it! Who knew!
So now I am going gung ho and making many batches. I have five jars done up so far and tomorrow I’ll be making 3 more…so 8 total. Why not! I’ve got 8 glass weights and 8 pickle pipe airlocks so why not use them all. Gonna be a few months before I’ll let myself eat these jars but they will be well worth the wait. Omg will they ever.
I’ve decided that for every jar I eat from now on, I will make another one immediately after, to replace it. This way I’ll always have a perpetually fermenting pantry and never be without sauerkraut again. I am going through serious withdrawal symptoms here.
Here is a jar I made up yesterday. Actually, I made two. They consist of organic cabbage, carrot and sweet onion. No caraway this time. I prefer it best, without it. No added water whatsoever. The juice on top is just the natural brine that extracted from the veggies once I salted it with pink Himalayan.
I must say having a packer/pounder makes the world of difference in packing the veggies tightly into the jars. It helps get more juice to come up also.
Anyway, check out my shot….
https://uploads.disquscdn.com/images/c4cab460d4e856f73a3bf0e5e7b677438d3d3339c202720742820ad880bebc07.jpg
You are so right on the skin health. I have a post on that topic: http://www.makesauerkraut.com/17-tips-for-healthy-skin/ Have fun with it. I see a water-sealed fermentation crock in your future!
I think you’re right! Then I could ferment much more at once! 😮
Ok I’m gonna check out your post about skin care!
Weigh you slice cabbage, you need .02% salt ratio, 2 grams of salt for every 100 grams of cabbage. Calculate – weigh sliced cabbage in grams, then multiply weight by .02% this equal the amount of salt you will need in grams. 800 grams of cabbage equals 16 grams of salt this is enough to fill one wide mouth quart jar.
Thank you for your wonderful tip. I should probably make a note of this but for the teaching recipe I try to “keep it simple” since most are not use to cooking with a scale. More here: https://www.makesauerkraut.com/salt-by-weight/
Holly, I have a question. Well ok, actually two questions. 😜
I have recently started growing various microgreens and I wonder if I can ferment them?!!! I’d like to make some more traditional cabbage sauerkraut but can I add in some of my microgreens with the cabbage?
My second question is, my pantry where I conduct my ferments, is 77 F. Is this ok…or too warm?
I’ve played around with making fermented herb pastes and so far have had good luck, like with basil. Great way to season dishes. Not sure how microgreens would do. I know the Shockeys in “Fermented Vegetables” have had good luck with spinach. Highly recommend their book: http://www.makesauerkraut.com/fermented-vegetables-book-review/
I think 77F is too warm. Shorten your time or look for a cooler place. If you’re after great flavors, 65-68F is would you would aim for. See if something in here helps: http://www.makesauerkraut.com/fermentation-tips-hot-weather/
I found a spot that’s 74 F but that is about as low as I can find in here. I’m considering buying a small wine cooler. Although my last batches fermented at 78F for 5 weeks and they came out delicious….so are these temps written in stone or is there room for some leeway? I can’t adjust my heat in this apartment so I’m pretty much stuck with what I’ve got….unless I buy a mini fridge or wine cooler with an adjustable thermostat. It’s very warm in my place. Sometimes even annoyingly warm. Lol. I’m wondering though…do people really need to go to so much bother and expense just to ferment some veggies? So many sites give different “ideal” temp ranges. I just want this process to be as easy and low-maintenance as I can get it. I must admit, having a wine cooler set to a constant 66 F is very appealing and worry-free. Maybe I should just go for it…but many of the decent ones cost $150 to $250. I best think this over.
You’ve been having good success so, I guess one could say, “If it ain’t broke, don’t fix it.” Microbiologists have found that some of the strains of bacteria don’t work as well at high end temps. But, don’t obsess with it. The idea is to ferment! You’re having so much fun and have quite the knack for combinations. 🙂
And, if you want to go to the “next step” (wine cooler), it will happen when you are so moved. They do come on sale and are easily found on the used circuit, with a bit of patience.
Hi Holly,
Last year I started my cabbage plants from seeds and made sauerkraut, for the first time, from that cabbage. I didn’t know how good kraut could be!
I used an open crock and I don’t want to do it that way again. I found your site searching for information when I had questions about what was going on in that crock.🤪 Thank you for making so much useful information available!
I’m looking at a water seal crock that is glass. I’ve read that light is harmful to the benefical bacteria. Should the jar be covered or in a closet or just not directly in front of a window? Can you tell me about that? Thank you!
Karen, making sauerkraut with cabbage fresh from the garden that you grew yourself, is a dream come true! I can imagine it tasted AMAZING!!
Yes Sherry, it is good. I was trying to find something to do with all the cabbage. “Well I GUESS I could try to make kraut” “ sigh” I thought. I’m REALLY glad I did. Now I know it’s delish!
What an accomplishment! My understanding is that direct sunlight is harmful; ambient light is fine. So, away from the window. Some cover their “artworK.” I don’t but I also ferment in stoneware crocks. I would tend towards stoneware over glass. Thicker walls that help stabilize temperatures.
Thank you. Maybe I’ll try both ways.
This afternoon I made a veggie medley of cabbage, carrot, red onion, yellow sweet pepper, microgreens, beet stems, beet root and sweet potato! 😮 See shot below….
https://uploads.disquscdn.com/images/5b75b4043645029fa2e00bec766d368547b5a8e43f795627af4721c05a59abbd.jpg
Good idea with the beet root stems and beet root. Should make for a nice texture.
I made a small jar of cranberry orange sauerkraut tonight. 😍 See picture below.
https://uploads.disquscdn.com/images/48b38559f1c587a57ec725a040c86a44d639381b1d29f512b3e6cf2a6d0291e8.jpg
Another beauty! What do you have the holes in the rim for?
Hahaha…those are embellishment jewels…not holes. 😜
Didn’t we have this conversation once before?
Ok Holly, I need your help. 🙂
I have found a reasonably-priced wine cooler and I’m about to order it from Home Hardware…but I’ve got a question first. The cooler only goes to 64 F…best temp I could find. I did see one that goes to 66 F but it was enormous and way too huge for my place. 64 F is the best I can find for the size and the cost to remain reasonable.
So my question is, can I ferment at 64 F and will this encourage all the friendlies to grow….or just some friendlies but not all of them? I want them all! Lol. I read that the first stage bacteria, needs things a little warmer so should I leave my jars at room temp for the first few days, then pop them into the 64 F wine cooler?
Furthermore, how long will I need to ferment for, at 64 F? Give it to me straight because I’m the type of person who doesn’t mind waiting long periods for a good thing. I want excellent flavor and trillions of all the friendly bacterias. So even if it’s 6 months of waiting…I’m ok with that. Will fermenting at 64 F, give me those wonderful developing flavors you talked about? I know you said between 65 and 68 F will give the best flavours but will 64 F still give me similar results? What about all the bacterias…will this unit help me achieve the results I seek?
I’m hesitant to order this wine cooler if you think it won’t make a difference for me…but right now I’m fermenting at 75F and that’s about as “cool” as I can get it here steadily. As you can imagine, my current jars are bubbling and fizzing like crazy! The warm months will only make my place even hotter. I want to ferment through summer! So what do you think….should I get the wine cooler?
If it was me? Yes, you can ferment at 64F. That’s only one degree below the ideal of 65F and will be absolutely fine. It’s temps above 72F that can interfere with flavor development; the Leuconostoc sp. don’t grow as well. I would go with the wine cooler to stay away from the high temps. I do know you may have to fiddle a bit to come up with a way to set your jars in there, so think that through, first. Just a comment I remember from another reader. You should only have to ferment between 6-8 weeks for all the stages to unfold.
Wow…ok great…I’m gonna order it! Thanks so much, Holly. The shelves are removable and it’s a decent size, so fitting the jars should be ok. I can’t wait to be able to ferment without worrying and stressing about temperature. 🙂
Oh yes, and Holly….one more thing I should ask you. My recently prepared jars are about 5 to 7 days old, fermenting between 72 and 77F. When I receive my wine cooler this Friday, can I put these jars into the wine cooler or will this shock them? Should I just leave these jars where they are, to finish fermenting….then make some new jars for the wine cooler later? Not sure about this.
Also, currently my jars are loaded with brine right to the top. They’ve been bubbling and fizzing away. Lots of juice has leaked out of my pickle pipe airlocks. If I end up placing these into the wine cooler in a few days, will the jars experience the “case of the disappearing brine” as you always say? Lol. And if the brine does disappear, will this affect my ferment and compromise the air tight-ness inside the jars? It’s just that I notice when my krauts are done fermenting and they go into the fridge for eating, the brine always absorbs back into the cabbage. I’m worried if the brine disappears when I place the jars into the wine cooler, that my cabbage will turn brown or gross. Will this happen?
One last thing….
In future, should I leave my jars at room temperature for a few days before putting them into the wine cooler…or just zap them right into the cooler from the get go? Doesn’t the first stage of bacteria need a bit of a warmer temperature to get started?
Sorry for so many questions…but this is only my second time fermenting and I want all the bacterias to develop…not just some. How can I help them all to survive, at every stage?
Yes, feel free to move them to the wine cooler. You’ll have more brine when fermenting in warmer weather and yes, the brine might get pulled back into the cabbage at the cooler temps. I find that once enough lactic acid has been produced and the pH has lowered, that not being covered in brine is not a factor. This usually happens by day 5. Sometimes, you get a bit of browning on the top layer. Leave it be until you are ready to eat that jar and just remove and toss that bit. Look into “fermentation gates” as I call them. They prevent the packed cabbage mixed from moving and seem to retain a layer of brine. https://www.makesauerkraut.com/fermentation-signs/#Consider_Adding_a_Fermentation_8220Gate8221_to_Your_Fermentation_Toolbox
Your “one last thing”… play around with both ways and see which one gives you better flavor. I would tend towards putting them in the wine cooler to start. Also see the following for maximizing probioitc count: https://www.makesauerkraut.com/fermentation-signs/#Tips_to_Maximize_Probiotic_Count
Happy to help! Questions are good. 🙂
Ok thank you so much, Holly. Now I feel confident and clear about what to do. So nice of you to take so much time answering everyone’s questions like you do. You’re such a great person. Thank you again and have a wonderful weekend. 🙂
Just at the end of my wonderful weekend! I’m happy to answer everyone’s questions – and presently can still manage that – because I learn so much along the way. 🙂
A few things I’ve read (so speculative on my part) and one that I know. I share these for what they are worth and for discussions sake. I’m curious what you think.
1) I know that I can ferment Sauerkraut at 55 degrees and within a week will have odors and bubbles (maybe the jars strayed into the 62 degree range a few times)
2) I’ve read that you can ferment at a constant 55 degrees but it might take 6 months for a fully developed product.
Currently (batches 9 and 10 in zip up 30 soda can coolers with ice packs swapped in and out) I aim to stay 50-55 for 3-4 days then 55-60 3-4 and then 60-65 for 2-5 weeks.
3) I’ve read that there are 7 or more strains of bacteria that could show up so a wealthy fanatic who wanted maximum probiotic diversity might make batches using cabbages from various locations then mix those together.
4) I’ve read that even though an ideal batch will go through 3 or 4 types of bacteria, at each stage one is 85-95% of the population and others might by that stage be under 1% so the wealthy fanatic above might (also) want to stop batches at 5,10,20,30 days then mix them up.
Personally I am enthused about the probiotic benefits though uncertain how many really survive past the stomach HOWEVER I am really driven by the delicious taste and fun process. I’m trying low temps to see if I can safely use 0.5%-1.5% salt with a great product if I carefully allow the mix to acidify at the start.
Dear Probiotic Wealthy Fanatic, You bring up some excellent discussion points. Most of us that dive into the research base our recommendations our what microbiologist have discovered in controlled environments. But cheers to the creative who think outside the box. I just wish I had more of a biology background to deeper understand all of this.
Part of what bacteria grown at what stage has to do with lactic acid levels, so… if you mix and then raise the lactic acid levels, the little guys that you stopped at day 5 would die off, in theory.
On the salt, I would be curious to know why you – and others – want to reduce the percentage? I would have a hard time supporting going below 1.5%, because at those numbers molds and yeasts are more likely to grow.
I guess for me, I want to keep it somewhat simple, but better understand the process so I can set up the best home possible for the microbes to do their work for us. I think a good idea also is to consume a variety of fermented foods for a variety of bacteria. Do get some pH litmus strips and test pH along the way. They’re a great educational tool.
I’m collecting research on the stomach survival and will eventually do a post on it. Did you know the bacteria in our Microbiome talk to one another? Do they also talk to one another in our fermentation vessels? Ah, the wonder of all this.
Wow…you’re so knowledgeable, Holly! I just love your intelligent replies and I hang on every word. Lol. Seriously though. That is so cool, about how microbiome communicate with each other! Who knew!
Just heard that on a podcast the other day. Delving into the research for something more definitive.
Mathprof REPLIED – For some reason his/her comment is not appearing in this thread, so I’ve pasted it here and I’ll answer it as another REPLY 🙂
https://uploads.disquscdn.com/images/ff14b1fcdd2a9a4b65ee600d516771ecb9d591be3c34a7cf2831a9b598bfbac9.png
Here are the sources which I am not qualified to evaluate. The graphic below is from the readable
“DNA Fingerprinting of Lactic Acid Bacteria in Sauerkraut Fermentations”
https://www.ncbi.nlm.nih.gov/pmc/articles/PMC216804%204/
It is indeed based on commercial production. They are presumably not using a starter culture since there are surprising things found. Note that Leuconostoc mesenteroides are 90% on day 0, 40% on day 3 and not detected after that.
Here is a fun article from 1929 which concludes:
SUMMARY
The quality of sauerkraut was found to depend very largely upon
the temperature at which fermentation was carried out, the most
favorable temperature for fermentation was between 60° and 65° F.
RELATION OF TEMPERATURE OF FERMENTATION TO
QUALITY OF SAUERKRAUT
https://naldc.nal.usda.gov/download/IND43967642/PDF
One finds many current blogs suggesting 60-65.
I just found that my first batches at 2.0% (by weight) tasted kind of salty to me. The first bad batch and I will jump up to at least 1.5% but so far no problems at 1% . I have lids with a valve in them so when I open to sample and re–close I pump out a bit of air. The fluid level goes up and CO2 bubbles up to the surface making (I imagine) a shied against any oxygen.
I just got an inexpensive PH meter and after a week at 55% my jars are at PH 4. That is the brine. It might be more accurate to blend the sauerkraut and brine. I’ll check that out.
My only other fancy equipment is a $15 IR temperature gun to quick check bottles (I already had it.)
Thanks for the delicious fun!
I’ve been reading the same or similar studies and I don’t know if I’m qualified to answer, either… I’m learning, too! They are great studies well worth a read by the extra curious.
The reason why you’ll see some bacteria numbers high in the beginning and not at the end is that successive strains of bacteria are at work throughout the ferment performing different tasks and survive at set acid levels. So the Leuconostoc mesenteroides that are numerous at the beginning die off after the acid levels become too high for them.
Great idea to pump that air out. I have the same lids and will now use those for future experiments.
Many do find the 2.0% too salty; I’m liking 1.75% and realized that’s what I’ve been doing all along (inaccurate measuring spoon). Yes, the pH drops fairly rapidly, which is why I don’t worry about lack of brine coverage after the first week. It’s preserved but yet needing further lactic acid development. I’ve been measuring just the brine; close enough for me. If I have to blend my samples, it will never happen. 🙂 Keep sharing your findings with all of us.
I’m so excited Holly….I just got my wine cooler!!!! 😃😃😃
I’ve already got it plugged in and my 8 jars fit perfectly…with room to spare….room for more jars! Hehehe! I’ll have to order more pickle pebbles and pipes! Looks like I can fit 4 more jars! Wow! The shelves are removable.
Sorry, I’m just so darn excited! I want to have the best tasting sauerkraut around. So tickled that I won’t have to worry and stress about temperatures anymore.
I’ve discovered that it actually goes to 66 F!!! How ideal! Here is an internet shot of the exact unit I purchased…
https://uploads.disquscdn.com/images/0fc5392d696d8ce2e8d4c847ac615af87f8749dba21d73d2841bd4fbc3fd125c.jpg
I have placed my digital thermometer inside the wine cooler and it is holding at 67.1 F
How ideal!
Furthermore, the brine hasn’t disappeared!!!
I couldn’t be happier! 😃😃😃
What a perfect temperature!
I totally understand your excitement. Stress and pressure removed! You should be sleeping like a baby now! 🙂
Exactly!
Holly, those “fermentation gates” as you call them….where do you get them? 🤔
Is there a formal name for them because I couldn’t seem to find them anywhere.
Currently, 4 options. I talk about them in this post: https://www.makesauerkraut.com/fermentation-signs/#Consider_Adding_a_Fermentation_8220Gate8221_to_Your_Fermentation_Toolbox
Here is what I would like to try for temperature controlled ferments here in the subtropics of South Florida: Find a big old inexpensive (ideally, free!) refrigerator and get something like this $22 Temperature controller https://www.amazon.com/gp/product/B01M0M98G0/ref=s9_dcacsd_dcoop_bw_c_x_1_w .https://uploads.disquscdn.com/images/bc07a7668cc09299d89134a1bab325b295104cb25394b76af8aa753b5d846ff8.png The fridge plugs into it and the probe goes into fridge (just close the door on the wire. ) Then the fridge never gets cold enough to turn itself off. Instead the power just gets shut off when the fridge is at the chosen stop temperature and goes on again when it gets to the chosen start temperature.
I see no reason why that wouldn’t work just fine. I’ve heard of others doing likewise. LOTS of room to ferment many jars of goodness.
Hi Holly, thank you for posting this detailed recipe that is very accessible for the wary.
I’ve followed it a couple of times, now, and my kraut isn’t keeping for a month in the fridge. It’s getting moldy up the sides of the jar above the kraut and at the top of the kraut. I expect the top is that I haven’t been topping up with brine to keep it submerged, but I wonder if this is a common phenomenon on the above brine level walls? I’ve been using canning jars and canning lids – perhaps they breathe too much? Or maybe I should change lids when I move from fermentation to the refrigerator? I’ve noticed that the kraut corrodes my canning jar lid rings!
Thank you for sharing your expertise!
Happy to hear the recipe is easy to follow, but… we need to make sure you’re not ending up with mold. Is your sauerkraut mixture below the brine when the jar is packed and doe it remain below the brine for at least the first week? How much salt are you using? And, what are the temperatures like in the room in which you’re fermenting.
Canning jars and lids work fine, though I prefer the plastic so there is not the rust.
Get back to me so we can make sure your can ferment so sauerkraut without mold!
Hi Holly,
I’m fermenting on my counter for at least a week at at least 65F, with kraut below the brine and using the 800g veggies /1T salt ratio. It turns out great! It’s when it’s in the refrigerator after the ferment that I’m getting mold after a few weeks. I’m wondering if it’s because I need to keep it submerged under brine in the refrigerator, too?
I can hardly believe you maintain a 65F on the counter. That would mean your house is that cold all the time. I found that cleaning the jars in & out & drying them immediately with dry dishtowel has limited the type problem you experience with mold, down to zero. Once bad bacteria gets started in the space between the kraut/brine level & the top, it will multiply in during fermentation & in the fridge. The fridge allows anything to mold over time, just at a slower rate.
I keep my temp at about 65 – 69 by putting the jars in a cooler with a lid. I ferment 5 jars at a time (about 4 lbs cabbage) with ice in a plastic container for 24 hrs. In the morning, I take out the back-up plastic container from the freezer and put the melted one in the freezer for the next day. I sometimes push down the kraut to re-submerge it when it floats to the top of the brine line, and put my loose caps or flat covers back on top of each jar, & close the lid.
Whatever you’re doing must be okay IF your temperature is accurate, but it does not sound as if it is. You should get one of those electronic needle thermometers at grocery store, about ten bucks, and insert it in the kraut on your counter. It may surprise you to find it is at kitchen room temperature, between 77 & 83 , which would make the kraut mushy after ten days or so, and much less pleasant to eat. Mine is crunchy & delicious, but again, it’s a controlled temp and takes a couple minutes to work it every morning.
Of course, you don’t want to cook it if you’re interested in keeping the benefit of the fermented product. Cooking it even for a couple minutes kills all the fermentation. We use raw kraut as a replacement for expensive store bought pro-biotics, since fermented kraut does an equal or better job, for stopping acid reflux, and it keeps good gut flora going, with just a couple good forks full once or twice a day.
Thanks, David, for taking the time to reply. It will be much to your surprise that I do, in fact, keep my place rather cool. As you can see, this is my thermometer indoors and it’s less than a year old. https://uploads.disquscdn.com/images/250cb377c5a5afc55f9058430fe54cf3ae990370639e29c9f42169890d7c648b.jpg I have an open floor plan and small square footage, so the kitchen is the same as this spot that is only 10 feet away. I keep my place 64-68F.
I don’t want to disturb my batch right now as it’s still in the first couple of days of ferment, but it’s a worthwhile idea to stick a thermometer inside of it, though I’m pretty confident that my room temperature while fermenting is not the issue.
What I’m struggling with is a month or so after they’ve been in the fridge (successful ferment, no mold) do I start to see mold.
Now, it sounds like perhaps you’re suggesting that the mold was there to begin with and it just finally came to be visible in the fridge – I’d just expect to have seen it sooner. And maybe that is the case – sometimes the top cover leaf has had a tiny corner stick up that looked a little funky, but I didn’t think anything of it, since I’d thrown it out. And when my brine bubbles over the jar rim, sometimes the residue from that gets a little funky. This is what made me ask if people transfer from their fermenting vessel to a different container when moving to the refrigeration stage.
I’m familiar with sanitary practices in cleaning my dishes, inside and out, drying, clean towels, etc. I’ve been successful in making kombucha without ever having mold, so I’m finding this situation odd.
I don’t use plastic lids, so maybe I’m getting too much air inside in the fridge? And I haven’t added brine in the fridge as it evaporates/kraut sticks up after taking some out. Maybe that is exposing it to mold? Or it’s also possible that there is a mold that comes to flourish only in the cold temperature of the fridge and isn’t fended off by my ferment because it’s in the air part where the residue concentrates on the sides/ not submerged. Maybe it was there all along from the edges of my ferment. These are my current hypotheses. But still possible I’m missing something.
Cheers.
Jamie, I have loose covers on my fermenting jars, as you do apparently, but when they go in the fridge, I screw a mason jar lid on each one, just firmly enough as you would any product. If you’re doing the same thing, then it means the bad bacteria is getting its foothold on the counter, which of course will not be in full bloom until a couple/ three weeks maybe.
When I started doing this a couple years ago, I had to occasionally clean off a little bad looking kraut at the top of each jar because I let it stay above the brine water line all the time. Since then, I began pushing the rising kraut down so as to pack it down, and that lasts until I do it again a few days later.
Anyway, I think the sterility inside my cooler is helping to keep bad bacteria out, since the cooler lid folds down after I finish each morning duty tending to it, and of course you know that bacteria is always floating around any house. I remember a friend gave me a couple petri dishes years ago when he was trying to get me to buy a “negative ionizer”, and I took the lid off one of them, and some chemical gel was on the bottom of each dish, so I let the one sit open on top of a breakfront next to the kitchen for a week. Sure enough, it began growing a couple of bacteria spots and then fuzz, which induced me to order an ionizer. I tried the second dish after running the ionizer for a week, and it did not repeat making bacteria/ fuzz.
Anyway, I don’t have the answer for you, as it sounds like you’re doing everything right. I know that jars of food with screw lids that are left unattended for weeks in the fridge will often surprise us when I clean out old unused stuff, and mold growing inside. Of course, this growth with the lid on lets us know that bacteria is already in there, just waiting to bloom within a few weeks or a month, on any product that has been opened to atmosphere.
Good luck.
Loose covers? I assume we all mean “a lid loosely screwed on?” It can be tightened down, by the way, after the active period of gas production ends, usually by day 5.
Actually Hol, I use cut out flat pieces of wax paper as a covers nowadays, and lay one slightly oversized one on top of each wide mouth mason quart jar. When I started a couple years ago, I tried the regular method with a cabbage piece on top and a tiny jar or rock on that, and then a cloth rubber banded around the top of the mason jar. However, that became too much after awhile, so I experimented and that was what I came up with, and it lets in enough air, and I only use mason screw on lids when I put them in the fridge. I also had become tired of the smelly overflow, the soaked clothes, etc, so that now, as long as I catch it in time from overflowing, I only have a little sweat from the plastic ice jar at the bottom of my cooler.
It requires leaving an extra inch or so of space at the top of the jar, but it means I am in and out in no time. As I said, I look in on the product every morning and replace the little plastic jar of ice, and I do my pack down operation as needed, since the fermenting pushes it up, but I don’t have a weight on it, so it lasts 1 or 2 days normally. Now that I’m an old hand at it, I think some folks have unnecessarily overthought the system a bit.
My neighbor used to have a large round tub in the old days, and he & his wife made a special “light weight lid” to hold down the kraut, and I guess the batch was for a number of families. I learned the cloth and jar/ rock system from one of Dr. Mercola’s links. I could never figure out why they went through all that trouble of clean up from overflow, after I trial and errored into my own system.
Also, I don’t like to add any salt water to the mix any more, since it seems like it is not “seasoned” as is the rest of the brine, and dilutes the brine for a few days til it catches up. That’s one of the bennies of my system, because I put in more than enough brine water from the beginning.
I also note that when I do my pack down operation, I can see the lower part of the jars and notice that the fermenting kraut pushes upward toward the top, which leaves two inches of brine on the bottom, and brine all the way to the top of the mix, with a couple inches space to the top of the jar, which is why I pack it down. I like that better since I feel it goosh down through the brine, and I can’t help but to imagine that each time I pack it, then it is getting a new dunking instead of being permanently compressed under the old system, when the brine squeezed up around the sides, and dripped out.
Anyway, it works for me, and the worst thing about it is that I don’t have as full jars. But, hey, no biggy. It’s great stuff for us, and has replaced our expensive probiotics. It’s actually kind of an addiction now, where I have to eat a couple fork fulls a couple times a day, but it controls this awful scourge. Sometimes, when I wake up with continuous acid reflux at night, I get up and go eat a couple fork fulls, and it stops my trouble within just a couple minutes, while it gives me lots of belching relief after a minute or so.
.
Question? Why are you wanting to let in air. Sauerkraut best ferments without air. But, Kombucha likes air. They’re different. The biggest trick to prevent brine overflow is a “weight” or what I’m calling “gate” of some sort that prevents the expanding sauerkraut mass from heaving. I don’t have time to fiddle with my ferments on a daily basis. 🙂
https://www.makesauerkraut.com/fermentation-signs/#Consider_Adding_a_Fermentation_8220Gate8221_to_Your_Fermentation_Toolbox
Yes, I agree on not added salt water as it dilutes the flavors and results in mushy kraut – too much liquid for the cabbage to reabsorb. Good to hear how well the sauerkraut works to alleviate acid reflux. Amazing. Keep on fermenting!
The recipe I used beginning two years ago was https://www.thekitchn.com/how-to-make-homemade-sauerkraut-in-a-mason-jar-193124
It uses the “gate” for holding down the kraut, but uses a cloth cover “to let air flow in & out, & keep insects and dirt out”. I am not sure why your method or this method is called for, as regards “purpose”.
I keep packing the product down every day or two because of the brine overflow. The cover clothes on each jar used to get wet even with a weight on the cabbage leaf.
Do you use mason jar lids that are screwed on and they still leak?
I know you don’t have to fiddle with it on a daily basis, but our house is always 76 to 80, which is why I use the ice in the middle of the cooler, since it keeps my kraut at 65F or so. I usually remove my kraut to the fridge after 10 to 15 days.
Also, this recipe says you can refrigerate the kraut after 7 to 10 days, but you can leave it in longer if you want to get higher bacteria count.
Thanks.
You don’t need a cloth cover. Sauerkraut fermentation is an anaerobic process, hence a lid to prevent air from entering your jar. Ideally, you would use one with an airlock, but for starters the slightly loose lid does the trick. More on lids here: https://www.makesauerkraut.com/fermentation-lids/
To prevent leaks, you have to prevent heaving and also not fill the jar too full. So, if my batch is active and expanding, it will leak with ANY lid. And yes, the ice is a nice way to get a good fermentation temperature. And, I do find better flavors with a longer (3-4 weeks) ferment.
Your temperatures for fermenting are fine. I am wondering if your pH is low enough and enough lactic acid has been produced. How long are your fermenting for – on the counter? Just a week?
Most of my jars do not remain covered in brine when moved to the cold of the fridge. Those fermented in a crock stay moist, however. NONE of them ever grow mold, even jars that are almost empty with plenty of loose bits of sk hanging to the inside of my jar. Even after 6 months to a year.
It sounds like you’re fine on the “clean” front. Not using bleach, are you?
Another question would be would type of salt of you using? We’ll keep working at this.
Oh wow! That’s really informative. I don’t have pH strips to know how it’s actually going in there, but I’ve been fermenting until it tastes good to me. Over a week, for sure. And I’ve been using Morton’s pickling salt. No bleach. Just bio friendly dish soap and city water to wash. We do have chlorine in our tap water, but I haven’t been adding brine/the sk hasn’t been coming in contact.
Usually, I use red cabbage. The red cabbage is what prompted this question thread about mold.
Maybe the parts that burble over are what are getting moldy and then when the sk gets exposed in the fridge, it pounces?
An added twist: My current batch is only the second time I’ve used green cabbage. (The first time, it was way too hot in a no-AC kitchen in August and def molded because of that)
Now: I went out of town with this batch fermenting (hence the slow reply) and came back to the brine level below sk! I think it had already been fermenting 4 or 5 days before I left, so it had already burbled over before. It was definitely submerged before I left, with cabbage just below the shoulder of the jar, brine sufficiently above, and I had changed the plate underneath. So, I was surprised that it had sucked up brine (seemed to have evaporated), but also had overflowed while I was gone! The plate was dirty! And the temperature was still 66ish.
In a panic, I took out the gate/leaf and rinsed it – it seemed to be a little cloudy on top – and made some brine to supplement. But in writing this reply, I realized that my water is chlorinated and I didn’t boil it off before use, so now I might have just ruined the whole batch. I was hoping that the good bacteria would mix with the brine and knock out any potential bad bacteria on the exposed sk.
So I have three questions here:
Have people noticed a difference in red vs. green fermentation?
Are my fears true, that chlorine will mung this up?
Are little white clouds normal? If not, then this is the beginning of this batch’s demise, and possibly connected to the initial mold question.
Thanks for being such a supportive and helpful community!
I have noticed – and heard – of differences in red vs. green cabbage fermentation. The red is a bit tougher and takes a bit longer to ferment. I haven’t noticed much else, though many of the moldy batches seem to be with red cabbage but I think that may just me focusing on the wrong thing.
I wouldn’t worry too much about the chlorine. Not ideal, but whether the bacteria will survive would depend upon their numbers and “health.”
Little white clouds? Or, white specs that float down and settle on the bottom? Clouds sound more like mold. The specs are normal and a good sign that the bacteria are working.
If you’re battling fermenting in heat, try some of these tips: http://www.makesauerkraut.com/fermentation-tips-hot-weather/
Hello intrepid fermenters!
I was hoping to collect some evidence before writing again, but I think it’s going okay.
Holly, are these the white spots that you’re saying a good? Mine don’t drift to the bottom.
And the cloudiness that I refer to is what is causing the graininess in the top brine when I shifted it, trying to stir up trouble for the photo. Though, it’s a bit harder to get a good cloud because I have the jelly jar inside.
It’s been about 3 weeks now. I’m due to taste it, now that I’ve had the added brine in there for a week. https://uploads.disquscdn.com/images/c2b86b0e7ec8a51cc04bfbb993649a83809f9f5715eb14d25e96cc3543f1f50a.jpg
That looks like Kahm yeast to me vs. the white powder produced by bacteria. I see a patch of it about an inch below and a bit to the left of the arrow. What temperatures are you fermenting at? It has more of a murky look than a fresh look. Kahm yeast can be a battle during warmer weather and when fermenting at warmer temperatures. Usually, it floats on the surface but it can look a bit wet and slippery when saturated by brine. Does your sauerkraut smell a bit yeasty or like alcohol?
Hi Holly!
I just read Phickle’s article on Kahm, what a boon! http://phickle.com/the-wrath-of-kahm/ But, I don’t think this is that. It happens even in deeper depths, not just at the top.
You’re right that it’s murky. Some of that might have to do with my home lighting and taking a night shot, combined with the double glass (jar in jar) look. But it’s still murky anyhow!
Ferment has been from 64-70 degrees.
It just smells like kraut. Not yeasty, not alcoholic.
I keep letting time pass with it to see if it will develop further, but I don’t know if the brine I added on top stopped/slowed it. I didn’t scrape anything out last week, because it didn’t look fuzzy and there are white flecks throughout, so why just take the top. But it’s been the same for a week and since it’s been over 3 weeks fermenting, I’m getting itchy to make the call on it.
I do remember that when I get whiteness in the fridge (from my red cabbage batches) it gets milky/slimy, but that’s just the top. Maybe it’s unrelated.
Does any of this spark new ideas?
Ooooh! I’ve happened upon this site: http://ferment.works/troubleshooting-fermented-vegetables/
It’s a feed of people’s submitted photos and the diagnoses! I’ve learned:
that my color is probably murky from the serrano peppers and garlic leeching their color,
the cloudiness is a good sign of an active fermentation,
the acidity is pretty much set after the first week or two, so the brine I added on top really didn’t do much,
when I discovered it had been dry on top, I should have skimmed it out and just kept what was underneath because the parts of ferments that are in anaerobic areas, even below mold, are safe.
I skimmed (pun?) through all of the submissions and answers and didn’t see any flecks. I’ll write to them/Kristen, too, to see if they have thoughts about those flecks.
What a nerdy way to spend a Friday night. HA!
I enjoy the photo analysis on FermentWorks. Their Fermented Vegetables book is also great. I’ll have to take in all these bits and what you shared in above discussion and see if I get the same in any of my ferments. An good insight on the acidity levels not being impacted by the additional brine. When fermenting in jars, there often is a top dry section when all is said and done. I only skim it when it has browned. Keep on learning and sharing!
I sometimes see the milky/slimy with Kahm yeast that has lost its liquid as in this picture. https://uploads.disquscdn.com/images/22a1c2eba085de41b961a0a251b3d88b12453df10a17a9b14b018f5e57790194.jpg
Hey i’d like to ask what length you recommend fermenting red cabbage?
I haven’t fermented enough red cabbage to have an close number for you, but I would taste it at the 3-week mark to determine if you like the texture then or if it should ferment longer. I would guess it needs 1-2 more weeks than green cabbage. Enjoy!
Wait so does opening the Jar have any effect on the fermentation process? my friends are telling me not to open the jar so I’m unsure of what to do.
The ideal is to not open it, but this is a learning process and opening the lid and tasting is one way to understand the process. However, I recommend waiting until day 7. By this time, pH has sufficiently dropped and enough lactic acid has been produced such that the brine is no longer hospitable to the mold spores.
Hi, I’m new to fermenting and pleased to have found this site. I took a fermenting workshop recently and we made red cabbage sauerkraut and kimchi, in mason jars. We put a baggy filled with water on top as a weight and then covered the jars with a piece of muslin with a rubber band securing it on. I’ve stored the jars in the back of one of my lower kitchen cupboards. The cupboard is very fragrant now after a few weeks!
Few questions thanks – I see you put a loose lid on your jars during fermenting. This lets enough air in vs the muslin topped approach?
I also see you simply put the ferment in the fridge in the jar you fermented in, not decanting it into smaller jars to store in fridge (I like this, less jars to use!)… so it’s ok to do this and not decant into clean jars?
Once it’s sealed up in the fridge do you still have to make sure the veg is covered in brine (pressing it down to create more brine if it’s not)?
Thanks very much, I’m going to try your recipe after I finish eating these.
Amy
I use the “loose-lid” technique to keep things simple for first-time fermenters and avoid having them buy a bunch of fermentation gadgets before one is sure they need them. You’re not wanting to let air in, but keep as much air out as possible. Sauerkraut fermentation is anaerobic – without air. Leaving the lid a tad loose allow gases that build up in the first few days a way to escape. Ideally, you would use a fermentation lid with an airlock that would let this air out but not any additional air in.
No need to decant when fermenting in the quart jars. The jars are “clean” and well-populated with beneficial bacteria. When I ferment in ceramic crocks, I decant into quart jars for storage in my fridge.
Brine coverage? Due to osmosis, brine created during fermentation is pulled back into the cabbage making it appear dry. I’ve yet to find a way to avoid this. Sauerkraut fermented in a water-sealed crock ends up much more moist and is not as dry once stored.
Thanks Holly. Hmm I wonder why we covered our sauerkraut and kimchi with muslins instead of a cap at this workshop. What have I produced then, with (red cabbage) sauerkraut that was covered with muslin and sat in lower kitchen cupboard for 4 weeks? Will it have gone bad somehow being fermented in this condition? It tastes good, I tried it for the first time yesterday. But I have felt quite bloated since I ate it (had it on a grain salad with roasted veg) that’s not necessarily down to the sauerkraut though.
Just a different understanding of how fermentation happens. You are most likely just fine. If too much air got into your ferment and it rotted, you would know! Bloating? Watch that you don’t eat too much too soon. Easy to do with such delicious stuff! https://www.makesauerkraut.com/how-much-sauerkraut/
Hi Holly,
This is a silly question but when you use your jar as a weight, is that jar filled with brine also? I’ve just made things exactly as instructed, but I realised that my jar is a giant pocket of air! Will this disturb the process?
No such thing as a silly question! My intention is that the little jar just fits inside the big jar and as the sauerkraut tries to move up in the jar, it is stopped as the little jar runs into your lid. Yes, there is air in the little jar, but brine should be covering your packet ferment which means no air reaching you ferment. At the end of the first week, or even around day 5, you may notice that the brine is pulled back into the cabbage and your ferment is no longer covered in brine. No problem. pH has dropped and there has been enough lactic acid produced that all is good. More here: https://www.makesauerkraut.com/fermentation-signs/
Hi Holly, that’s great thankyou so much!
My first ever batch is now 2 weeks old – what do you think? And what do you think about the cloudy murky business at the top of the batch – is that normal? Should I try and skim it out before putting in the fridge?
https://uploads.disquscdn.com/images/81d4d16644900fdfd6fabf101beae4601aa9828f0d2f79e5c0c3ad139bfbd1cf.jpg https://uploads.disquscdn.com/images/333a8ee12da2f71117e5ce1d24c47d6f5750213aceb8551c11a5dbf60522cc58.jpg
You will normally see some white bits that are from the fermentation but this looks a bit different, almost like the cabbage is disintegrating. Why don’t you take out a forkful and see what the texture is like? What type of cabbage did you use? I’m sure all is fine but let me know how the texture is. What did you add other than the cabbage?
Thanks a lot. Great instructions.
https://uploads.disquscdn.com/images/ea50a3c77bd81446e3c998da842598b62e864f86d4d45fd26153c5034ed25797.jpg Hello, I recently made my first batch of the cabbage/carrot/garlic sauerkraut. The brine turned a bit orange and cloudy. It’s been two weeks. The smell is throwing me off – it doesn’t smell bad or like yeast but not what I expected. I suspect it’s the garlic throwing me off, perhaps I should have started with a simple cabbage recipe! Does this look right?
BEAUTIFUL!!! It should be just fine. How is it now? (I’m late responding.)
The brine does take on the color of veggies. The amount of garlic in the suggested starter recipie was a public relations mishap for me. I had no problem with the odor but my wife found the first few days unpleasantly strong (and we both LOVE garlic) . It might be worth warning people of. Since then I have leaned more on spices like ginger, curry powder, radishes that are less fragrant. At most one small token garlic clove. Maybe I’ll try fermenting a jar of garlic if I ever get a dedicated fermenting shed 🙂
Thanks for your “odorous” tips. I make fermented garlic paste each year and don’t find it overpowering… See if you notice strong odors from it. I LOVE this paste and each year vow to make even more because I find it so handy for flavoring dishes. Recipe in this post: http://www.makesauerkraut.com/fermented-vegetables-book-review/
Hi! I am so thankful for your instructions! I made a jar of it for my daughter last Tuesday (so 5 days ago). It was in a jar, beet, cabbage, ginger, salt. Some liquid leaked out the top, but she says that the weight and veg. are all still below the liquid level. I am not at her place now, so cannot check it, but she sent me a picture. I told her to just wait until Tuesday to open it (so a week fermenting) and as long as there was no mold, it should be okay. But I wanted to ask: have you seen anything like this? Do you think it is okay?
https://uploads.disquscdn.com/images/cf4bbf6d00bbd44cebdc8c623d8194f94daf6d3dde81db53d70840be0092cded.jpg
The fading of colors at the top happens with beets and red cabbage. You’ll want to scoop off that top bit. If all smells fine and it tastes tangy, you are fine. For the next batch, try grating the beets and slicing the cabbage finer. Doing so opens up more of the vegetable cells and allows the bacteria to better do their job.
I just made my first batch and I’m wondering if I can put in garage where it’s about 95 above to ferment? Please answer in the next few hours! Tks Nancy
That’s a bit warm. See if you can cool it down with any of these tips: http://www.makesauerkraut.com/fermentation-tips-hot-weather/
I so appreciate your quick reply and the many wonderful tips!
Thank you so much! Blessings to you!
Nancy
You mentioned not needing starter, and this was popularized by Mercola. I have been fermenting veggies following Mercola’s recipe and I am excited to follow your recipe with Himalayan salt and no starter or celery juice; I would still like to include some of the other ingredients such as dill, parsley, ginger and red peppers as well as the carrots and I really don’t want garlic , do you see any problem with my adding these other veggies?
Let me know how it goes for you. Once I switched over (stopped using whey), I found it counter intuitive to mess with the bacteria already present. You should have no problem adding other ingredients. Keep peppers to a minimum; their high-water content causes them to go soft. More here:
http://www.makesauerkraut.com/vegetables-used-to-make-sauerkraut/
you mention that it’s best if the temperature doesn’t fluctuate more than 5 degrees. Here in Australia we have temperature fluctuations of about (in celsius) 16 degrees in Winter and about 10 degrees in summer. This is all the time – not on occasion. Today our minimum is 8 degrees C, maximum 26 degrees C. How will that affect the fermentation ?
That’s the ideal, but… And, we’re talking the temperatures in the room where you’re fermenting. If you find your sauerkraut is not turning out, you can try using a cooler and some bottle of ice to create a more stable environment if it’s too not or a plant heat mat if it’s too cold.
It’s on it’s 3rd day of fermenting (my first try at making sauerkraut) and it seems to be going okay. The weather’s gotten colder with a minimum of
4 C maximum 22 C (we don’t use heating so that’s the temp in the room where I’m fermenting.https://uploads.disquscdn.com/images/06a4d78b5257fbd8f51af8e8712453d59a49001ffa976757043891b58049275d.jpg . The brine is leaking out as you said it would. The colour looks fine. I can’t see any bubbles though.
It’s looking fine. Loosing its color. Brine leaking out signaling that it is active. You might not see the bubbles if you’re mainly at the cooler temps. Give it a taste sample around Day 10. 🙂
Thanks, do you always add 2% salt even if the temperature is cool ?
If you’re getting a good ferment and want a less salty taste, you can drop it a bit. I generally do a 1.75% ferment using Himalayan Pink Salt. Don’t go any lower than 1.5%. https://www.makesauerkraut.com/salt-by-weight/
The cabbage has now risen and you can see air trapped within it, causing it to rise. It’s getting close to the top of the brine. Should I open it up and push the cabbage back down ? Is it okay to pour the brine that has leaked out back into the jar ? Thanks so much for answering questions !!
Sorry to not get an answer to you sooner… Yes, air does get trapped. You can open the jar and push the cabbage back down or run a knife alongside the inside edge of the jar to release the bubbles. I don’t pour my brine back in. Happy to help and keep on learning. 🙂
No worries, it’s been 10 days now so I’ve tried it out and put it into the fridge. It tastes good, pretty mild, not very sour. It was a success !!
🙂
I used plastic drinking cups, cut to size for weights (only thing handy that fits in the jars} seems to be working.
Excellent.
I sometimes stick my jars in the fridge for several days (if In going to be away) then they slowly warm up over a few days from below 50 to about 65. It comes out fine.
Thank you for sharing your tip. How many days into the process have you done that?
After about 3 weeks I wouldn’t bother. I have a batch right now that is about 1/3 grated beets… maybe I’ll cube them next time! I expected it to be lively so immediately after sealing the jar with the airlock I left it in the fridge overnight. Then I put it in the cooler with ice packs. By the time it hit 62 it was pretty vigorous so I swapped out the ice packs for frozen ones. I was out of town at about 1 and 2 weeks so I left it in the fridge then for 36-48 hours. Also, at one point I was short of frozen ice packs so I loaded up the fridge and let the packs all freeze up again.
At the other extreme, if my cold ferment shenanigans leave me with underready stuff when my fridge is empty of sauerkraut, I am not above letting a jar finish up for 1-3 days on the counter at 74-76.
My superstition is that if at least the first 4-6 days are fermented in the mid 60s then the more delicate bacteria get a chance to thrive without getting crowded and their enzymes get to work. Then it is pretty resilient and will come out great under a wide range of conditions.
Great information. Thank YOU!
Your last paragraph covered my experience and concerns. I did a workshop once, forgot about my jar that was left unpacked in my very cold garage (around freezing), brought it into my kitchen about 1-2 weeks later and it never fermented “properly.”
Hi, Thanks for a very
informative site. Great stuff. We have now made two jars of sauerkraut and both
have started to brim over with brine. Should we pour some away or leave them
alone. That is after 3 days.
We have also bought some
Polish sauerkraut to keep us going until ours is ready. Oddly the pack says to
eat it within two days of opening.
It is a 400 grm pack and too
much for two of us to eat in two days. Is there a reason it only keeps for two
days and will transferring it to a jar make it last longer; should we not eat
it after two days?
Thanks again, Al and Carol
I just leave it alone and perhaps adjust the next batch to a slightly smaller batch to allow more room in the jar.
I’m assuming the Polish sauerkraut is heat treated – sadly destroying probiotics – but that doesn’t mean it should go bad so quickly. Keep it in the fridge and use your nose. It should be fine. Yes, it is better kept in a jar.
Hi and thanks for your reply. The sauerkraut we can buy in most of our supermarkets in jars is heat treated ( pasteurised) but I am told the Polish version in a plastic pouch) is not heat treated which is why we bought it. It is not in the chiller section of the store and has a use by date four months ahead though once opened it has to be eaten in two days as I mentioned.
It still passes the nose test four days later ( moved to a jar) though it does seem a little more acidic in taste.
Thanks again.
Al
It would need to be in the chiller section or it continues to ferment, soften or perhaps build up gases that have to go somewhere. Does it have a venting seal on it> Maybe that’s why it has the 4-month date on it??? Who knows, but once you’re making your own, you’ll know for sure that it is raw. 🙂
Hi again,
No, no venting seal, just contained in a sealed plastic pouch. I am told the Polish stuff is the authentic sauerkraut as it has not been pasteurised. The batch I made following your instructions is coming along nicely.
Thanks again,
Al
Thank you. https://uploads.disquscdn.com/images/10da651ce0e4f8b5e24eff5599605e4e6cfb43d034506bb436b5394326c2ef9c.jpg https://uploads.disquscdn.com/images/919a63557b71fc6443a01366d5c082a93b5893bd131e0fd6129527c17226722e.jpg
My wife makes me feel like a failure, but this is making me happy. Thanks again for an easy life decision.
Now, those look quite lovely. What are yous using as a weight? They look like they’re working quite well. Feed your wife sauerkraut and it will adjust mood and “energy.” 🙂 For many more fabulous ferments.
Korean fermented gabbage is awesome. Some chilli in it, would this work with some of that?
Yes. Here’s a detailed recipe:https://www.makesauerkraut.com/kimchi/
I bought a yard of tulle fabric and round, nylon kitchen scrubbers to push my fermented vegetables below the water surface. I have a gallon mason jar with no good options for keeping the vegetables below the brine. I simply wadded the tulle up and pressed down into the jar. No vegetables will get past that, and the fabric doesn’t absorb water because of all the tiny holes in the fabric. You can wash it after each use. The 3-4 inch circular scrubbers are made of nylon and work beautifully in a quart mason jar. You can even stretch them to fit if needed. You can pick up a pack of 6 for just a couple of dollars. I run them through the dishwasher after each use. I have the glass weights, but they are a pain to get out once you put them in.
Hello Whitney, I’m glad that’s working well for you as a weight. I would be concerned about it’s food safe capability. But, I tried all sorts of non food-safe items when I first fermented. Weren’t as many choices then and we all have to start somewhere. And, yes, those glass weights are a challenge to remove from a jar, hence handles on the new ones. 🙂
Can I use half gallon canning jars and just double the “recipe”? Anything else I need to be aware of editing or paying attention to?
Yes, you can. You might end up with a bit more “head space” in the jar but that should be fine. Might need to use something taller. It will probably give you a bit more space for the brine, which is good. The little jar wont’ be big enough for a weight.
Keep your carrots – or flavoring ingredients – to 25%. So for a 1600 gram batch, that would be 400 grams. Then add 32 grams of salt. Got it?
https://uploads.disquscdn.com/images/1010823f94e545b7465be5e3daa8c34cc1e73c038373cbe9ca939de0194af4ac.jpg I just made a 3.2 Kilogram batch yesterday in a Gallon jar, with the traditional German recipe of dill and juniper, but following your instructions here and the result after 1 day is amazing, as always. So much activity. I can hear the CO2 escaping from the living room (other side of the flat, furtherst room from the kitchen). And seeing the bubbles makes me happy as a kid 🙂 I love making ferments. Thanks for sharing all your knowledge with us, Holly. And happy new year.
It reminds me of listening to my water-seal crocks bubbling away. It’s like having a bubbly, happy friend in the home with you. Thank you for sharing. The picture looks delicious. Thank YOU!
I love your blog, the community, the helping spirit of it, and the recipes. Next I will make another batch of the Baseball Park recipe, which has been a total hit with friends and family. 🙂 So delicious!
Id like to add beets instead of carrots… will that change something in the process?
Beets are a bit more “active” due to their higher sugar content. You might see a bit more brine overflow during the first few days. Watch the scale when you add the beets and keep them to <200 grams.
https://uploads.disquscdn.com/images/a5139fedbe50c57ea7a51882adcab1fa4bdd11f25142f8926d5472ff9b6beac1.jpg
This looking correct? I had a lot of brine overflow with both of them the first few days but then today no overflow… seems most of the brine is now gone?
You’re good. Brine overflow can happen in the first few days due to all the CO2 being produce by the bacteria then. After that, the brine gets pulled back into the cabbage and all looks rather quiet. What are you using for a weight? You might want to try one of the ideas in this post: https://www.makesauerkraut.com/fermentation-weights/
Hello Holly! (Also my little girl’s name)
I’m excited to see how my first batch of sauerkraut come out, but I was wondering- a couple of days into this batch, some floaties escaped my cabbage leaf. Is it safe to replace the leaf at this point in the ferment? Thanks in advance, and thank you for the wonderfully informative site!
There are usually a few that sneak out. Just leave them be. You’re welcome!
And I love my hard-working, creative, daring readers. Enjoy the Baseball Park SK. 🙂
Hi thanks for the awesome information! I bought a 5L german fermenting crock pot. My question is after the sauerkraut is fermented, can i simply put it into mason jars and refrigerate? How long will it last that way? I don’t want to kill the good bacteria by heating up the jars so is it safe to skip that part?
Yes, just move it into jars and refrigerate. It will easily last a year. I don’t recommend canning due to your reasons. Keep the bacteria alive!!! Here’s my post on fermenting in a crock in case you haven’t seen it. https://www.makesauerkraut.com/surefire-sauerkraut-in-a-crock/
Hi Holly, Firstly thanks for the detailed info upon which I have successfully produced a few jars of sauerkraut. But I have a jar now that has been fermenting for about 10 days. The problem is that I see some white mold growing on the inside of the jar where the bubbles had dried out. Would you consider it safe to consume the sauerkraut? And what might have caused it? It is summer here in Australia. Thanks.
https://uploads.disquscdn.com/images/f984596fbddd104d03b35147b74a48ac1f39524de291e815d79e3c768a5815ce.jpg https://uploads.disquscdn.com/images/00b1ec4d45b8681daad49c57a84f3934ca41b60612b5fe9d2b1c97163a94f0f0.jpg
Thank you for the pictures. All will be fine. Remove the mold, clean off the jar the best you can (you could transfer it to a new jar), taste it and see if you would call it done. It will ferment faster in your warmer weather. In the future, you might want to try and cool things down a bit with one of these tips: https://www.makesauerkraut.com/fermentation-tips-hot-weather/
Also, due the the height of your weight, you do have quite a bit of air space in your jar that can help with the mold growth. All and all, it looks good, however. 🙂 Did you put some red pepper flakes in there?
Many thanks Holly for your prompt reply. I have transferred the sauerkraut to a new jar. It smelled good. To avoid eating any mold, I discarded the top layers. I think you hit it on the head . The head space (air space) was too high. I didn’t use any red pepper. The red (orange) bits are carrots. One more question: After 1 week of fermenting and if we should want to continue fermenting, should we remove the weight or should we leave things as they are?
If the weight is still holding everything below the brine, leave it in. Sometimes, after the first week or so, brine gets pulled back into the cabbage and the weight isn’t really serving any function. Though, unless you need it for another batch, just leave it be.
Can I use smaller jars instead?
Ideally, I wouldn’t go smaller than the one-quart (liter) size. I find smaller batches aren’t quite as active and tend to be too dry. Just not enough room for the bacteria to do their best work. 🙂
Hi Holly,
thank you for such an informative website. I am going to try your recipe, however I have already bought fermentation glass jar with a silicon lid, an airlock and weights sold as a set. It is larger – 3 litres. You have answered in another comment about doubling (or tripling) the amounts of cabbage, veg and salt which is fine. Do I still follow your recipe or make adjustments for this type of airlock jar? Also, when do I use the PH strip to test if the ph is OK? Do I submerge the strip into the brine when I open it a week or so later? Or does it need longer? thank you.
No need to adjust the recipe for the type of airlock you use. My recipes work with all of them. I just try to keep it simple (not have to buy gizmos) for the first-time fermenter.
The pH can be tested it at the one-week mark or whenever you open it. I use a spoon to remove a bit of brine and then dip the strip into that. Usually, you’ll find the pH low enough at the one-week mark. For fun, you can sometime do one jar, where you open it daily- even on day one – and check the pH. It’s amazing how quickly the levels drop.
Thank you so much! Good idea to try the small jar for testing, I will make an extra one to monitor. Thanks again!
ideally what should the pH be of the finished fermentation?
Below 4.0. https://www.makesauerkraut.com/fermenting-supplies/#pH_Test_Strips
Hi All: I opened my first jar on Sunday after 7 days fermenting. It is delicious and my family loves it. However though it did bubbly over into the dish while fermenting there does not seem to be any liquid now except in the very bottom, did I do something wrong? I want to make more now so I won’t run out and want to get it right. any help appreciated.
Hello Linda, No, you did nothing wrong. Bubbling in the first week is normal and even without the brine overflowing, the smaller environment of the jar often results in drier sauerkraut. Here’s my post on tips to combat it: https://www.makesauerkraut.com/dry-sauerkraut-gut-shots-recipe/
If you want to up your fermentation-in-jar’s game, look at the Pickle Helix in that post, and this one: https://www.makesauerkraut.com/best-fermentation-weight/
Hi, I think I messed up a perfect jar. I had a fresh cut on my hand, My right shoulder, arm and hand are not useable becuse I just had Rorator cuff tendon and bicep tendon repairr surgery. I Put a surgery globe on my hand to push down the kraut. Will this ruin the kraut?
You’ll be fine. I once gave a sauerkraut demo at the local library and they insisted that I practice “food safe” and wear gloves. My hands were so slippery that I almost dropped the bowl. Though your sauerkraut will not have the bacteria from your hands it will get plenty from the vegetables. 🙂
hello everyone. I am 10 days through my first ever batch of sauerkraut and everything is going fine. I am using the glass weights that are designed for wide mouthed mason jars and they work a treat. I push down on them with a pressing stick daily to release any trapped gas. I have kitchen paper held over the mouth with a rubber band and I lightly place the lid over that. So to my question!!!
Most commercial sauerkraut (as bought in supermarkets – yeuch!) seems to be “dry” i.e. the brine appears to have been drained out before bottling. I would prefer to do this too as it will be easier to serve (avoiding the inevitable pool of brine that will come out with the cabbage, even using a fork – there’s a lot of salt in that brine that I’d rather avoid ingesting). I can’t find any clear reference anywhere as to whether you drain the brine off at bottling/fridge point or just throw the whole lot into the fridge? I have the fermentation in 2 mason jars and have a larger jar ready to receive the whole batch for the fridge so that I can use the mason jars to get going with the next batch, so it’s all coming out anyway. Advice please?
Oh another question. Do you remember the ‘botulism scare’ (grossly overstated of course) a few years back, concerned with making infusions of raw chilli, garlic etc. and storing in the fridge. I am assuming that putting raw garlic into the mix shouldn’t be an issue here because of all those good soldiers at work!
Welcome and happy to hear that you first-ever-batch of sauerkraut is happily bubbling away. That’s a good idea to press down on your weight to release those trapped gases. That dry looking sauerkraut in the market can be due to two reasons: One, they did drain off the brine and sell it as Gut Shots, another way to consume probiotics. Two, the brine has been pulled back into the cabbage cells.
Commercial, pasteurized sauerkraut is usually made with a higher percentage of salt, which is why it may taste too salty to you.
Don’t drain off any brine you have at the end of fermentation. It helps keep your stored sauerkraut moist and is full of the same beneficial bacteria as the cabbage. If you have any left when you get to the bottom of the jar, sip eat for a quick pick-me-up, use it in place of vinegar in salad dressing, or pour it into a jar that you have finished fermenting.
And, yes your garlic is safe from the ‘botulism bugs’ due to the high levels of lactic acid and the low pH of your ferment.
Thanks for all that Holly. I tried a sample last night and all I could taste was Himalayan salt .. I mean really strong (not my favourite .. sometimes use to mouthwash but I don’t like it!). I think I used the right amount but I didn’t write it down neither did I weigh the actual cabbage so I’m wondering now if I’ve over salted; it seems to have fermented fine and its almost 2 weeks so I’m looking to refrigerate soon. I read online about rinsing before eating. Do you have a view?
Many thanks for all your useful responses below. This is now my goto reference source 🙂
It sounds like you over salted. Rinsing before eating is fine. It will wash away some, but not all of the beneficial bacteria. Choose a salt you like, even if it’s iodine-free table salt. Can’t have those mouthwash memories staining your palate. See this post: https://www.makesauerkraut.com/best-salt-for-making-fermented-sauerkraut/
Hi everyone. I started a basic recipe of just cabbage and salt on February 4th, I tasted it today and am wondering what exactly it should taste like. I’ve never had homemade before just the store stuff and it tastes completely different. Not exactly bad just not very sour and different. I’m wondering if I did something wrong?
You probably did just fine. If you’re able to by some raw sauerkraut at a health food store, it’s nice to get one jar for comparison. Many have never had sauerkraut before and don’t know what it should taste like. Tangy? Somewhat vinegary? Colors should have faded. More here: https://www.makesauerkraut.com/fermentation-signs/
Hi. I’m making my 1st batch of sauerkraut using an airlock system. Day 3 and I come home to find the brine level has fallen below the level of my cabbage leaf (I do Have a weight on top of the cabbage leaf). As I am using an airlock do I need to press down on the weight to push out the CO2, or will the airlock maintain an anaerobic atmosphere in the container? “The Art of Fermentation” says not to open the system, but most sauerkraut sites say to take off the lid and press down to press the CO2 out, but I think those sites are assuming just a lid, not an airlock. Any advice?
It is normal for brine levels to fall after the first few active days. The bacteria are no longer producing a lot of CO2 and the brine gets pulled back into the cabbage cells. The type of weight you use will determine how long everything stays below the brine. I would go ahead and open the jar and push things back up the brine. It’s good to get to day 5 with everything under the brine. By then, the pH is low enough and plenty of lactic acid has been produce to prevent mold growth. Here’s a post I did on different weights: https://www.makesauerkraut.com/best-fermentation-weight/
Hi, I’m making my second batch using your approach. First lot was very nice but tasted salty rather than sour…. not having had sauerkraut ever before, I’m not sure whether that’s right or not. My second batch is 7 days old today and, surprise surprise, tastes salty… should I leave it to ferment longer? any other thoughts. Also, is the finished sauerkraut high in salt as I do have high BP and don’t want to aggravate it.
The amount of salt in a batch does not change over time. The salty taste, however, is reduced as lactic acid levels increase to mask the salty taste. Fermenting at 65F and using top quality vegetables ensures this greater depth of flavor development. Also, using a mineral-rich salt will taste less salty due to the broad range of minerals in the salt. To reduce the actual amount of salt in sauerkraut, weigh your ingredients and use 1.5% salt instead of the 2.0% my recipe calls for. See these two articles for more or email back if you need help. Salt info in a serving towards the end of this one: https://www.makesauerkraut.com/how-much-sauerkraut/ And, how to weigh salt: https://www.makesauerkraut.com/salt-by-weight/
Hi Holly, thanks SO much for your speedy and helpful reply including the links regarding salt. Having read them, I have a feeling I’ve been creating “cabbage picked in salt” as I’ve used a UK table spoon and a rounded tablespoon at that. I’ve just weighed the amount of fine himalayan salt I used this latest time and it weighs 23grams. If I use a knife to create a flat tablespoonful that weighs 16gms. My question now really is, given I used 23g (with 800g of veg), should I jettison this “ferment” and start again? Will it always just be salty, or will more time help? Could I salvage it by watering down the brine at this stage (8 days in)? Many thanks again, in anticipation.
I wouldn’t mess with the current batch. I calculate it to be 3.0%. A bit high, but it should still ferment. You can rinse it before eating which will wash away some but not all of the beneficial bacteria. Or, use it in some cooked dishes – reducing the amount of added salt – and make yourself a new batch.
Thanks very much, Holly. Great to have your expertise. I probably wouldn’t have even attempted making any sauerkraut without the blow-by-blow guidance you provide. x
You’re warm words of gratitude make my day!!! You’re quite welcome.
I’ve used this recipe many times and it’s great. I also went to a larger 2 gallon crock but still follow the recipe and it’s perfect. So thank you for taking the time to share your recipe and knowledge.
Thank YOU, you are quite welcome! Have you seen my recipe for fermenting in a crock? https://www.makesauerkraut.com/surefire-sauerkraut-in-a-crock/
No but I’ll check it out. Thanks again.
So I am dealing with some brown brine. The cabbage below the brine under my big leaf is still bubbling and looks fine. What should I do with the brown brine when I want to eat the sauerkraut? Should I dump it out and make a new brine or is it safe to ingest?
I can’t always pinpoint the cause of the brown brine. Usually, warmer weather or not enough salt. It’s fine to consume. It will be pulled back into the cabbage cells when your ferment slows down so you won’t be able to pour much of it off. Was it extra warm during fermentation?
Thanks for your reply! Well, we live in TX and it is already on the warmer side of thing here. We keep the A/C at 73, but the kitchen is continuously warmer with all the cooking that goes on. So I could definitely understand if warmer temperature turned the brine brown. As for the salt, I am pretty sure I added the correct amount. Besides weighing the cabbage and using the corresponding salt per lb., it did taste pretty salty before I put it in the jars. So as of now (starting day 5 of ferment) the brown “stuff” has settled as a sediment, along with what looks like a white-ish powdery Parmesan cheese-looking sediment on top of the glass weights holding everything down. I am trying not to get freaked out by how this all looks, as the cabbage underneath everything looks healthy and is still bubbling and slowly turning a lovely pale color. I have yet to open the airlock jars to scrape the bubbly scum off the top or do a taste test. Should I just leave everything well alone for a few more days before reassessing? Thanks, Holly, I GREATLY appreciate your advice. This is definitely a new venture for me! (Pic is start of day 5 ferment) https://uploads.disquscdn.com/images/e656e1a5278d98b653a43468b09c0b56ce8ad86876b44d2cfed4a52f75bd35c8.jpg
You are welcome. What fun shaped jars! With the warmer weather, your sauerkraut will ferment faster. I’m concerned that the white sediment you see is Kahm yeast which is harmless but can give your ferment a yeasty taste. But, it could just be scum from the bubbles I would go ahead and remove your airlock, clean off the scum you see (Does it smell like alcohol or yeasty?) and move your jar to the fridge to enjoy.
Then, try a new batch, perhaps trying to keep it a bit cooler in a ice chest with some frozen jugs of water. More here: https://www.makesauerkraut.com/fermentation-tips-hot-weather/
Let me know if you have any other concerns. 🙂
Well, I abandoned ship and tossed out the sauerkraut. It didn’t taste right or smell right. Definitely more on the yeasty side of smells. I will give it another go using a cooler temperature environment with the ice chest. I will keep you updated… Thanks for all your help, Holly!
You’re welcome. I also abandoned a yeasty batch of Kimchi Carrots that I let ferment too long. Just not a pleasant taste. May your next batch be a success.
Hi Holly: I just finished my 2nd batch using your advise about dry sauerkraut. I have about 1/4 to 1/3 cup of brine left over, can I save it to use if these jars start leaking brine? Thanks so much for your help
Yes. Keep it in the fridge. Enjoy!
Thanks so much Holly for taking the time to answer my question. By the way, I got the large mandolin you recommended. It’s amazing what a difference it made in this 2nd batch.
Happy to help and happy to hear one more fermenter enjoying a mandolin. 🙂
I have table salt that contains only one additive, an anti-caking agent called; sodium ferrocyanide. It’s my first time, will I have way less beneficial bacteria?
Also you describe to lightly screw on the lid (so CO2 can escape) is this ‘burping’ it or is it still required to manually burp it? Could you explain the burping process? I don’t have a screw on lid, it is a clip on glass lid with rubber gasket inside.
I thought it was important for the jar to be airtight? Hope you can explain what I should do with the clip on lid in place of a screw lid.
https://uploads.disquscdn.com/images/35205cec204b4e7deef0110dfa4f19622e7b052a53d66d0461895bc437ff49e6.jpg
Looks like this. Also I’ve read that pouring a layer of olive oil on top will stop O2 from entering and let out CO2?
I don’t have experience with olive oil but remember reading a few places that it’s not ideal. If your jar is a “name” jar, not a knock-off cheap import (which can break), than the clamp should work as your airlock. Pressure causes the jar lid to move up so gases can escape. Some fit them with airlocks. More in this post: https://www.makesauerkraut.com/fermentation-lids/#How_Does_An_Airlock_Work The first sections cover your Fido style jar.
Thank you for the reply! I had already started reading that page but it starts to go into detail about different types of lids available. The above jar is from IKEA’s product page and it looks exactly the same as the one I bought from IKEA, it’s most likely the same jar. Is this not a ‘canning jars (Mason jars)’ as opposed to a Fido?
https://www.ikea.com/gb/en/products/cookware/food-storage-organising/korken-jar-with-lid-clear-glass-art-70213550/
It’s my 1st time, hoping it will help my stomach problems with helpful bacteria. I was about to follow a youtube video where someone uses a similar mason jar, he just put cling film on the very top of the open jar and then closed the lid on top of it and pulled down the lever. Then I came across your guide, but am confused what to do since the last stage says to lightly screw on the lid. Here is what I’m thinking (since my lid is a lever type seal):
I pull down the lever fully to create an air-tight seal (without any cling film) but I have to ‘burp’ it regularly, by lifting the lever opening the seal for a few seconds? If so how regularly should I do this and how do I know when I should? Is there a sign? How long should I leave it open, and should I only open it a tiny amount?
Or are you saying because it’s not an expensive jar, it will lift the lid slightly by itself without me noticing? In this last scenario, would I have to regularly re-apply the lever? Sorry for all the questions haha!
Happy to help clarify… On the jars, the issue is whether the glass has been tempered or not. The more expensive Fido jars have and should not explode under excess pressure. Since yours is from IKEA, I would error on the side of caution and burp it.
You’ll only have to lift the lever during the first week; once a day. You should hear gases whoosh out and see bubbles rise to the surface. By about day 5, nothing will happen (gases are no longer being produced) and there is not need to lift the lever anymore.
Sauerkraut, and other fermented foods, will help with digestion. Go slowly. It can be too big a big dose of bacteria if your stomach is not used to it and you’ll notice excess gas and bloating. 🙂
Thanks! I did it and just this morning after burping it there are some air bubbles (I might have opened it too wide and for a few seconds too long) just wanted to check it’s ok or should I have just lifted the lever (without lifting the lid itself) to allow the gas to escape but without O2 entering?
Don’t worry about the details. 🙂 Just whatever it takes to let the air out. Some air will get it and that is fine. The lactic acid being produced will protect!
Just wanted to check in, when I burp it I get sprayed and the surroundings also, there’s a lot of spray and smelly mess after. Is it normal to have so much spray? Only asking because I haven’t seen anyone mention the spray would be this much.
You have a VERY active batch. Some are like that. I would just leave the lid unlatched until the active period is over (5-7 days). Dealing with the spray and mess is no fun.
I was wondering, you said after 7 days:
‘you’ve created a safe environment in which the bacteria that would cause mold or slime has been chased away by the beneficial bacteria produced during the fermentation process.
I’m finding that there can be so many air bubbles mixed in with the fermenting sauerkraut that it expands, making it look like there is no brine. Pushing down on the weight, sliding a butter knife along the inside of the jar or poking the sauerkraut with a bamboo skewer will release all the air bubbles and allow the sauerkraut to condense back down into the jar and brine to recover the top of it.’
Is it important to ensure poking/other steps mentioned etc. to keep the brine level above? Even when there’s no danger of mould?
No, once I’m past the first week, I don’t try to force the brine up. Naturally, it is pulled pack into the cabbage as the active stage of fermentation passes. The weight you use will be somewhat of a factor. With a strong spring-style weight (Pickle Helix) you will still see brine. With something like a Pickle Pebble, it’s a toss up.
Ah ok thank you, just wanted to clarify if after a week it’s safe to leave the brine to itself to fall and rise without worrying it being an issue (I followed your instructions and used a small jar as a weight). So is it safe to remove the weight after a week?
YES! And, yes, you can remove the weight if it is no longer holding the sauerkraut below the brine. 🙂
Ideally, you would use salt without additives, but it’s a journey and we often have to be patient as we gather our supplies. Just keep an eye out at the store when you go shopping for a “better” salt for your next batch.
Airtight is ideal, but below the brine is what one aims for. Again, fancy airlocks can happen down the road. EITHER burp OR lightly screw on the lid. I find many forget to burp, so it’s just easier to leave the lid a tad loose. More, below the picture of your clamp jar…
Hello again, Holly. I hope you’ve had a nice easter holiday. I’m starting a new job tomorrow in a fermented foods store, of all places. I’m really excited and should be lots of fun and a great opportunity to keep on learning.
I wanted to ask you a quick question. Is it normal for the cabbage to release so much foam as in the picture? I don’t know why but sometimes it releases lots of liquid and sometimes lots of foam (with liquid). Any ideas? Cheers https://uploads.disquscdn.com/images/bec238769cc29ba68328ac30d377d3bac20a49c709ff5ba71dfb6092a7a1b805.jpg
Cool looking picture. 🙂 Not normally, but each batch is different and factors during the growth of the cabbage play a role. I read somewhere what causes this, but can’t track it down right now. You’ll just want to scoop off the foam during fermentation.
Hi Holly. Sorry for the delay. Since starting my new job, I haven’t had asmuch time and I tried responding from my phone but had some issues with the disqus applet. Thanks for the info. I left it in and it seems to have disappeared after a few days. The whole thing is looking good, although the top part of both brine and cabbage look a bit dark brown as opposed to the whiteish colour of the rest of the jar. But smell is good and no nasties have appeared anywhere so far. 🙂
No worries. Work does manage to get in the way of life. Good to hear it’s fermented fine. You can always toss the top layer if it is not “mouthwatering.” 🙂
Thanks Holly, as always 😉
Hello Holly, Thank you for sharing your experiences with us and providing such fantastic recipes. I’m on my second batch of sauerkraut – I started it on 17 April. Today I went to check on it – I was away for 4 days. To my amazement, the little piece of cabbage that I used to seal the sauerkraut had a dark grey rim around it. I am not sure if it is oxidation? All of the sauerkraut remained submerged, only that “lid” of cabbage was not totally under the brine. I tasted the sauerkraut and it tastes good. Is it okay to eat? Or does the grey rim on the cabbage indicate bad bacteria may be present? Thank you
https://uploads.disquscdn.com/images/a4dc2b487cc786322b76a2a48c2e150e3c920595c57774fd18d49650001a4ad5.jpg
You are very welcome. That looks like mold to me. You did the right thing by removing it. The mold grew where the cabbage leaf was exposed to air. It is find to eat what is below the part you removed. I just take off the top bit and you’ll notice what’s below smells wonderful, fresh, and clean.
Thank you kindly Holly for your quick answer!
I made this yesterday but in spite of a long massage, there was no brine. Should I add the salted water now ? I’m confused about when you remove whatever is keeping the kraut below the brine, in my case one of those metal coils. Do you store the jar in the fridge with these still in the jar, or remove and let the kraut soak up the brine? Thanks.
Here we are a day later, so yes, if you don’t have enough brine to cover it you’ll probably want to add some. See this article for more: https://www.makesauerkraut.com/dry-sauerkraut-gut-shots-recipe/
You are using the PIckle Helix (works great!). Remove it before storing your sauerkraut. The brine levels will decrease, but no worries, sauerkraut is preserved and will store just fine.
Hi! Thank you for such an informative website!!! It inspired me to feel OK about making kraut at home !
My first batch of sweet garlic kraut is on day 7 today. I opened the jar and tasted it- not the taste I like. Too mild, so I’ll let it keep fermenting. I have a few questions though: First, what should it smell like? I can smell a hint of that classic sauerkraut smell, but also something a bit acidic maybe? I’m really bad at explaining smells, but I know it’s a complex smell! I kind of think it’s like an acidic carrot. Haha. Is this normal? Second, the brine rose very high and spilled out of the jar during the first 3 days. Then it stayed quiet but always at the very top of the jar. When I opened it there was a small amount of dark pinkish film on the mason jar lid and on the rim of the jar. It doesn’t look like mold to me at all, so is it just residue from the brine and happens to be pinkish in color because I used rainbow carrots in this recipe (so I have those beautiful dark purple carrots in there!)? Finally, when I opened the jar to taste and smell I put my hand in the jar pretty good to smush the kraut back down below the brine. I also had to open the jar on days 2 and 3 to scrape some floaties off the rim and the 4 ounce weigh jar because the brine had risen so high. Is that OK? Did I handle it too much?
Again, thanks so much for such a great website! It must be a lot of work. 🙂 You really have a passion for fermented foods!
You are very welcome! Your sauerkraut should smell fresh and somewhat like vinegar. A hint of acid. It will smell a bit different than canned, or processed sauerkraut, which has been cooked.
Brine overflow can happen during the active initial phase – days 1-5 – when the bacteria that create the gases – are especially active. After that, things will be rather quiet.
Yes, that pinkish bit is residue from the carrots. And, you did find taking care of the floaties and brine level. Here is more on what to expect in that jar of yours: https://www.makesauerkraut.com/fermentation-signs/
Thank you for your kind words and support. It keeps the passion alive. Fermentation a rather fascinating world.
Hi. I made a batch of sauerkraut according to your instructions and it turned out delicious … but … there is almost no brine left. It is very dry. Is this normal? Will it keep ok without brine? Can I add water to the jar? Thanks for any advice you can give me.
It will keep just fine without the brine. I tend not to add brine or water because I find it dilutes flavors and makes the sauerkraut mushy. More here: https://www.makesauerkraut.com/dry-sauerkraut-gut-shots-recipe/
Hi, Great website and info – thank you! I am just wondering if I can put the overflow liquid that has collected in my bowl under fermenting jar back into the jar? It has been sitting there for several hours at least and I wasn’t sure if could potentially add back in some non beneficial bacteria. But if it’s safe seems a shame not to put it back in to keep liquid levels nice and high. My ferment is on 3rd day. Thank you 🙂
Feel free to pour it back it. Like you say, it hasn’t been sitting there long, so there shouldn’t be an issue.
Hi Holly, my jar is not 1L, it’s 24oz, can I still use them, or do I need to buy the 1L ones?
A 24 oz jar is fine for now. It’s about 33% smaller, so cut back on the flavoring ingredients by approx. 1/3 and then add cabbage until you have 600 grams. Take notes and adjust future quantities so that ingredients fit nicely in your jar with 1-2 inches leftover at the top.