
 This post may contain affiliate links which won’t change your price but will share some commission.
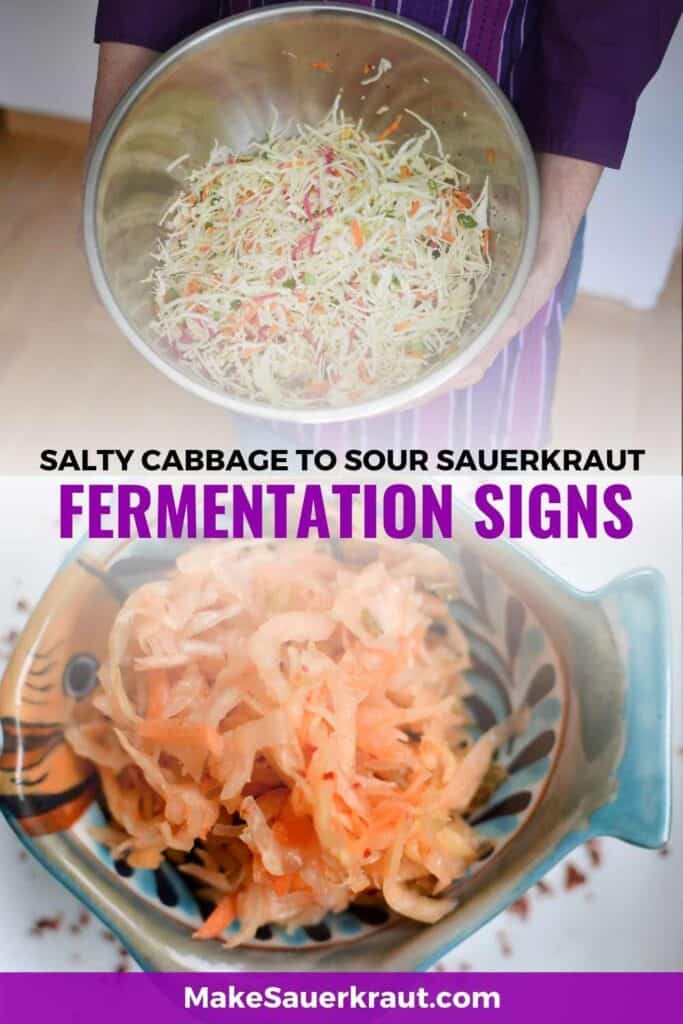

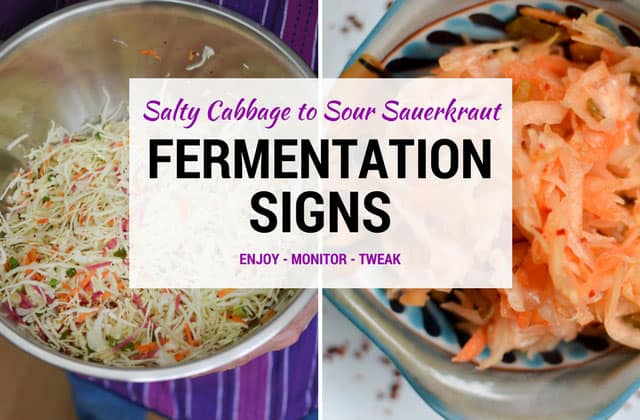
You’ve just packed your jar—or crock—with salted cabbage and set it on the counter to ferment. Now what? Learn what to watch for and monitor as it transforms into tangy, delicious sauerkraut.

So many questions.
If I open the jar to sample it, won’t that let in air and then mold will grow?
If I don’t see any bubbles, doesn’t that mean fermentation didn’t happen?
If it smells like bleach, should it be tossed?
Let me hold your hand through the process sharing fermentation signs, letting you know what to watch for and describing how a finished batch of sauerkraut should taste.
The friendly bacteria will be doing most of the work. Your job is to provide the right home for them.
Trust in the process. The wonderful Mighty Microbes really do know what to do.
The hardest part? Waiting seven days to first taste the transformation from salty cabbage to the tangy crunch of sauerkraut.
Ready to watch the magic happen?
Let’s dive into the signs that tell you your sauerkraut is happily fermenting away.
- Set the Stage for Successful Fermentation
- Label Your Artwork
- Place Your Jar of Fermenting Sauerkraut in a Shallow Bowl
- Find a Spot within the Ideal Temperature Range for Fermentation
- Keep Your Fermenting Sauerkraut Out of Direct Sunlight
- Adjust Fermentation Length to Fermentation Temperature
- Make Sure Your Sauerkraut Mixture is Under the Brine
- Tips to Maximize Probiotic Count
- What to Do While the Mighty Microbes are Working for You
- Evaluate Your Sauerkraut to See If It Has Fermented to Your Liking
- Store Your Sauerkraut
Set the Stage for Successful Fermentation
Your jar is now packed with fresh salted cabbage.
The lid is on.
Fermentation has already started.
What now?
Label Your Artwork
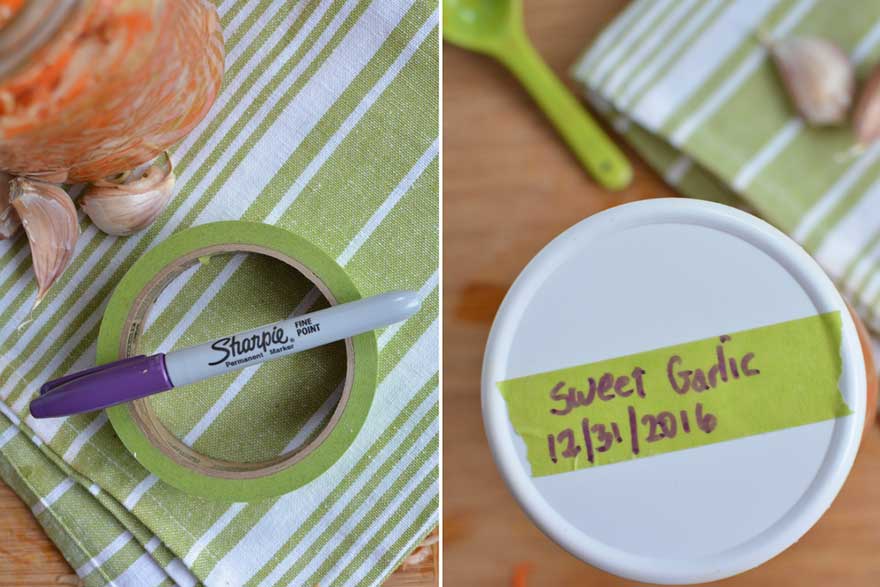
I like to label my jars using green or blue painter’s tape and a permanent marker. I like the “Painter’s Tape” because I can remove it later without leaving a sticky residue. Grab what you have and get marking. I note the flavor of sauerkraut I made and the date I started fermenting it. Believe me, a few weeks into the process, or months later, when you unearth the jar in your refrigerator, you’ll appreciate knowing what’s in the jar and when you made it.
And, it doesn’t hurt to make a few notes on anything specific you did for this particular batch. Some keep this in a separate notebook. Some just add more tape to the jar with extra notes.
Place Your Jar of Fermenting Sauerkraut in a Shallow Bowl
Imagine entering your kitchen. It is one day into the fermentation process. You see brine oozing across your counter and dripping onto the floor…
Why did that happen?
The first set of Mighty Microbes to go to work for you are the gas-producing Leuconostoc Mesenteroides. These bacteria do most of their work during the first 3-5 days, producing acids, alcohols and…
carbon dioxide (CO2), hence the bubbles you see rising to the surface.
However, the CO2 can get trapped within your packed sauerkraut, causing your fermenting mixture to move up in your jar, forcing precious brine to overflow, which is why you’ll want to place your jar of sauerkraut in a dish in order to prevent this brine making a mess on your counter. I’ll cover how to minimize brine overflow below.
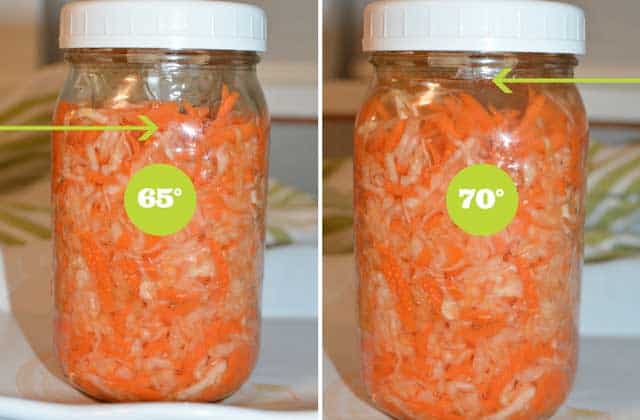
Find a Spot within the Ideal Temperature Range for Fermentation
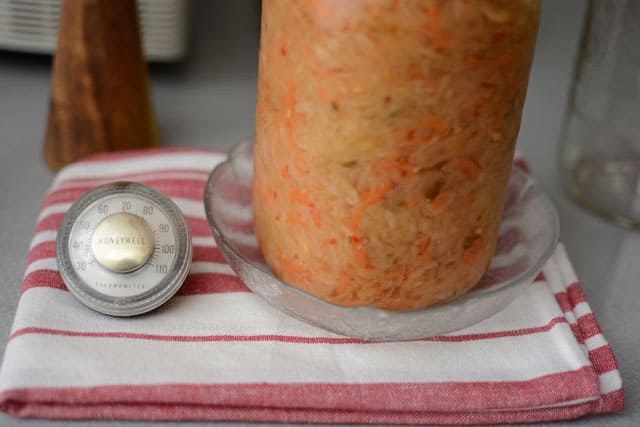
The ideal fermentation temperature range for producing sauerkraut with the most complex flavors is between 65 and 72°F (18–22°C). Fermenting within this temperature range allows the three bacteria strains necessary for fermentation to ferment your cabbage in the proper sequence. For example, the L. Mesenteroides mentioned above might not grow at temperatures higher than 72°F (22°C), which would be detrimental to the flavor of your sauerkraut.
Where your ambient room temperate is within this range will determine the rate at which fermentation happens. The lower the temperature, the slower the fermentation. The higher the temperature, the faster the fermentation unfolds. Ideally, you want the temperature to be somewhat stable, not fluctuating more than 5°F (3°C) in either direction.
It doesn’t hurt to place a thermometer next to your jar to monitor what the temperature is that you’re fermenting at. Nothing to get overly concerned about, but helpful to know if your fermentation is not progressing as expected. The temperature you are fermenting at will help you decide how long to ferment. Some even use a min-max thermometer. It keeps track of what the highest and lowest temperature has been until you reset it. Quite handy.
It’s best to find a spot away from your stove or your refrigerator due to excess heat these appliances might generate.
Temperatures below 60°F (15-16°C) results in a slow and incomplete fermentation.
Temperatures above 80-85°F (27-29°C) can result in abnormal fermentation. Though not ideal, many do successfully ferment in hot weather. You’ll definitely want to shorten fermentation time and to achieve complex flavors in your sauerkraut, find a way to cool things down: 11 Cool Fermentation Tips for Hot Weather.
Keep Your Fermenting Sauerkraut Out of Direct Sunlight
I like to be able to keep an eye on my ferments. There is so much to watch and learn from which is why fermenting in a glass jar is so practical. I keep all my ferments in my kitchen on the counter and out of direct sunlight, but still illuminated by indirect light.
The high levels of ultraviolet radiation in direct sunlight can destroy or inhibit the bacteria that will be working for us and can also diminish nutrients in the food that is being fermented. So, find a spot out of direct sunlight. If you are concerned about any light destroying the bacteria, feel free to cover your jar with a towel.
Some like to keep their ferments in kitchen cupboards. There is nothing wrong with this, just don’t forget them there in their little dark home, an easy thing to do.
Adjust Fermentation Length to Fermentation Temperature

If your home environment is within the ideal temperature range of 65 to 72°F (18–22°C), 3-4 weeks is a good length of time to ferment your sauerkraut. This allows time for each of the three successive colonizations of hard-working bacteria involved in fermentation to perform their magic.
If your climate is exceptionally warm, the bacteria will progress through these stages much more rapidly and you may find 10 days to be plenty; taste at about Day 5. If your house is extra cool, it may take 4-6 weeks for your sauerkraut to fully develop; taste around Day 10.
Ideally, you are not opening your jar numerous times and disturbing the friendly, hard-working bacteria. However, it’s a learning process and tasting is a good way to learn. And it’s nice to know that by Day 7, the L Mesenteroides have typically produced enough lactic acid to protect it from outside invaders they may try to sneak in when opening your jar.
I further discuss adjusting the length of fermentation to your home environment and your taste buds below.
Make Sure Your Sauerkraut Mixture is Under the Brine
The fermentation of sauerkraut is an anaerobic process. This means your mixture of sauerkraut needs to remain below the brine by using a fermentation weight of some sort. Even if you are using a lid with some type of airlock, your fermenting sauerkraut mixture still needs to be below the brine.
Most books and articles on fermentation – including myself – are quick to have you mix up additional brine and pour this into your jar of packed sauerkraut if there is not enough brine to cover it. A year or so ago, I found in my favorite fermentation book, Fermented Vegetables – reviewed here, that authors Kirsten and Christopher Shockey recommend against adding brine claiming doing so results in discoloration and mushy sauerkraut. This has been tickling my brain ever since and I’m slowly finding that adding fresh – or fermented brine – does negatively impact texture and flavor.
So, if you just packed your jar – or it’s only been 12-24 hours – and your sauerkraut is not under some brine – even a rather thin layer, see my suggestions in Dry Sauerkraut? 17 Transformative Tips [BONUS: Gut Shots Recipe] for ways to get more liquid into your jar.
NOTE: Tips #15 and #16 suggest adding brine during fermentation as a last resort. And, in Tip #17, I suggest adding fermented brine before storing your sauerkraut. The jury is not out yet, but I just started eating one of the jars I did that to last winter. I was not all happy with the results: mushy texture, watered-down flavors. Not what I was expecting.
Tips to Maximize Probiotic Count
I don’t quite know where to put this, but I periodically am asked if there is a way to achieve maximum probiotic counts in a ferment. Without expensive lab tests by curious micro-biologists, we don’t know how what we do impacts actual numbers, but to maximize the working conditions for our Mighty Microbes, I suggest the following:
- Use high-quality ingredients. The greater the nutrition of the cabbage and vegetables used, the greater the level of nutrients for the bacteria that will be turning your salty cabbage into sour sauerkraut. This would also include your salt. A mineral-rich salt (Himalayan Pink or Redmond Real Salt) will contain more food for those Mighty Microbes than a processed salt-containing only sodium chloride.
- Use fresh “winter” cabbage. Winter cabbages are planted in late summer and harvested in early fall, ideally after the first frost. These prized cabbages have tight heads, are harder, have thicker leaves and higher moisture content than summer cabbages. You’re in luck if you, or a local farmer, can grow a variety of late cabbage especially suited for sauerkraut making (Krautman, Danish Ballhead, and Premium Late Dutch). In addition, make your sauerkraut before the cabbage has been stored for months.
- Thinly slice cabbage. Cabbage sliced at 1/8th of an inch (2 mm) not only opens more cabbage cells but allows you to pack more cabbage into a jar dispersing more air. How to Slice Cabbage [Which is the BEST for Perfect Sauerkraut?]
- Add the proper amount of salt. Most literature puts this at 2.0-2.5% salt in relation to the weight of the sliced cabbage mixture, though I – and other artisanal fermentation companies – are getting consistent results with a 1.5% salinity. Below 1.5% will result in spoilage. My recipes are set up for a 2.0% salinity. See Salt by Weight for Delicious Sauerkraut… Batch after Batch for help adjusting these numbers.
- Keep your fermenting sauerkraut below the brine. This ensures that the pathogenic bacteria that love fresh air – and can ruin your sauerkraut – do not take up residence in your jar of goodness. In addition, the brine provides a moist environment for the bacteria. Bacteria are like sponges. They don’t pick up nutrients from dry cabbage but will absorb nutrients from the brine and the wet cabbage. Fermentation Weights: Keep Your Ferment Below the Brine
- Use a lid with an airlock (or crock with a water-sealed lid). Yeast and molds need oxygen to survive. The less air you provide them the better. 9 TOP Fermentation Lids for Mason Jar Fermentation [HOW AIRLOCKS WORK]
- Ferment within the ideal temperature range of 65 and 72°F (18–22°C). This may mean waiting until cooler weather to ferment or creating a cooler environment. 11 Cool Fermentation Tips for Hot Weather
- Ferment in a 5-liter (or larger) water-sealed ceramic crock. The larger container and thicker walls create a more stable environment and results in consistently high-quality sauerkraut. Fermentation Crocks: The Who, What, Where, When, Why and How
- Ferment seasonally. Before refrigeration, this is how the harvest was preserved for enjoyment during the cold, winter months. This necessitates a way to store a year’s supply of sauerkraut – that is, a second refrigerator! 5 Ways to Store Fermented Sauerkraut [One is Controversial]
Five years into my sauerkraut making journey, not only did I have a second refrigerator – and a garage to house it, but I also had access to “winter” cabbage and for the past ten years have been making a year’s supply of sauerkraut each fall. Game changer!
What to Do While the Mighty Microbes are Working for You
Once your jar of sauerkraut is safely packed and sitting in the right spot, your work is nearly done. Prepare yourself now for a long watch-and-wait period while our wonderful world of microscopic friends goes to work for you. You may be a bit nervous just leaving that jar alone on its own. Trust. It will not putrefy and turn to poison.
Here are a few tasks and tidbits to help you through the weeks ahead.
Catch Any Overflowing Brine
Your jar should be sitting in a small dish to catch the brine that typically overflows in the first few days. Check your dish daily during the first week. Empty and toss brine as need be.
Ideally, you do not want to lose this precious brine. It helps to keep your ferment anaerobic and provides moisture in your jar of finished sauerkraut. Brine overflow is caused by:
- Air bubbles trapped in your sauerkraut mixture.
- Jar packed too full. You’ll want to get into the habit of leaving 1-2 inches (3-5 cm) of space between the top of your packed sauerkraut and the top of your jar. This gives a place for the brine to go as your packed sauerkraut expands.
- An unusually active batch. This is generally due to extra-high sugar levels in your ingredients and is more common if your sauerkraut includes shredded beets or other extra sweet ingredients.
Clean Airlock
If you are using an airlock, brine can flow up into the chambers. If this happens, wait until the bacteria at the early stages has finished creating the high levels of CO2 that cause the brine to move up – around Day 5 – then pop off the airlock, wash well and replace. If, however, small bits have somehow found their way into the airlock and it looks clogged, go ahead and take care of that right away.
Make Sure Gases are Escaping
If you are using a lid with some type of airlock, gases will escape as need be without any intervention by you.
If you are using the white plastic lid I recommend, or some other lid without an airlock, you may notice that the lid is bulging. This means you screwed it on too tight. To release the trapped gases, carefully loosen the lid just a tad, stopping the second you hear gases escaping or see liquid seeping.
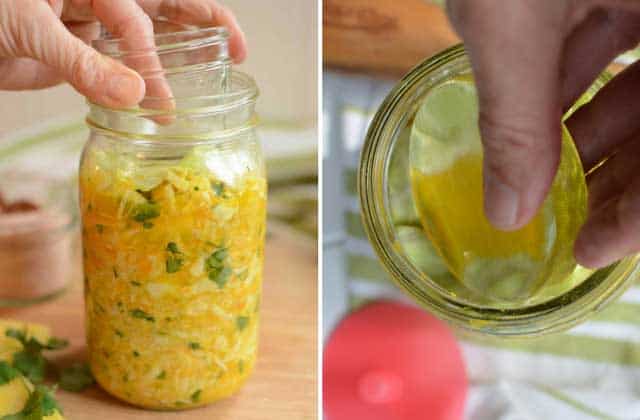
Ignore? or Nab? those Floaty Bits
You should have placed a Floaties Trap – a cabbage leaf cut to size – on top of your packed sauerkraut, and below your weight. Most bits are held under the brine by this, but a few small bits might still manage to escape.
I generally leave them be though by being exposed to air, mold and yeast can grow on them. If you are overly concerned, go ahead and open your jar and fish them out.
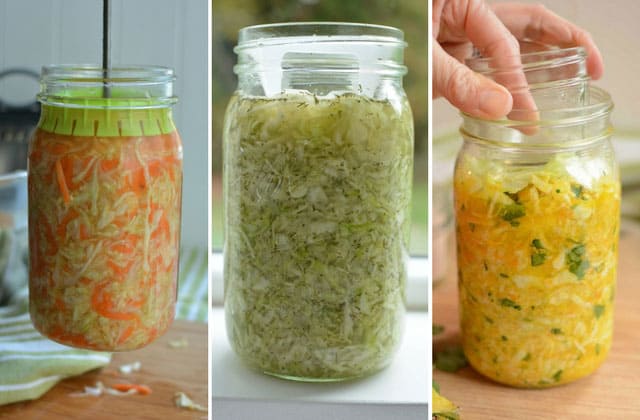
Watch for Fermentation Signs

These are the typical changes that your ferment will go through as if transforms from salty cabbage into flavorful sauerkraut.
Tiny Bubbles
Within a day or two, you should see little champagne-like bubbles slowly moving through the sauerkraut and rising to the surface. With some batches (usually those exceptionally high in natural sugars), you may even see a foam-like mass of bubbles collecting on the surface.
These bubbles are most predominate during the initial few days when the first bacterial strain to go to work (L. Mesenteroides) are eating the sugars in your cabbage and vegetables. This produces carbon dioxide, hence the bubbles. Their work also increases the acidity of the brine. When the acidity reaches 0.25 to 0.3% (calculated as lactic acid), the L. Mesenteroides die off – around Day 5 – and the bubbling slows down.
You may also hear an occasional fizzy sound as the bubbles work their way out of your jar.
The amount of bubbles you see depends somewhat on the sugar levels in your cabbage, which can vary quite a bit depending upon variety and growing conditions. Nutritional data shows that the sugar content in 5 types of raw cabbage ranged from 1.18 gram to 3.83 grams per 100 grams.
Though this is one of the key fermentation signs, don’t panic and toss your jar if you don’t see bubbles. They can be elusive and not every batch of sauerkraut progresses through each stage with perfect timing. You are not fermenting in a climate-controlled laboratory!
To reassure yourself that fermentation is progressing, try a few solid taps on the outside of the jar. You should see some bubbles begin to move up the sides of your jar. If not, and if your home is especially cool, you might need to move your jar to a warmer spot.
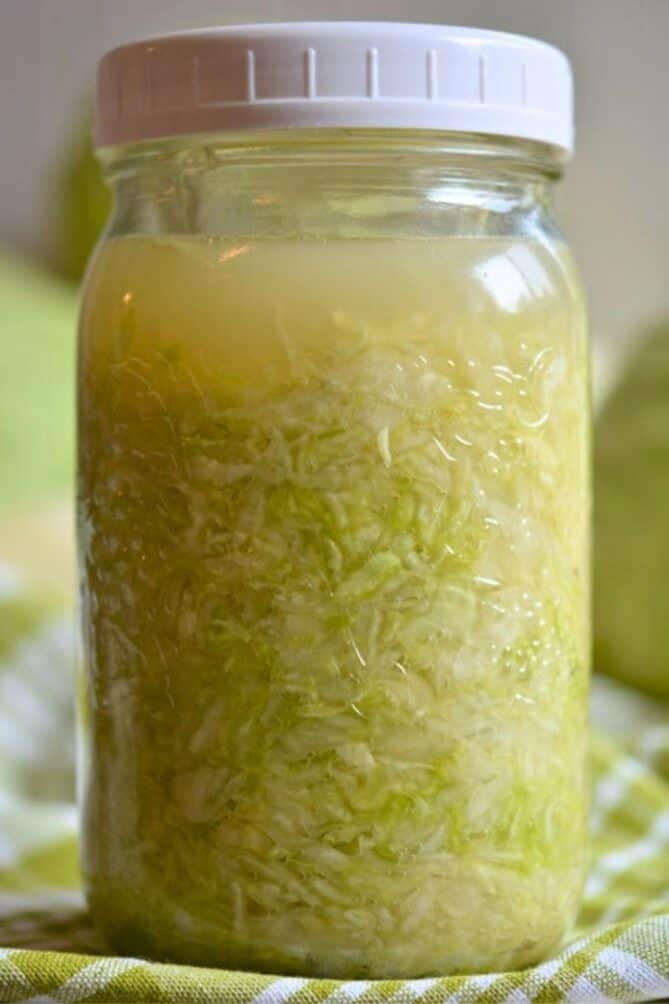
Cloudy Brine, White Specks and Color Changes
The brine in your sauerkraut may slowly change from clear to cloudy and you may notice some white sediment forming at the bottom of the jar. This white powder is from bacteria and is perfectly normal. If your sauerkraut contains beets, turmeric, or other deeply colored vegetables, you may see the brine change to match the color of what you are fermenting. You may also notice dirty specks of color – especially when using carrots or beets – forming at the top of your jar.
The cabbage and vegetables in your sauerkraut will lose their brightness and the cabbage will become somewhat translucent.
Strong Odors
Old gym socks? Rotten eggs? Sulfur? Even bleach!
Yes, the smell is one of the fermentation signs to “look” for.
Those are just a few of the terms used to describe what fermenting sauerkraut smells like. The sulfur-containing compounds in cabbage – and other cruciferous vegetables – are what produce these strong and pungent odors. Just remind yourself the numerous nutritional benefits they are packed with as your nose adjusts to the odors. Sadly, many a spouse has banished fermentation from the home due to the smells of fermentation.
For some, however, they are not sure if the smell indicates all is well in their jar and they worry that their fermenting sauerkraut is turning to poison. It isn’t!.
But, if you are totally new to sauerkraut and not sure how it should smell, buy a jar of sauerkraut to get a sense of what sauerkraut smells like. Look for raw, unpasteurized sauerkraut in the refrigerated section of a natural foods store. Compare its smell to what you have fermenting and nibble on it while you wait for your sauerkraut to ferment.
If, however, your sauerkraut smells like rotting or putrid food, you’ll want to toss it. Try to figure out what went wrong and then try another batch.
Browning?
If you are fermenting during hot weather, or if your brine levels dropped to expose your top layer of sauerkraut, you may notice that the top layer of your sauerkraut has turned brown. This is from oxidation and this section will have reduced levels of Vitamin C.
The general recommendation is to toss this oxidized layer when you get ready to eat your sauerkraut. Those who hate to waste can just mix the oxidized layer in with the rest of the sauerkraut.
You may also notice browning when using beets in your sauerkraut recipe. This is the color leaching out of the beets, usually if they’re old and are no cause for concern.
You may also notice the brine turning brown. This is usually due to fermenting in warm weather.
Monitor Brine Levels
Brine movement by temperatures. For most of the first week, you’ll notice plenty of brine and your packed sauerkraut should remain under this brine. However, you may observe that the level of the brine moves up and down throughout the day. In fact, I find it rather fun to monitor the temperatures in my home by the brine level in my jar of fermenting sauerkraut. Our house tends to be cooler at night and warmer during the day. When I first check on my jar in the morning, I might find the brine level is below the top surface of my ferment. Then, as the house warms up, the brine level rises to almost the top of the jar.
Brine drops below the top of sauerkraut. After the first 7-10 days, you may see the brine level drop and the upper part of your sauerkraut remain exposed and not covered in brine. This is normal, especially in the small environment of a jar, and happens when the active stage fermentation is complete. No worries. By this point, the lactic acid has reached a high enough concentration that molds and yeasts can’t grow on the exposed surface.
Add extra brine? I used to keep adding brine at this stage only to find it disappear again. I also found that not only did the additional brine add extra salt, but that it diluted the flavors I worked so hard to achieve. I no longer recommend adding brine to your ferment.
Deal with Heaving
Do you notice your packed mixture of sauerkraut expanding and moving up in your jar and causing brine levels to rise? This is “heaving” as described in Malolactic Activity of Lactic Acid Bacteria during Sauerkraut Fermentation:
“Heaving has been described as the increase in sauerkraut volume because of rapid CO production by heterofermentative LAB, resulting in gas entrapment within the sauerkraut and a rise in brine level in the tank.“
In other words, excessive CO2 is being produced. Rates are influenced by the concentration of malic acid in your particular head of cabbage. The Leuconostoc mesenteroides bacteria that are active during the first few days of fermentation, are converting malic acid to lactic acid and producing CO2. The more active the Leuconostoc mesenteroides, the greater the CO2 production.
By the way, bacteria are broken into two main categories: Homofermentative and heterofermentative. Heterofermntative bacteria produce more than one compound: lactic acid, acetic acids and alcohol in this case and homofermentative bacteria, just one compound. This gal that barely passed her high school biology class is still learning. 🙂
Trapped air bubbles forcing brine out? If air bubbles get trapped in your sauerkraut, the mixture will expand and force your fermentation weight up, making it look like there is no brine.
To release these trapped bubbles, first, remove the lid, then either push down on the weight, slide a butter knife along the inside of the jar or poke the sauerkraut with a bamboo skewer. Doing so will release the air bubbles and allow the sauerkraut to condense back down into the jar and the brine to once again cover the top of it. This will ensure that your sauerkraut mixture remains below the brine and that fermentation unfolds in the absence of oxygen.
Consider Adding a Fermentation “Gate” to Your Fermentation Toolbox
As I expand my fermentation repertoire and also better understand why my ferment might bulge above the brine, I am slowly seeing the benefits of a device that is strong enough to contend with the power of the Mighty Microbes furiously working away in a jar of fermenting sauerkraut. I have used fermentation weights – Pickle Pebbles – but find that every once in a while they are not heavy enough, especially with an extra active batch of sauerkraut.
Enter…
Fermentation Gates!
Fermentation Gates is a term I have coined to describe a device safely locked inside the neck of your jar, that no matter how much force you apply to it – or how much gas is created by the Mighty Microbes – it will not open, or move up the jar. Your ferment does not bulge up and out of the brine.
The silicone Pickle Pusher by the Ultimate Pickle Jar,
the plastic Canning Buddies by ViscoDiss,
the stainless steel Fermentation Lid by KrautSource,
the stainless steel – made in the USA – PickleHelix by Trellis and Co. and
the glass jelly jar I use in my teaching recipe are all examples of Fermentation Gates.
See Can I Use Plastic? Silicone? Stainless Steel? for Fermentation for a discussion on how the various materials perform in the acidic environment of fermentation.
Nothing is foolproof, but I am generally finding that my ferments remain below the brine throughout fermentation when using one of these devices. I have reviewed the first three and have been using the PickleHelix, but have yet to put a review together for it. Please note that the link to the PickleHelix might be just for the lids. Their company just moved manufacturing to the US and I believe they may be struggling to meet current demand.
[su_panel url= “https://www.makesauerkraut.com/pickle-pushing-no-float-jar-packer-review/”]
[su_icon_text color=”#9200ab” icon=”icon: thumbs-o-up” icon_color=”#bed738″ icon_size=”20″ url=”https://www.makesauerkraut.com/pickle-pushing-no-float-jar-packer-review/”]REVIEW POST: Pickle-Pushing No-Float Jar-Packer Review: Ingenious[/su_icon_text]
[/su_panel]
[su_panel url= “https://www.makesauerkraut.com/viscodisc-canning-buddies-review/”]
[su_icon_text color=”#9200ab” icon=”icon: thumbs-o-up” icon_color=”#bed738″ icon_size=”20″ url=”https://www.makesauerkraut.com/viscodisc-canning-buddies-review/”]REVIEW POST: ViscoDisc Canning Buddies REVIEW [Simple & Affordable]
[/su_icon_text]
[/su_panel]
[su_panel url= “https://www.makesauerkraut.com/kraut-source-review/”]
[su_icon_text color=”#9200ab” icon=”icon: thumbs-o-up” icon_color=”#bed738″ icon_size=”20″ url=”https://www.makesauerkraut.com/kraut-source-review/”]REVIEW Post: Kraut Source Fermentation Lid REVIEW [Solid Design][/su_icon_text]
[/su_panel]
T&Co. PickleHelix Fermentation Kit – MADE IN USA!Watch for Mold and Yeast Growth
If conditions for fermentation are ideal, rarely should you see mold or yeast growing in your jar. If you do, use it as feedback to adjust things for your next jar of sauerkraut.
Kahm Yeast

Kahm yeast is a thin, white to cream-colored powder that accumulates on the surface of the brine in your ferment. The powder can also appear as a creamy scum if it forms and then the brine level drops below the surface. It is harmless, appears most often during warm weather and with sweeter vegetables, such as beets and carrots.
In the above picture is Kahm yeast on a batch of sauerkraut containing sweet corn and sweet peppers and fermented during the summer. A bit of a challenge. I removed the top layer of sauerkraut and all underneath was flavorful and quite edible.
Due to its powdery nature, it can be hard to remove, and once it has invaded your jar, it tends to reappear after removal. Therefore, most recommend waiting until fermentation is complete when you can carefully remove all of it and then repack your sauerkraut into a clean jar. For future jars, try a bit more salt or wait to ferment at cooler temperatures.
Fermented Food Lab has a post with some pictures of Kahm yeast. I find it is more common on brined pickles and vegetables than on sauerkraut.
Mold
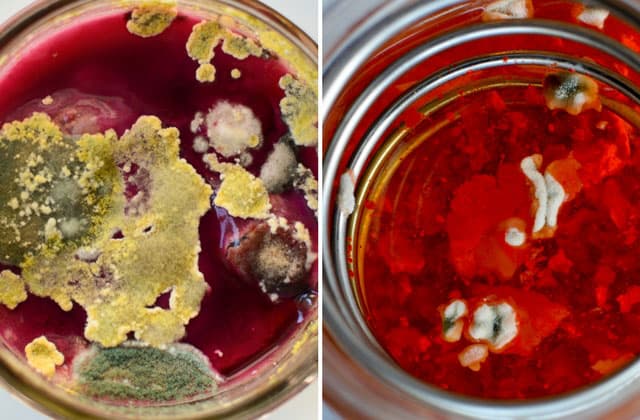
Mold is raised and fuzzy and can be white, black, blue, green or even pink. Mold grows from mold spores that are present everywhere in the air and on the surface of fruits and vegetables. Mold begins growing when spores land – or already exist – on a wet nutrient-rich surface, such as bits of exposed cabbage, and over time grows into a thick layer.
In the image on the left is mold on a neglected batch of fermented beets. It was August and time to leave for a few weeks of vacation. I left my beets to survive on their own in our warm house. This is what I came home to. The unwanted – but beautiful – growth of colorful mold spores.
In the image on the right is the start of mold growth on a batch of fermented red pepper sauce. Peppers are especially prone to mold growth due to their sweetness and fermenting them during the summer.
Fermenters fall into two camps on what to do with mold. The Toss-Your-Ferment Camp believes mold grows invisible tendrils down into your ferment, can never be removed completely and makes the ferment dangerous for consumption.
The Remove-Mold-and-Consume-Your-Ferment Camp believes mold only grows on the surface and can be safely removed. If you fall into this camp – which also includes those of us who have a hard time wasting food – carefully remove the food layer that has the mold and consume the fermented food below, as long as it smells and tastes fine.
The few times I’ve made the decision to toss a jar of moldy sauerkraut, I have removed that top layer of nasty looking stuff to unearth wonderful, tangy and fresh smelling sauerkraut. I then stop myself mid-toss, as my hate-to-waste side kicks in, and save it from the compost pile to then be enjoyed by the family.
I will eventually do an in-depth post on mold, but until then you may find this post at The Fermentation Podcast educational and helpful: Five Questions on Mold and Food Safety.
Check the pH of Your Sauerkraut to Ensure It Has Properly Fermented

- 0.0 – 6.0 pH ACID Short Range Readings ONLY.
- Offers clear bright single color matches at .5 intervals. Detects 0.5 pH unit differences with…
- Commonly used for Kombucha, Pickling, Cosmetics and Soap Making. Not for Water Testing.
If you are the over-cautious type, you might want to use pH strips (0.0-6.0 pH range) or a pH meter (I haven’t used a pH meter yet, but am realizing that pH strips won’t work with colored brines, like in a beet sauerkraut.) to check that the acidity of your sauerkraut has reached a “safe” level.
pH is a measure of the acidity and alkalinity of a solution that ranges from 1 to 14, 7 being neutral. The lower numbers indicate acidity, the higher numbers alkalinity. Vinegar and lemon juice read at the acid end; lye and Milk of Magnesia at the alkaline end. The pH of fresh cabbage is around 7.0 and typically drops to about a pH of 3.4 during the fermentation process.
We want the brine in our sauerkraut to read on the low end of the scale – the acid end – aiming for numbers of pH 4.6 and below. Numbers below 4.6 will tell us that acid-loving bacteria are thriving and that pathogenic bacteria, including Salmonella and E. coli have been destroyed. Literally destroyed. Eradicated. Obliterated.
I find this quite incredible.
Just imagine, you could have purchased a head of cabbage – even organic cabbage – that you didn’t know had been sprayed with contaminated water – water containing E. coli bacteria. It’s now packed in your jar and fermenting on your counter. But, have no worries. Guess what?
Our microscopic friends are working away, producing lactic acid to kill off the bad guys, that E. Coli or whatever other gangs of bad guys snuck on. Enter the marvels of nature and the ancient art of fermentation.
This is why many of us in the fermentation community say it’s safer to eat sauerkraut than a fresh spinach salad. Really!
To test the pH of your sauerkraut, wait at least until the end of the first week, then open your jar, remove your weight, peel back the Floaties Trap and push down with a spoon to grab a bit of the brine. Dip a pH strip in the brine in your spoon and read it according to directions on the package. Since pH strips can be slightly inaccurate, your safest option is to consume ferments that give a reading of 4.0 or below.
Trap Any Pesky Fruit flies
If you are fermenting during summer and you notice fruit flies in your kitchen, you may want to set up a trap to prevent them from sneaking into your jar of sauerkraut. Two effective methods I use are:
Add a drop or two of dish soap to a shallow dish and top with cider vinegar. The vinegar attracts the fruit flies and the soap reduces surface tension causing them to drown.
Place apple cores or other fruit bits into a small bowl and tightly cover with plastic wrap. Use a toothpick to poke a set of holes in the plastic. The fruit attracts the flies and they find their way into the bowl through the small holes but they can’t find their way back out.
Evaluate Your Sauerkraut to See If It Has Fermented to Your Liking
Don’t open the jar!
Don’t let any air into your ferment!
Don’t touch it for 21 days!
OR…
Open daily!
Taste and stir regularly!
What’s a newbie to fermentation – or a seasoned expert – to do?
I fall in between the two extremes.
I feel that the most crucial period for you fermenting sauerkraut is the first week. By Day 7 – under ideal conditions – lactic acid levels have reached a high enough concentration to deem your sauerkraut safe from nasty critters, but, not fully fermented.
During the first week, I try not to disturb my sauerkraut. Don’t lose sleep, however, if you feel you need to open your jar to push your ferment below the brine or remove little floating bits. The process is more forgiving than many of us like to admit. Opening your jar – or crock – is not going to ruin your lovely ferment and you will probably find it helpful to start tasting and evaluating at this point.
At the 7-day mark (5-day if fermenting in a warm environment; 10-day if your home is extra cool), open the jar, pull out the small jar or weight, and smell and taste your sauerkraut. It should start to taste sour and no longer taste like salted cabbage. Its colors should be fading and not bright like fresh cabbage. It will have a pleasant vinegar-like smell. Once you’ve dialed in the fermentation for your home environment and time of year, you won’t be opening your jars as often.
Ideally, you would let it ferment for 3-4 weeks. This allows time for each of the three successive colonizations of hard-working bacteria involved in fermentation to perform their magic. However, this is a learning process and for some, a gradual adjustment of taste buds to this newfound food may be necessary. You may decide your jar is done fermenting as early as 7-10 days.
What to look for to deem that a jar has transformed from salty cabbage to sour sauerkraut?
Color
The cabbage and vegetables are no longer bright green but, instead of pale green or even yellow. Strands will also appear somewhat translucent.
Smell
Your jar of sauerkraut should smell sour, reminiscent of vinegar.
Texture
The texture of your sauerkraut can vary from crisp and crunchy to soggy and soft and is dependent upon the amount of salt used, the temperature you are fermenting at and how long you ferment. There is a personal preference here. I like a bit of a crunch; others are looking for a soft texture.
Taste
You are looking for a slightly sour or tangy taste with a “bite” to it… A clean acid flavor… A bit salty but not as salty tasting as when you first packed your jar… A more complex flavor than just the cabbage you packed into the jar…
A depth of flavor that makes you go WOW! This is GOOD!
If your sauerkraut is not quite where you think it should be, think of fine-tuning 3 dials: Salinity, Time and Temperature.
Is Your “Sour” Kraut Not Sour Enough?
The sour flavor in sauerkraut comes from lactic acid produced by the lactic acid bacteria (LAB) eating the sugars in your cabbage and vegetables. Once all the sugars have been converted to lactic acid, your max levels of tang have been reached.
- Time. If the cabbage you used wasn’t especially sweet you may not find your sauerkraut to be sour enough a few weeks into the process. Let it ferment a few days longer, then sample once again.
- Provide more sugar for the LAB. For future batches under similar conditions, experiment with adding a touch of sugar to your ferment, say ½ teaspoon for a 1-quart jar, which will provide more food for the LAB to then create higher levels of lactic acid.
Is Your Sauerkraut Too Soft?
You can’t rescue the current batch but for future batches, adjust one or all the Salinity, Temperature and Time dials.
- Salinity. Bump up your salt numbers just a tad; add ½ teaspoon (4 grams).
- Temperature. Ferment at cooler temperatures.
- Time. Ferment for a shorter time period.
Is Your Sauerkraut Too Crisp and Crunchy?
To achieve a softer texture, adjust one or all the Salinity, Temperature and Time dials.
- Salinity. Use a tad less salt for future batches.
- Temperature. Ferment at warmer temperatures.
- Time. Ferment for a longer time period.
- Pound! When you are making your next batch and once you have mixed in your salt, spend some time actually pounding your cabbage mixture to break down the cabbage more than is possible by just “massaging the salted cabbage mixture with strong hands.”
Is Your Sauerkraut Too Salty?
Personal preference along with the type of salt you used will play a factor in how salty your finished sauerkraut tastes.
- Use a mineral-rich salt. Himalayan Pink Salt was used in all the recipes. Himalayan Pink Salt – and Real Salt – are mineral-rich salts that impart a greater depth of flavor to foods than ordinary table salt does.
- Use a bit less salt. Decrease the percent of salt used down to 1.5%. (2 ½ teaspoons; 12 grams)
- Add a potato slice. I have not tried this, but culinary experts often add a raw potato slice to dishes that are too salty. In theory, it will act like a sponge, absorbing the excess salt.
- Rinse. Just before eating, you can give your sauerkraut a quick rinse. This will wash off some but not all of the beneficial bacteria.
- Disperse the saltiness. Mix your sauerkraut into a salad or stir into a dish just before serving.
Store Your Sauerkraut
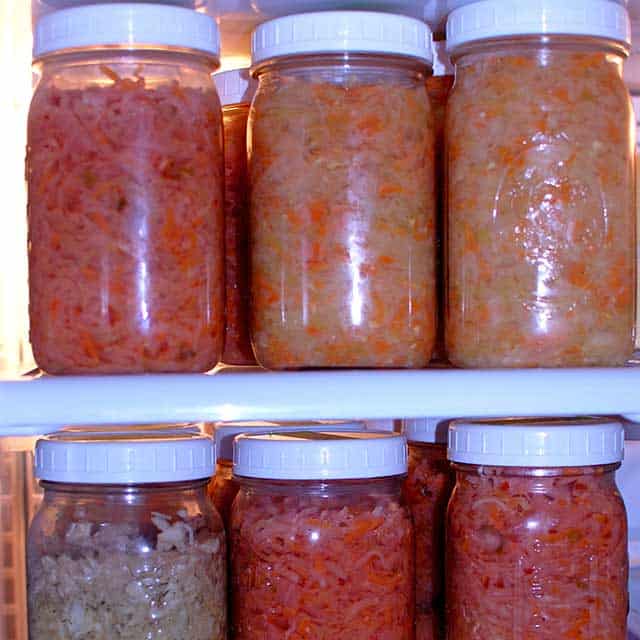
Once your sauerkraut has fermented to your liking, it is time to move it to “cold” storage. For most, this is your refrigerator. Here are some other options. Do realize, however, that your jar of sauerkraut can also be left out at room temperature. It is preserved! However, it will continue to shift in flavor and soften in texture.
Ready Jar for Storage
Remove the weight you used, cleaning it and leaving it available for use in other jars. Wipe down the rim of the jar and clean off any stickiness on the outside of the jar. I leave in my Floaties Trap until I’m ready to eat the sauerkraut. Clean lid and screw back onto the jar.
Enjoy for a Year

A typical refrigerator is set at 35° F (1.6° C). Properly fermented sauerkraut stored at this temperature can keep for a year without much change in texture. The flavor will continue to shift and age much like a fine wine. The coolest spot in a refrigerator is at the back of the lower shelves.
Extra Brine?
If you find leftover brine when you get to the bottom of your jar, don’t toss it! The brine full of the same probiotic goodness as is with sauerkraut. Drink it. Use it in a salad dressing. Or, use it to top off a dry jar of sauerkraut that has finished fermenting.
Use this set of fermentation signs to monitor, tweak and enjoy your jar of sauerkraut as it ferments in your home. What do you like to watch?
Sources:
Fermented Fruits and Vegetables: A Global Perspective
Last update on 2026-07-13 / Affiliate links / Images from Amazon Product Advertising API

Hi Holly. This article is very helpful. Thanks to you, your articles and your eBook, I have now successfully fermented several batches and even gotten my wife started on eating Kraut (she hated the smell and taste in the beginning). I love reading your posts, so keep up the good work and thank you so much for sharing all your knowledge with the world. Peace, love and microbes.
Thank YOU! Wonderful and supportive readers like you make the “job” all the more pleasurable. LOVE your “sign-off” Together, may we populate many homes with many Mighty Microbes!
Sure thing. 🙂
Holly, I have been making kraut for many years. I learned back in the 70’s from a woman then in her 80s. Needless to say, today’s methods are much removed from hers. For starters, she was the dietician for the deaf school here, so she produced it in great quantities. Thus, I learned to use a crock, and then canned it. I always make it in a large batch in the fall using 2, 5 gallon crocks. And, I have always canned it. I would prefer not to can it for several reasons, as you have mentioned. But, with refrigeration space and consumption time needed, I have canned it. Is that necessary? What is the shelf life after I jar pack it, but do not waterbath it? Adele
Canning is not necessary. “Shelf” life in your fridge is at least one year. See this post for more: http://www.makesauerkraut.com/storing-sauerkraut/
I see your recommendation Holly, of keeping the temps ideally between 65 & 72 F. My apartment is sitting at 74 F…..will this be ok? I could open the window a crack to maybe bring down the temp slightly if necessary…..what do you think?
Yes, that’s the ideal. You’re not much over that. You should be fine. But… you can shorten fermentation time, try to cool the room, find a cooler spot in your house if you want to. See more here: http://www.makesauerkraut.com/fermentation-tips-hot-weather/
I made my first batch of sauerkraut 2 weeks ago, using a Kilner fermentation set. I used only 1 head of cabbage. Small white particles appeared on the surface after a few days, that I removed and they clung together. Then they appeared again in a few days, this time growing into a film that covered the surface of the kraut completely. Today I removed it and again it clung together as a whole piece. It has small bluish spots on it, but I think these are from pieces of cabbage that floated to the top of the brine ( I forgot to put a cabbage leaf under the weights). This white thing has a slightly moldy smell. I tasted a tiny bit of the kraut and it tasted fine, although salty. Do you think I have mold, or is it Kahm yeast? My father made a big crock of kraut every year and I helped him, but never paid enough attention. I’m so grateful for your site and help.
Hello Janis, Google some pictures for help, but Kahm yeast smells closer to alcohol where as mold smells more musty. With mold, most just remove the layer containing it and find fresh and tangy sauerkraut below. Kahm yeast tends to fall apart acting more like a powder and mold tends to stay together as one clump.
Here is my solution to the the problems of brine overflow, air infiltration, bug invasion and brine shortage.
https://drive.google.com/open?id=1nSuKl1hbO9Qfqr2oFailoKEYeZlyXEhC
The fermenter is a 10 inch tall 6 inch inside diameter food safe vase I found on amazon. This is just big enough for a medium head of cabbage and some other stuff like bell peppers, hot peppers, onions, carrots, whatever.
The weight is an hourglass shaped food safe vase I also found on amazon. I fill it about 1/2 to 2/3 full of water. The bottom of the hourglass is about 5 3/4 inches so it is a close fit but I do put a couple layers of cabbage leaves in as a seal.
The plastic cap is a common ordinary cheap shower cap from someplace like Sally Beauty to keep the bugs out and release any pressure.
Something to think about. CO2 is heavier than air so if I never pull the weight out, I don’t disturb the layer of CO2 on top of the brine and I never get any growths that need oxygen.
Since I am a food adventurer, I like to be surprised by the flavorers. So not opening it till day 10 to 15, when, as long as temperature stays above 60 deg but below 75 I should have a good ferment, is not a problem for me.
The batch in the picture is a plain Jane kraut for a friend that is not adventurous.
My current favorite is cabbage, red and yellow bell peppers, red onions, and Poblano Pepper. I have friends that love it too. We live in south Texas so I call it Tex-Mex Kraut.
Red Cabbage, red onion and a red rocotillo pepper when I can find them is also very good with a nice greasy/salty plate of smoked brisket and some pinto beans.
Quite inventive and does the trick. Love your Tex-Mex combination.
I grew up eating homemade sauerkraut but it wasn’t until about 3 years ago that I found out why. I had always thought it was because my maternal grandmother (who learned to make kraut from her German grandmother) was from Germany and that may have some relevance, but, about 3 years ago I had a very severe bout of Diverticulitis (been having minor bouts every couple years for nearly 35 years) and my now 103 year old aunt heard about it and got hold of my now 80 year old cousin (who also has it) to give me the family secret (Diverticulitis seems to have a genetic component) for controlling the Diverticulitis. Home made, rough cut, sauerkraut. At least a cup every couple days. Now coming up on 3 years without an attack. The newest research on Diverticulitis is starting to confirm what my German Great Great Grandmother knew nearly 250 years ago.
But, plain jane kraut gets boring so I started spicing it up.
Eating a batch right now that is Cabbage, red and yellow bell pepper, colossal sweet onion and Anaheim pepper. This is the only batch I have made in my hourglass weight fermenter that overflowed but that shouldn’t be a surprise since that colossal (bigger than a softball) sweet onion has a lot of juice. I won’t make the weight as heavy the next time.
Got a batch working that has cilantro and garlic in it.
Congrats on you being able to manage that Diverticulitis… with sauerkraut, even! So, very powerful. Thanks for sharing with all of us. 250 years of wisdom. Please pass it on to the next generation. 🙂 And, keep creating those fabulous ferments.
Followed your 7 simple steps, made first gorgeous jar of saurekraut. Been in love with all things pickled my whole life, don’t know why it took so long to try this. But thank you for this great instructional. I did want to ask about the garlic, which turned a distinct green color. What do you make of that? Thank you for everything!
Hello Jessica, Congratulations on you success. Now, you can add one more pickled-love to your life. 🙂 Green garlic is normal – but you don’t see it often – and due a compound in the garlic that breaks down in the acidic conditions of fermentation. All is good.
Is this woman amazing, or what! Yet another fantastic article from the sauerkraut wizard lady! Amazing information. I could read your stuff forever. You’ve got new people fermenting with confidence and know-how. Thanks so much, Holly. Hugs. 🙂
🙂 Hugs gratefully received! It was a fun article to put together.
You mentioned that a second refrigerator would be needed to store a year’s supply of fermented food. I’m wondering if a root cellar would be cool enough for long-term storage? How cool does it need to be kept?
See this post: http://www.makesauerkraut.com/storing-sauerkraut/
The warmer temps of your root cellar work. It’s just that it won’t keep quite as long.
I made some sauerkraut and well it’s only the third day, but it seems like the brim is a little slimy. I used a different sight to do it by and then I found yours. What could be wrong or is that fine
It’s the bacteria that are up to no good. Give them a bit of time and they’ll rebalance and the slime will go away. More in this post: https://www.makesauerkraut.com/sauerkraut-fermentation-gone-bad-troubleshooting-tips/#Slimy_Brine
Hi Holly, I’ve just tried my first jar and it tastes wonderful, although my results are somewhat unique to what you’ve described above. I live in Asia, average temps around 85.
1. I followed your newbie recipe (cabbage + carrot), measured everything.
2. Fermented for 2 weeks, I didn’t touch it. First week lots of brine spilled over. Lots of bubbles, fascinating to watch. Week 2 the brine levels reduced again, and the overflow pan solidified into a brown crystalline sticky residue.
3. 14 days later I’ve opened it up. Brine is still covering the top, and floating on the top above the ‘sealing’ leaf is a lot of rust coloured sludge. Is that normal? What is that?
I scooped the sludge out, lifted the top leaf off and underneath looks great.
It smells like brown sugar and thats a surprise! I thought it should smell like vinegar? Whats going on here?
Taste is interesting/amazing?? Light tang, sweet, acidic – yep mixture of a lot of things! However it doesn’t have that familiar sour/vinegar taste that I’m used too. Is this safe? Whats going on here?
My current thoughts are that fermentation hasn’t finished yet which is why I can still smell/taste the sugar. If I leave it another few days or week its going to get more and more sour?
Thanks so much for the amazing information in your website!
Rob
The bacteria work through the fermentation stages a bit differently in the warmer weather. The rust colored sludge is most likely from the carrots and depending upon how many you added, that could contribute to the sweetness you’re tasting. I’ve never heard a “brown sugar” description before.
You do say “tang” and “acidic” so it should have fermented.Give it a few more days. You might want to grab some pH strips to be sure the pH has dropped but you would smell something nasty if it hadn’t fermented. https://www.makesauerkraut.com/fermenting-supplies/#pH_Test_Strips
Look at trying to cool things down for your next batch with one of these tips: https://www.makesauerkraut.com/fermentation-tips-hot-weather/ You’ll get better flavor development with a cooler ferment.
It has soured more over the week, however the smell hasn’t changed all that much. My gut is changing however so its definitely alive and working! Much more effective than the stuff I have been buying at the supermarket.
The jars that I used were slightly smaller than what you recommended, so I had some left over which I put into a 2nd jar. Interesting also, I opened the 2nd jar tonight (same batch, same mix) and it had a much more sour smell and taste. The taste was the much more familiar taste I am used too.
The only difference is that this second jar had much less in it. Both were weighted down with plenty of brine on top.
Thank you for the update. Interesting how that second jar tastes so different. We can do our best and after that it’s up to the bacteria. 🙂 The mystery of the microscopic world.
Thanks Holly. I’ve left it out but will start eating it to see how it changes over the week. The smell sugary smell is not what I was expecting at all either. I’ll let you know how it changes over the week.
Hi! I just made 2 batches of fermented sauerkraut. I have made this before but it’s been a while. I just tried them and they taste INCREDIBLY salty. Also, they did not seem to sour at all? Do you know if this means they did not produce probiotics? I left them on the counter for 10 days. Temp was fine I believe. I did notice that there was barely any brine in the jar (except for at the very top above the weight.) Any thoughts/suggestions on how to salvage all this cabbage?
Did the colors fade? Do you know how much salt you used? What kind of salt?
I would use these batches mixed into salads or other ways to disperse the saltiness. Let me know how you calculated the salt on them and we’ll see what to do for future batches.
Hello, this is my first time fermenting and I have chosen to make 5 of your recipes using cabbage from my garden. I made sure to use a fermentation weight and the silicone nipple like lids. However, I did not use the extra piece of cabbage over the top because I thought the weight would be enough. I have fermented the sauerkraut on my counter for a total of 4 weeks now. I do not have air conditioning, so the temperature of my house has averaged between 73-79 during this time frame. I checked the sauerkraut after 3 weeks and it was perfect and fantastic! I kept it out on the counter for an additional week, thinking that this would increase the beneficial bacteria level. However, upon inspecting the sauerkraut at this point, I noticed that the brine was now below the kraut surface and there was a white mold forming on top. I decided to scrape the mold off and wipe the interior of the rim, then stored in the refrigerator. I am wondering if I need to keep the weight or silicone fermentation lid on while in the refrigerator, or if i should use a regular flat sealing lid? Although I have seemingly removed all the mold and the sauerkraut still tastes and smells great, will it regrow mold while in the fridge if the kraut is above the brine? Thank you for the fantastic recipes and all of your guidance!!
Good troubleshooting with your mold. No need to keep the weight or silicone lid in place. Those are just used during fermentation. Just use regular flat sealing lid, though plastic lids are preferred since they don’t corrode with the acidic brine. https://www.makesauerkraut.com/fermenting-supplies/#White-Plastic_Storage_Caps
Mold should not regrow. For future batches, if you are still fermenting under the warmer temps, you don’t have to ferment as long. Fermentation happens quicker at the warmer temps. That might help prevent the mold, too.
Thank you for including such clever suggestions about fruit flies! How many others writing on fermentation would have thought of that? No one else as I’ve been studying how to make beet kvass with less salt and reading lots about fermentation. They began arriving today so something may be going well in the jar.
I’ve eperienced them and needed a solution. Thank you for your kind works. :=)
I have been making sauerkraut for a few years now and have never had problems with mold except for my latest batch! Around day seven, the floater trap cabbage leaf was growing white fuzzy fur (looked like a fat, furry caterpillar). I removed the glass weight and washed it then I removed the infected cabbage leaf, wiped down the inside top portion of the jar with a paper towel. I put the weight back in the jar then placed the lid back on. I didn’t have any cabbage leaves to replace the floater trap I removed. Now I’m worried that the top layer of the cabbage is exposed to the air in the jar. The brine was still covering most of it but it wasn’t fully submerged anymore. Should I re-cover the top of the cabbage? Can I use something besides a cabbage leaf?
The mold can creep in when we least expect it. It sounds like what you are doing is working, so don’t fear future batches. Was it warmer? You did the right thing by removing the cabbage leaf. Since you still have brine coverage, you should be fine. You could but in a folded up piece of parchment paper. Some use a plastic lid cut down to size. Enjoy!
Thanks for your speedy response! The room wasn’t any warmer than usual – I think the cabbage leaf must of had the spores already on it before I used it ( I obviously didn’t wash it adequately). I checked the my jars yesterday and they still look good with lots of brine so I will probably leave them – just one more week to go before they are done! Thanks again for your help.
You’re welcome! Mold spores are also in the air, so don’t feel the need to start washing your cabbage, though giving the topper leaf a quick rinse wouldn’t hurt. I’ve never done so. 🙂 Enjoy… in one more week.
Good article! You mentioned a bleach smell (“If it smells like bleach, should it be tossed?”) but never told us the answer. I’ve made lots of fermented products, but this is the first one that has a strong chlorine smell. Thanks!
No need to toss if there is a bleach smell. More on why here: https://www.makesauerkraut.com/frequently-asked-questions-sauerkraut/#Why_does_my_jar_of_fermenting_sauerkraut_smell_like_dirty_diapersor_rotten_eggs
Thanks, great info!
Hello Holly,
I think I’ve read things through, but I’m still not quite sure when I can remove the weight for good. For instance, you wrote after the 1st week to test the pH level. Can the weight be removed permanently at that time? I’m 2.5 weeks in and removed the weight, but non kraut is above the brine. It seems like this may be okay, or should I put the weight back in? I’d like to wait a full 3-4 weeks before eating it, yet we also live in Italy and I want to make sure our guts have a lot of good critters keeping us safe against the coronavirus.
Grazie mille!
I wait until I’m ready to move the ferment into the fridge before I remove the weight. Ideally, you want to keep the sauerkraut below the brine for the entire time.
However, sometimes the glass weights are not heavy enough to do so, so I’m saying not to worry if it is not below the brine after the first 7-10 days. Stay well. Italy has been hard hit. Here in BC, Canada, our cases are just starting. Time will tell how we weather this “storm.” It’s good that you’re doing what you can to keep your immune system strong.
Thanks, Holly!
I kept the weight out, because the brine has all but disappeared. I’d like to keep it out of the fridge for another week to continue building good critters and flavor, but I also don’t want to make a mistake. We can’t afford to do anything silly and risk a hospital visit. Not only are the hospitals at capacity, but it greatly increases our chances of getting the virus.
Yes, Italy has been hit very hard. It’s agonizing to know how many are suffering and grieving. How sick family members go into the hospital alone and too many have died alone (without family – the healthcare workers have been extraordinary). It’s troubling to watch it unfolding in the US but without the nationwide restrictions…frightening and frustrating actually.
I hope you continue to stay safe in BC!
Grazie mille!
Yes, do your best with your ferments. Thankfully, the process can be forgiving and the bacteria do a great job of producing the lactic acid for preservation.
It is disheartening to hear the inside details on what you are dealing with in Italy. Being alone, dying alone. Thankfully, we have put many restrictions in place in BC. Fingers crossed that numbers stay manageable but, it still too early in the process to tell. Stay well!
I truly appreciate your taking the time to respond. I decided I’m going to put it in the fridge tomorrow – 3 weeks.
Today was another tough day here and now more cases have emerged in our little town. We eagerly await for this nightmare to pass and for the return of health and well-being.
It’s a relief to me when I see political leaders taking action for the health of their citizens above all else, even if it means tight restrictions to keep them safe. Looks like you have some wise decision-makers in BC. You stay well, too.
Grazie mille ancora! Un caro abbraccio.
You’re welcome. All my best and be patient for the 3-week wait for delicious sauerkraut. 🙂
Hi Holly,
So I make sauerkraut every couple of months, I basically try to start a new batch as soon as the last batch goes into jars and into the fridge to eat. I use a gallon sized jar which typically holds 2 medium sized cabbages with plenty of head space to allow for room to expand. This gives me roughly 3 quarts of finished kraut. I found your site because occasionally I get some brownish sections at the top of the jar and I just wanted to know why this happens. Glad to know it’s just oxidation. I have always just mixed the little bit into the rest when I transfer to jars. Currently I do not have any space to make and store any large quantities of sauerkraut but hopefully in the near future our garage will be completed along with the brew room (husband is a brewer) which will have a walk in refrigerator and also a walk in cold room (fermentation room) so I will have to consider making a years worth at a time.
So now my question, Does sauerkraut made frequently throughout the year, obviously not always using winter cabbage, still have the same health benefits? Or am I wasting my time?
Also since the sauerkraut I make doesn’t last too long I typically don’t sterilize my jars when I transfer from the gallon jar to the quart jars? If I am able to start making a years worth of sauerkraut at a time I think I would still use the gallon jars (I have a lot) then transfer to smaller jars, would it be best to use sterilized jars since the kraut will be stored for a long period of time?
Thanks,
Debbi
You will jump for joy when you have a second fridge. 🙂 Totally transforms the fermentation process. All of a sudden it becomes a way to preserve whatever produce is at its seasonal peak.
Do worry about not fermenting with ideal cabbage. It does store fairly well. Just don’t use cabbage that is dry and brownish. There are still health benefits though I don’t have research to back that up. I do know of some companies that test their sauerkraut product for bacteria throughout the year and haven’t seen big swings in numbers.
No need to sterilize jars even when storing for a year. Just a gentle soapy wash and a good rinse. The bacteria work best that way. I find that when people sterilize everything, the results are not as good. Killing off too many bacteria. 🙂 You might want to consider a water-sealed fermentation crock. A 5-liter size is quite nice. https://www.makesauerkraut.com/fermentation-crocks/
Hi there Holly, my first venture into fermentation.
Day 10 today 24th June 20. Brine was just enough to cover, however now not enough. Have removed the Big leaves on top as one had mould (out the brine).
Having read all your methods the only Question now as I leave it out on the shelf is – do I keep air out or allow a slight bit by not tightening down hard? For the 21 days.
Thank you very much. Cecelle (South Africa)
Brine often disappears – or, is pulled back into the cabbage cells – after the first week or so. See more here: https://www.makesauerkraut.com/dry-sauerkraut-gut-shots-recipe/
You can let if continue to ferment until it reaches the flavor you like. No need to loosen the lid. The active stage with high gas production is only the first 5-10 days. Keep the lid tight, now.
Hello. I am on my first ferment. Sauerkraut with cabbage, cucumber and dill. I live in the Virgin Islands, average temperature in the house is 85°F. I opened the crock on day 3. There are a lot of foamy looking bubbles colored by I assume dill and cucumber. There is really no smell to it. Is that what it is supposed to be doing? Do I leave the bubbly foam or remove it?
Congrats on your first ferment. Feel free to remove the foamy bubbles if there is a lot of it. With higher temps, your ferment will progress rapidly. You might want to look at putting it in an ice chest as explained in this post:
https://www.makesauerkraut.com/fermentation-tips-hot-weather/
It should soon smell tangy and fresh, reminiscent of vinegar. You can also use a bit more salt in the next batch. Feel free to share a picture or ask more as time goes on.
https://uploads.disquscdn.com/images/a53e6f0a410eaa705f69b388530603b5e25401c72b9401da2ef66799862ad5e5.jpg
I guess since it is a large crock, that it won’t fit in an ice chest. 🙂
I would scoop all that off and grab some sauerkraut to taste. The colors should have faded. Bubble mean fermentation is happening. With the heat, it will ferment faster than usual. You might only need to ferment it for two weeks, at the most.
Hello again. I started a new bat https://uploads.disquscdn.com/images/a192d8e7aa447c0b4810abb7b99b5e2dd61664bcd62fec1430f0b9ce2edec920.jpg ch. I got a very small mini fridge that keeps the temp between 65-70°F. At 7 days it is already to a PH of 3. Should it have gone that fast? It smells fine, a little sour tasting. I put cabbage, some garlic cloves at a 2.5% brine.
There is no smell except for the smell of cucumbers and dill. I fished out the bubbles and floaters. It is in a water sealed crock. Should I taste it now?
Yes, the pH drop is fast. What a delux setup. From experience, and what I’ve read, those temps will give you the best flavors. Enjoy! If you find it too salty, feel free to drop the % down to 2.0.
I started making my first sauerkraut a week and a half ago. I tasted it and I thought it was OK but too crunchy for me. My husband tasted it tonight and said it tasted “BAD”. He is very sensitive to the taste of bitter. I taste a bit of bitter, but it has actually backed way off for my taste buds. So am thinking the longer it sits the better it will taste to him. (True or false?)
Up until now we have been buying “Boar’s Head” brand from the deli case. It is not cooked and does not have vinegar in it. I was hoping that homemade would be similar in taste and frankly expect it to be better than what we buy in the deli case. My day temps are at 65 degrees and down to 63 overnight. Is the overnight low going to be detrimental or just slower? And HEY! I just got a new refrigerator this week with the intention of keeping the old one in the pole-barn for my seeds and the surplus of eggs I have from time to time in the summer months… now I have another good use for it as well; a home for my ferments. So earlier tonight I was feeling a bit down when he said the kraut tasted bad (because of the cost of the tools/supplies needed to keep those ferments growing and bubbling along) but now that I have read your information I think I don’t care so much if he likes it or not. If he doesn’t eat it then it just means more goodies for me! Sorry for the long response, but I am just so glad I found you. Thank you!
The bitter taste could be from garlic, if… you added too much. One place to explore. Also, did you start with sweet-tasting cabbage? That can also make a difference.
If you’re trying to duplicate a commercial brand with a softer texture, slice your cabbage thinner than thicker. And, with your lower temps, it will need to ferment longer, most likely, to get the flavor you’re looking for.
Enjoy that new home for your ferments. A great score!
Hi Holly. I have a batch of Sauerkraut that fermented 108 days. There is definitely Kahm yeast inside. What concerns me is there appears to be mold on the outside of the crock. The kraut tastes amazing and didn’t appear to have mold inside. Is it safe to keep eating? Ph is 3.5. Was done with a 2.5% brine. https://uploads.disquscdn.com/images/f3f2bbe5473f399d9910883e57ebc36027ade03eba220312a87187453493e27a.jpg https://uploads.disquscdn.com/images/a289a5c8c663308e5465715897d3b79a24989b83486ccfc8332eb71ebe10a756.jpg
Thanks for all the details and pics. 🙂 Kahm yeast is not an issue, except for flavor impact, which is usually a yeasty and or alcohol.
You have a crock with cracked glaze which means the moisture can escape the crock and that is where your mold grew. Mold needs air to grow, so I don’t see an issue with enjoying the contents. Any mold growing on the inside would be on the surface, which can be removed. Hope that helps.
Hello, I'm on my first batch of sauerkraut in a 5 gallon crock, which I covered with a thick towel. The kraut is fully submerged under a pie plate and weighted mason jars. I keep my house at about 75 degrees during the day and a bit cooler at night. The kraut has been sitting for 10 days. I had a few very small bubbles for about 3-4 days, but now they're gone. I've only had to skim off some very minor floaters that had a bit of mold on them. The brine still tastes very salty, and I don't smell any "kraut" smells, or any smells for that matter. I'm worried I've done something wrong. Is it still working??
I would go by smell and color. Have the colors faded? Is there a vinegary odor? With it as warm as you say, there should be activity. The very salty taste would indicate that the bacteria are not eating sugars to produce lactic acid, the tang. How fresh was your cabbage? Did it have moisture? Sweetness?
Useless. All this text, i just need to know how it smells normally. You say sulfur and rotten egg smell is normal, but later on you say if it smells like it s gone bad you should throw it away?!?! Those are the same things!
The sulfur smells comes from the cabbage (and other members of the bassica family) and will vary depending upon how the cabbage was grown. You won’t always smell it. Normally, vinegar like odors. An overpoweeing noxious odor with rampant mold is when I toss.