
 This post may contain affiliate links which won’t change your price but will share some commission.

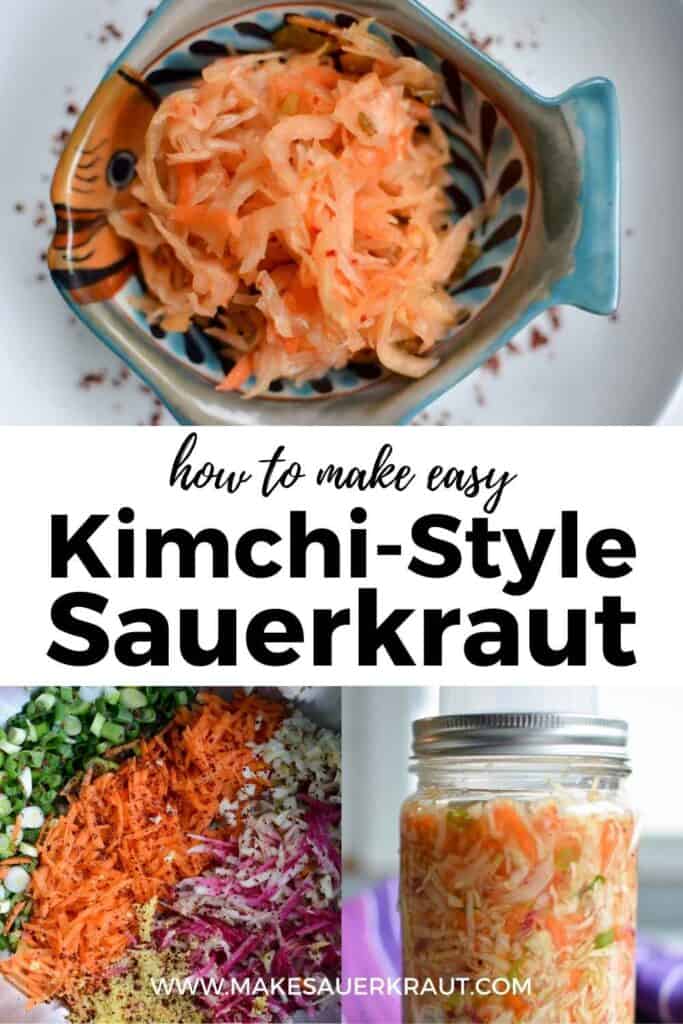
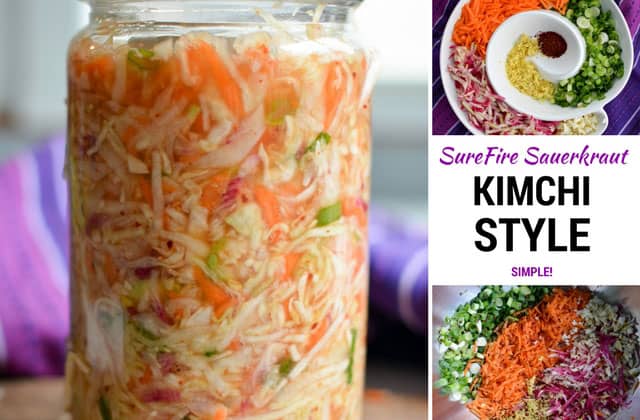
Discover the simplicity of making kimchi sauerkraut with our recipe that bypasses traditional complexities like soaking cabbage and crafting kimchi paste. Perfect for those with a busy schedule or anyone keen to dive into homemade fermented delights, this recipe promises traditional kimchi flavors in a fraction of the time.
One reader, Megan, commented: “I made this as an emergency birthday present for my husband during our New Zealand lockdown. He opened and tasted it last weekend and said we never need to buy kimchi again. He tolerates other sauerkrauts, but this one he loves. I’m calling that a success!!! Thanks, Holly, for the recipe, an easy first step into kimchi-making.“ ★★★★★

Years ago, a friend who served in the Peace Corps in Korea talked of one of his most difficult cultural experiences: learning to eat kimchi, the cornerstone of the Korean diet, which is served morning, noon, and night. He couldn’t stomach its strong smell and intense taste.
Fast forward forty years, and I’m now making kimchi, loving it, and wondering what my friend was complaining about.
Well, while researching how to make traditional kimchi, I discovered why. I stumbled across a missing ingredient in my original Americanized kimchi sauerkraut recipe: fermented fish sauce!
Some styles of kimchi also include fermented fish. I don’t think I’m ready for that.
But once I understood the flavor value of fermented fish sauce, I tried it and was pleasantly surprised. There were no overpowering flavors or smells but a nuanced depth that is hard to do without. My updated recipe includes it as an optional ingredient.
In Korea, kimchi is more than just food; it’s an integral part of the culture, with the average Korean consuming approximately 40 pounds annually. That is one jar a week compared to our one jar a year.
Kimchi-making is a communal activity, highlighted by events like the annual Kimchi Making Festival in Seoul, where over 2,000 volunteers prepare 270 tonnes of kimchi for those in need during winter.

This deep cultural engagement with fermentation, which forms a core part of daily life and community support, attracted me to this regional dish.
Don’t worry, making Kimchi-Style Sauerkraut couldn’t be easier and you too might want to include fermented fish sauce in your version.
Here’s Why You’ll Love Kimchi-Style Sauerkraut

In this recipe, we make Kimchi-Style Sauerkraut which has the flavors of kimchi without the extra preparation. For more on the difference between traditional kimchi and sauerkraut, read here.
Flavor: This Kimchi-Style Sauerkraut offers a rich and complex taste profile, blending the tanginess of traditional sauerkraut with the spicy and umami flavors characteristic of kimchi. This blend creates a unique and delicious flavor experience.
Texture: The texture is crisp and refreshing, with a satisfying crunch from the combination of green cabbage, carrots, and radishes. This contrasts pleasantly with the softer textures typically found in traditional kimchi.
Ease: This Kimchi-Style Sauerkraut is simpler to make than traditional kimchi. It eliminates the need to soak the cabbage or prepare a complex kimchi paste while still delivering the unique flavors of kimchi.
Time: Unlike traditional kimchi, which can be time-consuming to prepare, this Kimchi-Style Sauerkraut can be ready for fermentation in less than an hour. This quick prep time is ideal for busy individuals or those eager to enjoy homemade fermented foods without the lengthy preparation process typically associated with kimchi.
Grab your bowl, and let’s get started.

This post was originally published on September 26, 2014. It was last updated in Jan of 2024.
To learn my step-by-step process for making any sauerkraut, check out my Ultimate Beginner’s Guide.

Key Kimchi Ingredients
Vegetables in Traditional Kimchi
Grated carrots, radish, green onion, ginger, and garlic are traditional ingredients in kimchi, and they are included in this recipe.

Green Cabbage

This recipe simplifies the kimchi experience using regular green cabbage, ensuring a consistently nice texture.
Traditional kimchi typically uses Napa cabbage soaked in salty brine and mixed with a spicy paste. I don’t recommend using Napa cabbage in this sauerkraut recipe. Doing so can lead to a mixed texture in the final product due to Napa cabbage’s thick stalks and fine leaves.
Gochugaru

Gochugaru—Korean red pepper flakes—is traditionally used to flavor and add heat to Kimchi.
It is a coarsely ground red pepper with a texture between flakes and powder that disperses throughout your sauerkraut, coloring it beautifully and adding a complex flavor not found with red pepper flakes.
Tips for buying, using, and storing (with more details on my in-depth gochugaru post):
- The highest quality gochugaru is made from sun-dried chili peppers.
- Look for flakes, not powder. The powder is used in Gochujang, a traditional sauce used on dishes as we would use ketchup.
- Look for sun-dried and without seeds.
- When searching the internet, search for “gochugaru flakes”
- Store your gochugaru red pepper powder in your freezer to extend its shelf life.
- If gochugaru is not available, substitute red pepper flakes.
- Don’t hesitate to buy a one-pound bag. It is used in large quantities and stores well.
Some brands to look for are “Mother-in-Law’s,” “Crazy Korean Cooking,” and “Tae Kyung.” Here are some Amazon options. If out of stock, use the buying tips above.

- SWEET HEAT: Our Korean Chile Flakes are made from premium peppers, offering a fruity spiciness…
- NO SEEDS: As a symbol of quality, Mother-in-Law’s gochugaru flakes contain almost no seeds…
- FLAVOR NOTES: The unique balance of earthiness, spiciness and complexity, along with medium…

- RED CHILI PEPPER FOR KIMCHI – Coarse gochugaru flakes used for making kimchi and cooking Korean…
- AUTHENTIC KOREAN SPICE SEASONING – Regular spicy flavor with Scoville Heat Unit of around…
- 100% PEPPER ONLY – A kosher seasoning with no added MSG or additives. Korean government poses…
Fish Sauce

Fish sauce is a liquid condiment prepared from fermented anchovies and salt. It is a staple seasoning in the cuisines of Southeast and East Asia and is a key ingredient in many styles of kimchi. For many, however, just the thought of fish sauce can be rather off-putting.
Don’t make the mistake – as I did – of waiting years to incorporate this flavor-unleashing ingredient into your kitchen. Once you taste the incredible flavors of fish sauce, you will be dousing every dish in your kitchen with it. Learn to use it properly, and it becomes a robust flavor booster, with no trace of fishiness remaining.
The secret behind this powerful ingredient?
Umami! and further explained in my article on fish sauce.
Had to chuckle at your reference that the fish sauce in kimchi is why it was nasty. Fish sauce is a flavor that smells nasty but, in moderation, gives a dish an amazing umami flavor that you can’t pinpoint.
But kimchi is also made traditionally with raw oysters fermented in or fermented squid. I admit I have not had the guts to try this yet. I think that the kimchi your friend had may have included raw oysters or have been heavily fermented.
Kimchi scared me for years. I only had nibbles occasionally, and it was an odd taste. I don’t consider my palate all that adventurous and I find lightly fermented kimchi amazing. When it gets more heavily fermented I make stew or pancakes out of it.
—Kristin
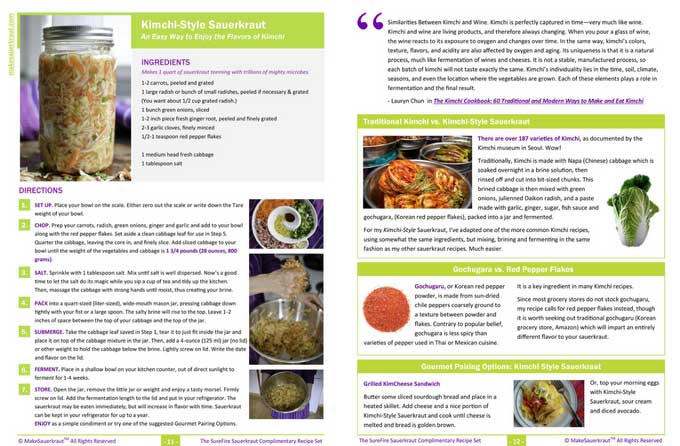
In Pictures: How to Make Kimchi
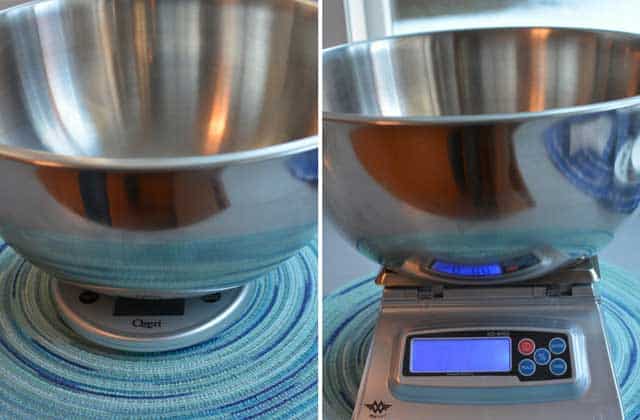
You don’t want to include the weight of your bowl in your measurements, so either zero out the scale (press the TARE button) or write down the weight of your bowl.
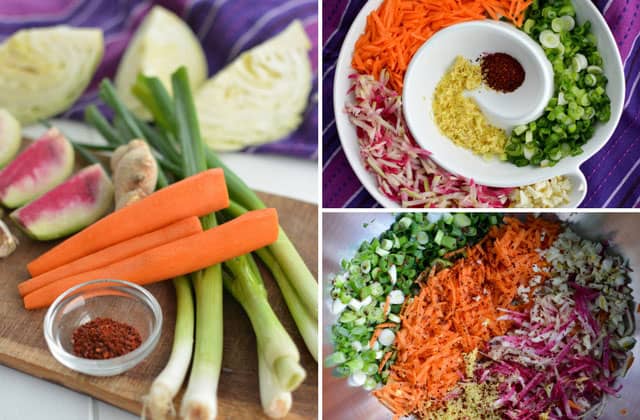
Mince garlic and ginger, shred carrots and radish, slice green onions, and add to your bowl along with the gochugaru and fish sauce.
Add sliced cabbage to your bowl until the weight of your vegetables and cabbage is 1¾ pounds (28 ounces, 800 grams).
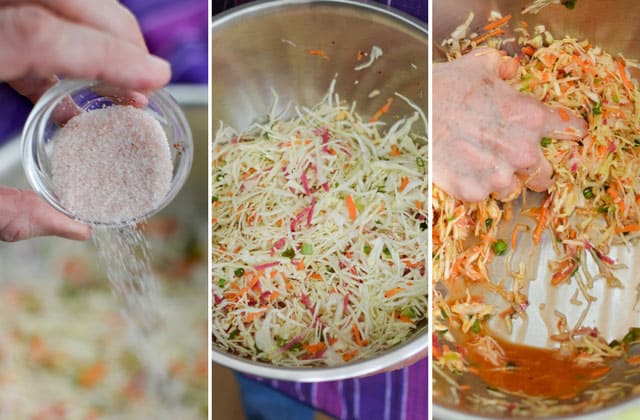
Sprinkle vegetables and cabbage with 1 tablespoon of salt and mix well. Then, massage the vegetables with strong hands until moist, creating the brine.
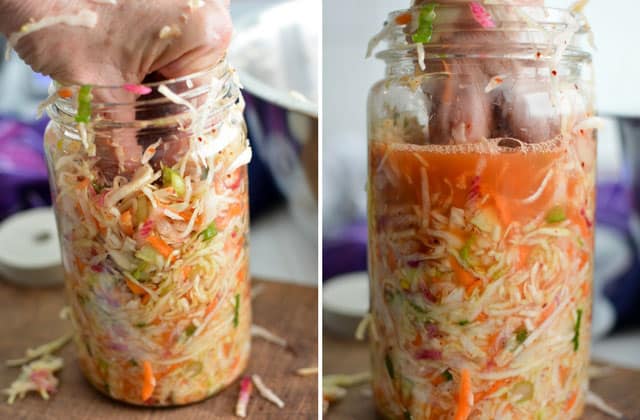
Grab handfuls of the salty, juicy cabbage mixture and pack them into your jar, periodically pressing the mixture down tightly with your fist.
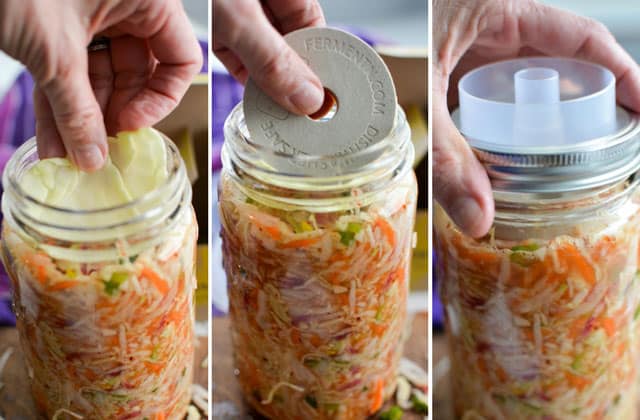
Place a 4-ounce jelly jar (or preferred weight) on top of the cabbage leaf, right side up with its lid removed. (Here I’m using the weight included with the Ferment’n fermentation lid.)
Lightly (to allow for gases to escape), screw on the white plastic storage lid or airlock of your choice, following their directions.
Recipe Notes and Tips
Two Easy Ways to Peel Ginger
I keep both fresh and frozen ginger on hand. For frozen ginger, grate it using the fine side of your grater. The peel is left on the outside of the grater box, and the minced ginger sits in a nice pile on your cutting board, ready to be scraped into your sauerkraut mixing bowl.
I used to peel fresh ginger with my vegetable peeler and often bemoaned at how much ginger I was losing. Try the Spoon Trick instead, as shown in the video below.
Turn Up – or Down – the Heat
The spiciness or heat of Gochugaru or red pepper flakes can vary greatly. If you like it hot, use 1 teaspoon of red pepper flakes. If you don’t want it too spicy, use 1/2 teaspoon instead. Then, adjust for future batches or taste after mixing in the salt, and add more red pepper if you feel it needs it.
Don’t Want to Irritate Your Hands with the Red Pepper?
If your hands are sensitive to the capsicum in the red pepper, don’t add them to your bowl until you have mixed all your cabbage and vegetables together and created your brine. Then, sprinkle on the red pepper flakes, quickly mix, and pack into your jar. You also might want to consider wearing a pair of thin plastic gloves when making this sauerkraut or using a large spoon when mixing and packing.
Ways to Eat Kimchi-Style Sauerkraut
I maintain an ever-growing list of ways to enjoy your sauerkraut. Check out #20: Peanut Butter Kimchi Sandwich!
Kimchi-Style Sauerkraut Recipe
I have two forms of my Kimchi-Style Sauerkraut Recipe for you. The online one that follows – with numerous pictures – and a PDF version below for printing that includes Gourmet Pairing Options and information on recipe ingredients.
Kimchi Style Sauerkraut
EQUIPMENT
- Digital scale
- Cutting board and chef’s knife
- Large mixing bowl
- Vegetable peeler and grater
- 1-quart (L) wide-mouth canning jar or similar sized jar
- 4-ounce (125 ml) canning jar (jelly jar) or fermentation weight
- Wide-mouth plastic storage cap (or lid and rim that comes with jar)
INGREDIENTS
- 1 medium head fresh green cabbage, 2 ½–3 pounds (1 kg), 2 ½–3 pounds
- 1-2 carrots
- 1 bunch green onions
- 1 large radish (1/2 cup gradted), (watermelon radish is nice) or a bunch of small red radishs
- 1 inch knob fresh ginger
- 2-3 cloves garlic
- 1-2 teaspoon Korean red pepper powder (gochugaru)
- 1 tablespoon fish sauce, optional, but highly recommended
- 1 tablespoon iodine-free salt (fine-grain) (16 grams)
INSTRUCTIONS
- SET UP. Gather Supplies and Set Up ScaleUsing a digital scale to weigh your ingredients is THE secret for delicious sauerkraut… batch after batch.You don’t want to include the weight of your bowl in your measurements, so either zero out the scale (usually done with a TARE button) or write down weight of your bowl.
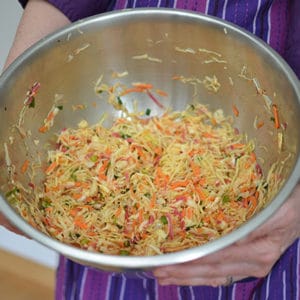
- CHOP. Prep Your Vegetables and CabbageWhen making sauerkraut, you first prepare the flavoring ingredients – carrots, ginger, radish, caraway seeds, or whatnot – then add sliced cabbage. This allows you to add only as much sliced cabbage as necessary to hit 800 grams (1¾ pounds, 28 ounces) on the scale, the amount that fits perfectly – usually – into a 1-quart (liter) jar. Grate carrots and radish, thinly slice green onions, grate ginger and mince garlic, placing everything, along with the red pepper flakes or Korean red pepper and optional fish sauce, in your bowl. NOTE: If you're concerned about the "hot" nature of the red pepper on your bare hands, either wear gloves or quickly mix it in right before packing your jar.Discard the dirty or limp outer leaves of your cabbage, setting aside one of the cleaner leaves for use during the SUBMERGE step.Quarter, then slice cabbage crosswise into thin ribbons. I leave the core in because I find it helps to hold the layers of cabbage together making the slicing job easier.Add sliced cabbage to your bowl until the weight of your vegetables and cabbage is 800 grams (1¾ pounds, 28 ounces).
- SALT. Create Your BrineSalt pulls water out of the cabbage and vegetables to create an environment where the good bacteria (mainly lactobacillus) can grow and proliferate and the bad bacteria die off.Sprinkle vegetables and cabbage with 1 tablespoon of salt (16 grams) and mix well. Then, massage the vegetables with strong hands until moist, creating the brine.You should be able to tilt the bowl to the side and see a good-sized puddle of brine, about 2–3 inches in diameter. This process can take anywhere from 2 to 5 minutes. Notice how the mixture has shrunk. Due to the hot nature of the red pepper, wash hands well after.
- PACK. Pack Mixture into JarGrab handfuls of the salty, juicy cabbage mixture and pack them into your quart-sized (liter) wide-mouth canning jar, periodically pressing the mixture down tightly with your fist or a large spoon so that the brine rises above the top of the mixture and no air pockets remain.Be sure to leave at least 1 inch of space between the top of the cabbage and the top of the jar. This should happen automatically because we weighed out just the right amount of cabbage to fit in your jar.Pour any brine left in your mixing bowl into the jar and scrape out any loose bits stuck to the sides of the bowl or jar.
- SUBMERGE. Hold Ferment Below BrineNow, make sure your fermenting mixture is in a safe anaerobic (no air) environment. This means keeping the cabbage mixture submerged in the brine while it ferments. Take that cabbage leaf you saved during the SETUP step, tear it down to fit in the jar, and place it on the surface of the packed cabbage. Forgot to save a cabbage leaf? No problem. You can fold a narrow piece of parchment paper to size or even cut an old plastic lid to size. Place the 4-ounce jelly jar (or preferred weight) on top of the cabbage leaf, right side up, with its lid removed.Lightly (to allow for the escape of CO2 gases), screw on the white plastic storage lid or airlock of your choice, following their directions.I like to label my jars using green or blue painter’s tape and a permanent marker. I note the flavor of sauerkraut I made and the date I started fermenting.For this recipe, I used the Ferment'n water-sealed fermentation lid. It comes with a weight, the water trough you hold in place with a metal canning band and the lid.
- FERMENT. Ferment for 1 to 4 WeeksTime now for the friendly bacteria to do their work while you watch and wait. Can you wait 7 days to taste the tangy crunch?Place your jar of fermenting sauerkraut in a shallow bowl (to catch the brine that may leak out during the first week of fermentation), out of direct sunlight. Wait for 1 week before opening to sample.For what to expect as your sauerkraut ferments, see SALTY Cabbage to SOUR Sauerkraut: Fermentation Signs to MonitorShould the brine level fall (very unlikely) and remain below the level of the sauerkraut during this first week, dilute 1 Tbsp of salt in 2 cups of water and pour some of this brine over the sauerkraut (removing the little jar first) until it just covers the mixture. Put the little jar back in, screw the lid on lightly and let the fermentation continue.Don’t worry if the brine disappears after the 7- to 10-day mark. By this time, you’ve created a safe environment in which the bacteria that would cause mold or slime has been chased away by the beneficial bacteria produced during the fermentation process.You can ferment your sauerkraut for up to 4 weeks. The longer you ferment it, the greater the number and variety of beneficial bacteria that can be produced.
- STORE. Store in Refrigerator for Up to 1 YearAfter fermenting your sauerkraut, it’s ready to go into the refrigerator and ready to be eaten. Rinse off the outside of the jar. You can take the little jar out. Clean the rim if necessary (sometimes it can get sticky from the brine that overflows), and screw the lid back on tightly. Add to your label how long you fermented the contents.Enjoy a forkful or two of your kimchi sauerkraut with your meals. It will continue to ferment – aging like a fine wine – but much slower than before. If the flavors are too intense, leave the jar in the fridge for a month or two and then eat it. You will be amazed at how the flavors have changed.If successfully fermented (tastes and smells good), your sauerkraut can be kept preserved in your refrigerator for up to a year.
Notes and Tips
- Adjusting the heat: The spiciness of Gochugaru or red pepper flakes can vary greatly. If you like it hot, use 1 teaspoon; for a milder version, use 1/2 teaspoon. Take notes and adjust for future batches.
- Protect hands: If your hands are sensitive to the capsicum in the red pepper, use a spoon when mixing and packing. You also might want to consider wearing a pair of thin plastic gloves.
- Fish Sauce: Optional, but highly recommended. My favorite is Red Boat. You can read more about fish sauce here. The fishy smell dissipates during fermentation. One of my readers successfully substituted soy sauce for the fish sauce.
- Special equipment (affiliate links): Digital scale, MyWeigh KD-8000 (my favorite), Etekcity Food Scale, salt, No products found., No products found., fermentation springs, storage lids
The Book That Will Transform Your Meals, And… Your Health
Learn to make gut-healing sauerkraut to instantly add delicious flavors to your meals. Step-by-step, easy-to-follow instructions with photos and tips.
Kimchi-Style Sauerkraut Recipe PDF
FREE PDF Download
Use the button below to get your PDF copy of the Kimchi-Style Sauerkraut recipe. No Opt-In is required.
Last update on 2026-07-10 / Affiliate links / Images from Amazon Product Advertising API

Do you use the Korean style red pepper flakes or something else for this?
Gene, I just buy “red pepper flakes” or “crushed red pepper” from the grocery store which is made from dried and crushed red chilli peppers. It works and is readily available.
When I finally get together my traditional Kimchi recipe, I’ll call for the Korean Red Pepper, which is a powder that you mix with garlic, ginger, etc. to make a paste which is then layered in with salted cabbage.
Use what you can easily find. It’s to add the spice kick to the recipe. – Hope that helps, Holly
Green onions are mentioned in the directions but missing from the ingredients list. What quantity of green onions should be used?
Oops! I’ll fix that. Thanks for pointing out the error. One-half bunch works well.
Thank you! (And perfect timing–I’ll be making this recipe tomorrow morning.)
I bought airlock lids for my quart jars. If you use this do you still need to put the cabbage leaf on top and weight down? Could you double your Kimchi recipe and put in the 1/2 gallon jars or would you recommend using 2 quart jars instead?
Hello Pam, Airlocks. Some companies/bloggers say you don’t. I haven’t used them a lot but no matter what, that sauerkraut still need to be held below the brine, in my opinion. Air exposure = chance for mold to grow.
Yes, feel free to double the recipe. Actually, the larger the fermentation vessel (5-10 liters for home fermentation being ideal) the better the microbial action. The quart jars are for learning and work well. But, ideally, we would all ferment in a water-sealed crock. Enjoy!
Thank you. I put a little 4 oz. jar on top. I will keep you posted once it is complete.
Had to chuckle at your reference that the fish sauce in kimchi is why it was nasty. I’ve been making my own authentic kimchi for years using the Korean red pepper flakes that, in addition to some kind of fermented seafood, make the flavor. Fish sauce is one of those flavors that smell nasty but in moderation give a dish an amazing umami flavor that you just can’t pinpoint. But kimchi is also made traditionally with raw oysters fermented in or fermented squid. I admit I have not had the guts to try this yet. I’m thinking that the kimchi your friend had may have been heavily fermented. Of course the more fermented the stronger. And perhaps really too foreign to his palate. Kimchi scared me for years. I only had nibbles occasionally and it really was an odd taste. I don’t consider my palate all that adventurous and I find lightly fermented kimchi amazing. When it gets more heavily fermented I make stew or pancakes out of it.
Now all that said I have friends who make a kraut that is pretty much like this. It is absolutely delicious. It isn’t kimchi. 🙂 So I appreciate that you call it kimchi style. The recipe certainly gives a good nod to the ancient original. (BTW no, I have never had kimchi for breakfast.)
Authentic Kimchi is on my list. Thank you for the encouragement. Achieving that unami flavor would be worth it. Fish sauce I could do, not raw oysters or squid, however! Thank you for sharing. It will help us all venture down the road of the unknown.
If you are hesitant in using raw seafood, I’ve made kimchi using anchovy paste and it works really well. Another way to add some unami flavor is to boil some shitaki mushrooms and dried seaweed. After boiling, discard the seaweed and dice up the mushroom and add that to the mix and use the umami water for your brine.
Thank YOU! Sounds like you have it all figured out. Time for me to start my experiments!
Hey Holly, your info on The Keem Jang Festival did my heart good! I am close to stepping into the world of Kimchi and will go with the fish sauce… That is something that must be done with caution… Hence: Our Daily Brine https://ourdailybrine.com/fish-sauce-taste-test/ … Expensive stuff, but Amazon has a pretty good 3 bottle “Red Boat” deal… To date I have done your Sure Fire Method adding Korean red pepper flakes (1/2 tbsp/qt) and been a pretty contented cowboy, but it’s time to get authentic 🙂
Yes, I am very drawn to a culture that is still steeped in their traditions. We have much to learn from them. Thank you for the Daily Brine link – what a rabbit hole that turned out to be.:-) Nice material there and now I know what fish sauce to use when I get authentic. Thank you for sharing.
Hi Holly, Wanted to let you know that I just packed 3 jars of your kimchi style sauerkraut and it is amazing. I wrote you a few weeks ago about my batches of sauerkraut sometimes turning a little brown and pink. I fermented this batch in a cooler place for three weeks, used Himalayan pink salt and it is absolutely delish! I substituted rutabaga for the radish and it worked just fine. I’m so excited to have a new sauerkraut recipe. Thanks for your helpful site!
So good to hear Leslie. It’s amazing how changing a few variables can make all the difference. Enjoy and you’re quite welcome!
Oh wow! I haven’t thought of using rutabaga to sub for radish. I love rutabaga! I will be trying this with my next batch. Will let you all know when I finish.
Happy we are all able to inspire. Creating ones own recipes is the best part. Edible art work!
Hi Holly, I have followed your Kimchi style recipe. It is in jars, under brine but it stinks to hi heavens. The temperature here has been very hot 38 to 45 degrees, as we are in the middle of summer. I have put it in the fridge until I can get some advice. I have had no trouble with my first batch of plain kraut & I have no trouble with my second batch of purple cabbage both done in a croc. thanks Jen
My guess would be the heat, but that doesn’t make sense if other batches have turned out just fine. How long did you let it ferment? The radish will give it a strong smell, more so than other vegetables. That might be part of it. I would leave it for a week or two in the fridge and then sample it and see if you like the flavor.
Thanks for answering, It was only a few days to a week, I was guessing one of the ingredients would give off a stronger smell than just cabbage. Can I take it back out of the fridge in a couple of weeks & resume fermenting?
It should be fine to take it back out. When I’ve seen problems, it’s been when the jar was put in the fridge at the very beginning. Restarting a ferment then doesn’t work.
Ok thanks for that I will try it 🙂
I always use fish sauce in my kimchi – but I don’t have the fermented kind as I can’t buy it even in the local Asian stores. But the fish sauce definitely makes the flavor better in my opinion.
Hello Gene, Thank you for sharing your experience with the fish sauce. I have a bottle of Red Boat fish sauce that I will be testing with a future recipe. Good to have options for flavor improvement.
I am on day 3 of my first batch of sauerkraut and am waiting for my order of Gochugaru to arrive, so I can start a batch of Kimchi!! I have a bottle of Red Boat fish sauce-if I use that, instead of salt, what is the amount to use to make one quart of Kimchi?
I wouldn’t know. I haven’t experimented yet, but my understanding is that the Fish Sauce is to add a depth of flavor and not cut down on salt. I would try 1 tablespoon fish sauce and a tad less salt. Then, adjust for future batches by taste of your “experiment.”
I ADORE fish sauce! I eat it in soups and stews and some meat dishes.
Normally, I would just add “to taste”, but since it is salty and this is a fermented product, how much should I add?
My guess would be 1-2 tablespoons. It’s there for the flavor. I would add it last, 1 T at a time tasting after each addition.
Thanks for your excellent comments. Do you plan to share a pickle recipe?
You’re welcome. I do have a pickle recipe 🙂 http://www.makesauerkraut.com/fermented-pickles/
Awesome! I just finished fermenting. I triple/quadrupled the recipe to fit in a gallon jar with a bubble airlock lid. I waited two weeks and it’s absolutely delicious. Thanks Holly!
Good to hear! Enjoy.
Ahh, the slugs! These are your tokens that the Napa hasn’t been sprayed.
Now, that’s a positive way to look at it! Or… extra protein. 🙂
Thank you for this wonderful and detailed recipe! I made a batch and it turned out yummily delicious! 🙂
Wonderful!
Hi Holly
I enjoy your advice, instruction, and recipes so much. On this one why not include the fermented fish sauce? I’ve made one batch of traditional kimchi which included fish sauce. It turned out quite tasty. My family loved it. I’m just curious to know why you don’t reccommend using it because I really want to try this one as well.
By all means add it, about 1 T for a quart batch and dial back the salt a tad. How much did you add?
No real reason I don’t call for it other that that I tried to make this recipe an introduction to Kimchi. Now, time to develop a recipe for the ones looking for a true/traditional recipe.
I made a 2 liter jar so about 2 1/2 Tbsp. Fermented about 10 days on the counter then moved to fridge.
And… how was it?
Fantastic!
Great! Time now for me to make some with Fermented Fish Sauce. Enjoy.
Hi Holly
Once canned up after the fermentation process, does the small jars stored in the fridge need to be submerged in brine. I have some that are not covered (but were always covered in the croc) Is this ok?
I remove the small jar before moving to the fridge. It most likely will not be submerged in brine which is OK. The brine gets pulled back into the cabbage and the cold also pulls the liquid into the cells.
Thank you
I would only salt the cabbage by itself. Then drain and rinse. Then add the other ingredients and pack for fermentation. I would also double the garlic and ginger, and triple or quadruple the gochugaru.
Good tips. I’m finding the gochugara not nearly as spicy and able to handle a lot more of it in a recipe.
Holly…question for you and Logue. I’ve been checking out sites on real kimchi and the rinsing business checks out (had same question in my mind about rinsing as the other person). But what I have noticed is they all say to just pack this stuff into jars and allow to ferment. Videos show the same. Yours and ANY sauerkraut recipe calls for weighing down and keeping the cabbage SUBMERGED!. Why is that seemingly crucial practice not followed with this stuff?
Here’s to stinky kraut farts! 🙂 Ed.
I don’t have an answer for your great question. I have likewise wondered the same. It might have something to do with the soaking of the cabbage which moves the salt into the cells of the cabbage. I’ll spend some time in my Kimchi Cookbook by Lauryn Chum and also ask my Kimchi making friend.
I have answer for why Koreans wash the cabbage before it is flavored and packed in jars, and a couple of notes on fish flavorings and salt.
I learned how to make Kimchi from watching and helping my Korean wife make Kimchi for 40 years. Koreans use a very coarse sea salt that looks more like rock salt than table salt. The salt is sprinkled directly on the cabbage by the handful. The salt will sit on the cabbage from 3 to 6 hours until it looks wilted and there is a small puddle of water in the bottom of the bowl. The cabbage is tasted at the 3 hour mark to judge its saltiness. When the cabbage tastes salted, but not salty, the excess salt is rinsed off. My wife does the whole process as she was taught by her mother and older friends when she was young.
A note on the fish sauce flavoring. There are basically two types of Kimchi– summer and winter. With Summer Kimchi, because of the higher summer temperatures, is made quickly with the vegetables usually cut into smaller almost bit-size pieces, and it is eaten quickly before it gets too sour. Not to many people will put fish sauce in Summer Kimchi. Winter Kimchi, on the other hand, was traditionally made to last all winter in huge 50 and 100 gallon ceramic jars that were half buried in the ground to keep the contents from freezing. Winter Kimchi is made from pretty much anything that is still growing at the end of the season, whole Korean cabbage heads, huge Korean turnips left whole or in large chunks, and any kind of salted fermented seafood (oysters, squid, anchovies, shrimp, fresh fish) that you fancy. Winter needed stronger flavors to overcome the boredom of a limited diet.
A note about how much salt to use. I learned to make sauerkraut from my Grandmother and Grandfather. Grandma made her kraut for New Years day in a 20 gallon crock, that I now have. Grandpa made his kraut in half-gallon jars for later in the year. They used the same look-and-guess-through-experience method for salting their cabbage that my wife uses. You recommend using a tablespoon of salt per 800g, however, there is no way, short of weighing it, to tell how much salt is really in the tablespoon. So weigh it! https://www.dadcooksdinner.com/salt-by-weight/
I did a lot of research in government publications, cookbooks, websites on fermentation and pickling, and personal experimentation to determine how much salt to use. To inhibit unwanted bacterial growth, but still allow Lactobacillus to flourish, you need to use a 1.5 – 3.0% (by weight) salt solution. Less than 1.5%, bad bacteria grow, More than 3% tends to taste too salty and good bacteria may not grow. Making a solution that tastes like seawater is not a good idea because on average seawater is 3.5% salt (by weight). I found that the middle of the range 2.0 – 2.5% is best and there is an easier way to achieve that than guessing. Just weigh your vegetables and multiply their weight (use metric, it’s easier) by 2.0 – 2.5%. Then only use that much salt. Your article says that a quart jar holds, on average, 800g of vegetables. Multiply the 800g salt by .02 which results in 16g of salt per quart. Process the Kimchi, or sauerkraut, in the same way as usual. Pack the vegetable, any loose salt and brine in a quart jar, then close the container with an airlock as usual. No guessing, no rinsing, no over-salting.
WOW! You are sooo wonderful to take the time to share all your wisdom. The planets must be aligning for me to embark on my Fermenting Traditional Kimchi Series. More great information.
I totally agree on weighing the salt and once I realized how much easier it was I put together the following post on what I learned.
https://www.makesauerkraut.com/salt-by-weight/
And, Yes!, 1.5% – 3.0% is the right range for a reason(s) as you stated. 🙂 Nice to know about the 3.5% seawater, because I’ve always said NOT as salty as seawater, because that is too salty. More like a potato chip.
If you have any questions about Kimchi, please ask. My wife is an
expert. All of her friends and church members agree that her Kimchi is the best.
A guy that I used to work with in Korea gave his recipe for smoked turkey to everyone in the office. He said that you should make the brine as salty as the sea, or salty enough to float an egg. A coworker of mine going to Hawaii for a family gathering wanted to smoke a turkey, but he misunderstood the directions. He took a bucket of water large enough to hold his turkey, cracked an egg into the water, and added enough salt that the raw egg floated. He later said the turkey was inedible.
Later, I wanted to smoke a whole turkey. I had to find out the correct salinity of seawater because I was told to brine the turkey in water as salty as the sea. I called my brother who was working at UC San Diego at the time,. He called the Scripps Institution of Oceanography on campus, and they told him that the salinity varies from place to place, but on average the oceans are 3.5% salts by weight. My turkey came out perfectly.
I got a good laugh out of that raw cracked egg floating in water. And, that nugget of information on salinity is worth the effort it took for you to get it. We rely too much upon Google at times.
Why in the world would you drain and rinse away your brine?
That is the traditional method used by the Koreans when making Kimchi. They soak Napa cabbage leaves in the brine; the cabbage cells absorb the salty brine through osmosis. Then in preparation for fermentation, the leaves are roughly chopped and packed into the crock with a flavoring paste.
This is somewhat incorrect.
When the cells (cabbage or otherwise) are immersed in a solution of a higher salinity than their contents, the water in the cells moves out (through the semi-permeable cell membrane) to attempt to balance the salinity.
Salt does not go into the cells, water moves out.
You are correct. I’ll try to be more exact in my explanation. 🙂 Thank you for clarifying.
So, there’s actually two reasons for this. Fist and foremost the end product would be too salty.
But aside from that the salt serves two purposes: to create an environment that will kill the bad bacteria and only allow the good stuff to do it’s fermenting job. After the initial soak, it has completed this task and enough salt has worked it’s way into the surface to season it perfectly.
The second job it does is to draw a portion of water from the cabbage to make it a bit limp, but still have just enough for crispness. If you leave all the salt in there it will continue to draw out water, and the cabbage will end up being very limp.
Thank you for sharing your wisdom. I didn’t know about the second job.
Is this just for this kimchi style, then? So you let it go for the full 2-3 weeks and then drain followed by additional ingredients or as soon as the brine has formed after squeezing or pounding? Would you do this for traditional sauerkraut as well? My kraut comes out quite crispy even after a month and then extended storage in the fridge. Never had it get limp. Look forward to your reply. I’ll always try something new.
We’re confusing you with the “adaptations.” My Kimchi-style recipe is made like all my other sauerkraut recipes. Mix ingredients and salt, form brine, pack in jar, let ferment 3-4 weeks.
I’ve yet to develop and post a traditional recipe which Michael is referring to in his comments. I link to some traditional Kimchi recipes on my Pinterest page: https://www.pinterest.ca/makesauerkraut/kimchi-recipes-lore/
Oh. Now I get it. Kimchi-Style. Well, I’ll let you know how it comes out. Then make a traditional batch. Thanks for the link.
I made 2 quarts last weekend, after 2 days they were oozing out the silicone air locks, opened them and spooned a little bit of brine out, and pushed the weights down a bit, 2nd jars brine was sorta slimy, still smelled good though, didn’t taste it. Closed both. 3rd and 4th day, the airlock had a bulge, still nothing on the jar with the slimy brine, now both jars silicone airlock tops are being pulled in, sorta like a negative pressure. Any ideas on what’s happening, made it last Sunday. Is it time to dump it and start over?
You’re fine. At the beginning you can get the brine “overflow” due to all the CO2 the bacteria are producing and then after that stage, it all quiets down and you end up with the negative pressure you’ve experienced. Go by smell. Fresh, clean and sour.
Here’s some tips for slimy brine: https://www.makesauerkraut.com/sauerkraut-fermentation-gone-bad-troubleshooting-tips/#Slimy_Brine
Thank you, will leave it be until next weekend, made more today. We keep temp at around 68-70 so figured that couldn’t be it. Thanks again.
Hi Holly,
I started the ferment for this yesterday. For the (your) record, you don’t have an explicit instruction as to when/where to add the Gochugaru (unless I missed it).
I myself opted to add it after I had massaged everything and was pretty much ready to pack it into a jar. I added the Gochugaru, massaged briefly, and packed.
In any event, I’m looking forward to tasty spiciness in a couple of weeks. Thanks.
-Steve
You’re right, that got missed. Thank you for taking the time to alert be to that. I’ve added it in. It’s nice to do it right before packing the jar, because the “heat” from it can burn a bit. Enjoy!
It’s been 2 weeks now on the kimchi-style mentioned in my previous post, both still have the negative pressure. We decided to go ahead and open one, everything looked good, smelled good, and had a pleasantly spiciness that wasn’t overwhelming. I did notice that it has absorbed all the brine, will this create a possible problem in the fridge, being without any liquid to cover the top, and drying out?
Here’s my post on dry sauerkraut: https://www.makesauerkraut.com/dry-sauerkraut-gut-shots-recipe/
I don’t add any liquid and find that as long as it fermented well and stayed below the brine for the first 5-7 days, I’m able to store my sauerkraut for at least a year without it going bad.
This is my third batch of Kimchi style of sauerkraut,I gave my friend 3 jars he is eating it like candy,I have 8 quarts in the making,me and my wife love it on hotdogs with grated cheddar cheese.(5 days fermentation,2 weeks total)I weigh out my ingredients on the KD-8000 800 grams a batch then mix it all together then put it in my 5liter water sealed crock and a 1/2 gallon with the air lock.for the serious sauerkraut maker the scale, weighing your ingredients is the way to go.Thanks Holly for the recommendation on the KD-8000 scale.
You made my day! 🙂 And, yes the KD-8000 scale is a winner. Wait until you realize how many uses it has!
Holly I opened my water sealed crock today,it had a white skim a little smaller than a dime along the edge I removed it all,my wife is afraid to eat it she is afraid that it will make her sick,I had a spoon full was great to me,can you give me an idea what it might be.Thanks.
I’m guessing harmless Kahm yeast. More here: https://www.makesauerkraut.com/sauerkraut-fermentation-gone-bad-troubleshooting-tips/#Things_Growing_on_My_Sauerkraut
You did the right thing by removing it. It is fine to eat.
It could have formed and then over time moved to the edge and glued on there.
Hi, love your site! I tried your starter recipe and it went well, which inspired me to try a southeast Asian flavoured kraut. I scoured the internet for ideas and cobbled together an experimental recipe that turned out to be incredibly good – exactly as below except what I’m posting here has the hot peppers halved, as mine turned out pretty hot. But that’s all a matter of taste. Lemon ginger kraut next, as my sweetie doesn’t like garlic. Thanks for the inspiration!
Southeast Asian kraut
For 3 jars:
1800g cabbage
150g carrot
150g radish
65g cilantro (one bunch, chopped to the wire twist-tie)
30g hot red peppers (3 3-4″ skinny hots)
90g green onion (smallish bunch)
30g ginger (good sized thumb)
30g garlic (9-10 cloves)
3T fish sauce
2T salt
juice of 3 limes
THANK YOU Courtney, That sounds like a winner. Nice to have the measurements first in grams followed by visual sizes. I’ll have to think about switching to that. Dear readers let me know your thoughts.
Hello 648576
Well, did you make that Kimchi-Style Sauerkraut? You’re lucky to have a Korean market so close. Enjoy!
As someone who has been married to a Southeast Asian wife for 45 years I would encourage you not to forgo the fish sauce. It gives a depth of flavor that just cannot be matched by any other way. Just be aware that some brands are much better than others. Avoid any with any ingredients other than fish and salt. Know that a little goes a long way.
You can also use it in soups, chilies, stews, or in any other dish you want to give a meatier taste. Add it at least 30 minutes before the dish is done and any “fishy taste” completely disappears. We mix a couple of teaspoons in our hamburger meat before making the patties and our friends never know why they consider our burgers to be the best they’ve tasted.
here are some starter ideas…
https://www.seriouseats.com/2014/09/what-to-do-how-to-cook-with-fish-sauce.html
Hello Jack, Thank YOU for your comments. I’m a total convert after making a batch of Brussels Sprout Kimchi last weekend. It called for fish sauce – 1 Tablespoon. I misread the recipe and put in 1/2 cup. A lot went a long way. 🙂 Smelled a little fishy initially. Started eating it a week later and boy is it GOOD!!! Red Boat is the brand I used.
Now, I’m anxious to experiment with fermenting and fish sauce. I’ll have to try it in the hamburger mix like you do. Thanks for the Serious Eats link.
Well thanks a lot. Because of you, I am now obsessed with fermentation. Just bought your book. Can’t wait to get done with work to sit, relax, and read.
About a year ago, by brother bought me some fermenting jar lids. Finally decided to try them out a couple weeks ago.
My first attempt was a kimchi inspired kraut. I used your recipe and website as a guide to get proper measurements and technique. Kept it simple – cabbage, salt, garlic, ginger, and red chile flakes. I cut the cabbage into chunks instead of shredding it. Whenever I see them making kimchi on a cooking show, they don’t shred it, so I wanted to mimic that technique.
10 days later, I have a jar in my fridge that gets a fork stuck in it daily. Crunchy, spicy, ginger-garlicky, pleasantly sour. I think the jar will be empty pretty quickly.
I now have sitting on my counter a jar of shredded carrots and daikon radish. (About a pound of each and 1 tablespoon of kosher salt.). I don’t mind using the food processor. I just rinse off the pieces and throw in the top rack of the dishwasher. My inspiration for this was the pickled carrots and daikon typically on a Vietnamese Banh Mi sandwich (which is usually made with vinegar, sugar, and salt.)
Anyways, thanks again and happy fermenting.
Your’e quite welcome. Hearing from a newly addicted reader – to fermentation 🙂 – always makes my day. Your gut bugs are asking for this good stuff. Continue to feed them well.
And, inspiration for recipes come from everywhere. Now, I’m inspired to try the carrot/daikon recipe with a stash of daikon that’s in my fridge. Thanks!
Hello Holyl, Are we supposed to use also the green,
chlorofyl rich part?
I’m not sure what green “chlorophyll” part you’re talking of, but if you mean on the napa cabbage, yes, use all parts. Same with the green cabbage.
Holly, I have a couple of suggestions:
1) Use a stainless steel spring to make CERTAIN everything remains submerged
2) Using red/purple cabbage will enhance visual appeal and antioxidants. Also gives a peppery note
3) If you’re aiming for a probiotic effect, use a starter culture. If you ferment to the max (ie one serving = a bottle of probiotics) but it’s too tangy for your palette, you can always use chemistry to dial it back. Add magnesium carbonate to the final mix to neutralize some of the lactic acid.
Warning: since #3 raises the pH of the sauerkraut/ kimchi, it’s imperative to keep it refrigerated afterwards. Magnesium lactate DOES posess some preservative qualities but not as much as lactic acid.
PS: you’re the only person in the entire world I saw advise using a scale. I think it’s a wonderful idea and intend to purchase one.
Hello Mark, Thank you for all your suggestion. 1-If you’re referring to the PickleHelix, I agree. It’s my favorite “weight” and did best in a recent test I performed using a variety of weights. https://www.makesauerkraut.com/best-fermentation-weight/
2-Yes, purple cabbage is great; much higher in vitamin C than green cabbage.
3-I’m not a fan of starter cultures. It seems counter intuitive to mess with the microbes already present on the vegetables, but that’s just me. Also, the bacteria stages unfold and change over time. We’re making an educated guess on what’s best to put into the mix. I’ve never heard of using magnesium carbonate. You must have a chemistry background. 🙂
Do look at the scale I recommend. It totally changed my fermentation results. The bacteria do like a set salinity percentage, so weighing ensures we use the correct %.
Also, check out my traditional kimchi recipe: https://www.makesauerkraut.com/traditional-kimchi-square-cut/
I’m much better at Electronics and coding than chemistry, but it’s all STEM so it’s just another tech as far as I’m concerned.
I’ll check out your article about the slinky thingy LOL.
Respect for making it the original way. I was on the fencepost myself. In my case I’ve been dealing with chronic pain and illness for so long that I want to mass produce this stuff as a probiotics supplement. Like I said with culture a serving equals an entire bottle of probiotics.
I intend on making medicine, not art so I’m ok with using culture.
I bought a premade kimchi from my local health food store and decide I like it. I figure if you ferment the daylights out of it, it will become quite acidic. Until a week ago, I have NEVER eaten fermented food except yogurt. However I’d like to get the maximum probiotic effect and dial back the tartness.
Baking soda would work just as well but drive the sodium even higher. So far as I could discover, magnesium lactate, the product of the neutralization is essentially tasteless. Also it does have some preservative qualities but likely not so much as lactic acid. Hence suggesting immediate refrigeration afterwards.
So anyways, we’ll end up doing things a little differently but I appreciate you not correcting me for it. I’m looking forward to reading your articles and maybe your book. Do you have a version on audible yet?
Art vs. medicine. 🙂 We all approach fermentation from our own special angle. All is good. Making our own ferments and reaping the benefits of them is the objective. No audible version of my book; audible cookbooks sell at a very low rate. We’ll see what happens down the road.
Hi Holly I have another question. Are floaties safe or should I pitch the lot?
I made a batch of kimchi but I’m leery of trying it. I forgot the leaf and weight on top for 24 hrs. That part probably isn’t a big deal.
The 2nd error may be more serious. I used a food processor to prep the veggies. Shred worked well for the ginger root, carrots and radishes. However, that blade minced the cabbage into tiny pieces. When I placed leaf, weight and spring, around a tsp of cabbage came up to the surface.
Is that a game changer? Can I simply spoon off the floaties or did their exposure to oxygen breed nasty and/or harmful microbes?
Floaties will happen. We can’t hold every little bit back. Just scoop them off if they look nasty or mold is growing on them, otherwise no worries.
The concern with floaties is that they are on the surface where they are exposed to air and where mold is more likely to grow, but not always.
Heidi I have a couple ideas and a question.
If you’re in a pinch and can’t find the goucharu, plain old red pepper flakes works well too. As for garlic, I usually crush the cloves- that activates the antifungal compounds. To keep the yeast and mold at bay I also toss in oil of oregano and grapefruit seed extract. Sometimes I use aged garlic extract if I’m low on garlic or it went bad.
Now my question. Does the size of the ferment affect the rate? I found 2 massive purple cabbage heads and filled four 1/2 gallon mason jars. My batches only take 8 or 9 days but the culture isn’t cheap (but I am) so I only used one packet per 1/2 gal instead of the usual quart.
I’ve craved pickled food as long as I can recall. I guess it seems my body was telling me it needs super doses of probiotics. Makes sense since I’ve frequently taken antibiotics, NSAIDS and prednisone, plus I love sugar and beer. All in all bad mojo for gut health. So I wanted to start making the stuff in enough quantity that I only need to make batches quarterly. Hence why I quadrupled my batch size.
PS I reached out to the pickle pusher folks and managed to grab their last 2. I’m hoping to get more whenever thats possible
Yes, I used red pepper flakes for years until I upped my game. Both work well.
I don’t think size impacts fermentation rate. I do find larger batches turn out better than those done in a quart jar. More brine, moister when stored, and a greater depth of flavor.
I never add culture because I don’t like the extra cost and I find great success just using the bacteria that come with the vegetables I ferment.
May these fermented foods help to heal your gut. Go slowly as you ramp up the quantity you consume. Some people end up with gut discomfort when they consume too much too soon. Enjoy the Pickle Pushers. They work great.
Just looking for suggestions on how much gochugaru pepper to use but found lots of other good bits of information. I like your approach.
Thank you. I’m finding as I use more and more gochugaru, that you can use more of it. It is not as hot as red pepper. Start with 1 tablespoon and gradually increase between batches to your liking.
I have been using toasted chile arbol, but it is a lot of work to separate out the seeds and membrane, and the residual flakes can be a tad spicy so the finely ground gochugaru becomes a preferred alternative in part because it is relatively mild and the increment of heat is ±1/2t rather than ±20mg. Combined with fresh ginger it should make a good batch.
I have also found that if I don’t have enough cabbage to fill a container, I can bring the liquid level up above the kraut with a 2% brine then fill the rest of the headspace with clear glass florist gems.
Yes, that does sound like a lot of work with the chile arbol, but I’m sure it is good, even though it is spice. Enjoy the gochugaru. I like having the flavor without the heat. Good idea on adjusting your batches.
The chile arbol is what I keep on hand for cooking beans, but in that case I put two crumbled chile arbol in a tea ball and just toss it into the pot with the beans as they cook. For two cups of dry beans, six chile arbol is very spicy, and two is medium spicy. I suppose it would be possible to do the same thing for sauerkraut since it ferments long enough that the capsaisin would diffuse to flavor everything. Just need a couple of ounces of 2% brine to offset the empty volume of the tea ball. But as you point out, the gochugaru carries the flavor of the chile without the intensity of the heat.
Great ideas, especially the tea ball. Thanks for sharing. 🙂 Since I don’t like too spicy, I would not need to use hardly any at all.
I made a batch of Holly’s Kimchi last autumn and there was a jar left this autumn (so it had been doing it’s fermenting in the jar for ONE YEAR). It was outstanding! Even better than the jars that sat for one month. If you can, make a large batch and let it sit and think in the jars for a year. Thanks so much Holly for sharing.
You’re welcome, and Yes, these ferments do age quite nicely. I’m glad you were able to do a taste test – by memory – between the 1-month-old kimchi and the one-year-old kimchi.
Perfect timing . . . . I’ve been looking for a Non traditional Kimchi recipe made with regular cabbage. Simply unable to get decent Napa cabbage in this area. But love the flavors of Gochugaru so I’ve been taking the kraut and adding the flavors after ferment but I suspect it isn’t the same. Eager to try this. Noticed you didn’t add the fish sauce.
Have fun with it. Yes, I have the same issue with Napa cabbage and use it only when I can get it local AND clean without a bunch of baby slugs. 🙂 I’ll put the fish sauce into the recipe. It’s talked about in the comment section.
oh, I didn’t read all the comments. . . but will do. I am due to pick up my Gochugaru tomorrow. Then I will make it. I may go ahead and add the flavors to my current batch of kraut that just finished its initial ferment. I know it won’t be the same, but, served with that steamed sprouted brown rice . .. . . . yum!
Enjoy the gochugaru and have fun with this new endeavor. 🙂
I made this as an emergency birthday present for my husband during our New Zealand lockdown. I had gochugaru stashed in the freezer so that “one day” I could have a go at making kimchi, and my designated shopper (husband) got the rest of the ingredients from the supermarket without a clue what I was going to make. I used red radish, fish sauce, 2 tbsp of gochugaru and stashed it away. I presented it to him with great ceremony on his birthday, he compared the before photos with the jar in front of him, then I put it away for another fortnight to finish “brewing”, which he found very amusing.
He opened and tasted it this last weekend and said we never need to buy kimchi again. The level in the jar is decreasing rapidly. He tolerates other sauerkrauts but this one he loves. He’s even asked me to tweak the recipe next time – less carrot and more spring (green) onion. I’m calling that a success!!! Thanks Holly for the recipe, an easy first step into kimchi-making and a sauerkraut that husband, finally, enjoys! I’m planning on making another batch this weekend so we don’t run out.
BEAUTIFUL! You are most welcome. Yes, do keep enough batches going so that you never run out. 🙂
Hi Holly,
Love your website — thanks for being the most informative and concise website on sauerkraut that I have come across!
One question — how do you think a sort of ‘hybrid’ of this recipe and the authentic kim-chi recipe would go? I.e. I was thinking I could pretty much make the kim-chi sauerkraut style, with 2% salt and no soaking in brine as the Koreans do, etc., but also add the rice flour paste to all the other ingredients in the massaging stage? Does this make sense? Was wondering how this might turn out…
Cheers,
Rishi 🙂
Sounds like a good plan to me! Traditional kimchi is more of a paste ferment so to achieve that same texture I wouldn’t massage for too long. It might create too much brine and water down the paste. Just a thought.
And, THANK YOU for the compliment. 🙂
Nice
Thanks! Hope you are able to make some.
Thank you for the recipe. I stumbled on your website 2 years ago and started with sauerkraut. It’s been pure joy!
2 questions:
1- I can’t find the Korean red pepper or the other one where I live. Can I replace with any chilli pepper flakes?
2- the same with radish. Somewhere you said “watermelon is nice” when talking about radish. Does that mean I can replace with watermelon where I can’t find radish?
Thank you
Yes, you can replace the Korean red pepper with pepper flakes. The flavor will be different, but that’s how I’ve made it for years.
Watermelon RADISH is what I meant to say. I’ve updated the recipe to clarify. Use any type of radish that you can find. Daikon would also be an option.
Fermenation = Pure joy! Thank YOU!
Hi Holly. Hope this isn’t too late for you to read and respond.
Did you know that when Robert F. Kennedy Jr. released the new US food pyramid, for the first time a fermented food–kimchi–is included? But this isn’t my question. 🙂
My question is, other than using more veggies and having more heat, what is the difference between sauerkraut and kimchi? I ask because according to nutritionist Kim Bright, kimchee has oodles (not her word) more probiotics in it than do other fermented foods including sauerkraut.
Yes, I’m super stoked to see the recommendations of fermented foods being added to the US Dietary Guidelines. I shared the news with my email list last week.
I updated my book and added kimchi recipes and now can’t get enough kimchi. I especially love it with cheesy dishes.
There is a group in Canada (The Canadian Fermented Food Initiative) trying to make the same changes here is Canada.
Both kimchi (at least the variety of kimchi we are most familiar with) and cabbage are fermented cabbage. Kimchi contains a greater variety and number of bacteria due to the inclusion of other fermented products (fish sauce, salted shrimp).
I go into greater detail here: https://www.makesauerkraut.com/kimchi-vs-sauerkraut-complete-guide/
And, have a section of kimchi here:
https://www.makesauerkraut.com/fermented-food-recipes/kimchi-recipes/
Wow, Holly, you really keep on top of your comments. Thank you for responding so quickly!
So with your kimchee-style sauerkraut and its added fish sauce, there should be at least a few more good bacteria than without it, I take it? I’m now adding fish sauce to my salsa and corn-relish ferments as well, although of course they’re of shorter duration so maybe not so many good little probiotics are born. Shrimp seems to be a bit iffy these days–some of it from Thailand and other realms containing some cesium radiation, from what I’ve read, so maybe I’ll eschew that addition. Thanks again!
Yes, adding fish sauce is a great way to up the strains of bacteria in the ferment. You can also add it to other foods to add a umami depth of flavor (I use it in meatloaf).
I’ll have to look into the health of fermented shrimp. Fermentation does break down pesticides. Polluted oceans. An unfortunate thing we have to worry about. They are a very small shrimp so they will be further down on the food chain.
Homemade milk kefir is another super star when it comes to a broad range of bacteria. Enjoy!