
 This post may contain affiliate links which won’t change your price but will share some commission.
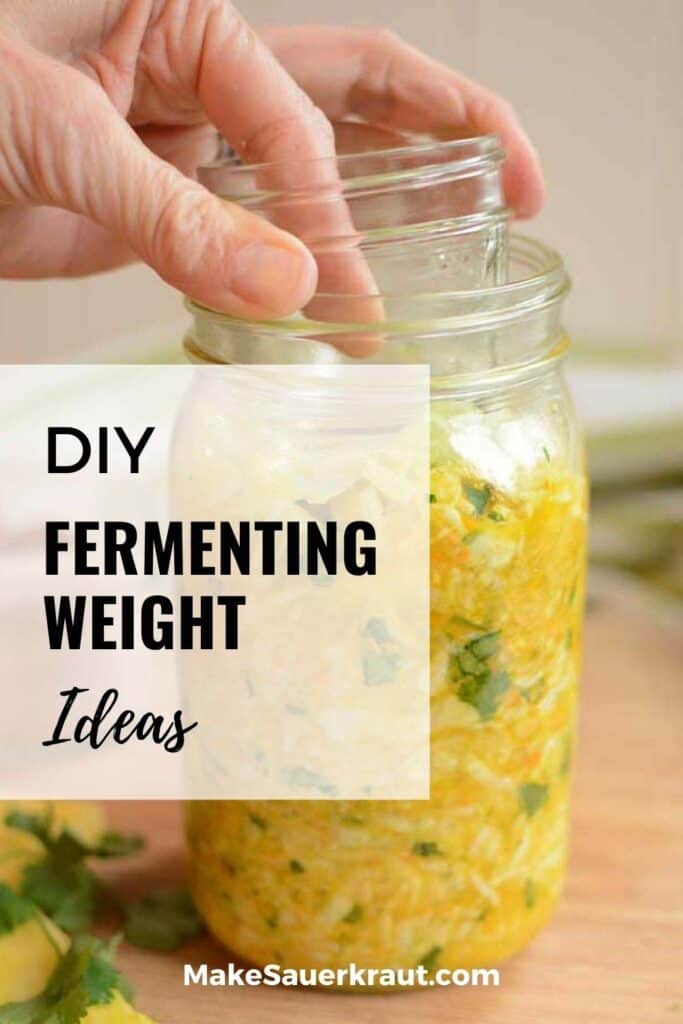
Ever had the unfortunate experience of opening a jar of homemade sauerkraut only to find fuzzy green mold or powdery yeast lurking on top? Learn what three key items to use to keep your ferments safe.

In the world of fermentation, keeping your ferments safe and below the brine is crucial for avoiding mold and yeast contamination.
Whether you’re a seasoned fermenter or just starting out, understanding how to effectively use these tools will help you maintain the quality and safety of your delicious creations.
Let’s dive into the essentials of keeping everything below the brine and explore some effective strategies for successful fermentation.
- How Do You Keep Your Ferment Below the Brine?
- Why Keep Everything Below the Brine?
- What Type of Materials Can Be Used for a Floaties Trap and Fermentation Weights
- What to Use as a Floaties Trap
- What to Use as Fermentation Weight
- Best Fermentation Weights to Purchase
- Fermentation Weights for Crocks to Purchase
- Below the Brine and All Is Safe
Also see: BEST Fermentation Weight for Fermenting in Jars [28-Day Challenge]
How Do You Keep Your Ferment Below the Brine?
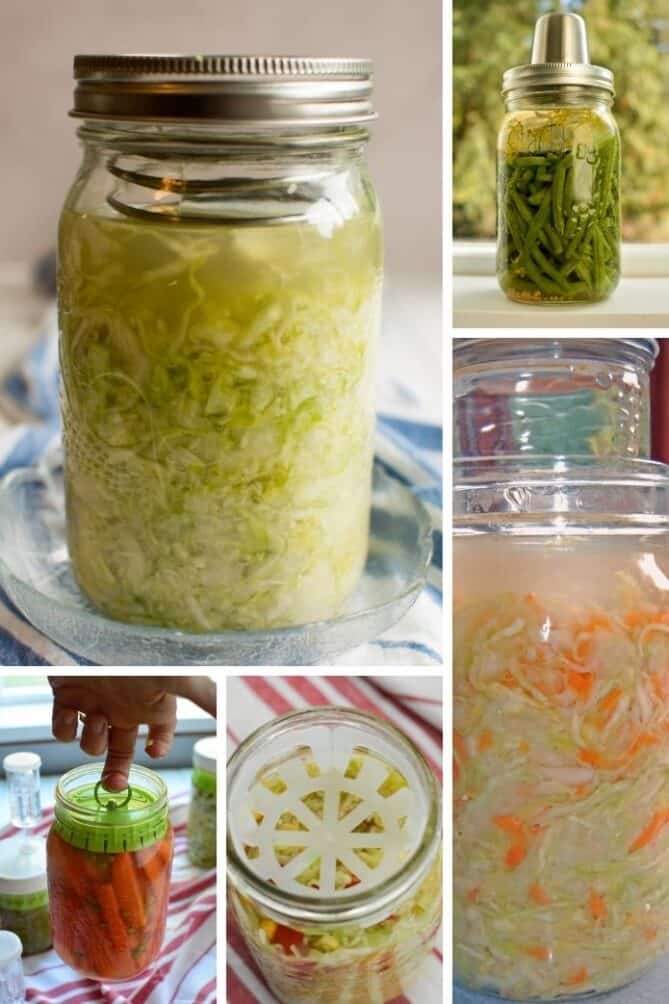
To help keep everything below the brine and away from air, you need three items at your disposal:
- Floaties Trap
- Fermentation Weight
- Fermentation Lid
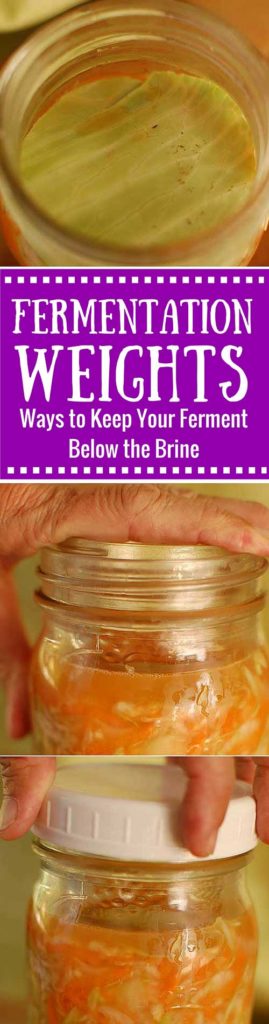
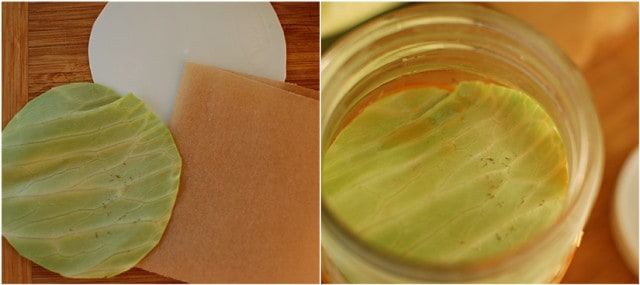
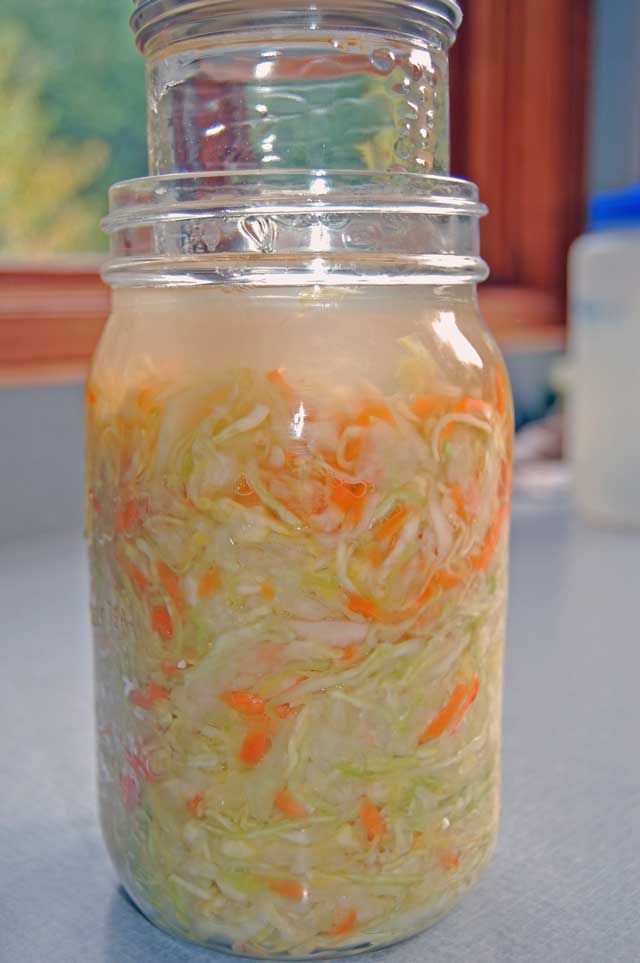
A Floaties Trap is what I’ve named the section of cabbage leaf or piece of parchment paper placed on top of the cabbage mixture to hold back any small bits wanting to float to the surface – where there’s plenty of air – to become a spot for molds to grow on. Below, I share other ideas for a Floaties Trap.
[su_photo_panel background=”#f2f2f2″ border=”1px solid #f2f2f2″ shadow=”0px 2px 0px #eeeeee” photo=”https://www.makesauerkraut.com/wp-content/uploads/2016/05/fermentation-weights-floaties-trap.jpg”]Use a Floaties Trap to keep loose bits from floating to the surface.[/su_photo_panel]
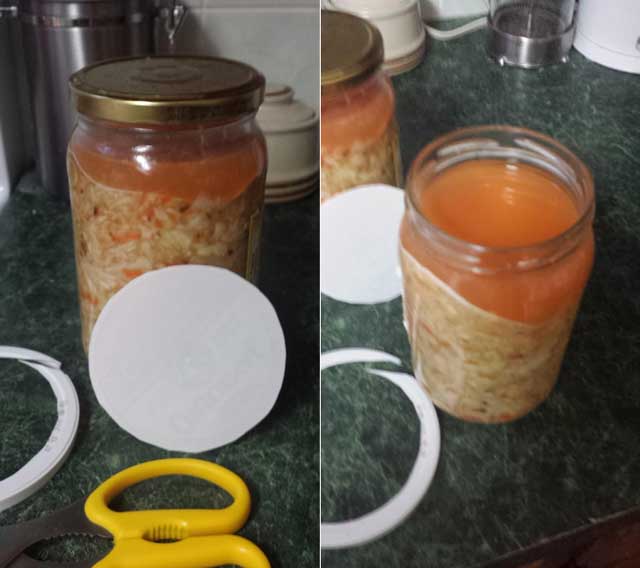
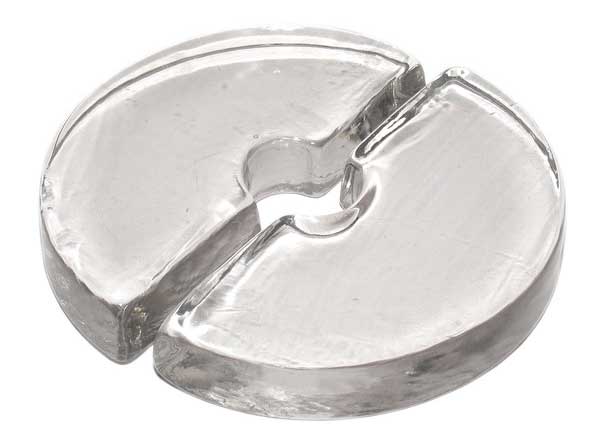
A Fermentation Weight prevents your packed mass of sauerkraut or loose vegetables from working themselves up and out of the jar.
The fermentation process creates carbon dioxide (co2) gases that have to go somewhere. With loose vegetables – as in pickles, the bubbles easily work there way around the vegetables and rise to the surface. With a packed mixture – as in sauerkraut – this can be made more difficult, especially if packed super tight. What can happen instead is that co2 gases accumulate in the packed sauerkraut and the mixture bulges and is then pushed up and out of the brine.
[su_photo_panel background=”#f2f2f2″ border=”1px solid #f2f2f2″ shadow=”0px 2px 0px #eeeeee” photo=”https://www.makesauerkraut.com/wp-content/uploads/2016/05/fermentation-weights-jelly-jar-weight.jpg”]Use a Fermentation Weight to prevent fermenting sauerkraut from “heaving” or moving upwards in your jar.[/su_photo_panel]
A Fermentation Lid dramatically decreases air exposure. You can use a simple plastic lid, the lid and rim that came with your jar, or a lid with an airlock.
In 9 TOP Fermentation Lids for Mason Jar Fermentation [HOW AIRLOCKS WORK], I cover the various types of fermentation lids.
[su_photo_panel background=”#f2f2f2″ border=”1px solid #f2f2f2″ shadow=”0px 2px 0px #eeeeee” photo=”https://www.makesauerkraut.com/wp-content/uploads/2016/05/fermentation-weights-lid.jpg”]Use a Fermentation Lid to let gases escape and prevent air from entering your jar.[/su_photo_panel]
Keep these fermentation tips in mind and soon you’ll be consistently making mouthwatering sauerkraut with ease.
Why Keep Everything Below the Brine?
Before I give suggestions for floaties traps and fermentation weights, let’s first understand the role that the trillions of bacteria in our fermenting vegetables or sauerkraut play. It’s important to understand how the many armies of microscopic friends and foes that live with us do their jobs.
There are countless armies at your disposal. Put out the welcome mat for the friendly armies by using the right amount of salt, fermenting at the right temperatures and keeping everything below the brine.
Friend or Foe?
The good bacteria – or the friendly armies – are:
- The friends that give our sauerkraut its tang.
- The friends that make carbon dioxide to keep air out of our jar.
- The friends that make lactic acid to preserve our ferment.
- The friends that eat the sugars in our fermenting vegetables.
- The friends that make our sauerkraut, oh so flavorful.
The “bad” bacteria – or the mold and yeast armies – are:
- The foes that grow bluish, greenish or grayish furry stuff on the surface of your ferment.
- The foes that leave a white powder in their wake.
- The foes that turn sauerkraut soft and slimy.
- The foes that make you fear eating your ferments.
Mold
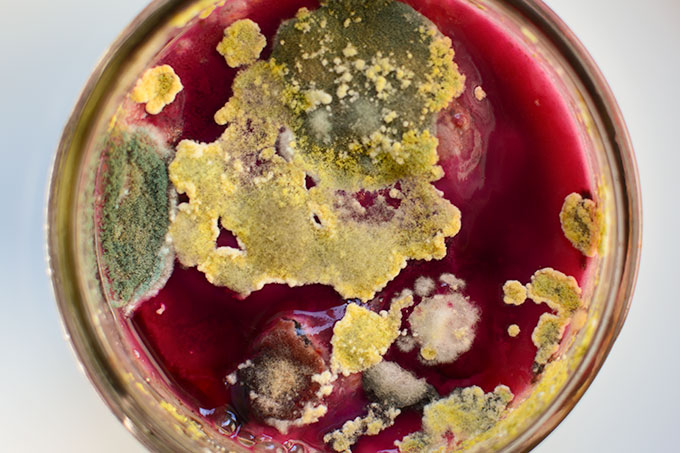
That bluish, greenish or grayish furry stuff is mold. This image is from a neglected batch of fermented beets.
“Mold is a fungus organism that grows in filaments that are connected, so it’s a thread-like type of creature that’s multi-celled in contrast to bacteria which is a single-celled organism.”
“Mold grows from mold spores that are present everywhere in the air and begin growing when they land on a wet surface that has nutrients (such as your food). They can actually survive in acidic foods so it’s not necessarily the acidity that deters them.”
“There is no reasonable way to eliminate mold spores when it comes to removing them from a human environment so you’re always going to be in the presence of them. They only become a problem when they begin to multiply.”
– Fermentation Podcast: 5 Questions on Mold and Food Safety
Kahm Yeast

Mold is different from Kahm yeast. Kahm yeast is a smooth, harmless surface powder that grows on ferments that haven’t reached high enough acids levels. It’s a hassle to deal with and can impart an off-taste. So, we don’t want to enable the Kahm Yeast Armies to move in either.
We don’t want the Mold Armies hanging out on the surface of our sauerkraut, but if you leave a little bit of cabbage, grated carrot or pepper chunk floating on the top of your ferment, like it or not, chances they are going to jump on board, just as a frog will jump upon a lily pad. Or, if there is a lot of air at the top of your jar or crock, the Kahm Yeast Army is going to invade.
For more on what might be growing in your ferment:
Has Your Sauerkraut Fermentation Gone Bad: 3 Fermentation Rules and Many Troubleshooting Tips
How do we prevent this?
With a floaties trap, fermentation weight, and fermentation lid.
What Type of Materials Can Be Used for a Floaties Trap and Fermentation Weights
When selecting items to use a floaties trap or for fermentation weights in your ferment, there is a whole range of options, some food-safe, some not. It is not ideal for some food-safe items to be used long-term in an acidic environment.
I’ll briefly discuss each choice and then it is your call on whether or not you use that knick-knack found at the back of your junk drawer as a Floaties Trap or fermentation weight.
Different materials that your trap or weight can be made of and considerations to bear in mind:
- Vegetable Matter. Your safest bet for a Floaties Trap. I almost always use a cabbage leaf.
- Glass. Items made from glass are my first choice when selecting a fermentation weight. Canning jars – like the mini jelly jar I recommend – meet the same quality standards as the jars you ferment in. They are food safe even for acidic foods. And now, there are glass fermentation weights available for purchase that are made from the same glass used in canning jars. Do you care where the item is made? Some avoid all glass from China, not being comfortable with their safety standards. It is hard to know the safety of non-food glass items such as marbles or Glass Floral Gems, all which I used as weights early on in my fermentation journey.
- Stainless Steel. Marine-grade stainless steel does not react with the acids in a ferment react.
- Copper or Brass. Do not use items made from copper or brass. They can leach into the ferment and, in addition, can themselves be destroyed by the acid and salt from the fermentation process.
- Plastic. So handy but such an unknown. But again, I’ve used many a plastic yogurt lid cut to size.
- Silicone. Silicone is considered food safe. However, I have seen no studies on its use in an acidic environment.
Remember, we all have different thresholds for what we’ll use and are all in a different place on our fermentation journey. Enjoy the journey and up the quality of the materials you use as you have the mental and financial space to do so. No guilt trips.
What to Use as a Floaties Trap
And now some suggestions for what you can use as a Floaties Trap in your ferment.
Cabbage Leaf Torn to Size
A clean outer leaf from your cabbage, torn to size, makes for a great Floaties Trap. It’s definitely food safe and readily available. After all, you are most likely making a batch of sauerkraut and should have an available cabbage leaf.
If you are obsessive, use the rim on your jar to firmly press on the leaf, leaving a ring print which you can then tear or cut into a perfect circle.
If you’re fermenting in a large crock, you will have to overlap a few large cabbage leaves to cover your ferment.
However, sometimes we forget to save a cabbage leaf or perhaps we’re fermenting something else. Some other options.
I have read of carrot peels, crisscrossed like spokes of a wheel, being used as a floaties trap. Or, thin slices of a large radish or other vegetables.
Parchment Paper
Use unbleached parchment paper – the brown stuff – so you are not introducing bleaching agents into your sauerkraut that could interfere with the fermentation process. Unbleached parchment paper can be found at most health food stores.
Tear off a strip the width of the opening for your jar and then fold to size.
For a crock, cut a large circle of parchment paper to size.
Piece of Clean Cloth
One of my readers alerted me to another idea for a Floaties Trap. Thank you, Wayland.
Fold or cut to size a piece of clean cloth, muslin or cheesecloth.
Food-Grade Plastic Lid
In a pinch, I’ve used a yogurt lid cut to size. It works like a charm. Some are not comfortable with plastic being used long-term use in an acidic environment.
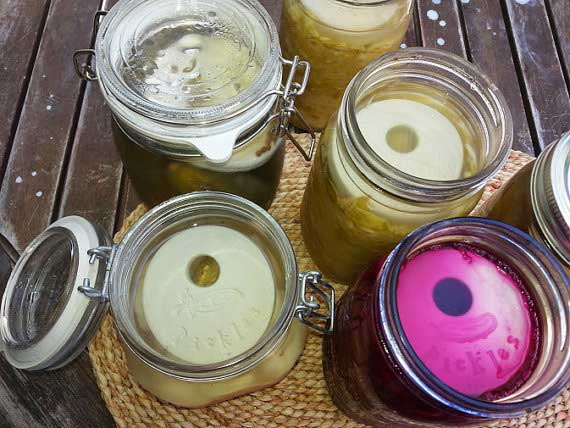
And, as you can see in the pictures above, a plastic lid cut to just the right size can serve as both a Floaties Trap and a fermentation weight. It works great for all jar sizes. Pictures above and instructions below thanks to Rob, one of my readers in Canada:
- Take a plastic yogurt or margarine lid bigger than the inside of the jar being used.
- Cut along the edge of the lid with good scissors to keep it round, rather than measurement perfect.
- Rinse in diluted bleach for a few minutes. Rinse well.
- Force the plastic into the jar on top of the kraut. Trim if too large. Start again if too small. It should hold on to the sides of the jar quite tightly.
And, what I like about this idea is that there is plenty of room for brine.
For a crock, the right sized plate or a larger plastic lid can also work as a floaties trap.
Pringles Lid – From One of My Readers
“If anyone needs A quick and easy floaty trap, a plastic lid off a Pringles potato chip can work really well. It’s a perfect size. Place flat side down. It’s all I use anymore.”
Thanks, Dean!
Dehydrator Screens
I ordered a set of Excalibur dehydrator screens just to make Floaties Traps for fermenting. The Excalibur company prides themselves on quality. Their dehydrator screens are made in the USA, use FDA approved food-grade materials, and are BPA-free. Again, if these are cut to just the rights size, they can serve as both a Floaties Trap and a fermentation weight.
The screen holes in this material, allow brine and co2 gases to easily move upward in your jar or crock.
The Excalibur screen is 14″ square which is large enough to cut down to size for a crock.
Silicone Sealing Lid Liners

Silicone Sealing Lid Liners. You may have a silicone item in your kitchen that you don’t mind cutting to size for a Floaties Trap.
The Mason Jar Company sells food safe silicone lid liners designed specifically for use inside Ball plastic storage caps and other lids for wide-mouth canning jars. If they are too big to fit down inside your jar, trim to size.
I have yet to try these. One reviewer complained of a smell she could not get rid of. The company recommends soaking the lids in a baking soda and water solution to remove the odor.
Now that you have a way to prevent little pieces of vegetable matter from floating to the surface where the Mold Army can invade, I share some ideas for fermentation weights.
What to Use as Fermentation Weight
First, some things to keep in mind when deciding what type of fermentation weight to use:
- Where are you on the food-safe spectrum? Are you OK with plastic? Do you care if the material you use is made in China?
- Do you prefer the DIY route or would the purchase of a few weights designed specifically for fermentation make your day? With new fermentation products entering the market almost daily, you can quickly spend a few hundred dollars. Would you rather put that money towards a fancy-schmancy water-sealed crock that takes fermentation to a whole new level? Or, are you perfectly happy with collecting what you need for the single-jar method?
- How many jars do you have going at any one time? Will $25 spent on a few weights be all you need?
- What’s the weight of the fermentation weight? You may find that some of the glass weights are not heavy enough to hold a very active ferment below the brine.
- What’s the size of the weight and can it fit into your jar? Weights designed for fermentation work well with wide-mouth jars but won’t fit into narrow-mouth jars.
- How about using a chunk of vegetable? Some recommend using a cabbage core or other chunk of vegetable. The problem I see with this is that a portion of the vegetable is above the brine and exposed to air. A perfect place for mold to grow.
Small 4-Ounce (125 ml) Jelly Jar
I have found this to fit the bill… almost. The main drawback is that the small jar does take up space I would rather leave for brine. This little jar – or other similar containers – work more as a counter-force than a weight. As the sauerkraut pushes up on the little jar, it’s held in place by the lid and can go no further, thus remaining below the brine.
Here are some other types of small jar-like-items that can serve as fermentation “weights” or a counter-force:
- Shot Glass
- Baby Food Jar
- Espresso Cup
- Condiment Dish
- Stainless Steel Portion Cup
And, if you don’t mind leaving the lid off your ferment, a jar filled with water and its lid screwed on works like a charm.
Zip-Lock Bag Filled with Brine
This is a common no-cost method. Start with an empty bag, open and press down on your ferment. Then, fill with brine and seal. It can get a bit messy when brine finds its way up the side the of the bag.
Cleaned Rock or Stone
Comb the beach for a stone the right size to fit in your jar. Stay away from limestone since it can interact with the acids in your ferment. Boil for 15-20 minutes before first using to kill any harmful bacteria.
Other Small Found Household Items
Place any of these small items in a cotton tea bag or mesh bag. Or, leave loose and pick out one by one.
- Marbles. You’ll want lead-free marbles without paints or glazes that could leach into your ferment.
- Glass Floral Gems. I used these for years and then switched to the small jelly jar. They can be a bit light and it’s hard to know the quality of the glass.
- Ceramic Pie Weights. These are food-safe and should be heavy enough to hold down your ferment.
- Whiskey Stones. Again, food-safe and heavy enough to hold down your ferment.
The Daily-Fork Method
Monitor your ferment daily and when you see it bulging above the brine, open the lid and press the contents down with a fork.
I prefer not to disturb my ferment like this and do realize it introduces a new batch of air into the ferment each time you open the lid. But, for the fiddly type, it can work well.
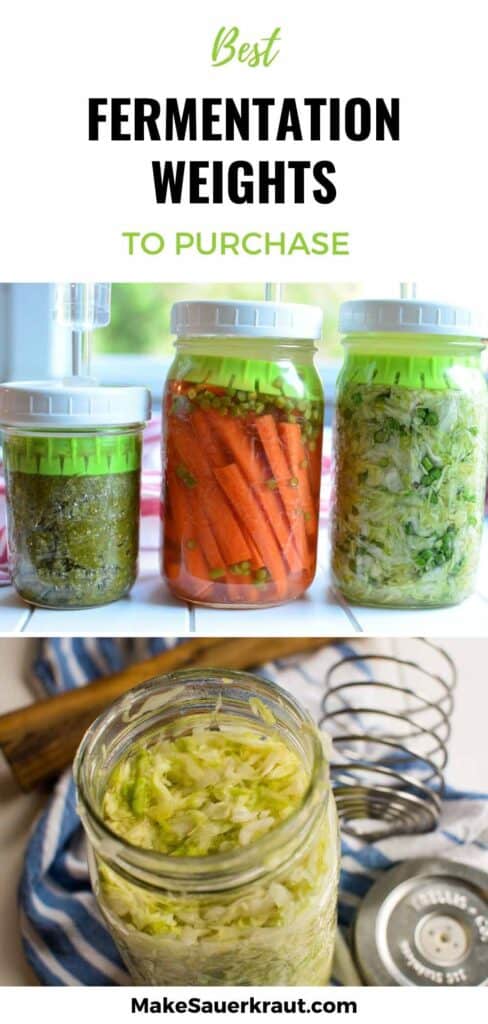
Best Fermentation Weights to Purchase
There are a wide variety of fermentation weights currently available in a range of styles. They are all designed to keep your ferment below the brine, though some do a better job than others. They are made with either break-proof glass, marine-grade stainless steel, food-safe silicone, or food-safe plastic with each material coming with their own set of pros and cons.
In the table below, I show some of the best. In the sections that follow, I group them into three styles of fermentatation weights and share the pros and cons fo each.

Fermentation Weights
A fermentation weight relies upon weight to hold your ferment below the brine.
Most all are made from made from non-iridized soda glass (the same material glass canning jars are made from), a lead-free material that guarantees nothing will leach into your ferment.
Common complaints from users are that they break and some can be difficult to remove from the jar, hence the “handles” on the newer designs.
The major drawback is that they don’t have enough weight to always hold your ferment below the brine for the 3-4 week duration of a ferment. However, they seem to keep your ferment below the brine during the critical first week of fermentation.

- Effortless Handling: Experience the ease of using our redesigned glass fermentation weights…
- Universal Compatibility: Our weights are tailored for all wide mouth mason jars. Ideal for…
- Superior Quality: Crafted from thick, crack-proof glass, our weights ensure durability and…

- GET A GRIP: The handle has a lip on the top edge that makes it easier to grab, whether it’s…
- KEEP YOUR VEGGIES DOWN: With an average weight of 6.5 ozs, these weights are heavier than most…
- STAY SAFE: Food safe, non-porous, lead-free, gluten free, non-GMO (ok, now we’re just being…
Fermentation Springs
A fermentation spring relies upon the pressure from a coiled spring to push your ferment down under the brine. These are being made from high-grade stainless steel.
The Kraut Source fermentation lid uses a spring made from a light grade of stainless steel along with a stainless steel plate to push down on your ferment. The The Pickle Helix uses a spring made from a heavier grade of stainless steel that is tightly coiled at the bottom to push down on your ferment.
The Pickle-Helix springs can also be purchased without the lids.

- INCLUDES: 3 x Pickle Helix Stainless Steel Fermenting Coils (lid & jars not included). BONUS…
- FERMENT LIKE A PRO: Pro fermenters use nothing but stainless steel why shouldn’t you? The…
- VERSATILE: The Pickle Helix Coil self-adjusts to work with any size mason jar for fermentation…

- Makes fermenting foods like sauerkraut, pickles, salsa, kimchi and more fun and easy.
- It fits on standard wide-mouth mason jars*, allowing you make pint, quart, or half-gallon sized…
- Specially designed to keep air out and fermenting fruits and veggies submerged in brine.
Fermentation Gates
A fermentation gate is a device locked into the neck of the jar to prevent your ferment from moving upwards in the jar or “heaving.” These are usually made from food-safe plastic or silicone.
The plastic No products found. has tabs that hold it in place in the neck of the jar. The silicone Pickle Pusher also has tabs that secure it in place in the neck of the jar. And the small canning jar I use in my teaching recipe relies upon the lid to hold it in place. There is also the plastic No products found. – with gripping teeth on its bottom and a slit on its side for brine seepage – that acts as a fermentation gate.
The challenge when using a fermentation gate is to pack the jar to just the right height. Too high and you have “brine overflow.” Too low and the fermentation gate can’t apply its force. With the ViscoDisc, I pack my jar with the usual amount of cabbage and then push the Canning Buddies down into the neck of the jar. It works splendidly as seen in my review post on the ViscoDisc Canning Buddies.
My in-depth review of the Pickle Pusher can be found here. It is available both on Amazon and on the company’s website.

- 1 Fermenting kit with airlock & Pickle*Pusher weight system. Holds 25X more than fermenting…
- Pickle*Pusher weight replacement system is BPA free foodsafe silicone & 316 stainless steel
- All lids & airlocks are BPA free foodsafe plastic. Gaskets & grommets are BPA free foodsafe…
No products found.
Porcelain or Ceramic Fermentation Weights
Pottery by Sandy Der Etsy Shop. Unglazed porcelain. Low absorption, like glass. They are made of unglazed porcelain and fired to 2160F. Non-porous and resists stains. Dishwasher safe.
Tamarack Stoneware Etsy Shop. Made of high-fired, fine-grain stoneware clay.
Since these are a 2-piece weight, they can be cut a bit bigger than the single piece weights thus allowing for complete coverage of your ferment. They weigh 6 ounces (170 g), similar in weight to some of the glass weights.
Note: Stoneware clay is porous. Porous weights work great, just make sure they are completely dry before storing, else mold can grow on them.
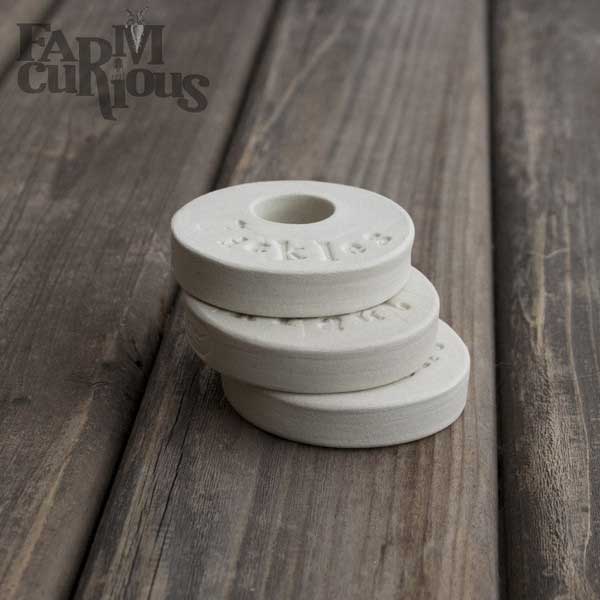
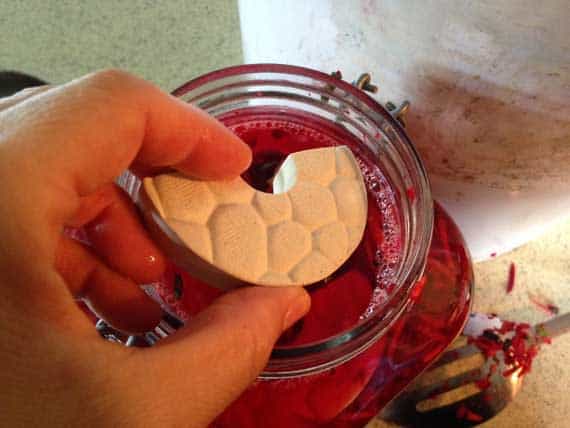
Farm-Curious Fermentation Weights. Handmade porcelain weights are ideal for keeping your fermenting veggies submerged under brine and are made in three sizes to fit any Mason jar.
Fermentation Weights for Crocks to Purchase
Most crocks come with weights, especially the water-sealed fermentation crocks that make it oh-so-easy to successfully ferment sauerkraut. I talk all about them in this post:
Fermentation Crocks: The Who, What, Where, When, Why and How
and discuss how to ferment in a crock here:
The SureFire Sauerkraut Method: In a Crock: 7 Easy Steps
If you need fermentation weights for your large crock, I highly recommend the lead-free glass weights sold by Stone Creek Trading as an alternative to the traditional porous ceramic weights which are sold with most fermenting crocks.
From their website:
“With traditional ceramic porous weights, the unglazed surface can absorb bacteria present in your ferment. When something goes wrong in the fermentation process, the bad bacteria or mold can be absorbed into the porous stones. It can be very difficult to then sanitize the porous stones. As an alternative, glass is non-porous and will not absorb anything!”
In addition to being non-porous:
“Luna Glass Crock Weights are 15% heavier than the traditional porous weights. The additional weight helps keep your ferment submerged where you want it.”
I’m excited to try a set of these. From one review:
“Glass weights are great as they don’t absorb odors or stains and allow you to see food beneath.”
Below the Brine and All Is Safe
Use these fermentation tips to keep your ferment safe from the Mold Armies and the Kahm Yeast Armies. In addition, use the right amount of salt and ferment for the right length according to your fermentation environment and all will be good:
How Much Salt Do I Use to Make Sauerkraut?
How Long To Ferment Sauerkraut?
And do share in the Comments your preferred method for a Floaties Trap or fermentation weight along with sharing any I may have missed.

Last update on 2026-06-15 / Affiliate links / Images from Amazon Product Advertising API
Last year I first made kraut in a jar and it turned out fabulous. This year I decided to go big and bought a 2 gallon crock and went to town. I had good coverage with large leaves, good brine and then I put 2 ceramic weights on to hold things down. Problem is, the brine never made it up and over the weights so mold started to grow on the weights themselves. I was just scraping it off but eventually took them out, replaced with a glass plate and weighted it down with a heavy jar. Two questions; 1. Should I toss it? I don’t know that mold got into the ferment itself. 2. Do stoneware crock weights need to be completely under the brine to prevent what happened? Advice is appreciated!!!
Hello Lorrie, If there is not enough brine to cover the weights, one should then add brine until they are covered. Both sauerkraut and weights need to be under the brine. Good troubleshooting.
It doesn’t sound like the mold got into the sauerkraut, just on the weights so if all smells fine, it should be OK. Learn more with my post on fermenting in a crock: http://www.makesauerkraut.com/surefire-sauerkraut-in-a-crock/
Thank you! That’s what I figured must be the problem. I’ve decided to toss it though because when I looked at it yesterday there is even more mold. Oh well. Now I know my next batch will succeed!
Thanks for sharing the latest. Keep on learning. You’ll be a pro before you know it!
I hope so! 🙂
Hi Holly,
Great blog! I’ve been making sauerkraut for two years with mostly success but have run into trouble lately. I have a 10L Harsch crock. My last two batches have sucked in a lot of water from the moat. In the second-to-last one, the moat water went down to the bottom twice, and when I opened it, was obviously bad, so I threw it away. The last batch, which I just decanted, looks fine and seems all right, but tastes pretty bitter. This last batch sucked in so much water that the crock was full all the way to the top, but the moat never ran dry.
Can I eat this bitter sauerkraut if I can stand the taste? And how do I keep the water from being sucked in so much? We’ve had a lot of barometric pressure changes in the last few weeks.
Do you keep adding water each time the water is pulled in? If so, instead jiggle the lid a bit to see if first you can get the water back to the other side of the moat.
Also, try to have your crock in room with even temperatures. Brine movement is also due to temperature changes.
If you’re not adding water to the moat, then all that “water” has to be brine, which you do get quite a bit of when fermenting in a water-sealed crock.
Read through my post on fermenting in a crock. Step 6 talks about the moat issues: http://www.makesauerkraut.com/surefire-sauerkraut-in-a-crock/#step6
Also, read the steps on weighing, mixing and using the right amount of salt to work with the “bitterness,” which could also be due to the cabbage you used. Old cabbage can be bitter due to the storage. If you can stand the taste, it should be fine to eat.
Hi Holly,
Thanks for your answer. I have been adding water when the moat gets low. With this last batch that was bitter, I did try jiggling the lid first. Sometimes it worked, and sometimes it didn’t. I don’t push it, though, because I’m afraid of getting air in there. What are your thoughts about opening the lid before the kraut is done? Is it to be avoided at all costs, or is it ok to do it once or twice?
I did read your treatise on salt thoroughly and got a better type of salt (Redmond’s) than I have been using. I’ll read your recipe carefully before I make my next batch of kraut tomorrow.
I wouldn’t lift the lid during the first week, but after that I wouldn’t worry. It’s more important not to have water from the moat enter the crock. And once you’ve made a few batches and feel comfortable with the whole process, you’ll naturally be able to leave it alone.
1. Edit:
“The bad guys multiple and take over in an aerobic (with air) environment.”
multiPLE = multiPLY
2. re: Weights and Brine Drama
One way to deal with the brine drama (because you want to EAT the Himalayan salts you’re [hopefully] using–not end up throwing them out) is to simply work the veggies a little less so that they release less liquid. This way, even if you have to end up using more jars to store the veggies (I recently used five 1.75-qt jars to store about 8-9lbs sauerkraut produce) you don’t end up having to throw brine (Himalayan salt) out.
When the brine levels get low (this seems to be a common occurrence toward the end of the cycle–even now that I keep the lids on tight this is happening now that I’m winding down toward the end of the cycle for this batch) on brine, just prepare a brine (using cheap table salt, even–you’re not going to be using that much anyway) and top them off.
3. Unrelated:
I’d suspected that Himalayan salt had had a different (more positive) effect on me than table salts had had, so, after having already used table salts (even those labeled “sea salt”) to prepare sauerkraut a few times (suffering edema if I wasn’t careful to keep my daily consumption of those batches at a minimum), I decided to use 100% Himalayan salt; and (I’ve already broken in to one of my jars–it finished ahead of the others, since its contents had been given a running start [I’d experimented “seeding” the veggies by simply leaving mature organisms–in the form of a few bits of sauerkraut from the previous batch–in the jar]) the results are in: I can eat this sauerkraut (made with Himalayan salt) without concern about edema–there is definitely a difference between the salts!
Interesting perspective on working the mixture less so that there’ll be brine available to be released later in the fermentation process. So much to play with during the creation of our fermented artwork!
Himalayan Pink and other mineral-rich salts contain the same sodium chloride percentage as sea water and body fluids (blood) – where there is sodium – which would account for your astute observations about when you do or do not experience edema. That ol’ processed food item rearing its ugly head again.
Wait, I didn’t mean “so there will be brine available to be released later” (I have to make brine with water and salt separately to top it off toward the end of the process), but work the veggies and salt less so that less moisture is released from the vegetables–that way, you save the salt used to draw the liquid out of the veggies (i.e., it’s not going to be gushing out when you push the shot glass or what ever down onto the sauerkraut–which thing you could also accomplish by simply not adding the brine in with the veggies which are to become sauerkraut, but then that brine ends up being lost anyway–it will be just wet enough so that when you tamp the veggies down the brine will rise about half an inch or so short of the mouth of the jar).
Thanks for clarifying. I’m also enjoying using the Pickle-Pusher or Pickle Pebbles. No brine loss. Also, I want to try drilling a hole in the bottom of my little jar to allow more space for brine.
Yeah, that pickle pusher looks interesting, but I’m not sure how I feel about putting plastic and metal in sauerkraut.
Totally agree. I have mixed feelings but I like to share all options that are effective since we all have different concerns. The Pickle Pebbles are all glass. I’ll have a review post out on Wednesday.
re: Glass Pebbles
Sounds good. I’d like to have something other than a shotglass as a weight some day because I’m afraid they’ll break sometimes. Also, when you apply pressure to the shotglasses (when you screw the lids on) they scrape the lids and the scrapes become rusty.
There is no plastic in the Pickle*Pusher that contacts your foodstuffs for more than seconds at a time and that would be during deployment and removal. The plunger part is silicone
I’m also unsure I’d want silicone touching the vegetables–unless there were a lot of evidence (from trustworthy sources–to start with, not scientists paid by interested companies) it was safe. People claim these newfangled things are safe but I’m not going to trust them. There’s always that apology–maybe a class-action lawsuit–that comes out years later. Remember teflon? Food cooked in those pans have markedly elevated levels of endocrine-disrupting fluoride. Another example would be silicone spatulas–the (so-called) “heat-safe” ones: I have a degree in culinary arts, and have worked in many kitchens, and I’ve been around a lot of these “heat-safe” spatulas that have obviously been heat-damaged–which have not completely but have noticeably melted. You can guess where the rest of those spatulas are right now–in peoples’ bodies.
I’d rather use a safe wood or glass.
I am sure there is a blogger who can dig up some facts 🙂 They did us a service bringing the BPA and related issues to light but fail miserably at admitting there was a solution found and implemented 🙂
Maybe; in the meantime, “If it’s not broke don’t fix it.”
Hardly the spirit of invention 🙂
We are at an wonderful time in history with the resurgence of fermentation. Products to make fermentation easier and most effective are bombarding the market daily.
I am deeply grateful to small family companies like the Ultimate Pickle Jar or Kickstarter funded companies like KrautSource. Both had an idea they were able to bring to fruition and consequently make our lives easier.
Some will appeal to one person and some will not for a wide variety of reasons. It’s all about choice. Silicone vs. glass vs. metal is not what it should be but a personal decision based upon what is important at this moment in your life. One day someone will tell me that there’s something terrible in glass that is leaching into my ferment… Who Knows!
Keep the inventions coming. What an incredible impact one individual can make.
You’re assuming that producing “inventions”, or walking in a spirit of “invention”, is a life-goal of mine. It isn’t; I value other things.
No, Himalayan salt contains virtually the same concentration of salt, as regular salt. That is because it is salt, with trace elements and minerals. The concentration of any salt can be made to match sea water or blood by diluting it with water. Check your facts, and you will find I am correct.
You are right on the salt concentration which will need correcting in various spots on my posts. What I’ve learned however, is that through the high heat processing of “processed” salts is that the natural chemical structure is altered to something that our bodies don’t recognize which might be part of the equation of why some prefer a mineral-rich salt over a “processed” salt. http://www.xbrain.co.uk/table-salt-versus-himalayan-salt
I just prepared a 2.5-gal glass jar (not all the way full but almost all the way full) of red cabbage, carrot, habanero, jalapeno, and red apple sauerkraut. I didn’t have weights so I had to use two little plates (semi-stacked–each touched one side of the glass jar, but overlapped one another), then a bowl, a piece of aluminum foil, a large plate (to accomodate the next item) then a 10lb (lifting / exercise) weight.
You’d mentioned that larger batches (for what ever reason) develop more compelx flavor profiles. I guess I’ll get to test that now.
Questions:
1. Do you think this will be safe? The two little plates (in contact with the brine) are corelle and I’m sure they have friction. Will this release anything harmful into the sauerkraut?
2. Do you sell weights big enough for this? I will check around.
I didn’t think the thing through very well but I’m certain I’ll arrive at a solution.
1. Safety? I would feel comfortable using those little plates. I’m assuming nothing else in your “weight” system is in contact with the ferment (i.e., aluminum foil) which I would not want in my brine.
2. Weights? Check with Stone Creek Trading. They sell beautiful glass weights in various diameters. Hopefully, their smallest size would work. https://www.stonecreektrading.com/collections/weights/products/luna-glass-crock-weights
1. re: Alum Foil
Not touching brine, no. LOL! TY for advice.
2. re: Stone Creek Trading
TY
I forgot to mention (elsewhere) that when you make the Yerba Mate tea you’re going to want to make sure you’re purchasing unsmoked Yerba Mate (the bags say it on them).
Thanks – will eventually try that out.
I broke in to the 2.5-gal batch of sauerkraut tonight (tonight marks the completion of the 21st day), and I think it does seem to have more “character”–but since I made it with apple (I don’t normally) I can’t say for sure that it is because the sauerkraut batch was bigger. LOL
Thanks for the tip nevertheless. By the way, there is not much sweetness from the apples left–they taste like tomatoes.
Good to hear. Sauerkraut with “character” is always a pleasure to imbibe in. The crock does raise the bar on sauerkraut fermentation.
why did you put aluminium foil? do you want to get sick?
The foil wasn’t touching any food.
Hello, dear Holly!
Thanks for this story about how much salt to make sauerkraut! At one time I want to write you on this subject. I make my sauerkraut weighing the salt, 20g for every 1000g of cabbage. But recently I did test following the guidance of http://www.celestialroots.com, which recommends 11g for every 1000g of cabbage. I confess I did not like the result … the sauerkraut was sticky in a short time and it was not tasty …
Have you seen this information on http://www.celestialroots.com?
http://www.celestialroots.com/basic-sauerkraut.php
Thank you!
Hello Ricardo, I have not seen this website before. Salt numbers work fine at 1.5% – so 15g for 1000g of cabbage – but much below that you’re giving the pathogenic bacteria a chance to take hold. There is a range – 1.5-2.5% – which I like to stay within. Flavor and texture are important as long as not too much salt and not too little salt. Thank you for sharing the link. Always ready to learn more.
Thanks, Holly!!!
Have you heard of these fermentation lids for mason jars? It appears you can use them without the weights as well…. https://www.amazon.com/gp/product/B01M73T3ZH/ref=ox_sc_act_title_1?smid=AOQ9H4NZQNA9L&psc=1
They’re nice. I see many using them. You still need a weight. See my recent post on Fermentation lids for more..
Hello Holly Thanks for your brilliant website. I’ve just made my second batch of sweet sauerkraut – so a bit of a rookie. One thing: I’m not sure at what point I should remove the weight inside the jar? I’m improvising with washed stones inside sealed polythene food bags.
Hello Lesley, The weight is most important during the first week when there is a lot of gases produced and the weight helps to hold everything below the brine. Most leave the weight in for the duration of fermentation (1-4 weeks) but you might not find it really necessary after the first week. Congrats on your sauerkraut! Keep on learning and perfecting the process.
Thanks, Holly. That’s really helpful. I’m so impressed with my (your) sauerkraut that I’m thinking of buying a second fermentation jar so I can have one brewing while I eat my way through the other.
FANTASTIC idea! Watch out though, next will be a water-sealed fermentation crock! Enjoy the delicious journey. 🙂
Ha ha. Yes, I can tell it’s a slippery slope.
https://uploads.disquscdn.com/images/7b1484b3c77bd06a871522b0ee6173fcfe3a8de9eb17ff15aa4f7b4454a4746c.jpg
Those are a beautiful setup. Enjoy the slippery slope, and… what’s in the jars. 🙂
Thank you for this info. I found some springs with self-burping lids for not too bad a price at Walmart, plastic with a little rubber membrane with a tiny hole. They seem to have worked great. I just didn’t know if I needed to put weights in after I am done fermenting. This satisfies me that I can just put on regular lids and refrigerate when the time is right. They are at 2 and a half weeks now.
I had one not as full jar too which I added apple. I noticed some brown floaties at 2 weeks, so I opened it, and there was a film, kind of like a scobi, floating on the top that came up with the spring. I scooped all brown apple floaties out, called it done and refrigerated it. I have not been a lover of sauerkrat, so maybe this will ease me into it. I don’t mind hard cider or kombucha, so I figured the apple might help. I mostly made it because I grew a huge cabbage, and my parents both like sauerkraut. 😉
The springs are my favorite weight. Nice that you were able to find some. No need to keep the weights in after fermentation is done. Use them in a new batch. Just put on a storage lid and more to the fridge as you said.
The sugars in the apple created that “scoby.” Hope you’re enjoying that batch.
Thank you for asking this question 4 years ago. It’s just what I needed to know here in the future. 🙂
Amazing what one can find in the comments thread. 🙂
For small single batches, I use a small french press coffee maker. It has a glass vessel and a mesh stainless steel screen plunger. It’s great for small jobs, such as hot sauce, pearl onions or mustard. It’s easy to clean, you can monitor the level of the solution and it’s easy to clean in the dishwasher after. Plus you can make coffee with it between ferments.
OMG! That sounds perfect, especially for small batches or condiments and relishes. Thank you for sharing.
Thank you for all of this fantastic information! I’m using a glass stone but some peppercorns and spices float to the surface. Are these at risk of developing mold?
Hello Matt, It’s near to impossible to prevent small bits from floating to the surface. 99% of the time, no mold develops so I wouldn’t worry. If you do see some mold growth, just gently scoop it out. You’re WELCOME!
I need some help! I’ve been happily fermenting sauerkraut and other vegetables for several years and using a similar method to one above, mainly cabbage leaf over the packed vegetables in a large Kilner jar and then a glass ramekin on top to weigh everything down.
This time around the glass ramekin has gotten stuck in the neck of the jar. I’m not sure how it’s happened as it’s been a foolproof method so far.
It’s too far down for me to grip it properly and it’s too wedged in to move it in any way.
I’ve tried putting ice cubes in the ramekin to cool it compared to Kilner jar – this did not work. Both the ramekin and Kilner jar are relatively heat-proof.
I added more brine around the edge of the ramekin, it did not help.
Also tried to tap the ramekin to see if it would move it as well as tipping the jar upside down to see if the weight of the vegetables might help push the ramekin. This did not work either.
I could really do with some advice as I have some tasty looking vegetables starting to ferment and I’d like to be able to get them out at some point.
Surely I can’t be the only person whose weights have got stuck in the fermentation jar. Or am I?!
Thanks!
Any luck yet? I’m had a small jar stuck but was able to turn the jar upside down to get it out. Could you somehow attach a suction cup to the stuck jar to then be able to play with the angle at which you try to remove it. Let us know…
Thanks Holly.
The only suction cup kind of thing I have is a sink plunger and I wouldn’t be able to use it because the rim of the jar is too thin for it to push against, and also that I’ve used it to unblock the kitchen sink once so don’t want to think about using it in another way now.
Instead, in addition to the methods above, I tried adding more liquid down the side of the ramekin to see if it would push the ramekin up and out. That didn’t work as the ramekin was thoroughly jammed in.
Also I submerged the whole Kilner jar up to the top in hot water, then placed ice cubes in the ramekin to create more of a temperature difference. But that didn’t work either.
I had to give up and so decided to break the ramekin with a hammer. Fortunately it was a fairly clean break, leaving the Kilner jar undamaged. I haven’t thrown away my fermenting vegetables yet but will have to. Even though it was a clean break and there are a couple of layers of cabbage on top, there’s still a risk of thin slivers of glass.
Well, you gave it your best! Always sorry to hear about a batch of sauerkraut that has to be tossed, but… better safe than sorry.
A perfect weight to keep the brine above the surface with no effort is a cut off typical plastic cup with a hole in the bottom touching the brine surface,
http://durgan.org/2018/July%202018/28%20July%202018%20Sauerkraut/HTML/dsc_0258_std.jpg
http://durgan.org/2018/July%202018/28%20July%202018%20Sauerkraut/HTML/dsc_0258_std.jpg
Durgan
Excellent trick. I keep wanting to drill a hole in the little jar I use. 🙂
Plastic is a terrible product for food preparation and cooking. The chemicals leach out of the plastic and into your food. Not healthy. Avoid plastic at all costs
In an ideal world, yes avoid the plastics. But… I feel we are all at different stages on this fermentation journey and we start with what works and then gradually up the quality of materials. I’m always humbled by what traditional cultures still practicing their art in a third wold country are using without Amazon at their fingertips.
The method I use is the same one you use, a cabbage leaf with a smaller jar on top as a weight. I don’t see the need to buy any contraptions when it’s been done like this for centuries. Another thing my German stepfather suggested, from when he was a kid, is using river stones, well washed first, of course, on top of a cabbage leaf or rolled up leafs.
Yes, sweet & simple.
Let me see you what we have in S.Korea. see down below
https://uploads.disquscdn.com/images/1d7c6ea5087493aa4e189a3fce4b7b79a92a2740ded83bae3606cbb83621e855.jpg
http://www.locknlock.com/eng/productbrand/index/42?tid=301#menu (Eng. Website)
Thank you for sharing what has worked for you in Korea. I just purchased some Kimchi containers that look quite similar and will be trying them out.
I do like how you can adjust the height of the lid so you are much more likely to keep everything below the brine. They won’t be an option for those who prefer fermenting in glass, but it’s nice to alert others about these.
The company(lock & lock) is pretty well carrying on thire business in korea. We have thire product every single home. So you can trust the quality and also they have stainless container as well.
Thank you. That is good to know. I’ll have to look for the stainless steel kimchi containers.
I am a newbie and sadly bought small mouth jars.
I also did not realise that what looked like a big cabbage would “shrink” so much once I had mooshed it with salt.
But my big question is – is it OK for the brine to rise above whatever you put to weigh the actual cabbage shreds down? The only objective is to keep the cabbage itself below the brine then? But its OK for brine itself rising up above the weight?
I would really appreciate an answer.
I just used wax paper on top of the cabbage floaties trap, because the cabbage piece wasn’t enough to keep it all beneath the brine. Is this okay or are there any concerns with wax paper?
Thanks for the great site!
That’s a great idea. I do the same. I use unbleached, but I don’t think their should be an issue with regular wax paper.
Good to know! Thank you, Holly. Yes, it’s the totally groovy wax paper. 😊
Hi Holly,
My main product to ferment is chillis, but because my harvest is quite small, I try to use recycled glass jars. This causes the issue of trying to find something that will seal properly and successfully keep all the product below the surface of the brine. What I wanted to ask is, can I use a scrunched-up piece of some sort of material made from an organic material (hemp or cotton), if it has been sanitised?