
 This post may contain affiliate links which won’t change your price but will share some commission.
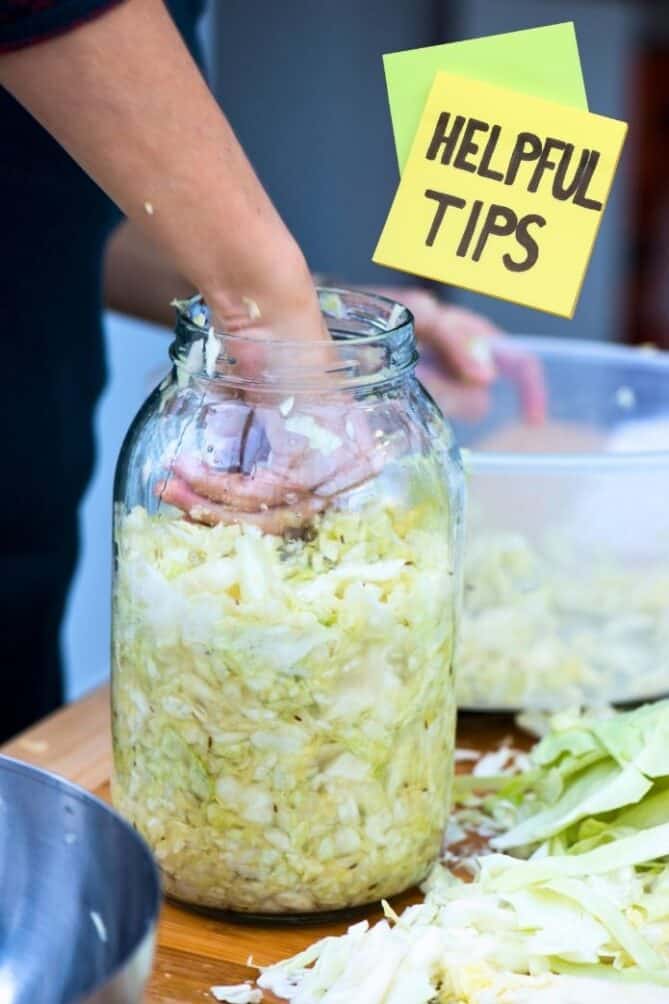
Ever opened a jar of sauerkraut only to find it dry as a bone? You’re not alone in the mystery of the disappearing brine! Understand what causes dry sauerkraut and then try one or more of my 17 tips to remedy it.

Dealing with dry sauerkraut can be frustrating, especially when you’re not sure what went wrong.
Fortunately, there are several strategies to prevent your sauerkraut from drying out during fermentation and storage.
Whether it’s selecting the right cabbage, adjusting your slicing technique, or managing fermentation conditions, these tips will guide you toward sauerkraut success.
Plus, as a bonus, I’ll throw in a delicious recipe for gut shots, a probiotic-rich beverage made from sauerkraut brine.
Ready to solve the case of the disappearing brine?
Let’s dive in!
Dry Sauerkraut During Fermentation and Storage
When do you need to worry about brine levels and what should you do? What are we dealing with? We will look at brine levels during 3 different periods:
- During the first stage of fermentation (the first 3 days) when it is important to keep everything below the brine.
During this stage, the bacteria L. mesenteroides are producing lactic acid, acetic acid (vinegar), ethyl alcohol and mannitol which all contribute to the characteristic flavor of high-quality sauerkraut. The L. mesenteroides also produce carbon dioxide (CO2), hence the bubbles you see floating to the surface along with brine being pushed out of the jar. - During the next two stages of fermentation, the bacteria L. plantarum are eating the sugar in the cabbage and vegetables and producing lactic acid (days 3-16). The lactic acid that acts as a preservative, supports digestion, inhibits the growth of harmful bacteria, increases the bio-availability of Vitamin C, among other jobs. And, the L. pentoaceticus are “finishing-off” the sauerkraut (days 16-20) by lowering the acid level a slight bit more. This is a quieter stage and when brine levels usually fall and you sauerkraut may look dry.
- During storage, the brine is pulled back into the cabbage due to the colder temperatures of your refrigerator. Remember how we used salt to pull the water out of the cabbage to make our brine? The cabbage takes it back. Darn, that cabbage. Again, dry sauerkraut.
Onto the tips. But first…
Don’t feel you need to complicate fermentation and go out and purchase the right gizmo. Be OK with simple solutions.
Yes, some of these tips for dealing with dry sauerkraut take advantage of new fermentation products on the market. Often, I ask myself if they really do make a big difference for I find comfort in the simplicity of my little jar as a weight and my white plastic lid. They do work, maybe not 100% but close enough for me… most of the time. I’m not putting together a post like this to sell products but to answer reader questions and satisfy my curiosities. Onward!
Start with Plenty of Brine
Do you notice that brine production varies from batch to batch of sauerkraut? Dry sauerkraut with one batch? Plenty of brine with another batch?
If you can’t quite put your finger on why, here are a few ideas to consider.
1. Use Fresh Ingredients
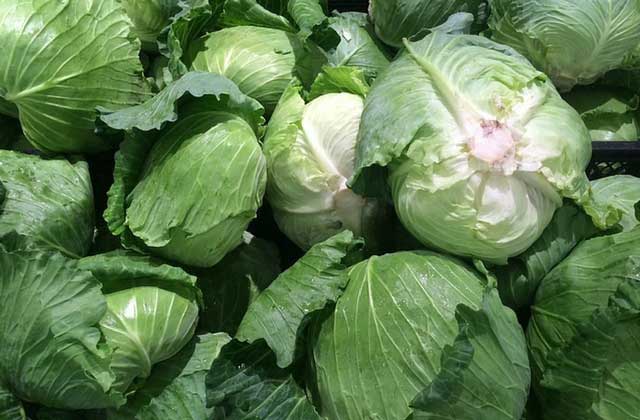
Most of the cabbage you will see at the store for purchase was harvested in October and November and then kept in a controlled storage environment to prevent moisture loss and shrinkage. Thank goodness for us Fermentistas, cabbage stores well. 🙂
Even though cabbage is approximately 92% water, if it is June and you’re about to make a batch of sauerkraut, that cabbage has most likely been in cold storage for 6 months and will have lost some of its moisture. Loss of moisture means less brine. The closer to harvest that you purchase your cabbage – and make sauerkraut – the more brine it will produce and the less chance of dry sauerkraut.
Check this Cabbage Buying Guide to ensure top quality cabbage for your sauerkraut.
2. Store Cabbage Properly to Preserve Quality
Cabbage stores well in the hydrator (crisper) drawer of your refrigerator.
Put the cabbage in a plastic bag to help retain moisture if it will be more than a few days before you will be using it. Any vents on the drawer should be closed to keep moisture in the drawer.
3. Select the Right Variety of Cabbage
If you’re lucky to be growing your own cabbage – or have a good relationship with the farmer you are buying it from – select cabbage varieties that work best for sauerkraut and are harvested in early fall after the first frost. These varieties (Krautman, Danish Ballhead, and Premium Late Dutch to name a few) are generally later maturing varieties with higher sugar content. More sugar = more food for the lactic-acid bacteria. 🙂
Realize, also, that there are two types of cabbage: winter cabbage and summer cabbage. Winter cabbages are planted in late summer and harvested in early fall, ideally after the first frost. These prized cabbages have tight heads, are harder, have thicker leaves and higher moisture content than summer cabbages.
4. Include a Watery Vegetable in Your Sauerkraut Recipe
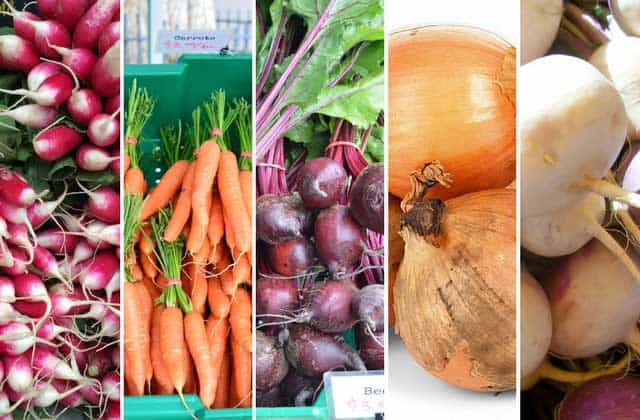
Grated radishes, carrots, beets, thinly sliced onions, or turnips will all give off a lot of liquid and help make copious brine.
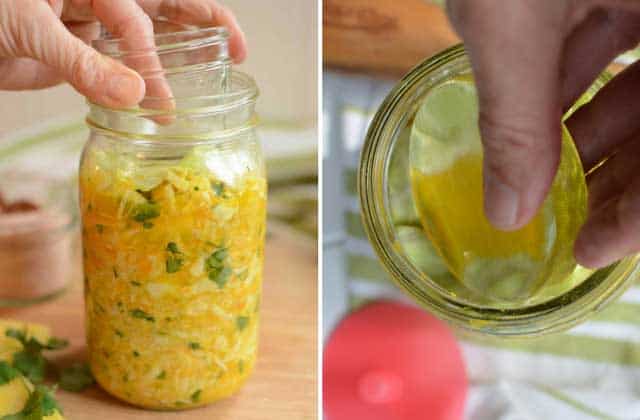
5. Add Liquid
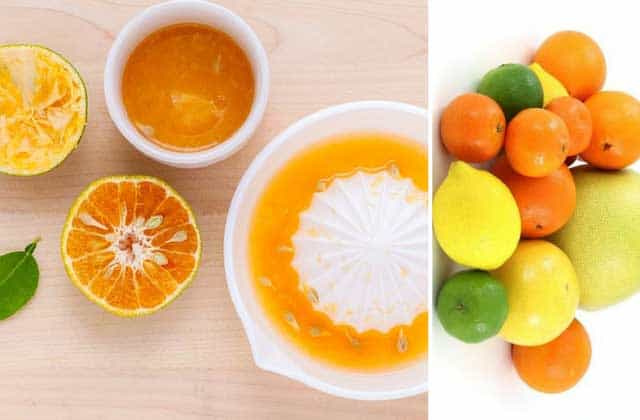
This tip comes from Kirsten and Christopher Shockey, authors of my favorite fermentation book: Fermented Vegetables.
“A few tablespoons of lemon juice, bottled or fresh, can save the day. The lemon flavor will be subtle, as it gets lost in the acidity that you are creating with the fermentation. If you want to taste the lemon, add the zest also. You can also add fresh-squeezed orange, lime or grapefruit juice.”
They recommend AGAINST adding saltwater – brine – to dry sauerkraut as they have found that it can cause discoloration and possible mushy kraut.
NOTE: They are right. I added fermented brine – as discussed below – to my finished sauerkraut before putting it into the fridge for storage. I am just now eating from some of those jars. Watery, mushy sauerkraut. (December 4, 2017) 🙁
6. Slice Cabbage Thinner
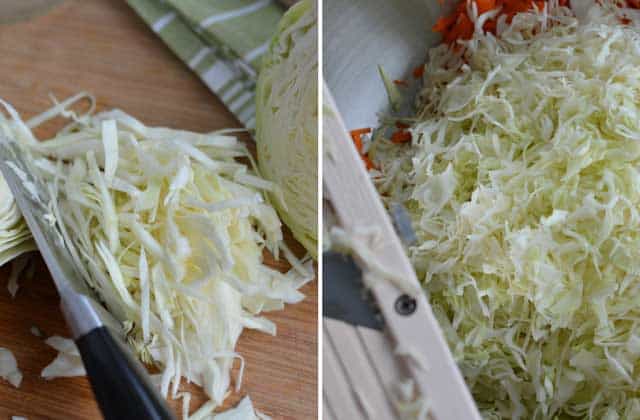
Thin thread-like cuts of cabbage make for easy brine production along with overall improved quality of the finished product.
Compare the thickness of the cabbage of the left – that I sliced with a knife – to the cabbage on the right that I sliced with my mandolin.
Why thread cuts are better:
- Expose more cabbage cells.
- More exposed cabbage cells release more fluid and more lactic-acid bacteria.
- More lactic-acid bacteria creates more lactic acid.
- Lactic acid helps to maintain a good pH which preserves flavor, texture, and color.
What is the best way to get those thread cuts?
A mandolin! Here on my Fermenting Supplies page are a few to choose from.
7. Give Your Freshly Salted Cabbage a Bit of Time
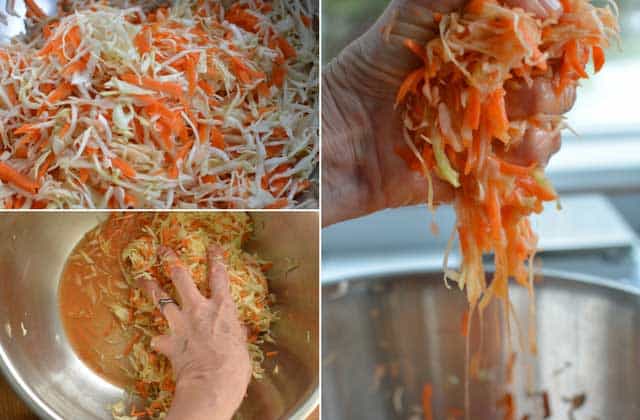
Once I have added salt to my cabbage and then mixed it well, I leave it be for 20-30 minutes while I clean up my kitchen and get a few other things done. When I return, I find that very little “massaging” has to be done to get a nice puddle of brine in the bottom of my bowl.
If you still don’t have enough brine, give it another hour or so and then consider adding a watery vegetable or a bit of citrus juice as suggested above.
Retain Brine During Fermentation
During the first few days of fermentation, the bacteria that go to work for you create a lot of CO2 or air bubbles that get trapped in your packed ferment. If they can’t make their way up and out of the ferment and then out of the jar, the fermenting mass expands and forces brine out of your jar. Brine that is better off kept in the jar so that there is less chance of ending up with dry sauerkraut.
To retain brine during fermentation and prevent dry sauerkraut:
8. Understand How Temperature Affects Brine Levels
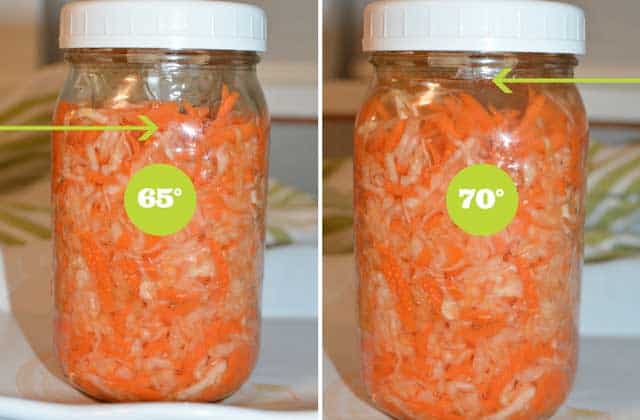
You can use your jar of fermenting sauerkraut as a thermometer! 😀
The picture of the jar on the left was taken early in the morning when my house was a little cooler. The picture on the right? Three hours later after the house had warmed up.
9. Leave Enough Room in the Jar for Expansion
When packing your sauerkraut mixture into the jar, leave a good 2 inches of headspace. This will give room for the sauerkraut and brine to expand into.
10. Use a Fermentation Weight that Uses Little Space
I still recommend a little jar as a “weight” to keep things simple for first-time fermenters. However, one of its drawbacks is that it uses up space that would be better left for the brine.
This is where the weight and size of the Pickle Pebble comes in handy, though I’m not convinced it is always heavy enough. Some batches stay under the brine during the entire 4-week fermentation period, others look dry after the first week or so. But… the Pickle Pebble is simple. It is made from glass. It doesn’t retain odors.
11. Use a Fermentation Gate: The Mighty Microbes Can’t Open a Gate

“Fermentation Gate” is a term I’m starting to use to describe something “locked” into the neck of your jar that can’t be moved by the force of the expanding sauerkraut mixture. The gate stays locked and your ferment then has to remain in place below the brine (on the other side of the gate) with CO2 bubbles escaping. 😉
Image 1: The Pickle Pusher is not going anywhere. The weight of the jar of carrot sticks cannot pull the Pickle Pusher out of the jar nor will you ferment be able to expand up past the Pickle Pusher.
Image 2: The ViscoDisc Canning Buddies are held securely in place both by tabs below the neck of the jar and by tabs in the neck of the jar. Your expanding ferment can only expand a bit as the ViscoDisc is stopped when coming in contact with the lid of the jar. This is the same principle as the little jar that I use as a “weight” – actually, it’s a gate – in my recipes.
Image 3: The Kraut Source Fermentation Lid comes with a stainless steel spring that forces your ferment down into the jar. It can adjust to the level of the ferment. Notice the brine line in the picture? My jar of Raisin Chutney was compressed that far down into the jar by the Kraut Source plate and spring.
I’ve tested three different fermentation gates that all work to prevent the expansion of your ferment. Read my review posts:
Pickle-Pushing No-Float Jar-Packer Review [Ingenious]
ViscoDisc Canning Buddies REVIEW [Simple & Affordable]
Kraut Source Fermentation Lid REVIEW [Solid Design]
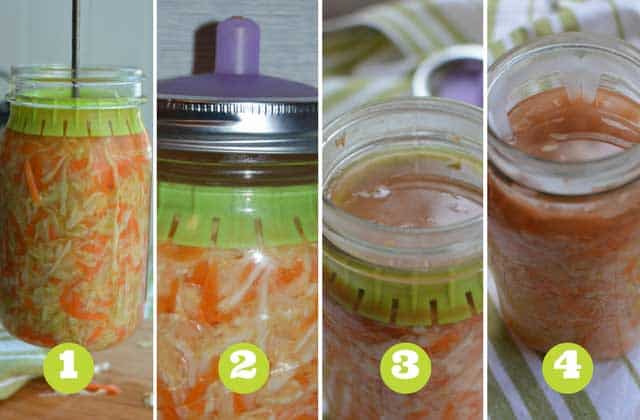
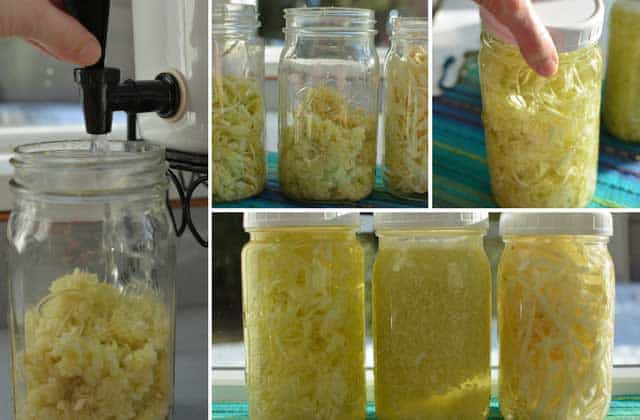
This is my jar of Sweet Garlic SureFire Sauerkraut as it progressed from a freshly packed jar to being moved into the refrigerator.
Image 1: Packet and ready to ferment. Held in the air to show that the Pickle Pusher won’t be going anywhere.
Image 2: Day two of fermentation. Notice the droplet of brine trying to escape the Pickle Pipe? The brine created moved up into the neck of the jar but did not flow out of the Pickle Pipe.
Image 3: Brine coverage at the end of 4 weeks. Everything has stayed below the brine during the entire fermentation process.
Image 4: The Pickle Pipe and Pickle Pusher has been removed and a ViscoDisc Canning Buddies put in place for holding the sauerkraut below the brine during storage. The picture was taken 24 hours after being placed in the refrigerator. The cold of the fridge causes much of the brine to be pulled back into the cabbage.
A Pickle Pusher for a fermentation weight along with a Pickle Pipe for an airlock lid is becoming my favorite fermentation setup. I like the visual feedback you get with the Pickle Pipe. Barometric pressure, along with CO2 gas levels cause the pipe to become concave or convex. A fun way to get feedback on what is going on in your jar.
12. Fiddle with Your Jar
Break all rules about letting air into your jar and find a way to release the trapped air bubbles that are causing your sauerkraut mixture to look dry. When things look dry because your packed mixture is “heaving” – moving up in the jar and/or when the brine looks like it is about to overflow, you can:
- Poke the packed mixture with a wooden skewer.
- Run a knife along the inside edge of your jar.
- Push down on whatever weight you are using.
I don’t have pictures of this but it seems to be most effective during the first week of fermentation when there is more microbial activity from the gas producing bacteria.
13. Vacuum Air from the Jar
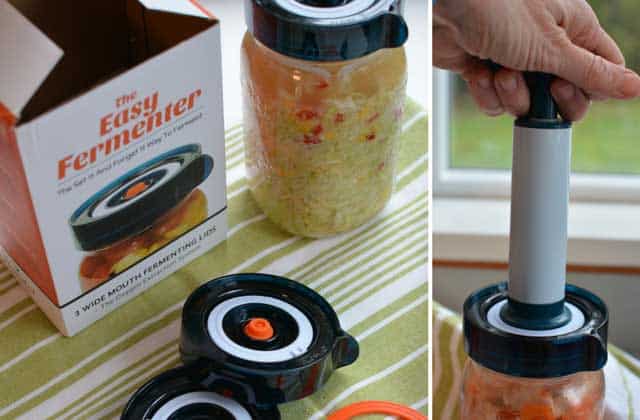
The No products found. has a small airlock and comes with a vacuum pump. I’m just starting to experiment with this and have yet to completely understand what’s going on. But as you pump (vacuum) the air out of your jar, the brine rises to the surface. This seems to work best during the first week or so. Needs more experimentation.
14. Ferment in a Water-Sealed Crock
You tend to end up with much more moisture in your finished sauerkraut when fermenting in a water-seal fermentation crock. There is something about the larger environment and the greater amount of microbial activity that takes place.
It is not that I have cups and cups of brine in the bottom of my crock when I’ve finished packing everything into jars, but that the finished product is moister and if I press down on it – plenty of brine easily rises to the surface. Here’s my recipe for fermenting in a crock:
The SureFire Sauerkraut Method… In a Crock: 7 Easy Steps
In the picture, the jar on the left is a batch of Kimchi I fermented in one of my water-sealed crocks. The jar on the right is of all the brine evident after inserting a ViscoDisc. I don’t get this much brine with most of my sauerkraut that has been fermented in a quart (liter) jar.
Due to their affordability and proven track record that they don’t leach nasties into my sauerkraut, I’ll be inserting the ViscoDisc Canning Buddies into my jars before storing.
Add More Brine
When do you add more brine to dry sauerkraut and what type of brine do you add?
Do realize that when you add additional brine to your sauerkraut, you are not only diluting the flavors but you are also upping the sodium levels in the finished product?
To get around the dilution of flavors, I’m using some of the cabbage and vegetable bits leftover from prepping my vegetables to make…
Gut Shots, or fermented cabbage juice.
Not only is it a flavorful brine to add to your dry sauerkraut, but it is also a way to drink your probiotics and obtain similar benefits to eating sauerkraut. A recipe for Gut Shots (beta version 🙂 ) follows this section.
To get around the increased sodium levels in your sauerkraut, I’ve reduced the salt a bit in the Gut Shots recipe.
I’ll have to eat my way through a few jars of my Gut Shots infused sauerkraut before I can give a thumbs up or down on the flavor. So far, so good.
No time to make Gut Shots? Here are the numbers for mixing up a brine:

15. Add Brine 24 Hours Into Fermentation
If you have dry sauerkraut at the end of your first day of fermentation, salt brine or fermented brine (Gut Shots) needs to be added to your jar of fermenting sauerkraut. Check first that your room is not too cold. Remember how brine levels fluctuate with temperature?
16. Add Brine During Fermentation
It’s your call whether you want to add more brine to your sauerkraut between day 7 and the end of fermentation. I’ve never had mold grow on dry sauerkraut that has been fermenting for at least 7 days. A healthy fermentation environment – in which mold should not be able to grow – has already been established.
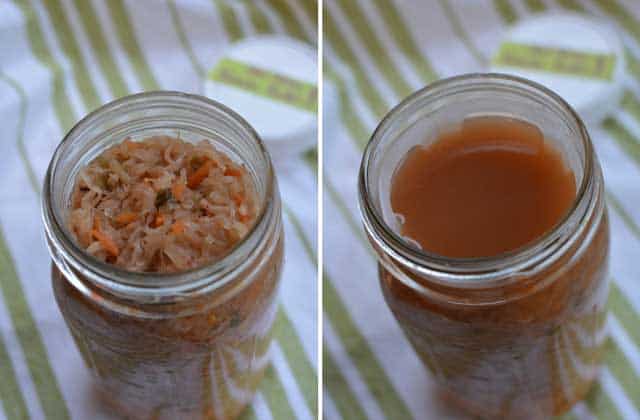
17. Add Brine Before Putting Jars into Storage
If your sauerkraut looks dry and it’s time to move it to the refrigerator, you can choose to add brine. Or, if it’s been in the fridge for a day or so and all the brine has disappeared, you can add brine to reduce air exposure to the sauerkraut.
You won’t see mold or yeast growth when a properly fermented jar of sauerkraut is stored in your refrigerator, but you may see some oxidation happening – browning or loss of color – in the top inch or so of the packed jar. Oxidation means loss of nutrients, particularly Vitamin C.
With this year’s batch of sauerkraut, I am doing a few things to make sure my sauerkraut is under brine during storage. When fermenting in a jar, I’m using the Pickle Pusher during fermentation, removing that and inserting a ViscoDisc Canning Buddies for storage. If my brine level is not at the jar threads, then I’m adding some Gut Shots brine.
After I eat my way through these jars of sauerkraut, I’ll be able to report back on my findings.
UPDATE: I DID NOT like the texture or flavor of the sauerkraut to which I added Gut Shots brine a year ago. Watery. Soft.
I now DO NOT recommend adding brine to a jar of sauerkraut before storage. Eat your drier jars first or use the tips earlier in this post to make sure you have enough brine to start with. (December 4, 2017)
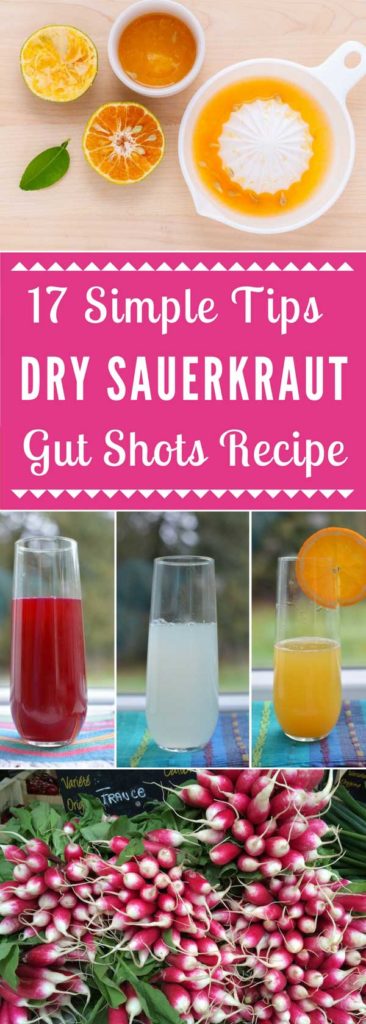
Gut Shots
Consider keeping a batch of Gut Shots in your fridge for topping off jars of dry sauerkraut, and…
for sipping their goodness as another way to get fermented foods into your diet.
Gut Shots are a fermented cabbage juice that will not dilute the flavor of your sauerkraut but instead enhance it. At least that’s my plan. They’re easily made with the leftover bits you used to make your sauerkraut.
Here’s are general guidelines for fermenting Gut Shots. Jump to official recipe.
Chop and Salt. In my test recipes, I used 8-12 ounces of sliced cabbage (220-330 grams) and added 2 tsp (10 g) of salt.
NOTE: Salt numbers are based on the amount of water we’re adding and not the weight of the cabbage. This is closer to a Fermented Carrot Sticks recipe, where a brine is poured over vegetables rather than creating our own brine as with sauerkraut.
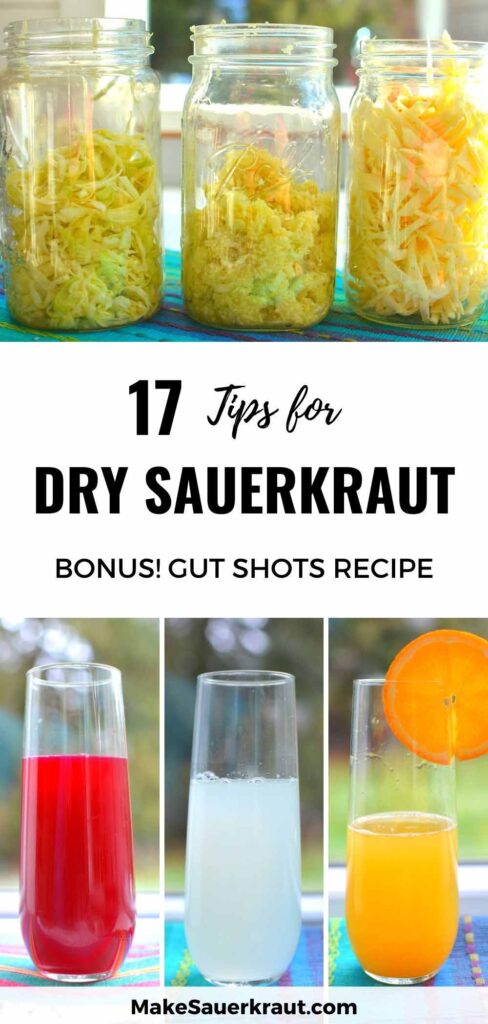
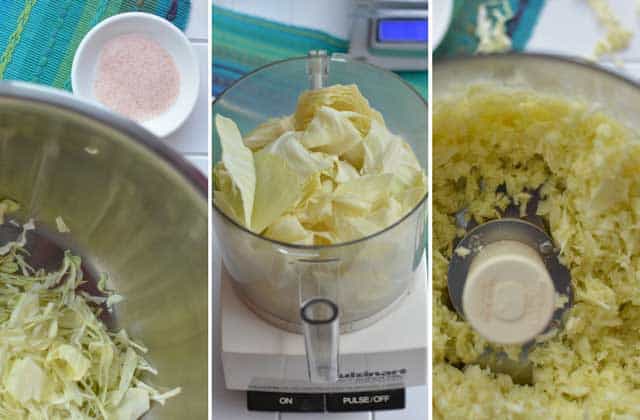
I prepared the cabbage in three different ways.
ONE: Sliced the cabbage with my mandolin (or knife) and massaged in the salt to create a brine.
TWO: Sliced the cabbage with my knife, packed this into a quart (liter) jar and added the salt to the jar.
THREE: Pulsed the cabbage in my food processor, added the salt and gave it a few quick pulses.
Method TWO did not have as rich of a flavor as methods ONE or THREE.
Pack into Jar. I used a quart (liter) jar in my test recipes. It was a bit small for the amount of cabbage used. I would use the same amount of cabbage but instead pack it into one of those tall, 1/2 gallon (2-liter) jars and use 1 tablespoon of salt.
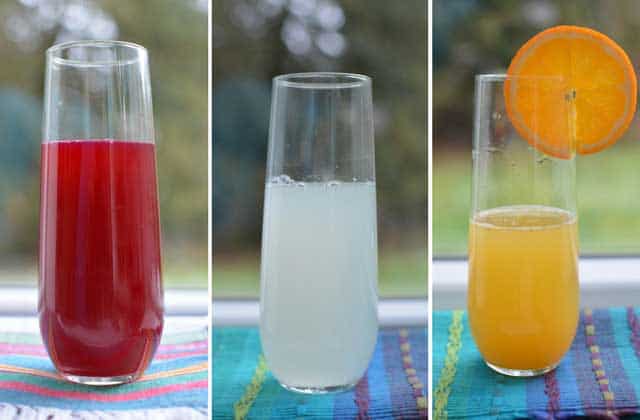
Add Water, Cap, and Ferment. Jar #1 (the first jar in the line up) has the salted and massaged cabbage; #2, the cabbage pulsed in the food processor and, #3 the loosely packed, then salted cabbage. Ferment for 5 days to 2 weeks.
Each Day During Fermentation, mix the contents of your jar. Gently turn upside down letting the bubble rise to the surface then turn back upright. This will prevent any surface molds from growing.
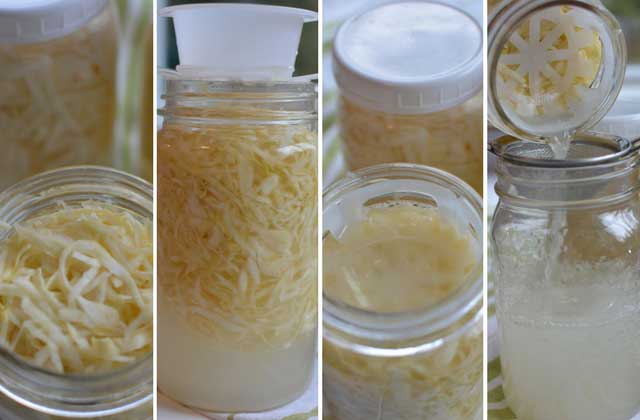
Decant. Strain contents into a clean jar. You’ll see that I added a ViscoDisc Canning Buddies to hold the fermented cabbage in the jar. For future batches, I would insert this at the beginning of fermentation. It does a good job keeping the cabbage below the brine.
Enjoy! Sip at your leisure or add to dry sauerkraut.
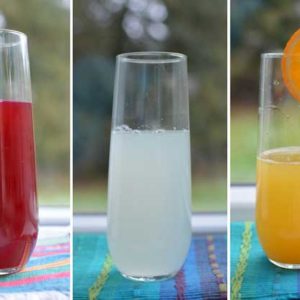
P.S. The Ginger Beet Gut Shots – quite delicious – included 2 small peeled and chopped beets and 1 heaping tablespoon of grated ginger. One-half squeezed orange was added to the Orange Gut Shot after fermentation. Just in the glass before drinking. 🙂
Gut Shots Recipe
Gut Shots Recipe
INGREDIENTS
- 4-6 ounces (110-170 grams) Cabbage
- 2 tsp iodine-free salt (fine-grain)
- Chlorine-free Water
- 1 Quart (Liter) Jar
- Lid
INSTRUCTIONS
- SLICE approximately 4-6 ounces (110-170 grams) of cabbage.
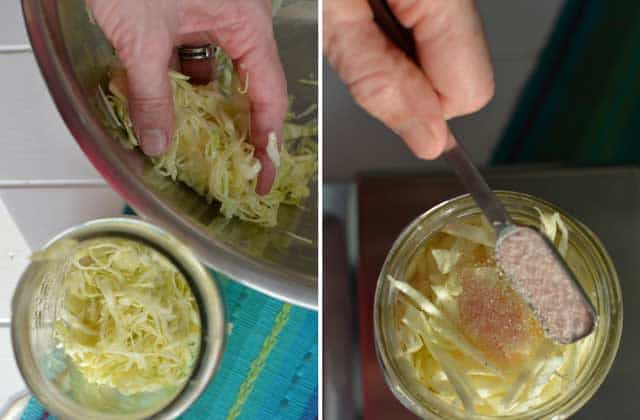
- CREATE BRINE.Place sliced cabbage in a mixing bowl.Sprinkle with 2 teaspoons of iodine-free salt.Massage gently to create a brine. The cabbage will soften, want to clump together and there will be a small bit of brine in the bottom of the bowl.
- FLAVOR.Feel free to add flavoring ingredients at this time. Mix in one or 2 peeled and roughly chopped beets and one tablespoon of grated ginger is a favorite. Or, try just 1 or 2 finely chopped garlic cloves.
- PACK into a quart (liter) jar.Fill to the bottom of the jar threads with chlorine-free water.Lightly screw on lid.
- FERMENT.Place in jar in a small bowl out for direct sunlight to ferment for 5 days to 2 weeks.
- MIX DAILY.Each day during Fermentation, mix the contents of your jar. (You might want to first tighten the lid.) Gently turn upside down letting the bubble rise to the surface then turn back upright. This will prevent any surface molds from growing.
- DECANT AND STORE.Strain contents into a clean jar. Store in your refrigerator.
- ENJOY!Sip 1/4 cup 1-2 times daily or use to add moisture to dry sauerkraut.
- DOUBLE.Feel free to double the recipe. Roughly double the ingredients and use 1 tablespoon of salt for a 1/2 gallon (2-liter) jar.
Do you have any tricks for dry sauerkraut? Insights? Please, share in the Comments Section.

Last update on 2026-07-11 / Affiliate links / Images from Amazon Product Advertising API

Thank you for all your informative documentation! I have been trying to make kraut for over a year. I don’t care if it’s mushy. I really just want it for the broad spectrum of probiotics that form after fermenting. So do the gut shots have a good amount of probiotics/microbes, established if you only ferment for a week or two?
I live in Florida and i guess it is just to warm here to ferment 28 days and not have it turn brown and spoiled? I’m DESPERATE to eat some because I need the microbes that are in it.
Also, I put my food processor cut shreds into my big stand mixer, add salt while it mixes around in the bowl. Do you think it’s ok to mix it until there is a puddle of cabbage juice? I can’t use my hands to squeeze due to finger issues.
I’ve made it five times and each time, by the 28th day, the first inch or so is brownish.
You’re welcome. I’m always amazed that there is always a new set of skills to learn about.
In your warmer weather, don’t feel you need to go the 28 days. With higher temps, the fermentation will move through the stages faster, so stop it before the browning starts.
If the food processor works for you, by all means continue. It’s a good idea, actually. Maybe, give it some rest time (20 minutes – 1 hour) after a short bit of mixing. Let the salt do its work and then mix again until you get your brine. This might prevent any over mixing.
Oops, forgot to respond to fermentation length. Honestly, it is flexible. I went with the shorter time due to less salt in the mixture and a greater chance for mold growth since the loose bits float to the surface if you’re not using some device to hold everything below the brine. You can easily let it ferment for as long as you wish, checking flavors along the way.
Thanks for this information. I was considering discarding my sauerkraut because the top was dry and discoloured. This post really helps.
Glad to hear. Thank You. Some remove just the top discolored section – loss of nutrients – and then enjoy the rest. I tend to just eat. Personal preference.
Thanks, nothing like hearing directly from one who knows!
Can I pour the leftover brine from my old sauerkraut into my new jar if it needs more brine?
Yes, but at storage time, not during fermentation. Different sets of bacteria in there working for you doing different jobs, depending upon the fermentation stage. More here: http://www.makesauerkraut.com/starter-cultures-not-used/
What do you mean by “Fill to the bottom of the jar threads with chlorine-free water.” Don’t understand “thread” and do you pack this down like when making sauerkraut ?
You’re making a very watery sauerkraut. No need to pack down like with sauerkraut. Just loosely pack in the salted and sliced sauerkraut – and any flavorings – and then fill the rest of the jar with water.
Thanks Holly, very clear.
Hi Holly – loving – absolutely LOVING – your site and newsletters. It’s no doubt on here somewhere … however, can I strictly use brine from a ‘here’s a kraut I made earlier’ (and refrigerated until all eaten) to top up a new batch? I’ve got a lovely cup of purple brine which I’d hate to toss if it can be reused.
Hello Cynthia, Thank YOU!!! Yes, topping off a FINISHED batch of sauerkraut with extra fermented brine is fine. However, I don’t use in to add to a batch I’ve just started as explained here: http://www.makesauerkraut.com/starter-cultures-not-used/. Definitely don’t toss. Drink it. Use it in salad dressing. Top off a fermented batch.
Thank You for this site and sharing your wisdom! I came home with 4 jars of goodness after a 4 hour fermentation class last week ~ and .. kept wondering if I could tamper down the cabbage when it floats up. I was also wondering … is it too late (6-7 days later) to add a folded up cabbage leaf to the top, to keep it down? We also made preserved lemons, kim chee, and a fennel, lemon, carrot mix. It’s soooo scary making these for the first time ~ I don’t want to get myself or anyone else sick ~ but … so far…. it all looks good. But I hear the bad stuff …. won’t be visible. Just needing some reassurance I guess. Next batch will be made using the tips from your really detailed educational and amazing site!!
This is probably too late to help, but… I was on vacation and away from the internet. 🙂 Feel free to tamp down the mixture when it bulges up. And at this point in the game, adding a cabbage leaf won’t help much. It’s the first 5 days when everything is active that you have to worry most about pushing it back down below the brine.
Yes, it’s scary to leave food on our counter. But, trust in the Mighty Microbes. They make your food safer than raw spinach. You will know if the ferment will make you sick. It will smell so noxious, you won’t want to eat it. eColi can’t survive in the acidic brine.
Glad to hear about your fermentation class and all the great stuff you are making. Continue to enjoy the site – you are quite welcome.
Not too late, and …. your response was just what I needed to hear! Thank you soooooo very much!
how about this to simplify the whole process:
chop the cabbage up coarsely, place in vitamix, add 1 quart of distilled water, plus 2 tsp of sea salt (non iodized salt), blend on low, till cabbage is partially liquified, then pour into quart jar, cap and wait for fermentaion?? You have to correct me on this, the salt quantity, 2 tsp or more? will fermentation be quicker with this method, since less surface area for cabbage? 3 days??? also, when done, strain, chill and drink?
Hello Ari, That might work quite nicely. I’ve seen recipes for fermented cabbage juice, which is close to what you’d do with your Vitamix idea. I have not Vitamix, so I haven’t tried it and I find my Champion juice to be too much work.
Yes, fermentation should happen more quickly – go by taste and tang. Any of the recipes can go for a few weeks and are a bit more subtle with just a few days. Just taste along the way and keep it “mixed.” I would strain before drinking then keep in the fridge.
Salt? Go by the size jar/liquid amount: 2 tsp for the quart or 1 tablespoon for a 1/2 gallon jar.
how do you make fermented salsa? what is percentage of salt to salsa weight, 2.5% or more? and if adding whey, can i just extract the whey for Daisy sour cream brand?
Tomatoes are hard to ferment and have them retain their texture. You’re better off making something like this http://nourishedkitchen.com/fermented-green-chile-salsa/ which you then mix with fresh tomatoes. When I need whey, I’ve always dripped yogurt, but sour cream should also do the trick. There’s also this recipe that uses tomatoes: http://ozuke.com/fermented-salsa-2/
Thanks for doing the experiment with the fermented brine and mentioning that it doesn’t work! I came online looking to find out whether I could add the brine from the jar of fermented kohlrabi sticks I just finished to my sauerkraut, which is drying out after just a few days in the fridge (it had so much brine when it was done that I put it away unweighted). Since the joy of sauerkraut for me is in the crunch, I guess I’ll just try to eat it as quickly as possible! I only make microbatches anyway.
You’re welcome. It’s fine to add the dregs – a bit at the bottom of the jar – to another jar in the fridge if you don’t want to drink it and your don’t want it wasted. The softness I experienced came from adding 1/2 cup or more of brine to my jar before storing. Just way too much extra liquid for the cabbage cells to drink up. Continue to enjoy the crunch.
After fermentation, can you dehydrate your sauerkraut?????
YES! I did so with a some of my extra Kimchi-Style Sauerkraut and then ran it through a blender. Now I have a great way to flavor deviled eggs, pasta dishes and what not. Here’s my post of other ways to store sauerkraut, to include dehydartion: http://www.makesauerkraut.com/storing-sauerkraut/
That’s so weird that adding brine makes the sauerkraut mushy. Isn’t the salted water what makes pickles crisp?
It’s the grape leave or tannin that keeps pickles crisp. I think the mushiness comes from the cells in the sauerkraut trying to drink up more liquid than they started with. We add salt to sliced cabbage to then mix with the water released from the cells. When we add more salt water, the cells get too full and thus mushy, watery, flavorless kraut??? Just my logic on it, which could be totally off base. 🙂
Hi Holly, thanks for all the great content. I just finished my first batch of gut shots, and had my first shot, yummy! Do I eat the strained off veggies, too?
I leave the veggies in the jar, and then make a second batch which will be weaker.
You could also eat the veggies if they are beets or garlic. In essence, you are fermenting them just like one would beets or carrots or garlic…
Thanks, I’ll try the second batch!
It’s immensely satisfying to use up the outer leaves and core to make gut shots after making a batch of sauerkraut! Minimal waste and maximum goodness from the cabbage. I have a jar fermenting at the moment – cabbage leaves and cores with black radish and a tsp of rather old juniper berries! I used a few from a new pack of juniper berries in the sauerkraut itself. The fresher berries have a lovely scent and the old ones didn’t but I was still loathe to throw them out!
I agree and need to start doing likewise. I’ve love the juniper berry seasoning idea. I don’t like the Gut Shots without some type of flavoring. My current favorite is with the beets.
Does the cabbage have to be the base or could I just do a recipe with just plain old beets? Thanks!
Here’s my recipe for fermented beets: https://www.makesauerkraut.com/fermented-beets/
Thank you for this wonderful site!! I’m new to making sauerkraut and was wondering if my second batch is ok..after 8 days I popped in fridge as was heading outta town.. on return half the brine had disappeared and top half is dry… it smells like sauerkraut lol… is it ok to eat without brine ?
The brine disappearing is normal. The cold of the fridge pulls the liquid back into the cabbage and also slows down fermentation which creates the contraction of the cabbage mixture. It is fine to eat. ENJOY!
Can the brine that has been “pushed out of the jar” be “put back into the jar”? Or do I need to use new brine? Everytime I make kraut, I have “dry kraut” at like day 7. Has always turned out well, but dry. I must be overpacking the jars or packing them too tightly. BTW, I’m using the 64oz ball jars, 1/2 gallon jars for my ferments. :))
If it has not been out of the jar more than a day, I would feel comfortable putting it back in. Look at some of the newer fermentation weights. I find that the spring style weights do a good job of keeping the jar packed down so that there is enough room in the jar for the brine. I like the Pickle Helix. https://www.makesauerkraut.com/best-fermentation-weight/
This is my first time making sauerkraut and I think I over-packed it. After 7 days I slowly opened the jar only to have brine spew out everywhere in a fizzy mess. Smells kind of like beer. After getting the jar open and all the gases releasing I replaced the brine lost with the 2% mixture that you mention. The kraut is still good right? Should I put it in the fridge or can I keep letting it ferment on the counter?
Yes, all is good. Make sure to use either a lid with an airlock or leave the lid loose to allow gases to escape. This is only needed during the first week when the bacteria produce a lot of gas. So, yes packing the jar too full, using too many sugary vegetables like beets or carrots, and not leaving a way for the gas to escape contribute to this. You can let it continue to ferment.
Hello! I’m loving your blog and learning so much! I started my first batch of sauerkraut (apfelkraut to be precise) on Nov 23 – so 11 days ago. I’m using a quart jar with one of those Ferment’n lids/weights. For the first week, it was very active and overflowed quite a bit – not too worried there. As you’ve pointed out, the fluid level ebbed and flowed. For about the last 5 days or so, I’ve noticed that it is looking dry. I haven’t opened the jar, because I don’t see any mold or yeast (through the glass) and I don’t want to introduce anything by doing so – if I can help it. Is this okay? Can I just leave it alone and not worry about it, or should I try and add some brine. I’m really wanting to not open it for the full 21 days, if I can help it. But, I will if I have to. There is still fluid in the lid. Thank you so much for your help!
Just leave it alone and don’t worry about it. The pH is low enough and there is plenty of lactic acid in there to keep it “safe.” You might want to rinse out the lid, however, to get rid of the brine in there and not have in dry in the airlock.
Thank you! 🙂
Hi Holly, I have so enjoyed your recipes. I want to make gut shots for my daughter and I. We have discovered how much they help us. I wish to add a lot of flavorings to mimic the flavor of the ones we have found in our local grocery. Our Favorite is the Thai lemongrass kimchi (not Korean, yikes..way too spicy) flavor. Looking at the ingredients list I would like to add garlic, ginger, mint, basil, lemongrass, chili peppers (I actually found organic beets with sweet chili peppers somehow infused) and lime juice. I have found all of these that are organic. Can you advise me how much of each I should include? And in what form ie: chopped, grated, etc? Thank you for any advice you can offer.
Hello Paula, That sounds like a nice combination. Here’s what I would try:
For a 1/2 gallon jar, fill 1/3 – 1/2 with finely sliced cabbage
For flavoring add:
2-3 roughly chopped garlic cloves
1 inch ginger root, sliced
1/4 cup roughly chopped basil leaves
1/4 cup lemongrass stalk, 1/4 inch slices
1-2 chili pepper cut into quarters, lengthwise
1-2 limes, zest of and juice of
See how that works for you and then adjust. 🙂
Thank you so much! Now I have a staring point. I can’t wait to try it!
Hi again Holly! After many batches (I have just finished my 8th, 2 half gallon jars) I have found the perfect combination of flavorings:
3 roughly chopped large garlic cloves
1 1/2 inch ginger root, sliced
1/4 cup roughly chopped packed basil leaves
1/4 cup chopped packed mint
1/4 LEVEL cup lemongrass stalk, 1/4 inch slices
2 heaping tsp Korean pepper powder (Gochugaru)
1 good sized lime, juice & zest
1 half good sized Jalapeno cut up, seeds and all.
Most all of your suggestions. Thank you so much for your guidance, now my husband even takes this. We all have happy healthy guts now!
If you’ve got a reluctant husband drinking it, I would say you are 110% successful. Great work playing around with quantities. I must try this myself. (I’ve printed it out.) A flavorful combination I would never have dreamed up.
Well he drinks it because he sees how much my daughter and I benefit from it, she and I really like the taste, he is dubious lol, but he swigs it for his health now. When I first decant it, after straining in a screen colander, stirring lots to keep the Korean pepper dispersed as I pour into 6 oz bottles…it starts out more spicy but still good…I notice as it sits in the fridge each bottle mellows, becomes really yummy I think, for each morning 3 to 4 gulp swig 🙂 My tummy has never been so good. Just before I started drinking it I thought I had some awful intestinal issue and then I started feeling better than I had in years! No gluten or dairy issue after all..wonderful, thank you so much for your help!
A good place to start. One does start to crave it as your gut buddies realize how good it is for you and start “asking” for it. 🙂
And… so good to hear how much better you are feeling and nice to know gluten and dairy are not the culprit. Life’s no fun with restrictive diets.
Hi, Holly —
I’ve encountered dry kraut before and thought it was due to the dry desert climate where I live. But I discovered a great solution that works for me every time. Just add some vegetable broth (homemade, unsalted). It doesn’t dilute the flavor and doesn’t add more sodium.
Veggie broth is something I often have on hand, as I save all my vegetable scraps and parings until I have a quart or so, then make a nutritious broth for sipping or recipes.
Thanks for all your helpful tips,
Carolín
Hello Carolin, Now, that’s a new one for me. Don’t see why it wouldn’t work with your homemade broth. Let me know how they “store” or flavors meld over time.
Already been done. I cannot tell the difference from batches that haven’t had broth added, there’s no issue of flavors melding or in how the kraut stores.
Good to know. Another trick to have in one’s fermentation pocket.
I’m confused by the amount of cabbage. 4-6 oz isn’t even a full cup and my quart jar is half full with water and the bottom half is the cabbage… is this correct?
Just fill the jar about 1/3 of the way full with the cabbage; you don’t really need to weigh it. Then cover with the brine. You are using the cabbage for flavor and bacteria, not to make into sauerkraut so it is a bit different.
Hi Holly,
I notice that you use and interchange everywhere the 2 measurement systems. As a Canadian, you should know that our official measuring system is METRIC. The only country left in the world using the Imperial system is the USA… renamed after them: the US system.
https://uploads.disquscdn.com/images/e19d5899b7dd81a7eb90597faa0f0b1a9c307e2b94e034b0513e1ee7b7ccf683.png
https://uploads.disquscdn.com/images/2eb69398bf156d49295a5b4b737bdfa4f7ffe4d1f8ccd6cfcc8152796b700348.png
Why not stick to the more wonderful and simple metric system.
Also, it would be easier to figure out the quantity of salt if we know that it is 2% of the weight of the cabbage.
Hi Holly, I have fermented cabbage a couple of years now using a fermentation crock in small batches probably filling my crock half to 3/4 full. This year we had a stellar cabbage yield and I filled 2 -10 L crocks and 6 gallon fermentation bucket . I packed it tight. The sauerkraut stayed covered in the brine for 6 weeks . It stayed this long because I had surgery and was unable to do anything with it. Thankfully it taste fabulous and I moved it to the refrigerator. The problem is I took it out of the crocks and packed it into jars but I did not have enough brine to cover all the sauerkraut. It is tangy and crunchy and I really wanted to stay that way. It is also a nice color. Is there any other brine I can add to it or should I just leave it as is? I love you site! I have read through the post and can’t wait to try other recipes. So far I have only made traditional sauerkraut with just cabbage.
Congratulations on all that fabulous sauerkraut!
The brine gets pulled back into the cabbage cells, especially in the cold of the fridge. Just leave it as it is. It will be fine. You will also find, as you go beyond using just cabbage, that adding other watery ingredients – carrots, radish – will result in more brine. – Enjoy
Hi Holly, I’m new to all this. I’ve been buying and drinking a product called “Gut Shot”. It’s been helping my digestion, but I want to make my own. I am going to try your recipe and the flavouring you mentioned in a post. What I wanted to ask you though was, can I simply add garlic and fresh dill, so that the end result is a dill pickle flavour drink ? Plus my Husband might drink it then, he likes dill pickle flavour. Also,….do I not need to add any vinegar at all ? Thank you for your help. Your website is a gold mine 😊also one other question, I bought THE EASY FERMENTER and I’m wondering if I can use these lids to ensure no mould, as I would if I was making sauerkraut. Again thanks so much, look forward to hearing from you…. Gayla
That’s great to hear that the “Gut Shots” are helping. You’ll have fun making your own. Yes, flavor choices are endless. Just fill the jar about 1/3 of the way with cabbage, add your brine and let it ferment. No vinegar necessary. The fermentation process creates a natural vinegar tang as the bacteria eat the sugars and create lactic acid.
The Easy Fermenter is a nice airlock lid. You’ll still want to do the “daily mix” however. Between the two, you’ll greatly decrease the chance of mold growing. The daily mix will incorporate any mold spores into the brine where they are killed off. You can also make pickles and let your husband drink the brine which will have the beneficial bacteria. https://www.makesauerkraut.com/fermented-pickles/
I’m three days into my first ever batch of sauerkraut. I have lids that have a valve with a little pump to pull off the gasses from fermentation. I do it maybe 2-3 times a day. I came home from work and tonight my sauerkraut looks like the liquid is gone! I don’t know where it went! There’s been lots up to this point, and when I went to work 10 hours ago, it was there. I don’t know what to do! Is it ruined? Do I need to move it to the fridge? Should I taste it yet to see if I like it and then use it? I’d love some advice if anyone has any.
The brine is pulled back into the cabbage cells toward the end of the first week, and depending upon the weight you’re using, you may not see the brine always covering your sk. It’s all fine. How far along is your ferment. You might find this helpful:
https://www.makesauerkraut.com/dry-sauerkraut-gut-shots-recipe/
Do you know if the Shockeys’ trick of adding lemon juice can be used after fermentation, too? My last couple batches have been drying out (at least one pushed too much brine out during fermentation, but I’m wondering if the dry winter air might be a factor, too).
I’ve seen something else with my last two batches that I was hoping maybe you could help with. I have white spots. They don’t look like mold. (In fact, in the previous batch, they were all down inside the jar — nothing near the surface.) I don’t think they’re yeast, either. It looks like it might actually be part of the cabbage itself — as if there are parts that are denser than others or something, so they stay more opaque? But I’ve never seen that happen before, so I’m not sure what to make of it. Have you seen this?
Lemon juice? That’s an interesting thought. I would give it a try. As you know, I don’t add brine, but lemon juice or ACV might not impact flavors in the same negative way as brine does.
White spots. You’re probably right. Mold or yeast would be on the surface. I sometimes see black specs that are in the cabbage and were there to begin with. And, I do now know what you’re talking about. I get those, too. Something with the cabbage. Nothing to worry about. Good observation skills. 🙂
Hi, I’m 36 hours in and still no brine, the cabbage is below the liquid level. Is it too late to add salt water to cover the veg? Thanks
You say the cabbage is still below the liquid level. That means it is below the brine. If not, then add brine.
Hi there. Not my first rodeo fermenting but I do have a question regarding the safety of dry kraut. I made my kraut in a crock on the counter. After a month I moved it to a mason jar with a burping lid and put it in the fridge. There was plenty of brine, or so I thought, at the time. I left town for three months and when I returned the top inch or so was dry. I had some commercial kraut brine that I saved on purpose so I used that to top off the mason jars when I found them, but I want to check to make sure it’s safe to eat. Thanks!
Dry kraut? Perfectly safe. In the cool of the fridge, moisture gets pulled back into the cabbage, hence the decrease in brine. Enjoy!
Hi Holly,
My latest batch of sauerkraut didn’t go well. I sliced about 3.8 lbs cabbage, put it in a crock, added 2% salt, and mixed and pounded/bruised it. I noticed that it didn’t make liquid.
I went ahead, but a cover on the cabbage with a weight and left it. I didn’t get back to it until two days later, and it still didn’t make liquid, so I added a pint of 2% brine, which did start the liquid production. After three more days, I tasted it, and it tasted fine, but it didn’t seem as salty as usual, and it was very slimy. Obviously slimy. I could even see long slime threads from dripping liquid.
I know that many bacteria make slime, and in fact the Japanese natto is made from boiled soybeans left out in the air. I’ve made this, and it’s very slimy, but apparently not harmful.
My guess is that the cabbage picked up a lot of ambient bacteria and it grew in those first days without liquid.
So I’m not inclined to eat this sauerkraut, and I read your suggestions on how to remedy dry sauerkraut. I’ll make a new batch and be careful to insure that liquid covers the kraut within a day, either naturally, or by adding brine.
Best regards,
Tom
If you didn’t get any brine, it probably means that the cabbage was old and did not contain much moisture. Also, if the cabbage was not cut thin enough there may not be enough moisture.
A slimy ferment will usually rebalance itself after a couple of weeks in the fridge. I haven’t pinpointed a specific cause for it. Pack it into jars and store it in the fridge for a few weeks and see if it has “aged” to your liking.
Hope that helps. Also, I find it best to mix the cabbage and salt in a large bowl before packing it into the crock. You can also add water-rich vegetables for the liquid, too.
Hi Holly, thanks for the tips. I just downloaded your chart on brine concentrations for different vegetables. This is just what I was looking for. Thank you very much.
Best,
Tom
You’re welcome. Enjoy the flavorful journey ahead.
Hi,
I made sauerkraut for the first time. For the first 3 weeks, the brine was above the cabbage and even overflowed at one point. A week later, I checked it and the brine had completed disappeared. I wondering if it is safe to eat?
I’m sure that it’s safe to eat (unless it has a strong, nasty odor). It was preserved during the time under the brine. Most sauerkraut is dry once the fermentation process is over. More here: https://www.makesauerkraut.com/dry-sauerkraut-gut-shots-recipe/