
 This post may contain affiliate links which won’t change your price but will share some commission.
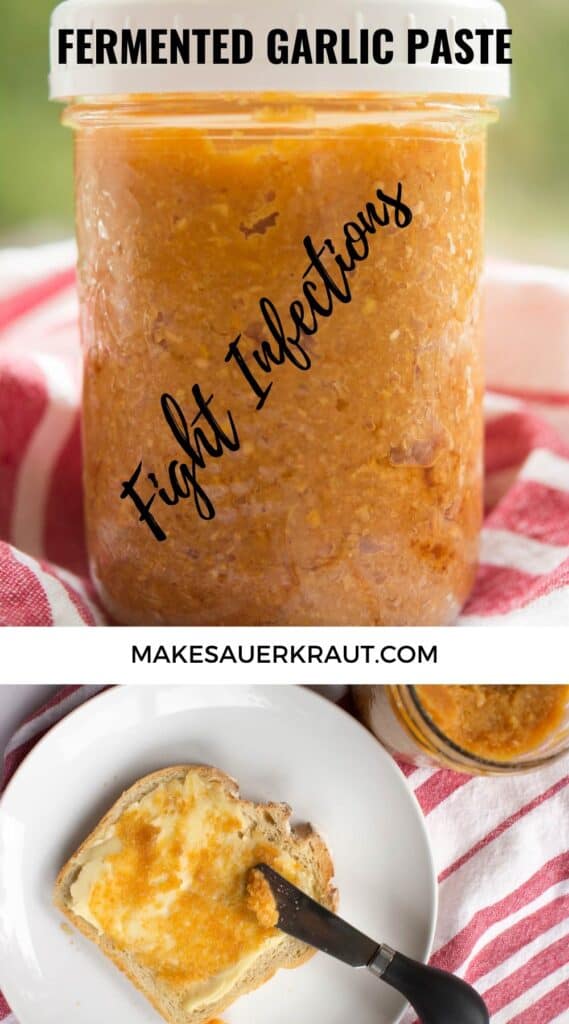
Looking to level up your culinary game while boosting your immune system? Meet your new kitchen staple: fermented garlic paste. With its sweet, caramelized flavor and potent health benefits, this versatile paste transforms everyday dishes into extraordinary meals.

Fermented garlic paste is not just a flavor enhancer—it’s an immune-boosting powerhouse.
This paste combines the natural antiviral and antibacterial properties of garlic, onion, and ginger to create a delicious and healthful addition to your kitchen.
In this guide, we’ll walk you through the simple steps to make your own fermented garlic paste and offer tips on customizing it with different ingredients like fresh turmeric.
Whether you want a straightforward garlic paste for sautéed greens or a garlic-ginger mix for Asian dishes, this versatile recipe has you covered. Plus, no need to worry about garlic breath—the fermentation process mellows the strong sulfur compounds.
And if you’re feeling under the weather or want to bolster your immune system during flu season, just a teaspoon a day can make a big difference.
From preserving garlic to exploring its health benefits, we’ve got all the information you need to make and use this incredible paste in your cooking.
- Other Preservation Methods for Garlic
- Health Benefits of Garlic
- Benefits of Fermenting Your Garlic, Ginger or Onions
- Fermented Garlic-Ginger-Onion Paste Ingredients
- FAQs for Fermented Garlic Paste
- How to Make Fermented Garlic-Plus Paste
- Using Your Fermented Garlic
- Recipe: Immune Boosting Fermented Garlic-Plus Paste
Other Preservation Methods for Garlic
Garlic forms the base for each of the fermented pastes in this recipe.
As you search around the internet for ways to preserve or ferment garlic, you may come across black garlic, pickled garlic, or honey fermented garlic. I’ll eventually have fermentation recipes for some of these other methods, but for now, some clarification.
Black Garlic

Black garlic is a type of preserved garlic made by aging whole bulbs of garlic—in a dehydrator or rice cooker set on warm—over the course of several weeks. The cloves turn inky black and develop a date-like texture with a sweet, earthy-like flavor, prized by chefs for adding intense flavor to dressing and dishes.
Black garlic is not fermented. The change in color, flavor, and texture is the result of the Maillard reaction, a process initiated by heat in which a chemical reaction between the amino acids and sugars of food result in the browning of that food. Think toast.
Ready to make your own black garlic? Why and How to Make Black Garlic by Oh, the Things We’ll Make
Pickled Garlic
Pickled garlic usually refers to garlic being preserved in vinegar with the addition of salt, sugar, and herbs. This is done without fermenting the garlic and does not contain the same beneficial bacteria and enzymes.
It’s easy to confuse pickling with fermenting since fermented garlic is also preserved in an acidic brine, naturally created by bacteria. I call garlic preserved without the use of vinegar, fermented garlic, or lacto-fermented garlic and that which quick-pickled with vinegar, pickled garlic.
Fermented or Lacto-Fermented Garlic Cloves
Lacto-fermented garlic is made by covering a jar full of peeled garlic cloves with a salty brine. Garlic preserved in this way retains its antibacterial and antiviral qualities, as well as a whole other suite of health-boosting properties.
How To Make Lacto-Fermented Garlic + 5 Ways To Use It by Rural Sprout
Fermented Garlic Paste
For fermented garlic paste, we puree the cloves with 2% salt first and then ferment the paste for up to 4 weeks.
I rarely ferment whole garlic cloves but instead stock my fridge with garlic paste. No peeling and chopping needed when wanting to add garlic to a dish. You already did so when you made the paste. Open jar, scoop out some paste. Stir into dish. The flavor added makes you an instant 5-Star Michelin chef.
Honey Fermented Garlic
Honey fermented garlic is a valuable example of food as medicine and is good to have on hand as the weather cools and cold germs abound. Eat a clove or two daily, add to salad dressing. Drizzle the honey on pizza or roasted vegetables.
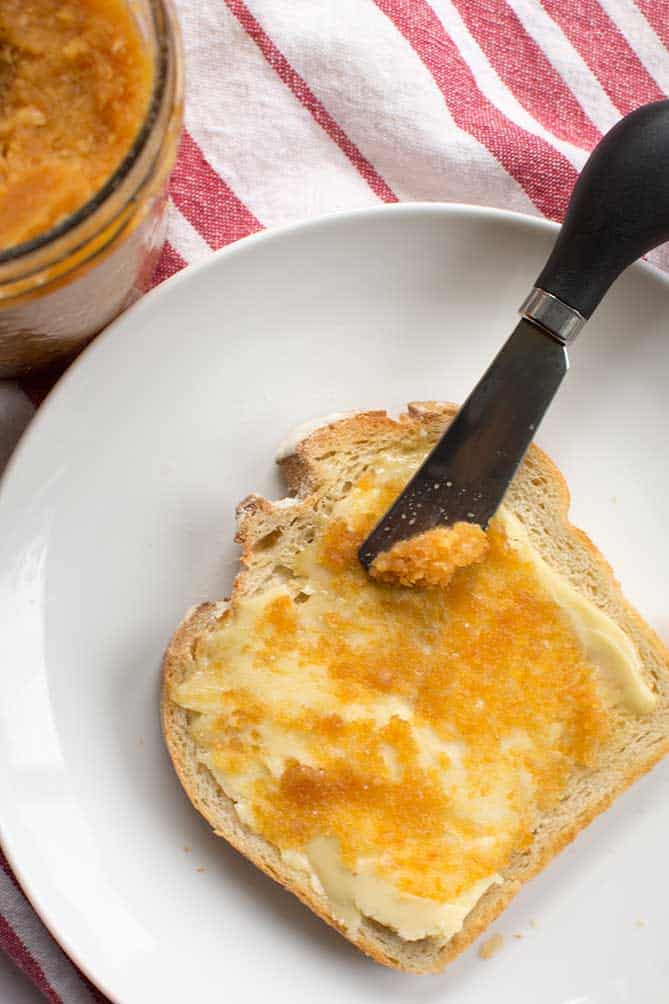
I’m now spreading pureed, honey-fermented garlic on my toast each morning. The tad of sweetness from the honey seems decadent. Such a simple way to get my daily dose of garlic. I’m finding a stronger garlic bite with honey-fermented garlic than with fermented garlic paste.
It is dead simple to make. Fill jar with prepared cloves, pour in raw honey. Let ferment for 3-4 weeks. Botulism fears? On average honey has a pH of around 3.9, so it is too acidic for botulism to be an issue. I used the recipe below to make my first batch of honey fermented garlic.
Brad Makes Fermented Garlic Honey | It’s Alive | Bon Appétit
Now that you understand the various ways in which you can preserve garlic, let’s cover the health benefits of raw and/or fermented garlic.
Health Benefits of Garlic
Green Med Info has gathered together over 443 abstracts covering the benefits of garlic with a few of the studies discussing the benefits of fermented garlic.
Allyl sulfur compounds are the major active constituents found in crushed garlic. Studies demonstrate that heating has a negative influence on these beneficial effects, which is why fermentation is such a great way to preserve it. Academic
Some notable benefits are:
- Garlic fights infections. Garlic has potent antibacterial powers that can kill bacterial and viral infections. It contains the sulphur compound alliin that have a direct antiviral effect. When garlic is chopped or crushed, that enzymatic changes turn the alliin into allicin.
- Garlic is a potent anti-inflammatory that protects the blood vessels and prevents oxidative stress, lowering the risk of heart attack and atherosclerosis. Hydrogen sulfide acts as a chemical messenger in the body, relaxing blood vessels and allowing more blood to pass through. Science Daily
- Garlic contains selenium, an important antioxidant that supports liver detoxification and prevents premature aging.
- Garlic contains sulfur compounds that are anti-cancer and are important in liver detoxification pathways.
- Eating raw onion can be as effective as eating garlic. It contains the same anti-microbial compound allicin.
- Turmeric contains curcumin, a substance with powerful anti-inflammatory and antioxidant properties which the fermentation makes more bioavailable.
How Much Garlic to Eat for the Health Benefits?
The benefits of garlic can be enjoyed by eating one or two cloves per day. Fermenting garlic enhances its nutritional value and makes it easier for the body to digest and to assimilate all the valuable nutrients.
Benefits of Fermenting Your Garlic, Ginger or Onions
Like other fermented foods, fermented garlic, ginger, and onions are a rich source of probiotics, vitamins, and enzymes that support gut health and immune system function, among many other things.
As a fermentation nerd, I’ve been studying the effects of fermentation on garlic’s medicinal properties and am thrilled that allicin content does not reduce during fermentation and increased sulfur compounds are formed, (Journal: Food Science and Biotechnology & LaChance). One study found that fermenting the garlic increased antioxidant properties by up to 13 times compared to the control garlic. The fermented garlic had increased polyphenols as well as higher amounts of SOD (superoxide dismutase), an important part of the antioxidant chain which reduces free radical damage, (Journal: Plant Foods for Human Nutrition).
Kathrin Brunner, The Miracles of Garlic and a Recipe for Fermented Garlic Paste
Yes, you can buy those handy tubes of garlic and ginger paste at the grocery store, but I don’t care for the questionable ingredients and preservatives found in many of them. When making fermented garlic paste, we add just salt, and during the fermentation process, the bacteria create lactic acid, a natural preservative.
Fermented garlic, ginger, or onion paste is:
- Packed with probiotics, enzymes, and lactic acid for added nutrition and flavor.
- Contains enhanced nutritional value and makes it easier for the body to digest and to assimilate all the valuable nutrients.
- Lasts forever. A jar of fermented garlic paste stored in your fridge will last much longer than heads of garlic kept in your pantry.
- Won’t sprout. When you buy garlic from the store, it will often sprouts before you get a chance to use it. Not so with your fermented garlic.
- No garlic breath, a welcome bonus. The fermentation process mellows garlic’s pungent flavor.
- Great way to preserve the harvest. You can capture garlic at the peak of quality by fermenting recently harvested garlic.
- Make the perfect gift. Pack a 4-ounce (125 ml jar) with some fermented garlic paste to introduce friends to this flavorful, time-saving ferment.
Fermented Garlic-Ginger-Onion Paste Ingredients
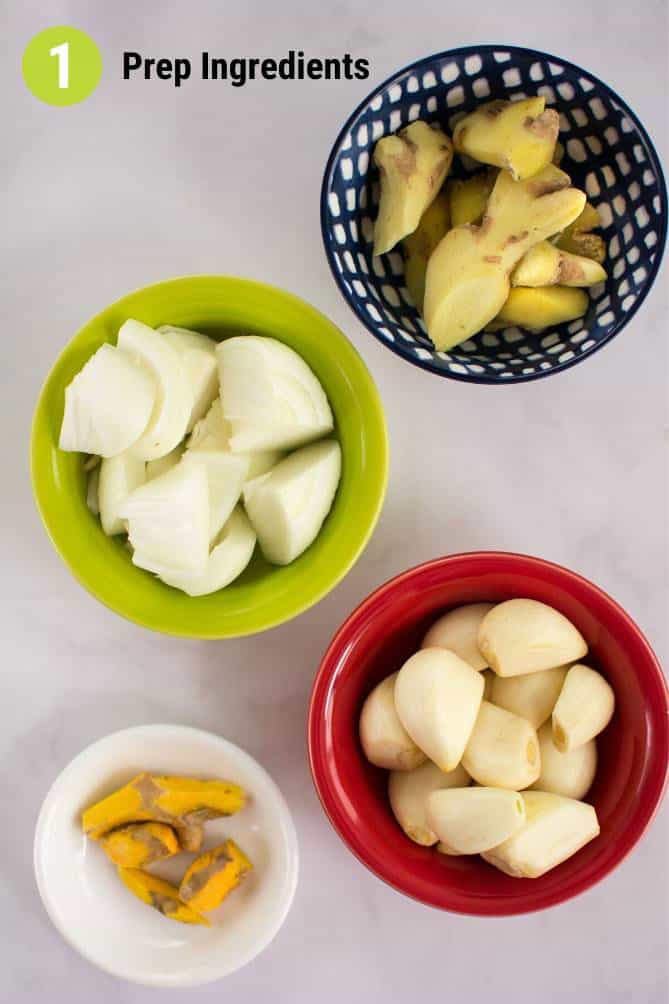
To make fermented garlic-plus paste, you need a combination of garlic, onions, ginger, and salt, Sherpa Pink Himalayan Salt – Fine Grain, 5 lbs. | All-Natural, Gluten-Free, No Additives | Perfect for Everyday Cooking & Recipes, being my favorite. The addition of fresh turmeric root gives additional immune-boosting properties.
You can also make a paste using just garlic or any combination of garlic, ginger, and/or onion. I give directions for each variation.
Not sure about using the salt in your kitchen, read about the pros and cons of each type of salt.
Purchasing Garlic
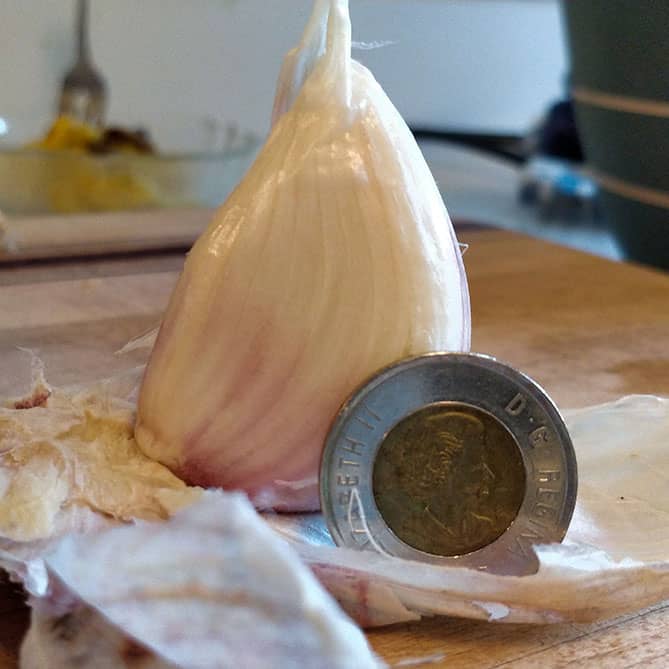
You will find garlic at the store year-round, but realize you’ll find the best quality from mid-summer to early fall when it is in season. There are two general categories of garlic: hardneck and softneck.
The “neck” in the names refers to the stalk that grows upward from the garlic bulb. Hardnecks have a stalk that stems from the center of the bulb and turns rigid at maturity. When breaking the cloves off the garlic bulb, you can still see the stalk in the center of the bulb. Softnecks stalks are made up of leaves rather than a central stalk. Softneck leaves remain soft and flexible at maturity. You won’t see a rigid central stalk.
Softneck garlic heads contain smaller cloves, usually a dozen or so per head. The husks on the cloves tend to be thinner and more papery.
Hardneck garlic heads contain fewer cloves, some as few as six, and the cloves are much larger. The husks on a hardneck garlic clove are more brittle and thick and tend to be easier to peel.
The best garlic for fermenting is hardneck garlic, which is more pungent with a stronger garlic flavor. You are more likely to find hardneck garlic at local farm stands. Use what you have access to, even if it is softneck garlic. But, at least now you know the difference between the two and what to look for when shopping in order to know what kind you’re buying.
I’m lucky that my husband loves to grow garlic, most of which I ferment into paste after harvest time.
When shopping for garlic, look for heads that feel full and firm and not hollow or dehydrated. Avoid heads with any sprouts or noticeable garlic odors, indicators that the garlic is old.
How Much Garlic Do I Need?
To make one-pint (500 ml) of fermented garlic paste, a perfect amount to start with, you’ll need 7-8 heads of garlic. At the store, feel free to weigh it, buying just over a pound (500 grams).
Peeled, this should be about 2 cups of cloves, or 400 grams. If you are fermenting a paste to include onions or ginger, you’ll use less garlic.
There are approximately 8 garlic heads to a pound (454 grams).
3 Ways to Peel Garlic
You’ll have to fiddle around a bit to find the best way to peel your garlic. Since you need 6-8 heads of garlic to make a batch of fermented garlic paste, you’ll want to find an efficient method. In order of preference for efficient peeling are three ways to peel garlic:
- The jar method—my favorite. Break the head into cloves. Place garlic cloves into a large jar, cap, and shake vigorously for 20-30 seconds. I find I get better results if I first trim off the flat, root end, making it easier for the skins to break away.
- The garlic peeler method. A garlic peeler is a silicone tube that you insert garlic cloves into and roll across your cutting board pressing down to removing the skin.
- The knife method. Trim the root end off the clove and place under a large chef’s knife, with the blade facing away from you. Press down with the palm of your hand until you hear or feel a crack. This works great when you need just a clove or two.
NOTE: Do NOT use the microwave or hot water to peel garlic. Garlic peeling methods that use heat will not only kill the bacteria necessary for fermentation but also the active components that deliver the health benefits of consuming garlic.
All About Onions
Onions are the only vegetable we know of that lack intrinsic lactic-acid bacteria, the bacteria we need to make fermentation happen. For this reason, don’t try to ferment onions on their own and keep the percentage of onions in your paste to 50% or less.
I used yellow onions in this recipe.
Yellow onions have a nice balance of astringency and sweet.
White onions have a sharper and more pungent flavor than yellow onions.
Red onions have a relatively mild flavor and will give a somewhat muddy color to your fermented paste.
Purchasing Ginger
When purchasing ginger, look for tubes that feel heavy for their size with smooth skin and a spicy fragrance. Since the bacteria responsible for fermentation hide in the nooks and crannies of the peel, don’t feel the need to remove every last bit of peel. I do like to remove most of it for flavor and appearance.
Turmeric
It can be a bit of a challenge to peel turmeric. Not only are the tubes small, but it will stain everything it comes in contact with. Peel as best you can and cut off any woody or soft spots.
If you can’t get fresh and still want to add turmeric, use 1 teaspoon powdered turmeric for a 400 gram batch.
FAQs for Fermented Garlic Paste
I would use only fresh garlic, ideally in season, though I’ve had good luck with using our homegrown garlic that has been properly stored for months.
I’m afraid that the processing of the garlic and the use of additives, like the citric acid, would eliminate any of the necessary bacteria and prevent a good ferment.
Prepare your ingredients FIRST, then weigh them to calculate the correct percent of salt. You only want to weigh what you’ll actually be fermenting.
Help, My Garlic Turned Blue!
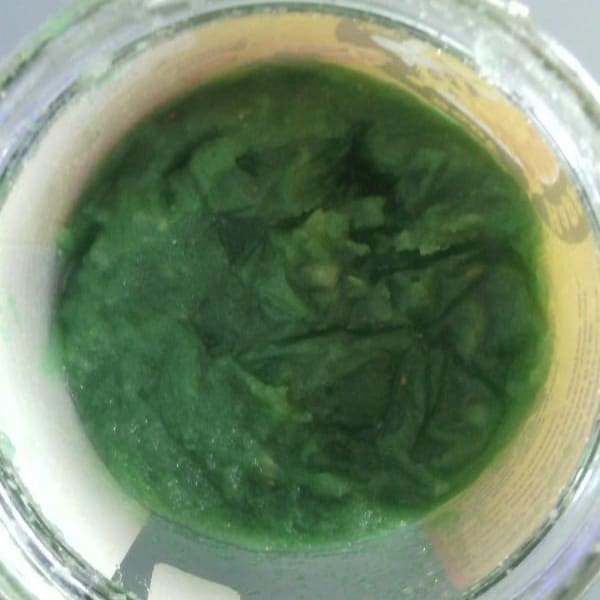
It can be rather shocking to see your garlic change colors. It doesn’t happen often, but when it does, there is no need to panic. The color doesn’t affect the flavor or safety of the garlic.
The color change is caused by a reaction between enzymes and sulfur-containing amino acids in the garlic (the same enzymes are responsible for garlic’s flavor). When these enzymes are activated by mild acid, they produce blue and green pigments. The compound responsible for this reaction, isoalliin, is formed when garlic is stored at a cool temperature for several weeks, typically in the winter, when pantries are colder.
To avoid this blue discoloration, ideally use fresh, young garlic.
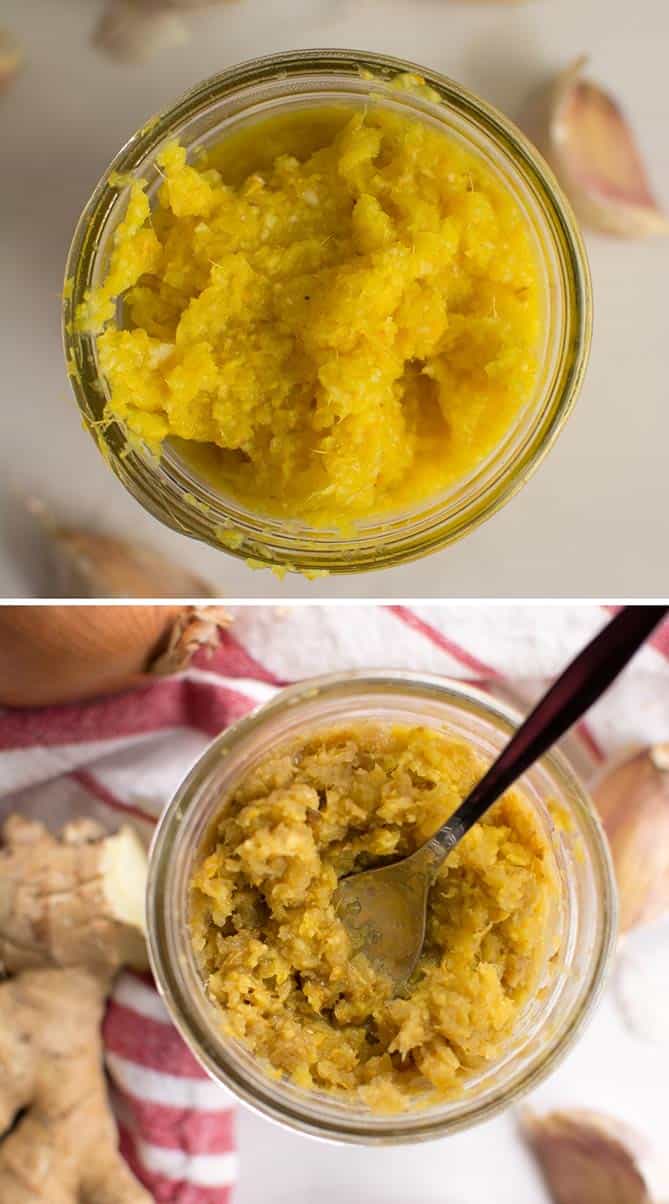
How to Make Fermented Garlic-Plus Paste
You can use any combination of garlic, onion, and ginger to make your fermented paste. If you use onions, keep them to less than 50% of the total weight. In these pictures, I’m using equal amounts of garlic, ginger, onions. To keep life simple, feel free to start with 100% garlic.
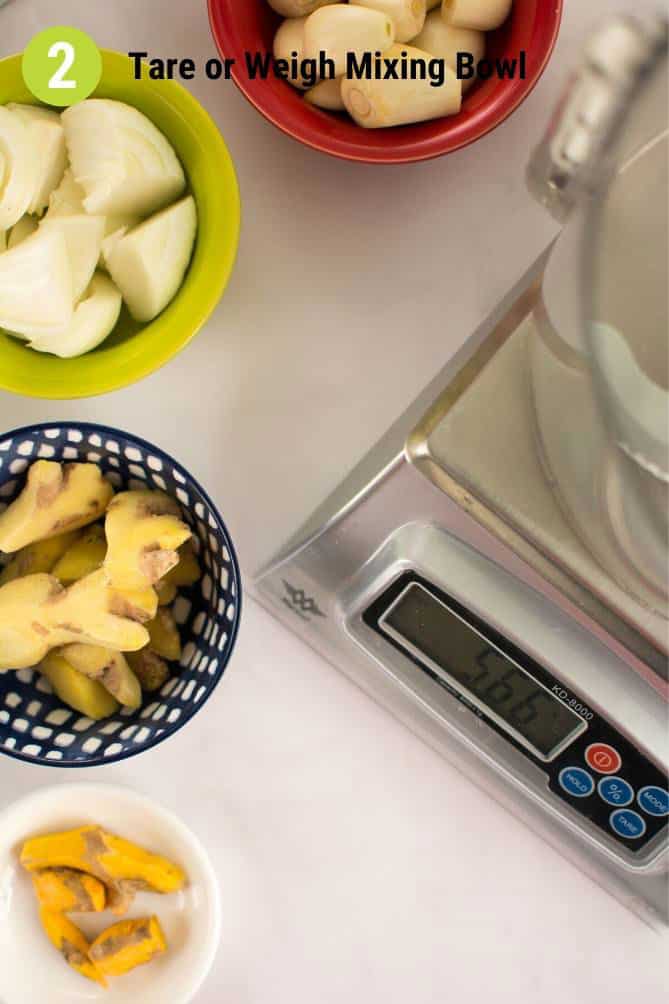
To fill a pint (500 ml) jar, you need approximately 400 grams of ingredients. Your life is so much easier if you weigh your ingredients, using a digital scale, the My Weigh KD-8000 being my favorite.
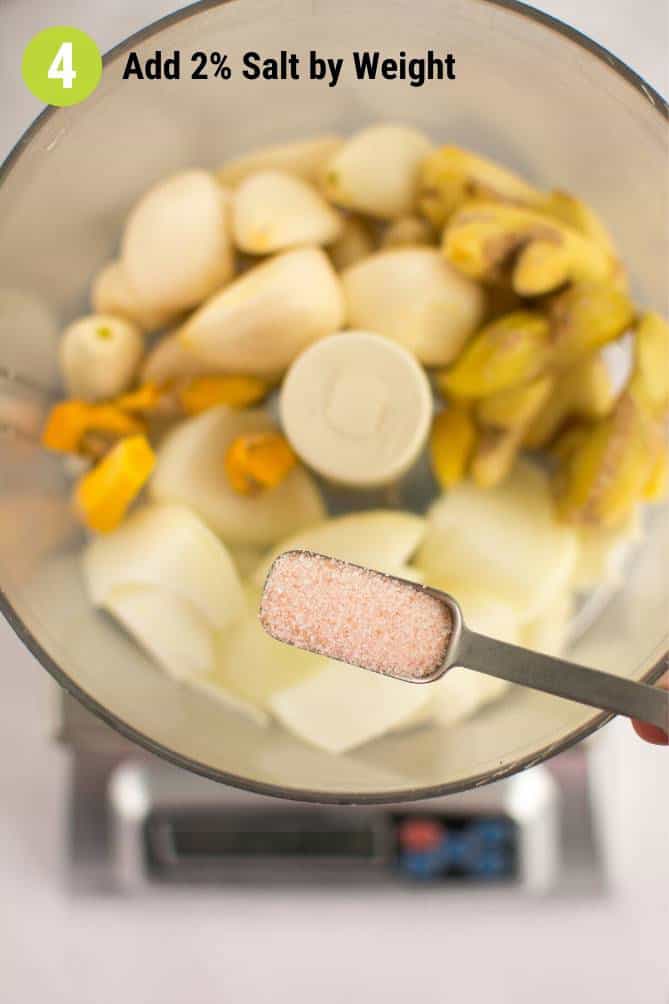
Time now to add your ingredients to your food processor bowl and calculate how much salt to add.
Fermentation Ninja Skill: Calculate How Many Grams of Salt to Add
Fermentation best unfolds at a set percentage of salt base upon the weight of the ingredients that you’re fermenting. For fermented garlic paste, we add 2% salt by weight.
You probably think that it’s much easier to grab a measuring spoon and just add a set number of teaspoons of salt. However, if you know the weight of your ingredients, we can calculate the weight of salt to add. Then, no matter which size batch you’re making, you add the right amount of salt to establish a proper fermentation environment. The good bacteria grow. The bad bacteria die.
Once you do this a few times, you’ll see how easy it is. Your finished paste is not too salty, not too bland, but… Goldielocks right. It’s OK to break out a calculator for this.
- Multiply the weight of your ingredients x 0.02
- Ignore the numbers after the decimal point, or round up if great than .50
- Add that many grams of salt
For example:
- Multiply the weight of your ingredients (410 grams) x 0.02: 410 x 0.02 = 8.20
- Ignore the numbers after the decimal point: 8.
20 - Add that many grams of salt: 8
OR:
- 540 x 0.02 = 10.80
- 10.80 rounds to 11
- Add 11 grams of salt

Whew, that part’s all done! Now to blend your ingredients into a smooth paste.
Time now to let the bacteria go to work for you.
How to Know When You Fermented Paste is Done
Ferment garlic for at least 14 days to allow time for the pH to drop to a safe level (below 4.0), enough lactic acid to be produced to preserve your garlic, and for flavors to mellow.
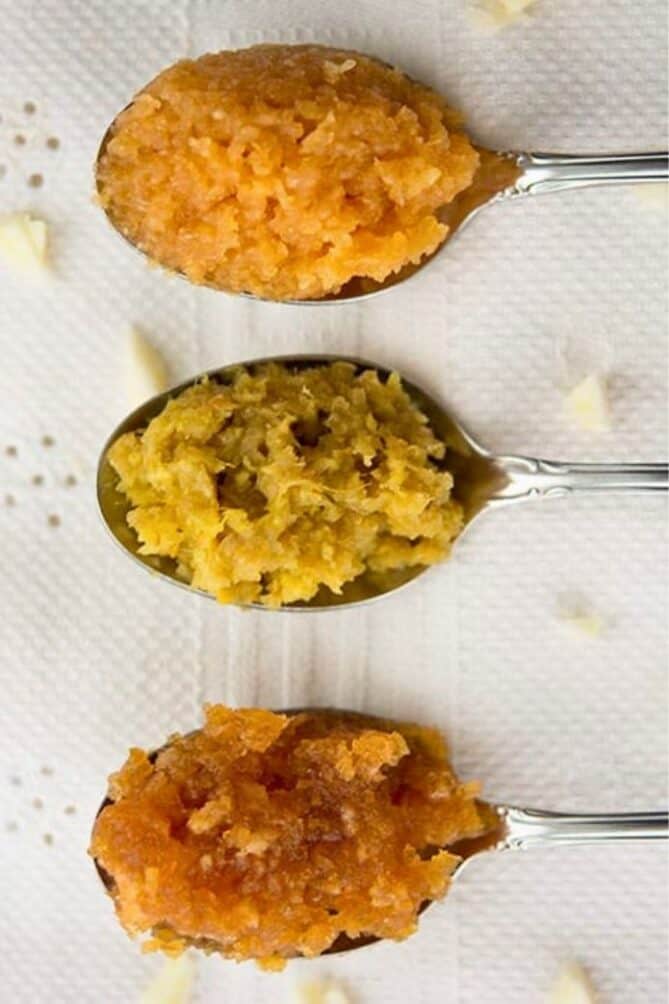
As your garlic paste ferments, these are the signs to watch for:
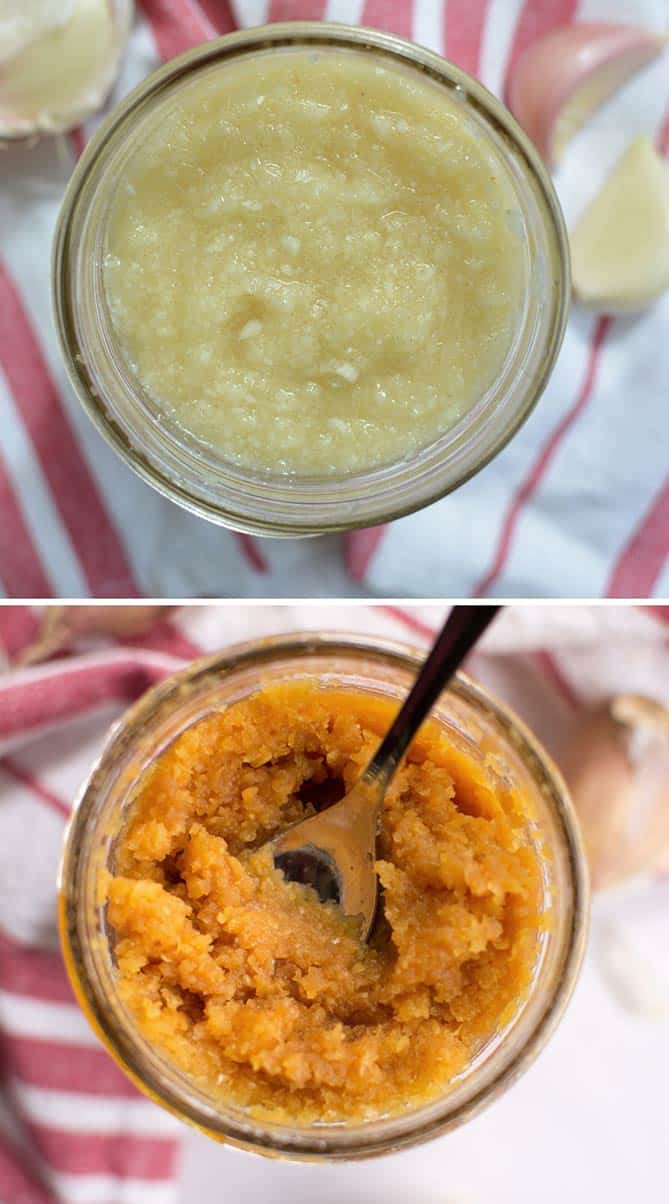
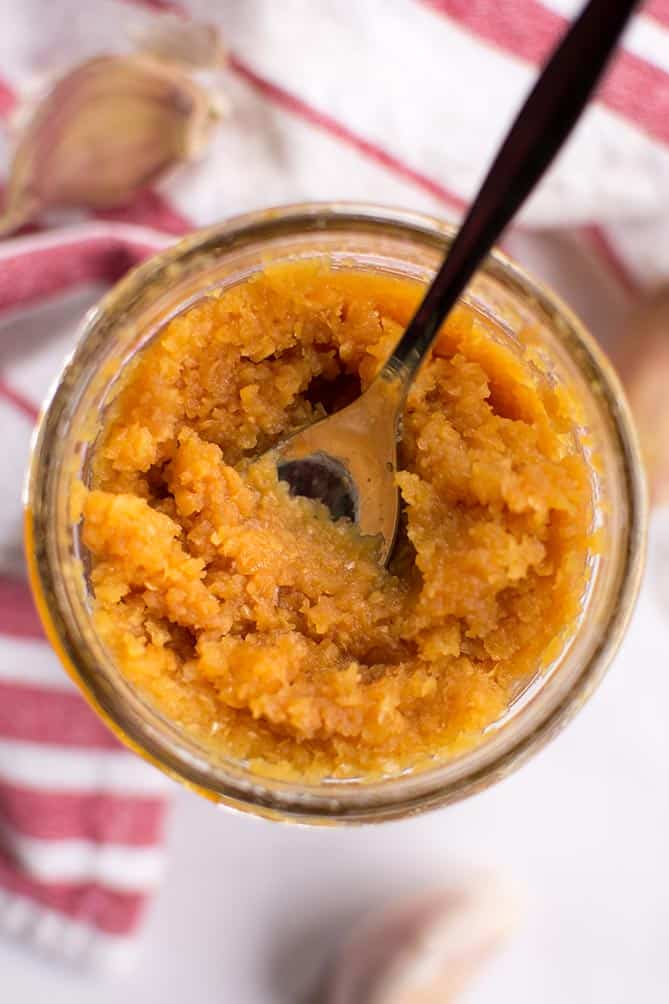
- Color shifting from a pale white—or the original color of your garlic—to a beautiful caramel brown. Note: If you added turmeric, the yellow color will dull over time.
- CO2 pockets forming in your packed mixture. Some recipes note the possible development of a bitter flavor if the CO2 pockets remain. I haven’t noticed this and find it difficult to remove the CO2 pockets because pressing down on the mixture seems to just cause the paste to ooze everywhere. If you do notice a bitter flavor, mix well, pack it back down into the jar and let it ferment for a few more days.
- Heaving. As CO2 pockets form in your packed paste, you may notice it expanding and moving up in your jar. This is normal and is called “heaving.” If you did not leave enough headspace in your jar, try pressing it back down into the jar or if need be, move some of the paste to a small jar.
- Flavor shifting. As fermentation progresses, the flavor will shift from a sharp garlic bite to a mellow, almost sweet flavor.
If you’re extra eager to use your paste, leave it to ferment for a minimum of 7 days, then remove some, placing it in a smaller jar of its own. Leave this out on the counter, where it will continue to ferment, but go ahead and use it as needed. You will notice a strong garlic bite that should dissipate within a week.
The paste is ready when it tastes milder than raw garlic and has a slightly acidic flavor. Clean up the jar and transfer it to the fridge with an airtight lid. Your paste will keep for up to a year, but once you discover the power of this flavorful gem, most likely will be long gone before then.
Using Your Fermented Garlic
Now that you have a jar of garlic paste, keep it handy, and use it to effortlessly add flavor to any dish or meal. I keep mine right on the door of my fridge, ready to grab at a moment’s notice.
- Keep refrigerated to slow down fermentation and keep flavors stable.
- Don’t heat if you want to take advantage of the probiotic, enzymatic and various health benefits. Anything over 106F (41C) will kill off beneficial bacteria along with the health benefits of garlic derived from the alliinase activity.
- Temperature check trick. If you want to add fermented garlic paste to soups or stews—highly recommended—check the temperature with your finger dipped into the dish. When you can hold your finger in the warm liquid for a few seconds, it is cool enough.
1 teaspoon (5 ml) of garlic paste = 1 medium clove of garlic
It all depends upon clove size, of course. My husband is the Garlic-Growing King and has picked a variety of garlic that rules when it comes to clove size. For us, we probably get 1 tablespoon of garlic paste from one clove of garlic.
Since the flavor of fermented garlic paste is mellower than raw garlic, I always add more than the recipe calls for and add it when I’m done preparing the dish.
How Long Does My Fermented Paste Last?
Forever, if you never use it. Or, just a few weeks if you slather it onto toast, add it to sautéed greens or stir it into soups, as I do.
5 Ways to Use Fermented Garlic Paste
The sky is the limit when looking for ways to use your fermented garlic paste. Just add it to any dish that calls for garlic (or onions or ginger if you’ve added those to the mix).
1. Straight Out of the Jar
Feel a cold coming on? Sore throat? Wanting to boost your immune system. Enjoy a small spoonful of fermented garlic paste 1-2 times a day, either straight from the spoon or spread onto toast.
One teaspoon (5 ml) of garlic paste is equal to one medium clove of garlic
2. Sautéed Greens
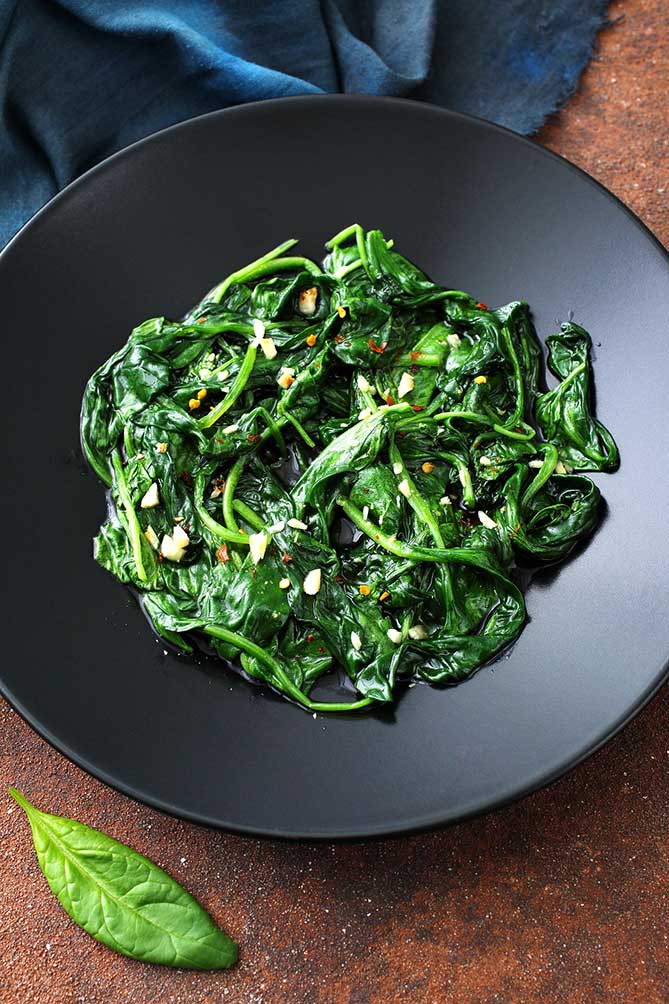
Sauté your greens as usual. Turn off heat and stir in some garlic paste. I add about one tablespoon of paste for one bunch of spinach.
3. Bruschetta
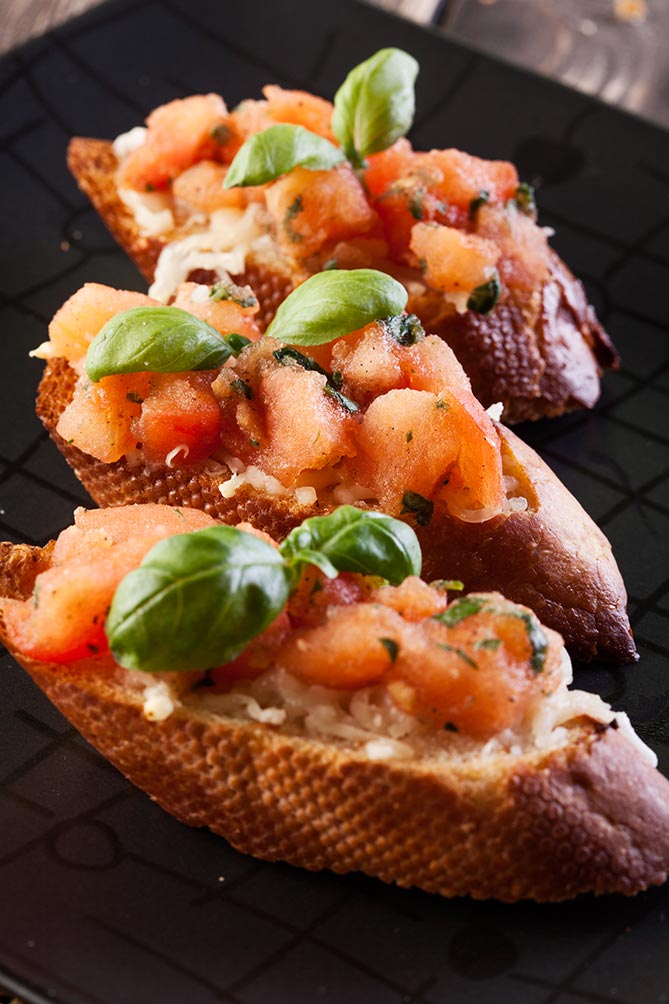
Bruschetta topping. Mix together:
- 2 cups (480 ml) Roma tomatoes, finely minced
- 1/2 cup (120 ml) basil, finely sliced
- 1/4 cup Parmesan cheese, finely grated
- 3 tablespoons (3 x 15 ml) olive oil
- 2 tablespoons (2 x 15 ml) balsamic vinegar
- 1 teaspoon (5 ml) salt
- 1/2 teaspoon (3 ml) pepper
Toast bread, spread with a thin layer of garlic paste, and add a spoonful of prepared bruschetta topping.
4. Avocado Toast
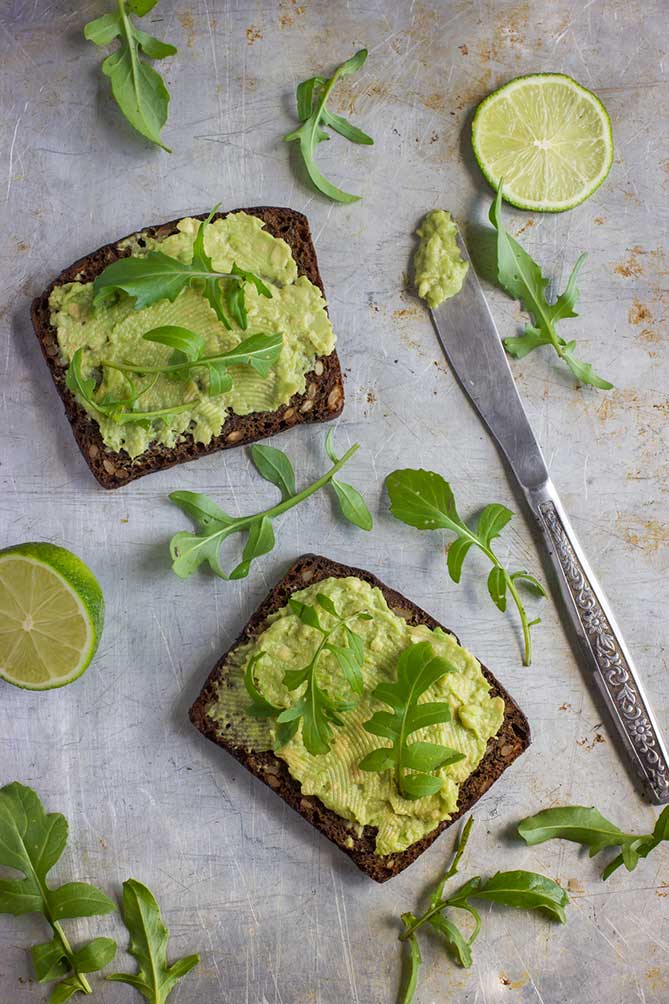
- Mash avocado
- Stir in a spoonful of garlic paste
- Stir in the juice from one lemon half
- Salt and pepper to taste
- Spread on toasted bread
5. Ranch-Style Salad Dressing
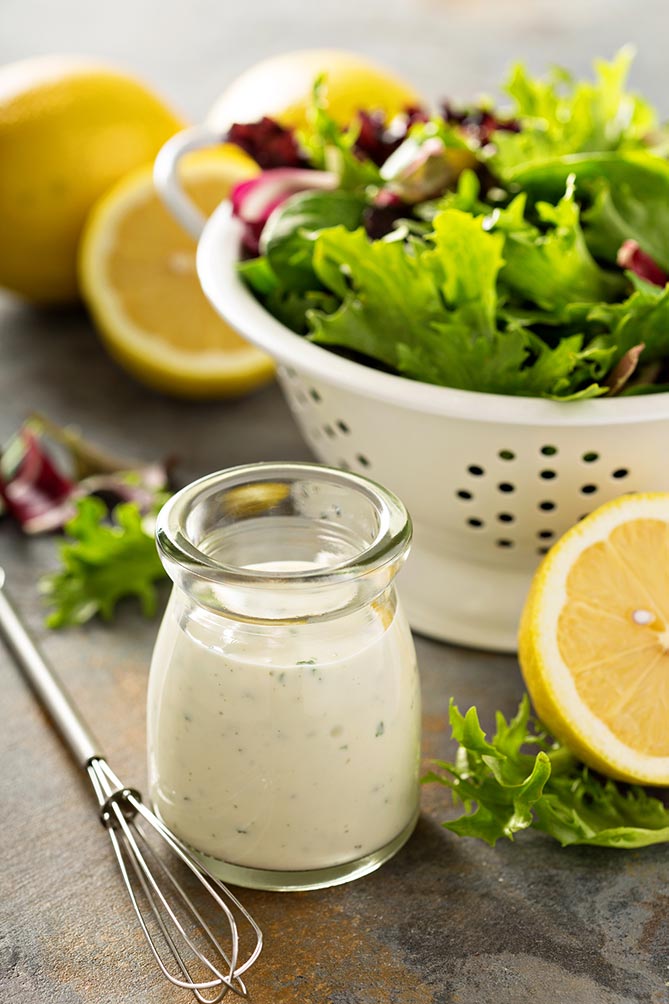
- Mix together 1/2 cup (120 ml) each of yogurt, sour cream, and mayonnaise.
- Add one tablespoon (15 ml) of fermented garlic paste.
- Stir in juice from one lemon until desired consistency.
- Add 1 tsp (5 ml) dried parsley flakes or 1 tablespoon (15 ml) fresh
- Add salt and pepper to taste
Other Fermentation Recipes with Garlic
My signature recipe, where I teach you how to make sauerkraut, includes a few cloves of flavor-packing garlic.
No kimchi recipe is complete without a hefty dose of garlic. Head to my traditional kimchi recipe, part of my kimchi series, where I cover all you need to know to make kimchi.
Garlic is also found in this red-hued sauerkraut recipe that uses beets. A winner in any household.
Recipe: Immune Boosting Fermented Garlic-Plus Paste

Immune-Boosting Fermented Garlic-Plus Paste
EQUIPMENT
- Food processor
- Digital scale
- 1 pint (500 ml) wide-mouth canning jar or similar sized jar & lid
INGREDIENTS
Immune Boosting Fermented Garlic-Plus Paste
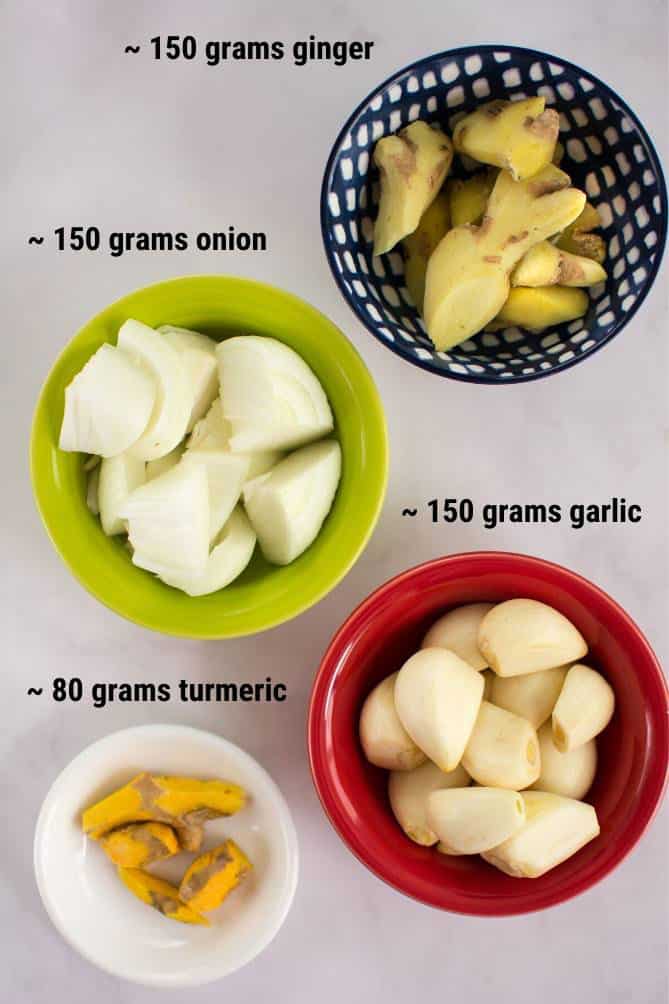
- 2-3 heads garlic, cloves separated, peeled. Root ends and blemishes removed, ~150 grams, prepped (33%)
- ~175 grams piece fresh ginger root peeled and cut into 1 inch chunks, ~150 grams, prepped (33%)
- 1 medium yellow (or white) onion, peeled and cut into 1-inch chunks, ~150 grams, prepped (33%)
- 2-3 pieces fresh turmeric root, peeled,, or 1 teaspoon powdered
- 2 % iodine-free salt (fine-grain)
Fermented Garlic Paste
- 6-8 heads garlic, cloves separated, peeled. Root ends and blemishes removed, ~400 grams, prepped
- 2 % iodine-free salt (fine-grain)
Fermented Garlic-Ginger Paste
- 3-4 heads garlic, cloves separated, peeled. Root ends and blemishes removed, ~200 grams, prepped (50%)
- ~225 grams piece fresh ginger root, ~200 grams, prepped (50%)
- 2 % iodine-free salt (fine-grain)
Fermented Garlic-Onion Paste
- 3-4 heads garlic, cloves separated, peeled. Root ends and blemishes removed, ~200 grams, prepped (50%)
- 1 large yellow (or white) onion, ~200 grams, prepped (50%)
- 2 % iodine-free salt (fine-grain)
INSTRUCTIONS
- Prep and weigh ingredientsTurn on scale. Switch it to grams. You'll first use it to weigh each of your ingredients as they are prepped. Determine what type of paste you're going to make. In this recipe, I give instructions for the Immune Boosting Paste Garlic-Plus Paste that uses approximately equal quantities of garlic, ginger, and onion with a bit a turmeric root (optional) for an added immune boost. In parenthesis, I give quantities for the other fermented paste options. Garlic: Peel garlic cloves and cut away root ends and blemishes. Weigh your garlic as you go. For the Immune Boosting paste, you need approx. 150 grams of garlic (To make Garlic Paste, you need 400 grams of garlic; To make Garlic-Ginger Paste, you need 200 grams of garlic, and to make Garlic-Onion Paste, you need 200 grams of garlic).Onion, if using: Cut off top and root end of onion and peel. Roughly cut into one-inch chunks. For the Immune Boosting paste, you need approx. 150 grams of onion (To make Garlic Paste, you need 400 grams of onion; To make Garlic-Onion Paste, you need 200 grams of onion).Ginger, if using: Peel as best you can. Don't worry about removing all the skin. Cut into one-inch chunks. For the Immune Boosting paste, you need approx. 150 grams of ginger (To make Garlic-Ginger paste, you need 200 grams of ginger).Turmeric, if using: Peel as best you can. Don't worry about removing all the skin. I ended up with 80 grams. Anything close to that is fine.
- Get the weight of your food processor mixing bowl (with blade)Set up food processor. To add the proper amount of salt, we need to make sure to not include the weight of your bowl. Place the food processor bowl (with blade) on your scale and either write down its weight or use the TARE button to remove its weight from the scale reading.
- Add ingredientsTo add the proper amount of salt, we need to know the weight of just your ingredients. With the food processor bowl still on the scale, add all ingredients, except the salt. Follow the instruction below that matches your situation.
- Determine correct amount of salt to addIf you used the TARE button and have a "%" key on your scale, press the "%" key and slowly sprinkle in salt until the scale reads "102.0". That is your 2% salt. If you used the TARE button but have NO "%" key, multiply the weight of your ingredients—shown on the scale—by 0.02. Add that many grams of salt. Unless you resized the recipe, your ingredients should weigh 400-600 grams, approximately. For example: 430 x 0.02 = 8.60. Add 8-9 grams of salt. Or, 500 x 0.02 = 10. Add 10 grams of salt. Or, 700 x 0.02 = 14. Add 14 grams of salt. If you have no TARE button, take the number on the scale—the weight of your mixing bowl plus the weight of your ingredients—and subtract the weight of your mixing bowl and blade) the number you wrote down earlier). That's the weight of your ingredients. Unless you resized the recipe, your ingredients should weigh 400-600 grams, approximately. Multiply that number by 0.02. Add that many grams of salt. For example: 430 x 0.02 = 8.60. Add 8-9 grams of salt. Or, 500 x 0.02 = 10. Add 10 grams of salt. Or, 700 x 0.02 = 14. Add 14 grams of salt.
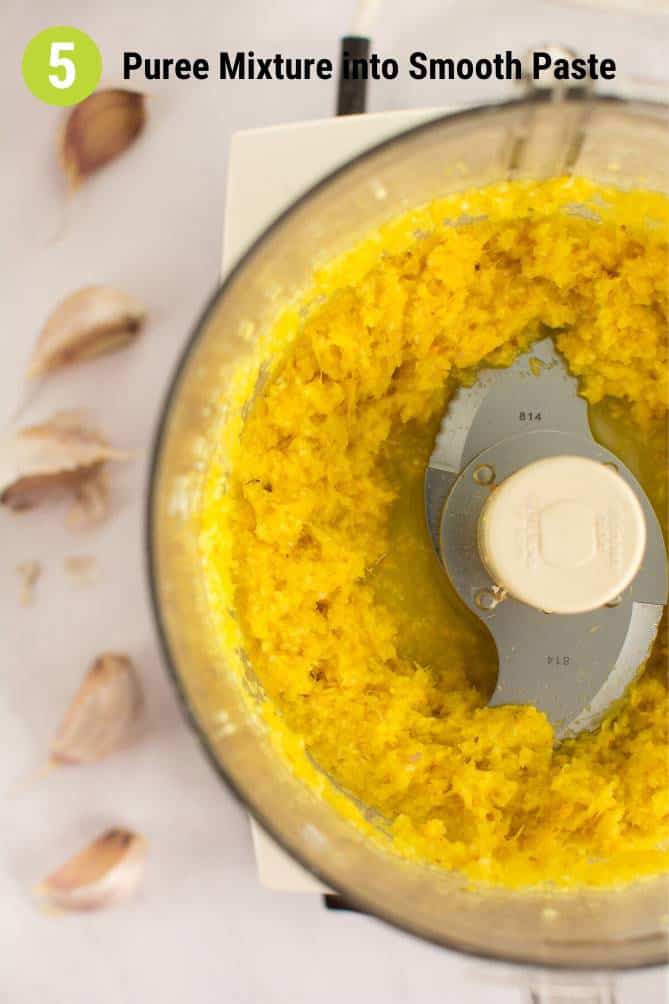
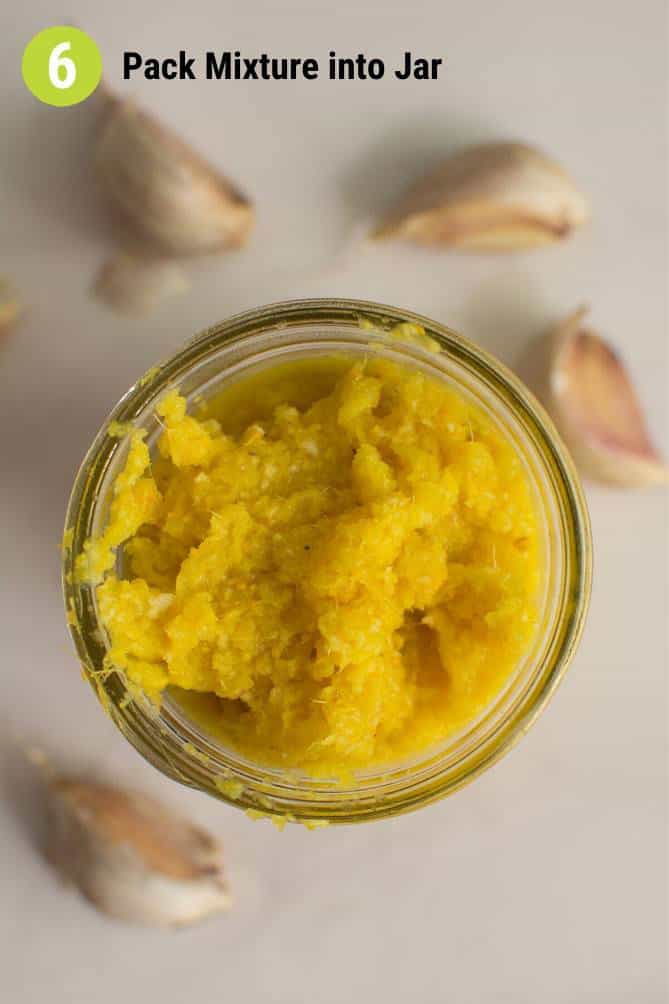
- Puree ingredients & pack into jarPuree mixture until it is a smooth paste, periodically turning off food processor to scrape down the side of the bowl. The "gases" from the onions and garlic can be strong; keep your face away as you pulse the machine.Pack fermented paste into jar leaving 1-2 inches of space at the top of the jar. Clean off the edges, pushing any bits down. If you have more than will fit in the jar, its fine to pack it into a smaller jar. You might want to taste a tiny bit to see how sharp the flavor is on day 0.
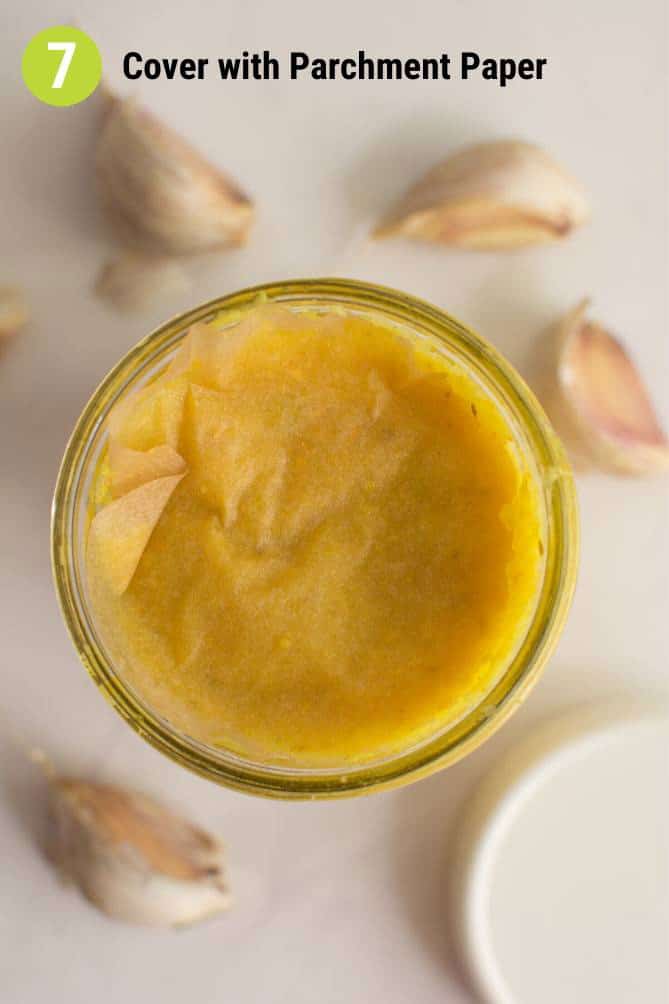
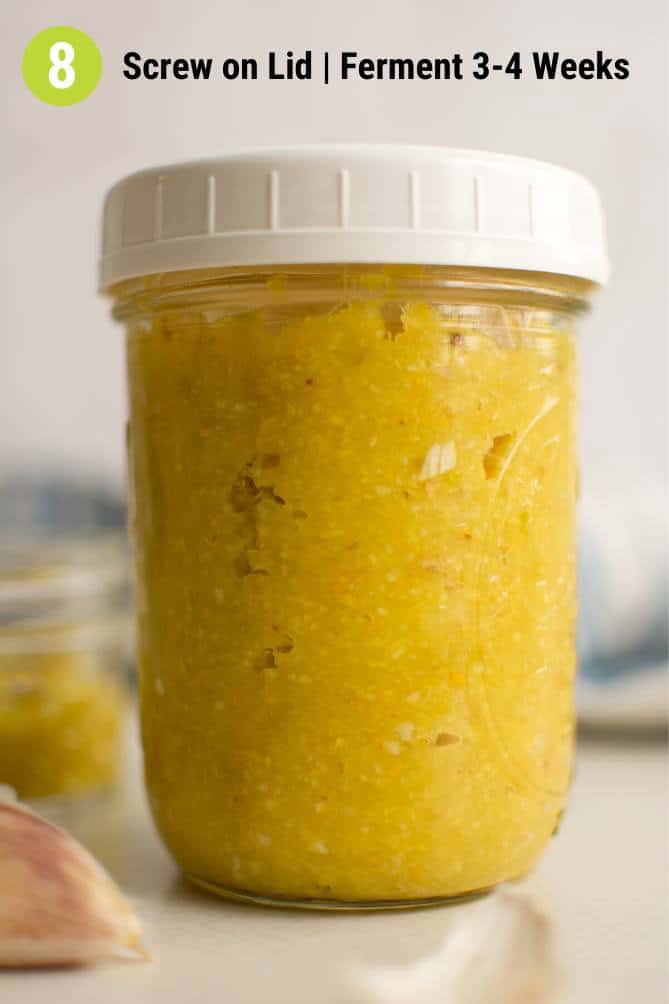
- Prepare paste for fermentationAdd an optional piece of parchment paper cut down to size. I don’t always do this, but it does give a bit more protection to your paste while it ferments.Screw on lid and let ferment on your kitchen counter for 3-4 weeks. Feel free to use an airlock lid if you have one but I don't find it necessary when fermenting garlic paste.
Notes and Tips
- Feel free to adjust this recipe to any sized batch, just keeping any onion used to less than 50% of the total weight and adding 2% salt.
- Himalayan pink salt or Redmond Real Salt are my favorite salts to ferment with.
- The best garlic for fermenting is hardneck garlic, which is more pungent with a stronger garlic flavor. You are more likely to find hardneck garlic at local farm stands.
- You will find garlic at the store year-round, but realize you’ll find the best quality from mid-summer to early fall when it is in season.
- When shopping for garlic, look for heads that feel full and firm and not hollow or dehydrated. Avoid heads with any sprouts or noticeable garlic odors, indicators that the garlic is old.
- To peel garlic, break the head into cloves. Place garlic cloves into a large jar, cap, and shake vigorously for 20-30 seconds. I find I get better results if I first trim off the flat, root end, making it easier for the skins to break away.
- The paste is ready when it tastes milder than raw garlic and has a slightly acidic flavor and its color has shifted from a pale white—or the original color of your garlic—to a beautiful caramel brown.
- If your garlic turns blue, there is no need to panic. The color doesn’t affect the flavor or safety of the garlic. This doesn’t happen often.
- Don’t heat your garlic paste if you want to take advantage of the probiotic, enzymatic, and various health benefits. Anything over 106F (41C) will kill off beneficial bacteria along with the health benefits of garlic derived from the alliinase activity.
- Enjoy the health benefits of fermented garlic (and onions) by eating one or two teaspoons of the paste each day. Fermenting garlic enhances its nutritional value and makes it easier for the body to digest and to assimilate all the valuable nutrients.
May you find many ways to use your Fermented Garlic-Plus paste and take joy in how easy it easy to add flavor, and a nutritional boost, to any dish.
Leave your favorite way to eat garlic in the Comment section, below.

Last update on 2026-07-11 / Affiliate links / Images from Amazon Product Advertising API

should I put a fermentation weight on top? When I do a lot of liquid squeezes to the top
I find it does fine without a weight, and like you said, it just oozes up with one. You can just put a piece of parchment paper – if you have some – over the top and then the lid.
This has been a great addition to my kitchen. I fermented the paste for a month and found the pictures and descriptions of the color changes very helpful. I add this to greens as you describe, to stir fries, or mix with tahini, soy, and chili garlic sauce for a quick noodle sauce.
The jar method didn’t work very well so I took the time and peeled the garlic by hand – very meditative.
HI! I have made the ginger garlic paste exactly like the recipe and let it ferment for a month. However my ph strip indicates that it has almost the same PH as water, definitely not lower than 4. Does this mean it is not safe to eat?
I’ve run into the same issue and have been drilling down deep in the research to find an answer. None yet. I ate mine for many years before I even checked the pH. As long as it smells fine, I’m not worrying, but… I do want an answer.
I does smell great…well the search goes on.
Enjoy it and I’ll eventually get more info on the pH.
Can I make my already fermented garlic into paste & store in fridge? Would I keep it in the brine? Love your website! Thank you!
I haven’t done so myself, but there is no reason why you can’t. I would puree just the cloves to start, then add brine to the consistency you prefer. Use any leftover brine in dressing or to take a swig of periodically.
Thank you!
I love love love this! How long can I leave it unopened sitting in the counter? Once the 3-4 weeks is up, should it always be refrigerated even if the jar hasn’t been opened yet?
I prefer to move it to the fridge once the 3-4 weeks is up and the taaste and texture is to my liking to “stop” fermentation and capture the flavors that I prefer.
It will continue to ferment on the counter (and in the fridge, but at a super slow rate). If you’re liking the taste, it’s fine to leave it out.
As long as the ingredients weigh 400-600 grams, can I play with the amount of ingredients? Such as upping the amount of turmeric and lowering the amount of onion or garlic? Could I add black pepper since it’s supposed to be good with turmeric? Thanks so much.
The 400-550 grams is what fits in the 500 ml jar. Yes, feel free to play around with ratios of ingredients. The key is the 2% salt concentration. Multlply total weight of ingredients by 0.02 to determine number of grams of salt to add.
I forgot to pack it down. Its been a week and it smells fine. should I pack it now?
Garlic paste will not generate brine like sauerkraut and vegetable ferments. Just press down lightly on it to remove any air pockets you see forming. I also like to cut a round piecec of parchment paper to size and press that over the surface to seal it.
I’ve made your garlic paste several times always with amazing caramel results. This time my garlic is definitely trending toward blue/green. I’ve read it’s ok but definitely makes me scratch my head. I did everything the same. Is there a reason suddenly this happened? Will it taste the same as the golden colored garlic paste?
It is due to enzymes and acids interacting in that batch. You won’t always see it but when you do, it can be a bit alarming. More here: https://www.makesauerkraut.com/fermented-garlic-paste/#h-faqs-for-fermented-garlic-paste