
 This post may contain affiliate links which won’t change your price but will share some commission.
You’ve set up your fermented green beans, sauerkraut, or delicious chutney. Everything’s under the brine, the microbes are getting busy—and then you find your kitchen counter awash with oozing brine. Ever wonder why your ferment spills its guts and how to stop it?

Dealing with overflows in fermentation can be frustrating, especially when it results in loss of precious brine that is essential for keeping your sauerkraut moist and safe.
In my fermenting adventures, I’ve come to understand the dynamics behind brine seepage and how to prevent it, a revelation that was reinforced by my experience with the Kraut Source Fermentation Lid.
This review will explore how the Kraut Source Lid is designed to manage fermentation gases and maintain an ideal environment for your ferments.
I’ll delve into my personal experiences using this lid with various ferments, from sauerkraut to green beans and even a raisin chutney, sharing insights on both its strengths and areas where it might fall short.
Ready to see if the Kraut Source Lid could be the solution to your fermentation challenges?
Let’s get into the details.
- The Mighty Microbes Challenge
- Review of the Kraut Source Fermentation Lid
- Kraut Source in Action
- Kraut Source Conclusion
- Other Fermentation Products to Consider
The Mighty Microbes Challenge
When I first started signing off my emails with “For Mighty Microbes and Fabulous Ferments,” I was thinking of the power of our bacterial world to heal. I’m now finding that I need to think of these Might Microbes as Weight Lifters, or at least the gases those bacteria produce. 🙂
If you don’t want precious brine seeping out of your jar, you have to have a fairly strong force pushing down on the packed ferment so that bubbles are forced to the surface where they can escape out of the jar either via an airlock or a loose lid. (Or, as one of my readers recently shared, you can run a wood skewer along the inside of the jar to help the CO2 escape. Even poking the packed sauerkraut will allow the CO2 to release.)
The Kraut Source device has a spring-loaded plate that I found is a perfect tool for an expanding ferment.
The Pickle Packer reviewed here, also can’t be forced upward nor can the Canning Buddies. The jury is still out on the Pickle Pebbles. So far they have been working for me, but I need a few more batches under my belt to truly know if they are heavy enough to hold back an especially active ferment.
More on this as we go through my review of the Kraut Source Fermentation LId and whether it is strong enough to contend with the Mighty Microbes.
Review of the Kraut Source Fermentation Lid


Some fermentation lid products that are similar to the Kraut Source Fermentation Lid but not reviewed here are the Ferment'n Home Fermentation Kit which also uses a water seal and the Trellis & Co. Pickle Helix which has a spring that acts in the same fashion as the Kraut Source Fermentation Lid spring.
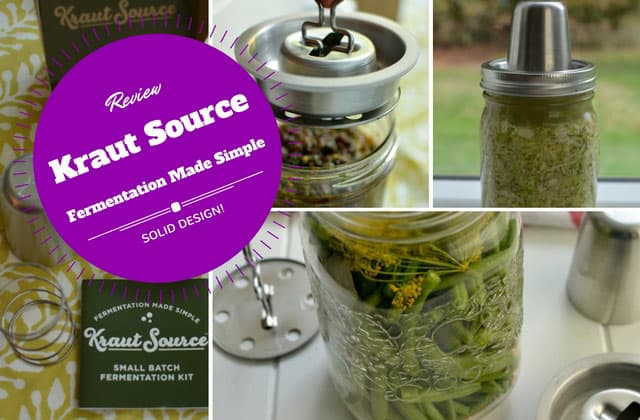
Review of: Kraut Source Fermentation Lid by Kraut Source (Non-Affiliate Link to the company website.)
Use: With any sized wide-mouth canning jar. Stainless steel fermentation lid with a Press and Spring to hold your ferment below the brine and a water-sealed Moat and Cap to keep your ferment anaerobic.
Evaluation is with similar products in mind. Previous posts covered the Pickle-Pushing No-Float Jar-Packer, the Pickle Pipe Pickle Pebble [MasonTops] REVIEW: Delightfully Simple and the ViscoDisc Canning Buddies REVIEW [Simple & Affordable].
How the Kraut Source is Designed to Work
The Kraut Source Fermentation LId is a series of stainless steel parts: Plate, Spring, Moat, Gasket and Cap. Once assembled and placed on your jar, the Spring is released allowing it to push down onto the jar’s contents to keep them submerged.
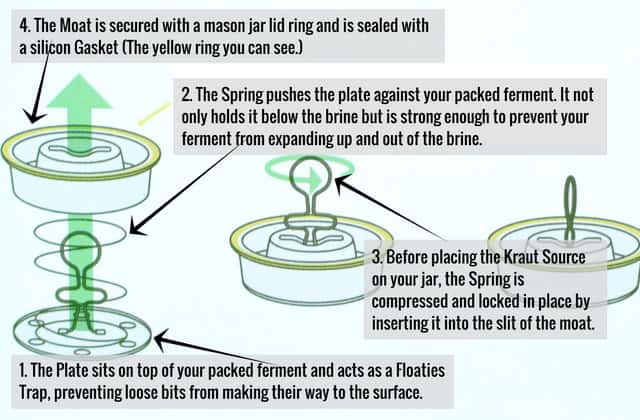
Here is a snapshot of the directions that are enclosed when purchasing a Kraut Source Fermentation Lid. I add the notations for the parts and how they work.
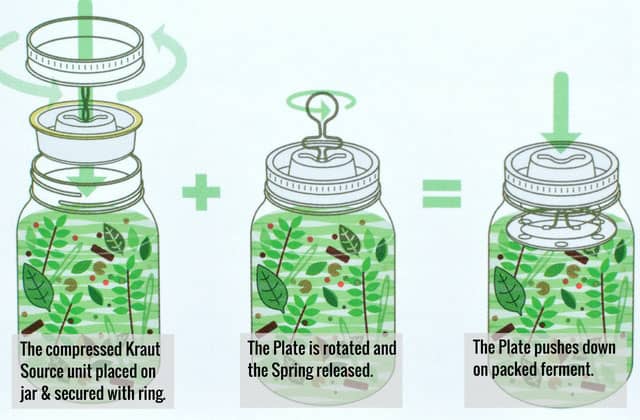
Once the lid is assembled, you place it on your jar and then rotate the Plate to release the Spring. Next (not pictured), pour water into the moat and then place cap onto the moat.
Product Information
There are four parts to the Kraut Source Fermentation Lid that are assembled together to hold your ferment below the brine and keep it anaerobic:
- Press
- Acts as a Floaties Trap to prevent loose bits from floating to the surface.
- Spring
- Pushes against the Press and holds your ferment below the brine.
- Moat
- The lid for your jar. Filled with water.
- Cap
- Placed in the moat to keep your ferment anaerobic.
- Stainless steel
- Food-grade 316 stainless steel. Quality construction.
- Box packaging is compostable. Insert paper contains dill seeds! Plant and grow your own sauerkraut seasoning.
About the Kraut Source Company
Kraut Source was founded by Karen Diggs and Eric Klein, to create a new device to make fermented foods in small batches. It easily fits on a mason jar, it is durable and allows you to make a variety of different fermentation projects at home.
In the video, you see water being poured into a jar of packed sauerkraut. Only rarely is this necessary. Properly salted cabbage will on its own create enough brine to safely ferment.
Kraut Source in Action
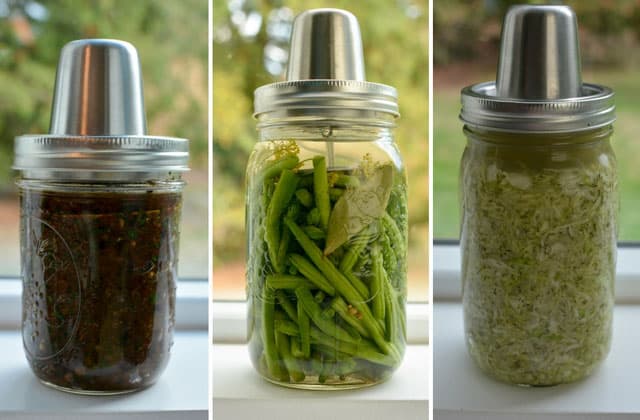
I tested the Kraut Source Fermentation Lid with three types of ferments: a thick chutney, loose beans in a watery brine and sauerkraut.
Since many of us ferment more than just sauerkraut, it’s nice to know how versatile a tool that your invest good money is.
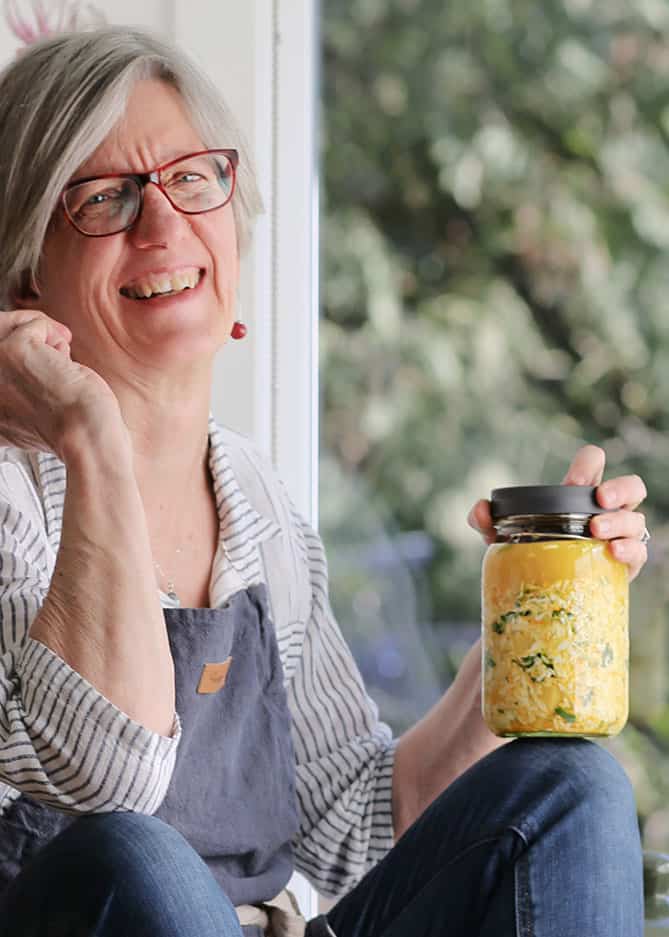
Sauerkraut
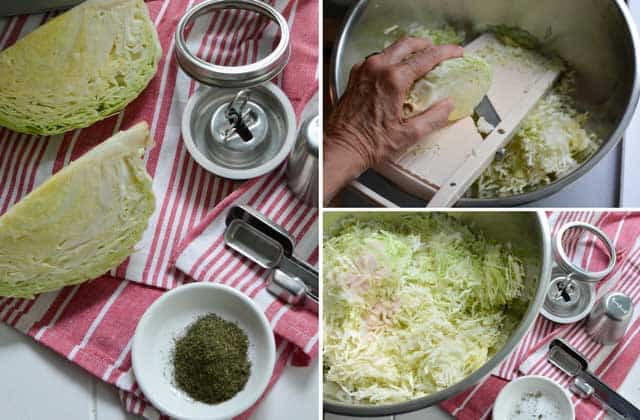
I made up a quick batch of Dilly Delight Sauerkraut. I love my mandolin for how quickly it slices cabbage into thin, even strips.
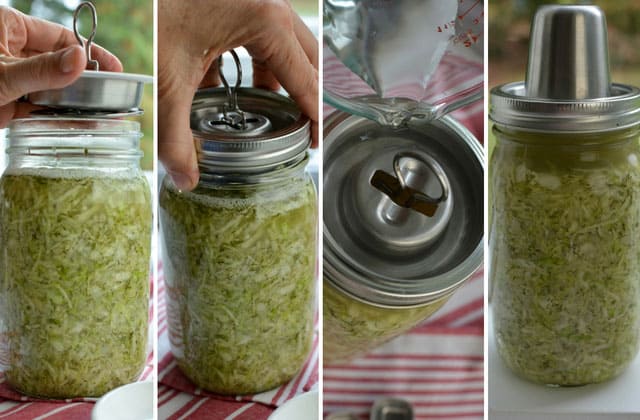
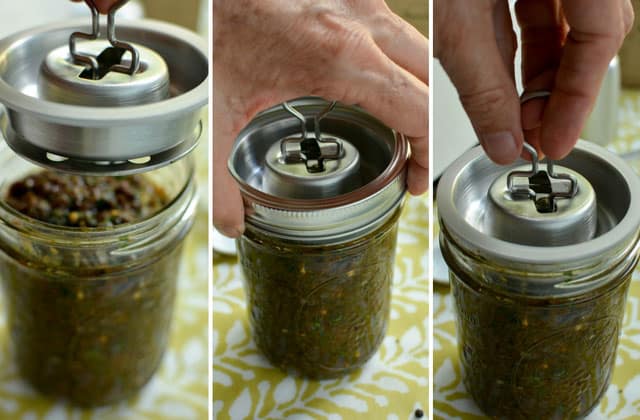
I assembled the Kraut Source Fermentation Lid before placing it on my jar. The spring is locked in place. No need for a Floaties Trap once my jar was packed. The circular disc – the Press – that pushes down on your packed ferment serves the same function.
The metal rim, that is including when purchasing canning jars, is used to secure the Kraut Source.
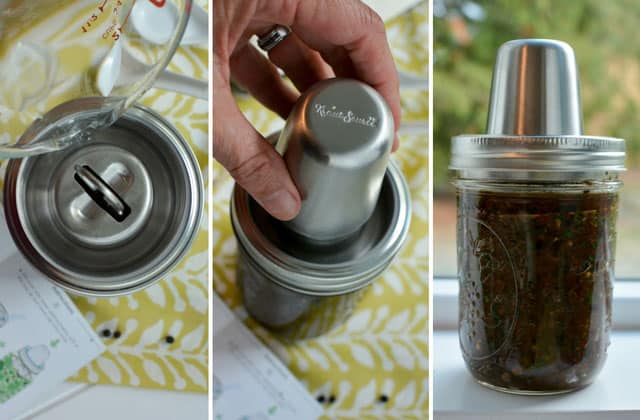
The Spring is released by twisting that ring you see. Then, water is poured into the moat – about 2/3’s of the way up.
The Cap is placed onto the moat and all is ready for fermentation.
My Discoveries When Fermenting Sauerkraut with the Kraut Source
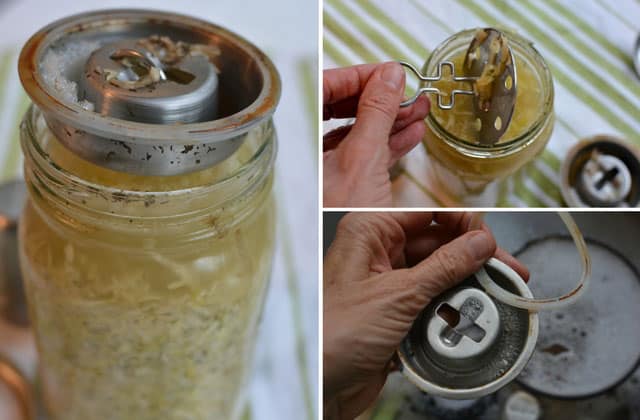
Don’t Overfill Your Jar
I was playing around with increasing the amount of sauerkraut I could pack into a jar so that it would be at the right height for use with the ViscoDisc Canning Buddies. Bad idea. Stick to 1 3/4 pound (800 grams).
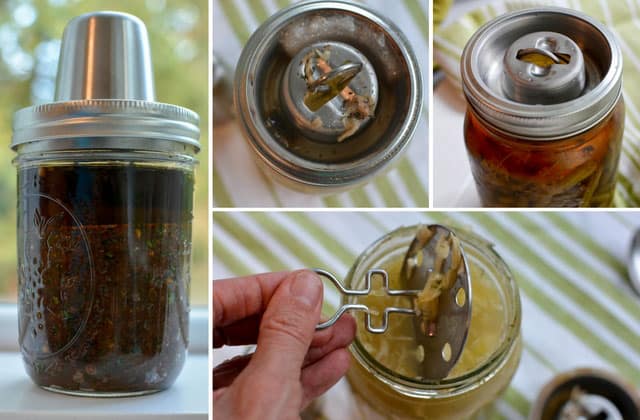
It created a mess I had to clean up later. The brine moved up into the moat. I had to remove the gasket and carefully open it (It’s actually folded to fit on either side of the moat rim.) to clean the gunk out of the hidden part of it. No big issue and I would probably want to do likewise each time I use it.
Get Creative When Trying to Remove a Stuck Lid
With dried brine in the threads of the Kraut Source Fermentation Lid, it can be near to impossible to remove. Strong, supple teenage son to the rescue. But, even he was challenged by it. See below for suggestions on how to remove stuck lids.
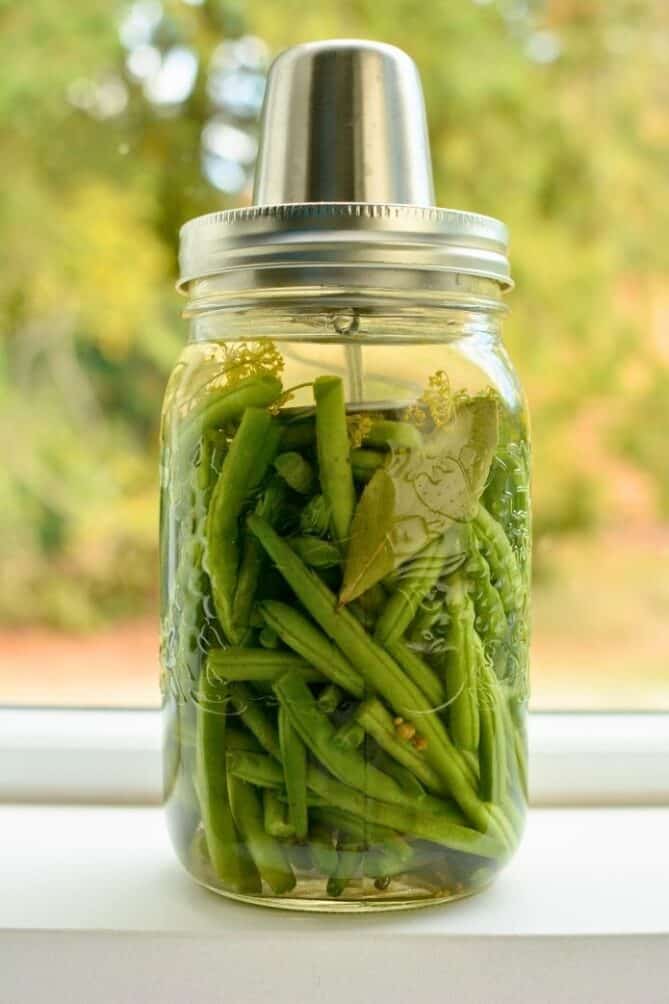
Fermented Green Beans
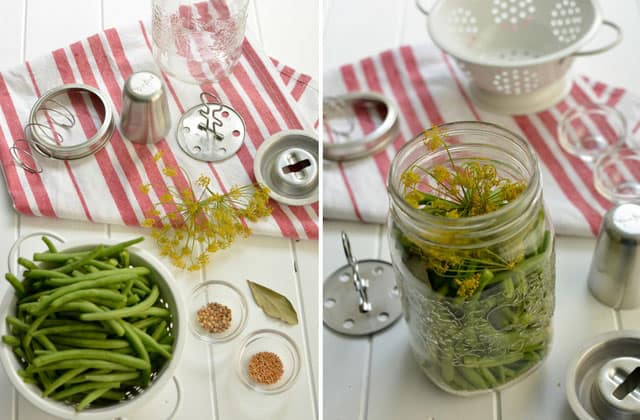
Fermenting loose vegetables in a brine, like carrots or cucumber pickles, is quick and easy. I probably used too much of that dill head for the finished product had a rather pronounced flavor.
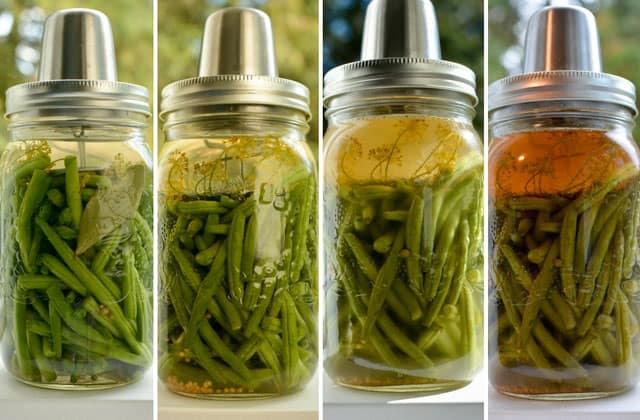
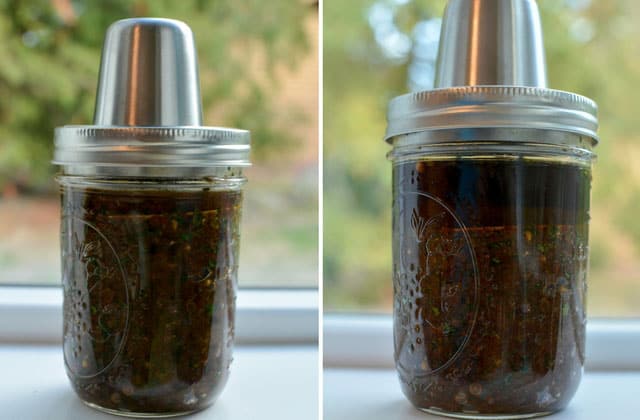
My fermented green beans at Day 1, Day 2, Day 4 and Day 6. Notice how the Press gradually was pushed further and further down into the jar. I love the power and adaptability of that Spring.
My Discoveries When Fermenting Green Beans with the Kraut Source
Fill Your Jar Full Enough
I love how the level of the Press automatically adjusts itself. However, in this case, it almost lowered itself right out of the lid. Loose vegetables tend to shrink as they ferment so you will want to make sure these types of ferments are packed high enough in the jar so that the Spring can still do its intended job.
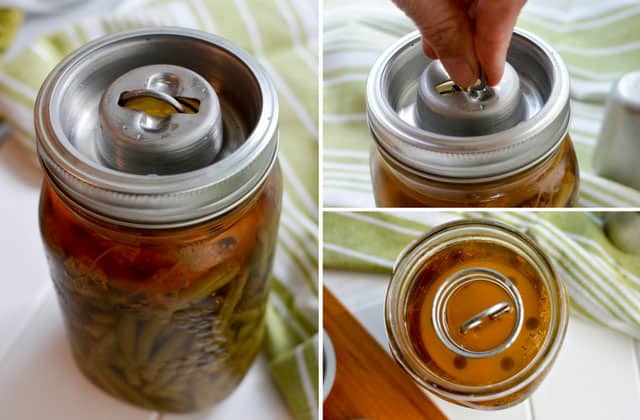
Raisin Chutney
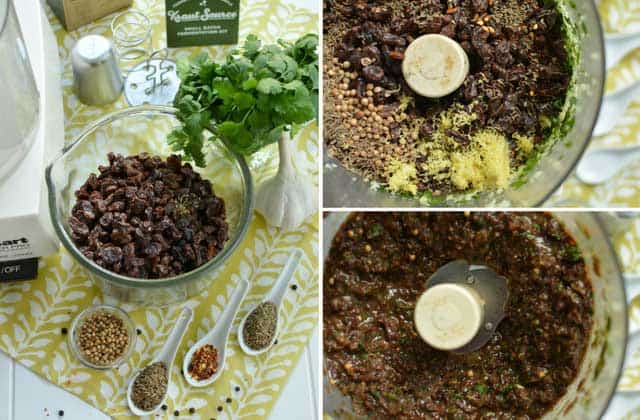
I always want to test a new fermentation product with a relish (like this Cranberry-Orange Relish), paste (Fermented Garlic Paste) or chutney to see if it is able to keep the packed mixture in place. Here the ingredients for Fermented Raisin Chutney are pulsed in my food processor.
I fill my pint jar with raisin chutney, being careful not to overfill it, 😉 and placed the compressed Kraut Source Fermentation Lid on.
The Kraut Source Fermentation Lid is secured with a metal lid ring.
Then, the Spring is released allowing the lower disk – Press – to push down on the packed chutney.
Finishing touches to get the water-sealed anaerobic fermentation environment in place.
My Discoveries When Fermenting a Relish or Paste with the Kraut Source
The Spring & Press Work Beautifully Work Together to Hold Back Expanding Ferments
Compare the two jars. Notice the level of the Press? See how it is able to keep any Mighty Microbes at bay?
Kraut Source Conclusion
The Kraut Source Fermentation Lid worked splendidly with sauerkraut, pickled beans and the raisin chutney. I find the ability for the “weight” – or Press – to sit at different heights invaluable in keeping expanding ferments below the brine. The strength of the Spring pushing down on the ferment forces CO2 up and out of the ferment where it can then escape through the water-sealed moat is so very helpful. Just don’t overfill your jar and all is good.
Pros of Kraut Source
- Works with varying levels of packed ferment.
The Spring and Press work together to push down on your ferment at whatever height it is packed into your jar. You ferment is held in place as CO2 is produced and the mixture attempts to expand. A loose ferment (carrots, beans, pickles) that soften and shrink is also kept below the brine as the plate is moved downward by the force of the Spring. - No need for a Floaties Trap.
The Plate has just a few holes in it for the brine to move through but not for small bits to float to the surface. - Works well with straight-sided jars. The Kraut Source device fits on wide-mouth jars of all sizes.
- Effectively holds your ferment below the brine. Key to successful fermentation is keeping your ferment below the brine. Kraut Source does a great job at this, no matter at what level your ferment is packed into the jar.
- Made from food-grade 316 stainless steel. This is the same stainless steel that winemakers and some commercial live-cultured sauerkraut makers use as fermentation vats and tanks.
- Replacement parts can be purchased separately. Though an extra Gasket is included when purchasing Kraut Source, you never know when a part might break. The Gasket, Press, Spring. Moat and Cap components that make up the Kraut Source can all be purchased separately. This is especially helpful if you want to have your Kraut Source functional for many years.
- All packaging is compostable. The package insert contains dill seeds and can be planted.
Cons of Kraut Source
- Press can move too far down in the jar if your ferment shrinks.
When using the Kraut Source with the fermented beans, they shrank and the Press of the Kraut Source almost moved down too far in the jar. - Can be a bit of work to clean up.
There are many loose pieces to keep track of that take a bit of time to clean thoroughly, especially if your ferment overflows into the moat. - Lid is near to impossible to remove.
I thought this was just an issue with Kraut Source but as I’m now tending to use lids with built-in rubber or silicone gaskets, I’m finding that it’s really an issue with all lids that seal. Between any brine that might seep into the lid threads and the vacuum created by an airlock, you’ll need a strong grip or a special device or technique to remove the lid. See below for some tips. - Expensive.
The quality and design probably justify the cost, but the cost of two or three Kraut Source lids is equal to that of a water-sealed fermentation crock. You have to look at your own particular needs and acquire your fermentation tools accordingly.
Removing a Super-Tight Lid
As I am slowing switching to using lids with rubber or silicone gaskets I’m finding that they can be very difficult to remove. I generally don’t have a problem removing the white plastic storage lids. Some suggestions.
First off, try to avoid a super-tight lid by not overfilling your jar – sticky brine seeps out and dries in the threads – and by not screwing the lid on super tight. If you still can’t remove the lid, here are a few ideas.
Jar Lid Gripper
Use a leather or rubber piece of material to better grip the jar lid.
Kraut Source sells a Kraut Source Gripper which is 5 inches in diameter and made out of a rubber-like material to grip the lid. Here is a set of EasyGrip Rubber Jar OPeners on Amazon.
Break the Seal
Sometimes, I’m able to break the seal by very carefully inserting the tip of a butter knife between the jar and rim and giving it a slight twist. Not so much as to damage the lid but just enough to break the seal and release the vacuum.
Bring to Room Temperature
When I first grab my jar out the refrigerator, the lid can be difficult to twist. Just letting it warm to room temperature seems to help loosen the grip.
Rinse Around the Threads
Let a bit of warm water run between the lid and jar threads to dissolve any sticky brine.
Other Fermentation Products to Consider
A last look at the Kraut Source Fermentation Lid and similar products.
And, here are some reviews I have done on other fermentation products designed for keeping your ferment below the brine:
ViscoDisc Canning Buddies REVIEW [Simple & Affordable]
Pickle-Pushing No-Float Jar-Packer Review: Ingenious
Pickle Pipe Pickle Pebble [MasonTops] REVIEW: Delightfully Simple
If you have used the Kraut Source – or if you do – feel free to leave a comment and share your thoughts.
Disclosure of Material Connection: Some of the links in the post above are “affiliate links.” This means if you click on the link and purchase the item, I will receive an affiliate commission. Regardless, I only recommend products or services I use personally and believe will add value to my readers. I am disclosing this in accordance with the Federal Trade Commission’s 16 CFR, Part 255: “Guides Concerning the Use of Endorsements and Testimonials in Advertising.”
Holly/MakeSauerkraut.com is a participant in the Amazon Services LLC Associates Program, an affiliate advertising program designed to provide a means for sites to earn advertising fees by advertising and linking to amazon.com or endless.com, MYHABIT.com, SmallParts.com, or AmazonWireless.com.
Last update on 2026-07-11 / Affiliate links / Images from Amazon Product Advertising API
Wow, I like the way you try a new product with different types of fermenting foods. I like the fact that there is no need for a Floaties Trap, and the most important thing: the system keeps the kraut under the brine ! Thanks for another wonderful well written review!
You’re quite welcome. It’s educational to see how these devices work with the different ferments.
Thanks Holly for sharing yet another fermentation system review…a very ingenious one, though pricey …I like the spring loaded press. Does that mean you didn’t use any cabbage leaf floaty trap at all in a jar with shoulders?
No Floaties Trap necessary since the press is just a bit smaller (maybe a 1/4 all around) than the jar opening.
I’m impressed 🙂 thanks Holly.
We made a batch of kraut in a large ceramic crock and the water seal bubbled every couple hours for the first five days and has since stopped. Is there any reason to be concerned? We’re still considered rookies at the process.
Perfectly normal. The bacteria that make CO2 and cause the bubbling are most active in the first 5 days. After that, a new set of bacteria go to work. We all have to start somewhere. It sounds like you’re quite successful rookies!
Thank you Holly, we jarred the batch yesterday and it looks and smells great. We’re beginning round two this weekend.
This I see from today I could use…I began January 18… just the same thing as described at beginning of the article happened but, it’s too small – I’m not using a mason jar. What I’d use is an adjustable gate I guess if I want to keep the jar and not buy a crock. Using a bag with water is working fine though to keep the cabbage down so far and a container to catch overflow. The lid is 5″ across and the jug is estimated 6″ across. .
This I see from today I could use…I began January 18… just the same thing as described at beginning of the article happened but, it’s too small – I’m not using a mason jar. What I’d use is an adjustable gate I guess if I want to keep the jar and not buy a crock. Using a bag with water is working fine though to keep the cabbage down so far and a container to catch overflow. The lid is 5″ across and the jug is estimated 6″ across.
This I see from today I could use…I began January 18… just the same thing as described at beginning of the article happened but, it’s too small – I’m not using a mason jar. What I’d use is an adjustable gate I guess if I want to keep the jar and not buy a crock. Using a bag with water is working fine though to keep the cabbage down so far and a container to catch overflow. The lid is 5″ across and the jug is estimated 6″ across.
All of these fermentation lids coming out are designed to fit on standard Mason jars. If what you have is different, you’ll have to jerry rig something. Like the bag with water that you’re using. I like a capped jar of water as shown in this post: https://www.makesauerkraut.com/fermentation-weights/