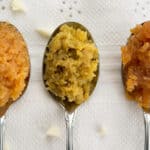
Immune-Boosting Fermented Garlic-Plus Paste
FERMENTATION LENGTH: 3-4 weeksSALT PERCENT: 2%A must-have staple in any kitchen, fermented garlic paste will save you oodles of time when preparing meals. Its sweet, caramelized flavor is similar to roasted garlic and enables you to instantly transfer a dish from blah into WOW! Additional bonuses are the potent viral and bacterial agents in raw garlic that support and strengthen your immune system.
Servings 32 tablespoons
Equipment
- Food processor
- Digital scale
- 1 pint (500 ml) wide-mouth canning jar or similar sized jar & lid
Ingredients
Immune Boosting Fermented Garlic-Plus Paste
- 2-3 heads garlic, cloves separated, peeled. Root ends and blemishes removed ~150 grams, prepped (33%)
- ~175 grams piece fresh ginger root peeled and cut into 1 inch chunks ~150 grams, prepped (33%)
- 1 medium yellow (or white) onion, peeled and cut into 1-inch chunks ~150 grams, prepped (33%)
- 2-3 pieces fresh turmeric root, peeled, or 1 teaspoon powdered
- 2 % iodine-free salt (fine-grain)
Fermented Garlic Paste
- 6-8 heads garlic, cloves separated, peeled. Root ends and blemishes removed ~400 grams, prepped
- 2 % iodine-free salt (fine-grain)
Fermented Garlic-Ginger Paste
- 3-4 heads garlic, cloves separated, peeled. Root ends and blemishes removed ~200 grams, prepped (50%)
- ~225 grams piece fresh ginger root ~200 grams, prepped (50%)
- 2 % iodine-free salt (fine-grain)
Fermented Garlic-Onion Paste
- 3-4 heads garlic, cloves separated, peeled. Root ends and blemishes removed ~200 grams, prepped (50%)
- 1 large yellow (or white) onion ~200 grams, prepped (50%)
- 2 % iodine-free salt (fine-grain)
Instructions
- Prep and weigh ingredientsTurn on scale. Switch it to grams. You'll first use it to weigh each of your ingredients as they are prepped. Determine what type of paste you're going to make. In this recipe, I give instructions for the Immune Boosting Paste Garlic-Plus Paste that uses approximately equal quantities of garlic, ginger, and onion with a bit a turmeric root (optional) for an added immune boost. In parenthesis, I give quantities for the other fermented paste options. Garlic: Peel garlic cloves and cut away root ends and blemishes. Weigh your garlic as you go. For the Immune Boosting paste, you need approx. 150 grams of garlic (To make Garlic Paste, you need 400 grams of garlic; To make Garlic-Ginger Paste, you need 200 grams of garlic, and to make Garlic-Onion Paste, you need 200 grams of garlic).Onion, if using: Cut off top and root end of onion and peel. Roughly cut into one-inch chunks. For the Immune Boosting paste, you need approx. 150 grams of onion (To make Garlic Paste, you need 400 grams of onion; To make Garlic-Onion Paste, you need 200 grams of onion).Ginger, if using: Peel as best you can. Don't worry about removing all the skin. Cut into one-inch chunks. For the Immune Boosting paste, you need approx. 150 grams of ginger (To make Garlic-Ginger paste, you need 200 grams of ginger).Turmeric, if using: Peel as best you can. Don't worry about removing all the skin. I ended up with 80 grams. Anything close to that is fine.
- Get the weight of your food processor mixing bowl (with blade)Set up food processor. To add the proper amount of salt, we need to make sure to not include the weight of your bowl. Place the food processor bowl (with blade) on your scale and either write down its weight or use the TARE button to remove its weight from the scale reading.
- Add ingredientsTo add the proper amount of salt, we need to know the weight of just your ingredients. With the food processor bowl still on the scale, add all ingredients, except the salt. Follow the instruction below that matches your situation.
- Determine correct amount of salt to addIf you used the TARE button and have a "%" key on your scale, press the "%" key and slowly sprinkle in salt until the scale reads "102.0". That is your 2% salt. If you used the TARE button but have NO "%" key, multiply the weight of your ingredients—shown on the scale—by 0.02. Add that many grams of salt. Unless you resized the recipe, your ingredients should weigh 400-600 grams, approximately. For example: 430 x 0.02 = 8.60. Add 8-9 grams of salt. Or, 500 x 0.02 = 10. Add 10 grams of salt. Or, 700 x 0.02 = 14. Add 14 grams of salt. If you have no TARE button, take the number on the scale—the weight of your mixing bowl plus the weight of your ingredients—and subtract the weight of your mixing bowl and blade) the number you wrote down earlier). That's the weight of your ingredients. Unless you resized the recipe, your ingredients should weigh 400-600 grams, approximately. Multiply that number by 0.02. Add that many grams of salt. For example: 430 x 0.02 = 8.60. Add 8-9 grams of salt. Or, 500 x 0.02 = 10. Add 10 grams of salt. Or, 700 x 0.02 = 14. Add 14 grams of salt.
- Puree ingredients & pack into jarPuree mixture until it is a smooth paste, periodically turning off food processor to scrape down the side of the bowl. The "gases" from the onions and garlic can be strong; keep your face away as you pulse the machine.Pack fermented paste into jar leaving 1-2 inches of space at the top of the jar. Clean off the edges, pushing any bits down. If you have more than will fit in the jar, its fine to pack it into a smaller jar. You might want to taste a tiny bit to see how sharp the flavor is on day 0.
- Prepare paste for fermentationAdd an optional piece of parchment paper cut down to size. I don’t always do this, but it does give a bit more protection to your paste while it ferments.Screw on lid and let ferment on your kitchen counter for 3-4 weeks. Feel free to use an airlock lid if you have one but I don't find it necessary when fermenting garlic paste.
Notes
- Feel free to adjust this recipe to any sized batch, just keeping any onion used to less than 50% of the total weight and adding 2% salt.
- Himalayan pink salt or Redmond Real Salt are my favorite salts to ferment with.
- The best garlic for fermenting is hardneck garlic, which is more pungent with a stronger garlic flavor. You are more likely to find hardneck garlic at local farm stands.
- You will find garlic at the store year-round, but realize you’ll find the best quality from mid-summer to early fall when it is in season.
- When shopping for garlic, look for heads that feel full and firm and not hollow or dehydrated. Avoid heads with any sprouts or noticeable garlic odors, indicators that the garlic is old.
- To peel garlic, break the head into cloves. Place garlic cloves into a large jar, cap, and shake vigorously for 20-30 seconds. I find I get better results if I first trim off the flat, root end, making it easier for the skins to break away.
- The paste is ready when it tastes milder than raw garlic and has a slightly acidic flavor and its color has shifted from a pale white—or the original color of your garlic—to a beautiful caramel brown.
- If your garlic turns blue, there is no need to panic. The color doesn’t affect the flavor or safety of the garlic. This doesn't happen often.
- Don’t heat your garlic paste if you want to take advantage of the probiotic, enzymatic, and various health benefits. Anything over 106F (41C) will kill off beneficial bacteria along with the health benefits of garlic derived from the alliinase activity.
- Enjoy the health benefits of fermented garlic (and onions) by eating one or two teaspoons of the paste each day. Fermenting garlic enhances its nutritional value and makes it easier for the body to digest and to assimilate all the valuable nutrients.