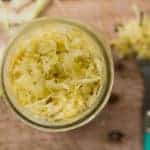
Bare-Naked Sauerkraut Recipe
FERMENTATION LENGTH: 1-4 weeksSALT PERCENT: 2%When life gives you cabbage, you make sauerkraut. For those of you who want to keep life simple, this is your recipe. Shred cabbage, mix in salt, and pack the juicy mass—along with all those hardworking bacteria—into a jar. Easy peasy.
Servings 28 1-ounce (30 gram)
Equipment
- Kitchen scale, ideally digital
- Cutting board and chef’s knife
- Large mixing bowl
- 1-quart (L) wide-mouth canning jar or similar sized jar
- 4-ounce (125 ml) canning jar (jelly jar) or fermentation weight of your choice
- Wide-mouth plastic storage cap or airlock lid of your choice
Ingredients
- 1 medium medium head fresh green cabbage, 2 ½–3 pounds (1 kg)
- 1 tablespoon (15 ml) iodine-free salt (fine-grain)
Instructions
- SET UP: Gather Supplies and Set Up ScaleRound up all your equipment so it is on hand as you work your way through the recipe.You don’t want to include the weight of your bowl in your measurements, so either zero out the scale or write down the weight of your bowl.
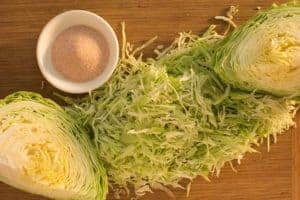
- CHOP: Slice Your CabbageIf you are adding any seasoning to your sauerkraut, now is the time to sprinkle it into your bowl. Discard the limp outer leaves of the cabbage, setting aside one of the cleaner ones for use during step 5, SUBMERGE.Quarter, then slice cabbage crosswise into thin ribbons. I leave the core in because I find it helps to hold the layers of cabbage together making the slicing job easier. There are many ways to slice that cabbage as reviewed in this post.Add sliced cabbage to your bowl until weight of cabbage is 1¾ pounds (28 ounces, 800 grams).
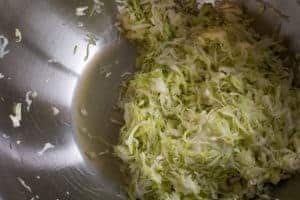
- SALT: Create Your BrineThis is the fun part. Salt will put the moisture out of the cabbage cells to create a brine in which the salt loving bacteria grow and proliferate while the bad bacteria die off. Sprinkle the cabbage with one tablespoon (15 ml) of salt. OR... Be a Fermentation Ninja! Measure Your Salt Like a ProYou'll want to be working in grams for this. Your scale should read 800 grams, which is the amount of sliced cabbage you added to your bowl. You need to add 2% salt. For 800 grams, that is 16 grams of salt. Sprinkle salt into your bowl of sliced cabbage until the scale reads 816. Mix well until salt is evenly dispersed.Once the salt is dispersed, you can let the salt work on its own. At this point, I usually leave the salted cabbage sit for 10-15 minutes while I clean up the kitchen. (When you come back, you'll see the cabbage glistening with moisture and find that it requires very little massaging to create the brine.)Massage your salted cabbage with strong hands until moist, creating the brine. The mixture will wilt, shrink in size, and start to "squeak" as your work it. Work it until you see a 2-3 inch puddle of brine when you tilt the bowl to one side. If little or no brine is being created, see this post for some tips.
- PACK: Pack Mixture into JarGrab handfuls of the salty, juicy cabbage mixture and pack it into your quart-sized (liter) wide-mouth canning jar, periodically pressing the mixture down tightly with your fist or a large spoon so that the brine rises above the top of the mixture and no air pockets remain.Be sure to leave at lease 1 inch of space between the top of the cabbage and the top of the jar. Because we weighed out just the right amount of cabbage to fit in your jar, this should happen automatically.Pour any brine left in your mixing bowl into the jar and scrape out any loose bits stuck to the sides of the bowl or to the side of your jar.

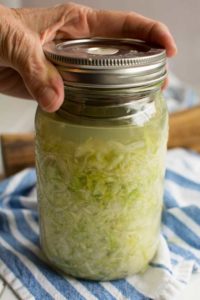
- SUBMERGE & SEAL: Hold Ferment Below BrineNow, it's time to make sure your fermenting mixture is in a safe anaerobic (no air) environment. This means that you need to keep the cabbage mixture submerged in the brine while it ferments, especially during the first 5-7 days.Take that cabbage leaf you during the SETUP step, tear it down to just fit in the jar, and place it over the surface of the packed cabbage. Forgot to save a cabbage leaf? No problem. You can fold a narrow piece of parchment paper to size or even cut an old plastic lid to size. Place the 4-ounce jelly jar on top of the cabbage leaf, right side up with its lid removed. In this picture, I am using my favorite weight, the PickleHelix by Trellis + Co. with a link to it right above this recipe. Lightly (to allow for escape of CO2 gases), screw on the white plastic storage lid.I like to label my jars using green or blue painter’s tape and a permanent marker. I note the flavor of sauerkraut I made and the date I started fermenting.
- Ferment: Ferment for 1 to 4 WeeksTime now for the friendly bacteria to transform salty cabbage into tangy sauerkraut. Place your jar of fermenting sauerkraut in a shallow bowl (to catch the brine that may leak out during the first week of fermentation), out of direct sunlight. Ideally, wait for 1 week before opening to sample.For what to expect as your sauerkraut ferments, see SALTY Cabbage to SOUR Sauerkraut: Fermentation Signs to MonitorShould the brine level fall (very unlikely) and remain below the level of the sauerkraut during this first week, dilute 1 Tbsp of salt in 2 cups of water and pour some of this brine over the sauerkraut (removing the little jar first) until it just covers the mixture. Put the little jar back in, screw the lid on lightly and let fermentation continue.Don’t worry if the brine disappears after the 7- to 10-day mark. By this time, you’ve created a safe environment in which the bacteria that would cause mold or slime has been chased away by the beneficial bacteria produced during the fermentation process.You can ferment your sauerkraut for up to 4 weeks. The longer you ferment it, the greater the number and variety of beneficial bacteria that can be produced. One study shows bacteria levels peaking on day 21.

- STORE: Store in Refrigerator for Up to 1 YearAfter your sauerkraut has fermented to your liking, it’s ready to go into the refrigerator to then be effortlessly added to any meal or dish. Rinse off the outside of the jar. You can take the little jar - or whatever fermentation weight you used - out. Clean the rim if necessary (sometimes it can get sticky from the brine that overflows), and screw the lid back on tightly. If you used an airlock lid, clean that up and save it for another batch of sauerkraut. Add to your label how long you fermented your sauerkraut.
Notes
- You can use any variety of cabbage in your sauerkraut: green, red, napa, or savoy. However, for your first few batches of sauerkraut, you might want to use standard green cabbage. It ferments fabulously, which is one more way to guarantee success, and it gives you a baseline to gauge how future batches are fermenting.
- Cabbage is available year-round in most markets, enabling you to make sauerkraut throughout the year. Specific varieties of cabbage fall into two broad categories: summer and winter. Summer cabbage is sown in early spring and harvested throughout the summer. Summer cabbages grow faster and tend to have thinner leaves and overall lower moisture content. Winter cabbage is usually sown in late summer and harvested in late fall. Winter cabbages grow slower and have thicker leaves and higher moisture content, making winter cabbage ideally suited for sauerkraut. Farmers usually wait until there have been a few light touches of frost to harvest winter cabbage. Cabbage reacts to cold conditions and frost by producing sugars, making it taste rather sweet.
- Choose cabbage heads that seem heavy for their size, an indication of freshness. The tighter the cabbage leaves, the easier the head is to slice.
- Sugar levels in your cabbage can vary quite a bit depending on variety and growing conditions. The sweeter the cabbage, the greater the depth of flavors obtained, and the better fermentation unfolds. Taste a few slices of the raw cabbage, staying away from heads that taste bitter.
- The fresher the cabbage, the more brine it will create. Most cabbage is grown in the fall, stored throughout the year, and shipped to the stores as requested. During storage, it dries out. This loss of moisture means the cabbage can create less brine. Cabbages that are light for their size, with outer leaves that are wilted, brown, or excessively torn, could be older. Check the bottom of the cabbage to be sure the leaves are not beginning to separate from the stem, an indication of age.