
 This post may contain affiliate links which won’t change your price but will share some commission.
Ready to learn how to make sauerkraut in a crock with ease?
Would you like sauerkraut with copious brine?
Do you want to erase all fears of fruit flies or other critters getting into your sauerkraut?
Are you ready to say Goodbye to mold and yeasts?
And, Hello to sauerkraut with a greater depth of flavor?
How about, would your family appreciate little or no odor during fermentation?
Then…
It’s time to take the plunge and learn – or relearn – how to make sauerkraut in a crock!
Now I ferment anything I can get my hands on!
This crock is the end result of me stumbling upon your website five years ago and nervously fermenting my first quart jar of cabbage lol.
My first batch I did back in May 2017. I didn’t have proper mason jars at the type, or a digital scale, weights, or a cabbage shredder.—Adam
- Let’s start! Time to Learn How to Make Sauerkraut in a Crock
- Determine The Capacity of Your Fermentation Crock
- Buy Ingredients
- Gather Equipment
- SET UP Notes and Tips
- Prep Your Ingredients
- PREP Notes and Tips
- Salt Your Vegetable Mixture
- SALT Notes and Tips
- Pack Your Crock One 5-Pound Batch at a Time
- PACK Notes and Tips
- Place Cabbage Leaves and Weights in the Crock
- SUBMERGE Notes and Tips
- Select a Location for Your Crock, Put the Lid On and Fill the Moat with Water
- How Long to Ferment?
- Can I Take a Peek?
- FERMENT Notes and Tips
- Pack Into Jars
- Stash in Your Refrigerator or Other Cold Place
- STORE Notes and Tips
- Condiment to the Main Meal
- Almost Instant Salad
- Scrambled Eggs for Breakfast?
- Quick Pick-Me-Up
- Tacos
- Hot Dog!
- ENJOY Notes and Tips
First, a question.
Is this your first time ever to make sauerkraut? Yes?
Then, first become experienced with making sauerkraut in a jar with The SureFire Sauerkraut Method… In a Jar: 7 Easy Steps. This proven small-batch method will help you:
- Gain confidence and experience with fermentation.
- Understand the process and steps of making sauerkraut.
- Determine which flavor of sauerkraut you or your family enjoys. No sense making 10 quarts of Kimchi if no one is going to eat it.
- And, if something goes wrong, you’re only throwing out one jar of sauerkraut, not a whole crock’s worth.
Don’t own a crock yet? See Fermentation Crocks: The Who, What, Where, When, Why and How if you need help selecting a fermentation crock and understanding why a water-sealed fermentation crock makes for perfect sauerkraut… every time!
Don’t worry, I also cover fermenting in an open crock with tips to ensure success. Not having a water-sealed crock means for a bit more work during the fermentation process, but it’s definitely doable. After all, that’s what our ancestors kept in their basement, scooping sauerkraut out of it periodically.
Not ready to purchase a crock yet? You can start with a one-gallon pickle jar or any food-grade container. To minimize air-exposure however, make sure it is taller than it is wider.
My methodology? I don’t make one huge batch to then pack into my crock. To evenly mix and pack 10 plus of sauerkraut in one step is a challenge.
I don’t mix and salt directly in the crock. Instead, I mix and weigh in 5-pound batches which:
- Makes for a consistent product that ferments evenly.
- Allows for even salt distribution, a key factor in successful fermentation.
- You can complete in manageable chunks.
Done with failed batches? Ready to turn on YOUR Fermentation Ninja skills?
Then, download a PDF copy of my expanded recipe: How to Make Sauerkraut in a Crock, AND… enroll in my mini-email course: 5 Tips for Successful Fermentation in a Crock
Guaranteed success! All for FREE!
Let’s start! Time to Learn How to Make Sauerkraut in a Crock
Read through the entire recipe first and be sure to check the Notes and Tips Section at the end of each step before you start that step. That’s where all the helpful gems are kept.

For Step 1, you want to make sure you have enough of the ingredients you need on hand and your scale ready for weighing.
To know how much of each ingredient and how many heads of cabbage to buy, you have to know the size of your crock. You’ll want to know how many liters (quarts) of sauerkraut you can you pack into it? Most crocks have this marked or printed somewhere on the crock. I treat quarts and liters the same and switch gallons into liters by multiplying by 4.
Fermentation crocks, both open and water-sealed crocks (pictured below) are designed to be filled about 3/4’s full. This allows room for stone weights, brine to cover the stone weights and some air space for the expansion that happens during the early and active part of the fermentation process.
Leaving too much head space – not packing the crock full enough – leaves too much air in the crock which can lead to mold and less than ideal fermentation conditions. The fermentation of sauerkraut is an anaerobic – without air – process. We need to do our best to keep it that way.
For each liter of capacity, I roughly figure on 2 pounds of my recipe mixture. I pack a 5-liter crock with 10 pounds of the recipe mixture, a 10-liter crock with 20 pounds of the recipe mixture and a 3-gallon (12 liters) with 25 pounds.
- If you have a Harsch crock, take off about 20% on the size. Their sizing is for the actual size of the crock and not how many liters it makes. This is also the case with most hand-crafted 1-gallon crocks.
- If you have an open crock, take off about 20-25% on the size. The sizing indicated on most open crocks is actual size.
- If you are using some make-shift container other than a crock, determine its capacity either by finding a measurement on the container and taking off about 20-25% or by seeing how many liters of water you can pour into it, stopping 4-5 inches from the top. A one-gallon pickle jar’s capacity is 3 liters.
Here are a few examples of commonly used crocks and approximately how much you can pack into them.
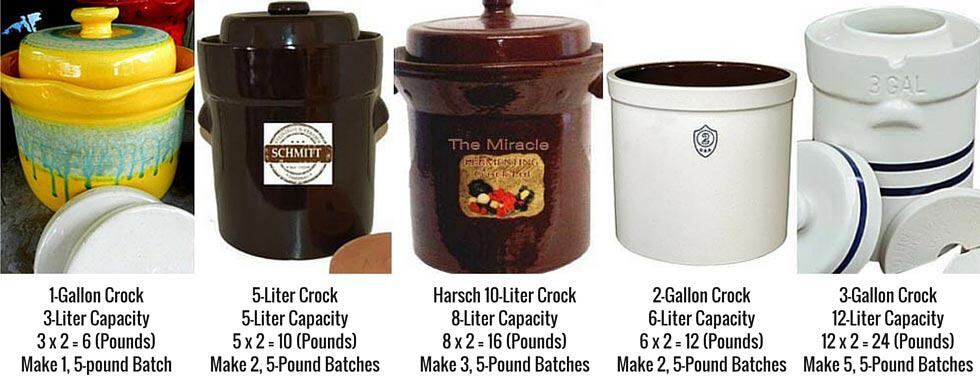
Inspect your crock, determine its size, and figure out how many 5-pound batches you will need to make to fill your crock. To learn how crock sizing works, I actually filled my crocks with water, counting the number of liters that fit into each one.
Determine The Capacity of Your Fermentation Crock
Write the capacity of your crock down. Switch it into liters, if not already, and multiply by 2. That’s how many pounds of cabbage mixture will fit into your crock. If you’re lucky, your size of crock appears in the picture and I’ve already made the calculations for you.
For this post, I give quantities for the recipes on my website and for Firecracker Sauerkraut, a recipe in my book: Fermentation Made Easy! Mouthwatering Sauerkraut. Click below to download a complimentary copy of Firecracker Sauerkraut. Pictures will be of Firecracker Sauerkraut.
Firecracker Sauerkraut Recipe
Jalapeño + red onion + oregano + cumin + red pepper flakes = Simply Delicious!
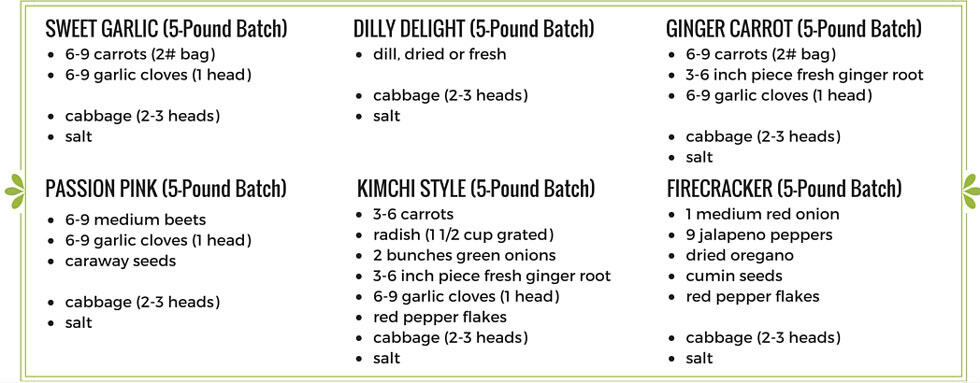
Shown below is what I would buy for a 5-pound batch. Multiply these numbers by the number of 5-pound batches you need for your crock. For my 5-liter crock, I make 2, 5-pound batches, so I buy double the ingredients listed.
Buy Ingredients
Pick your favorite flavor of sauerkraut and buy enough ingredients. Below are rough estimates for a 5-pound batch for each of the recipes on my website. Adjust for your tastes and up the quantities as necessary for your crock. See SETUP NOTES AND TIPS for information on what salt to use.
Gather Equipment
- Kitchen scale
- Cutting board and knife for slicing cabbage or mandolin
- Extra-large mixing bowl
- Vegetable peeler, measuring spoons and grater
- Crock, weights and lid
- For STEP 7: STORE, you’ll need jars and lids
SET UP Notes and Tips
- Your crock and weights do not need to be “sterilized” before use. Just use a tad of dish soap to clean them, rinse well and let dry thoroughly.
- I highly recommend that you weigh your vegetables and cabbage so that you add the proper amount of salt.
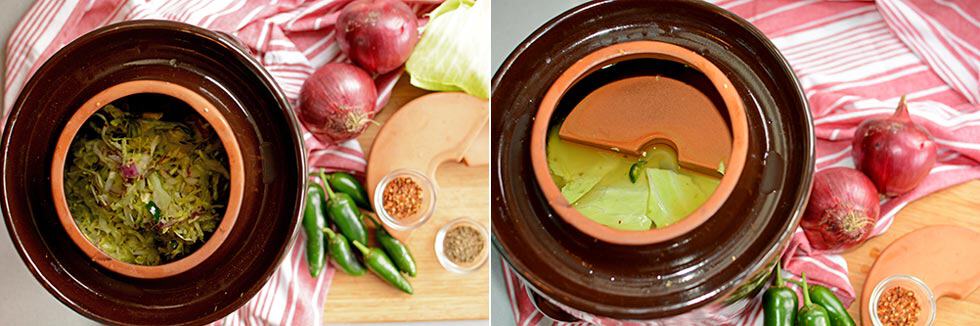
After teaching dozens of people in my MakeSauerkraut! Workshops, I’ve found that success rates hit 99.9% when participants used a scale to ensure that the correct amount of salt was used, and they were far less likely to have mold or yeast in their ferment. See my Resource Page for scale considerations and recommendations. The $20-$30 you’ll spend on a scale will save you throwing out that much expense in cabbage. - My favorite salt – and now the only salt I use – is Himalayan Pink Salt. The following post covers types of salt to use, or not to use:
What is the Best Salt to Use When Making Fermented Sauerkraut? - The amount of cabbage you need to buy varies according to other ingredients. Using lots of carrots? Well, they weigh a lot, so you’ll need less cabbage.
- You’ll be mixing up 5-pounds of vegetables and cabbage at a time. This amount should fit in an extra-large mixing bowl.
- So you don’t have to work your hands in a bowl of cold cabbage, you’ll find it useful to pull your cabbage out of the refrigerator the day before you plan to make your sauerkraut.
- Most digital scales automatically shut off after a few minutes. If your scale does, put your bowl on the scale and write down its weight. In STEP 2: PREP, you’ll add 5 pounds (2.4 kilograms, 2400 grams) to this number.

Done with failed batches? Ready to turn on YOUR Fermentation Ninja skills?
Then, download a PDF copy of my expanded recipe: How to Make Sauerkraut in a Crock, AND… enroll in my mini-email course: 5 Tips for Successful Fermentation in a Crock
Guaranteed success! All for FREE!
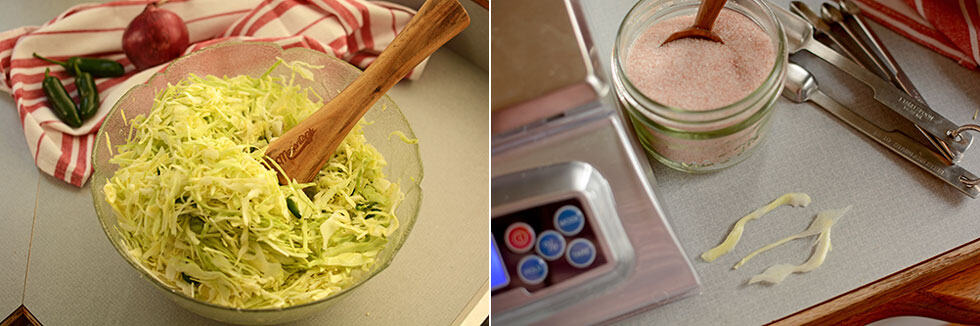
Now that you have your ingredients and equipment together, you’re ready to chop, slice and dice your way through the vegetables for your sauerkraut.
You will need 5 pounds (2.4 kilograms, 2400 grams) of vegetables and cabbage in your bowl. When making sauerkraut, it works best if you first prepare the flavoring ingredients – red onions and jalapenos in this case – then add as much sliced cabbage as necessary to hit 5 pounds (2.4 kilograms, 2400 grams) on the scale.
Prepping Jalapeno Peppers. How Much Heat?

With hot peppers, the heat is in the seeds and the inner membrane. Vary the heat by how many jalapenos you use and how many seeds you leave in. As for me? One jalapeno with seeds and membrane removed. My husband? Three jalapenos, no seeds or membrane removed.
If you don’t like super-hot & spicy foods, use just one jalapeno, cut off the stem and slice lengthwise. You might want to wear a glove for this, or be careful and wash your hands well after. With the tip of a knife, or a small spoon, scrape the seeds out. To remove even more heat, also scrape out the inner pithy membrane.
If you like the heat, use three jalapenos, cut off the stem, leave in the seeds and inner membrane, then slice the jalapeno into 1/8 inch slices.
Prep Your Ingredients
I give measurements to get you in the ballpark, but don’t feel you have to follow my recipe exactly. Add your own creative flair to it.
However, a good rule of thumb for sauerkraut to ferment
1 ¼ pounds (600 grams) flavoring
3 ¾ pounds (1800 grams) cabbage
NOTE: You might want to add and mix in your salt as you add the cabbage to your bowl. See the SALT NOTES AND TIPS section at the end of Step 3.
Firecracker Sauerkraut (5-Pound Batch)
- Peel, cut into quarters and finely slice 1/2 to 1 whole red onion.
- Prep 9 jalapenos according to how much heat you want and add these to the bowl too.
- Add 3 teaspoons oregano,
- 3 teaspoons cumin seeds and
- 1/2 to 1 teaspoon dried red pepper flakes to the bowl.
- Set aside a few cabbage leaves for use in STEP 5.
- Quarter the cabbage, leaving the core in, and finely slice. Add sliced cabbage to your bowl until the weight of the vegetables and cabbage is 5 pounds (2.4 kilograms, 2400 grams).
Sweet Garlic Sauerkraut (5-Pound Batch)
- Peel and grate 6-9 carrots. Add these to your bowl. You should end up with approximately 1 pound to 1 ¼ pounds (450-600 grams) of grated carrots.
- Finely mince 6-9 garlic cloves and add these to your bowl too.
- Set aside a few cabbage leaves for use in STEP 5.
- Quarter the cabbage, leaving the core in, and finely slice. Add sliced cabbage to your bowl until the weight of the vegetables and cabbage is 5 pounds (2.4 kilograms, 2400 grams).
Dilly Delight Sauerkraut (5-Pound Batch)
- Add either 3 tablespoons dried dill or 1/2 cup fresh dill to your bowl.
- Set aside a few cabbage leaves for use in STEP 5.
- Quarter the cabbage, leaving the core in, and finely slice. Add sliced cabbage to the bowl until the weight of the dill and cabbage is 5 pounds (2.4 kilograms, 2400 grams).
Ginger Carrot Sauerkraut
- Peel and grate 6-9 carrots. Add these to your bowl. You should end up with approximately 1 pound to 1 ¼ pounds (450-600 grams) of grated carrots.
- Peel and finely grate a 3-6 inch piece of ginger and add to your bowl.
- Finely mince 6-9 garlic cloves and add these to your bowl too.
- Set aside a few cabbage leaves for use in STEP 5.
- Quarter the cabbage, leaving the core in, and finely slice. Add sliced cabbage to your bowl until the weight of the vegetables and cabbage is 5 pounds (2.4 kilograms, 2400 grams).
Passion Pink Sauerkraut (5-Pound Batch)
- Peel and grate 6-9 medium beets. Add these to your bowl. You should end up with approximately 1 pound to 1 ¼ pounds (450-600 grams) of grated beets.
- Finely mince 6-9 garlic cloves and add these to your bowl too.
- Add 3 teaspoons caraway seeds.
- Set aside a few cabbage leaves for use in STEP 5.
- Quarter the cabbage, leaving the core in, and finely slice. Add sliced cabbage to your bowl until the weight of the vegetables and cabbage is 5 pounds (2.4 kilograms, 2400 grams).
Kimchi Style Sauerkraut (5-Pound Batch)
Until I get a chance to update this section, please see my recipe for Kimchi-Style Sauerkraut in a jar. There, I recommend using Gochugaru (a Korean red pepper that adds an unparallel depth of flavor) in place of the red pepper and also consider the addition of fish sauce – though you might want to first see if you like it with a quart (liter)-sized batch.
- Peel and grate 3-6 carrots. Add these to your bowl. You should end up with approximately 1 pound (450 grams) of grated carrots.
- Peel (if it looks rough and dirty) and grate your radish – approximately 1 ½ pounds (750 grams) – and add to your bowl.
- Slice 2 bunches of green onions and add to your bowl.
- Peel and finely grate a 3-6 inch piece of ginger and add to your bowl.
- Finely mince 6-9 garlic cloves and add these to your bowl too.
- Add 2-3 teaspoons red pepper flakes (or Gochugaru).
- Fish sauce (optional). “For the Kimchi style, I would recommend using the authentic gochugaru red pepper powder (it’s on Amazon) and also adding a tbsp of fermented fish sauce to each 5lb batch. The fish sauce smell can be unpleasant at first but it completely disappears during the fermentation and adds a richer taste to the kimchi.“
- Set aside a few cabbage leaves for use in STEP 5.
- Quarter the cabbage, leaving the core in, and finely slice. Add sliced cabbage to your bowl until the weight of the vegetables and cabbage is 5 pounds (2.4 kilograms, 2400 grams).
PREP Notes and Tips
- Some use a food processor to slice their cabbage. If you do, the feed tube will result in nicer slices than the S-blade. If you use the S-blade, be sure to not over-process the cabbage.
- Consider a mandolin for slicing your cabbage. I recommend the wide-body Benriner. Here is a quick video on how to use it. I leave the core in; no need for the ice bath.
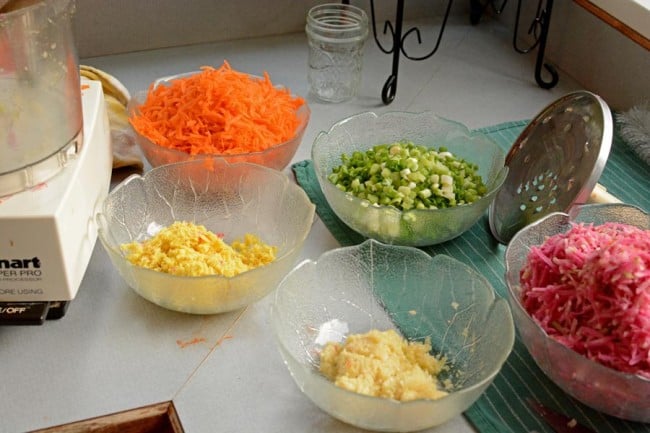
- When making large batches, the food processor is handy for grating large amounts of carrots, mincing lots of garlic and prepping quantities of other vegetables in your recipe. I process what I need for my entire crock and then grab approximate amounts for each batch. Here are all my ingredients prepped for a 10-liter crock of Kimchi-Style Sauerkraut.

Now that you have chopped and sliced all your ingredients, it is time to create the brine in which your sauerkraut will ferment.
For this you need salt. Salt pulls water out of the cabbage and vegetables to create an environment where the good bacteria (mainly lactobacillus) can grow and proliferate and the undesirable bacteria die off. If you use the correct amount of salt, ideally a mineral-rich salt, you create the best environment for the good bacteria to flourish.
Salt Your Vegetable Mixture
For a 5-pound mixture, you need 3 tablespoons of salt. Sprinkle the mixture in your bowl with 3 tablespoons of salt. Use your hand or a large spoon and mix really, really well until the salt is evenly dispersed. Make sure to reach all the goodies buried at the bottom of your bowl.
3 tablespoons of salt for 5 pounds (2.4 kilograms, 2400 grams) of cabbage & vegetables
Next, massage the cabbage mixture with strong hands until moist, thus creating your brine. The mixture will reduce in size and want to “clump” together. Tilt you bowl to one side. Once you see a 2-3 inch puddle of brine, you’re good.
Taste a pinch. Yummy?
SALT Notes and Tips
- When making 5-pound batches, I like to add the salt and mix as I’m slicing my cabbage. This makes it easier to evenly mix a large batch and makes for more room in your bowl if it’s on the too-small side.
I first place all the vegetables for the current batch in the bowl, slice about a 1/2 head of cabbage, sprinkle that with 1 tablespoon of salt and then mix. I then slice the rest of the cabbage head, add another tablespoon of salt, mix again. Lastly, I slice and add cabbage – until it weighs 5 pounds on my scale – add the last tablespoon of salt and do the final mix. - Since it’s easy to forget how much salt you’ve added, I keep track with slices of cabbage next to my scale. Each time I add a tablespoon of salt, I lay one slice of cabbage on the counter.
- No-Pound Sauerkraut. If you want the salt to work for you, or are feeling lazy and want to put your feet up and sip on a cup of Joe, you can leave the salted cabbage alone for 20 minutes to an hour. Return later and you’ll notice the cabbage is glistening with “sweat,” and find that very little massage work is necessary to get your puddle of brine.
- The fresher the cabbage and the higher the moisture content, the quicker the brine will be created. If you’re making sauerkraut in the fall with fresh cabbage, you’ll see this for sure. On the other hand, if you’re making sauerkraut with cabbage that has been stored for months, you’ll find it harder to create the brine and there’ll be less of it.
- Some recipes sprinkle the salt directly into the crock. I don’t recommend this. Mixing well and evenly is key to properly fermented sauerkraut.

Now that you have a puddle of brine in your bowl, it is time to pack your bowl of cabbage and vegetables into your crock.
Pack Your Crock One 5-Pound Batch at a Time
Place your crock on the floor, and using one arm to hold the bowl above the crock, grab handfuls of the salty, juicy cabbage mixture and pack it into your crock, periodically pressing the mixture down tightly with your fist, or a kraut pounder, so that the brine rises above the top of the mixture and no air pockets remain.
Once you have packed the current batch into your crock. mix up and pack in additional 5-pound batches until the crock is approximately ¾’s full, or you have 3-4 inches of space before hitting the top inside rim. Pour any brine left in your mixing bowl into the crock and scrape out any loose bits stuck to the sides of the bowl.
PACK Notes and Tips
- If you are using a large crock that will be difficult to lift once full, you’ll want to pack it where you are going to ferment it. Read STEP 6: FERMENT to select a location.
- You may find it hard to pack the mixture solid. It likes to move around when you press down on it. Don’t worry, the weights added in the next step help to stabilize everything.
- Be sure to leave at least 3-4 inches of space between the top of the cabbage mixture and the top of the crock. You’ll need this space for the weights and expansion of your ferment.

Now that your crock has been packed with your cabbage mixture, it’s time to make sure everything remains below the brine during the fermentation process. This is important! Any sauerkraut that gets exposed to air degrades in quality and is where molds and yeasts can grow. There are two components to this step: layering in a protective barrier, or “floaties trap,” and placing weights into the crock.
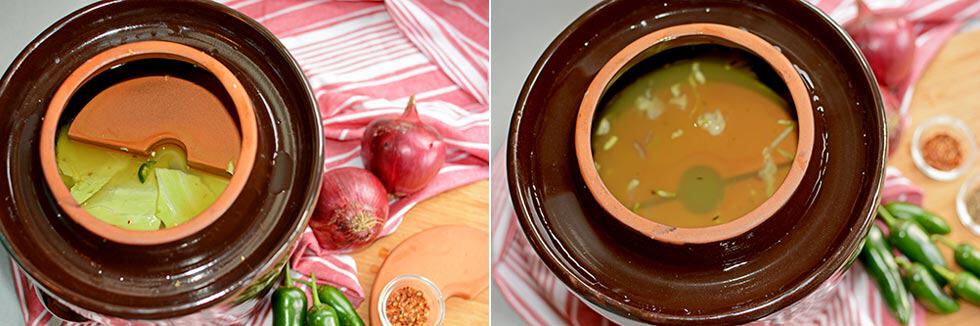
Place Cabbage Leaves and Weights in the Crock
Floaties Trap. Whole cabbage leaves make for a great Floaties Trap to hold everything below the brine. The cabbage leaves also act as a protective barrier and will make it easier to remove any small amounts of mold or yeasts that might develop on the top layer of your sauerkraut.
Take the cabbage leaves saved in Step 2 and place them on top of the cabbage mixture.
Weights. Most crocks come with stone fermentation weights, shaped as 2 half-circles to make it easy to place inside the opening of a water-sealed crock. You can also purchase weights for use in an open crock.
Place your weights in the crock, pushing down firmly to get the brine to rise above the weights. You’ll want about 1 inch of brine above the weights.
If there is not enough brine, wait a day and check. Often, additional brine is produced during the beginning stages of the fermentation process.
VALUABLE TIPS FROM A READER.
Hi Holly – I thought you might like an update on my latest batch, opened on 27.12.22 after three weeks, with no horrors, delicious, and now in the fridge.
Firstly, pre-soaking the weights in a 2% salt solution obviously reduced the absorption of actual cabbage juice and I was able to just pour boiling water over them to remove almost all the smell of cabbage – only vaguely noticeable from about an inch away now that they have been air-dried. So that is a further bonus of pre-soaking.
Thanks for your explanation about jiggling the lid, which I did. I also found a suggestion on the internet to use a 2% salt solution in the water runnel around the lid of the crock, so that if any is sucked in by the vacuum, the strength of the juice is not diluted below 2%, which seems a practical idea.
SUBMERGE Notes and Tips
- Floaties Trap. If you forgot to save a few cabbage leaves for your Floaties Trap, sift through your cabbage scraps and see if you can retrieve some. If that doesn’t pan out, a piece of parchment paper, cut to size, works well. Wax paper should also do the trick. If you’re using an open crock, a plate that covers the majority of the cabbage makes for a great Floaties Trap. Some recipes recommend boiling an old dish towel or piece of sheeting for 5 minutes and using this to cover the cabbage mixture.
- Weights. If you’re using an open crock, or don’t have weights, gallon food-grade freezer bags filled with salt water (1 tablespoon salt to 2 cups water) can serve as weights. Or try a jar filled with water with the lid screwed on tight.
- Some of the handles for the water-sealed crocks don’t work well as handles. I find it easier to carry my crock with one hand inside the opening and one hand holding the base. Therefore, I wait to put the lid on until my crock is in place.
- If there is not enough brine to cover the weights by 1 inch, go ahead and put the lid on your crock and check it the next day. If there is still not enough brine, dissolve 1 tablespoon salt in 2 cups water and pour this over the weights.

Your work is now mostly done. Time to let the friendly bacteria work for you while you rest.
Select a Location for Your Crock, Put the Lid On and Fill the Moat with Water
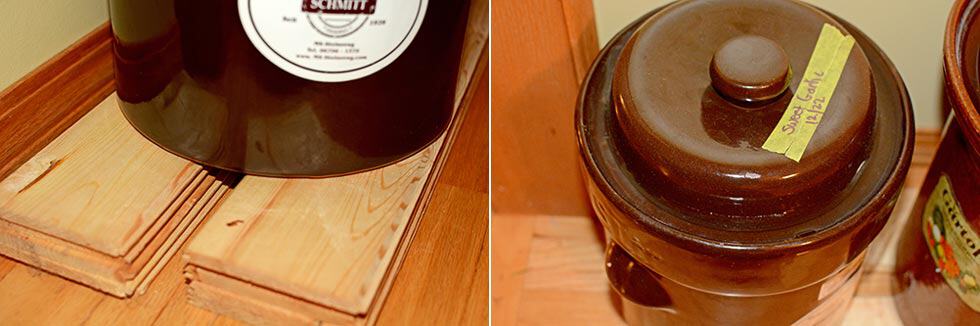
Find a spot where your crock can sit undisturbed for 4-8 weeks. Ideally, the temperature of the location should range between 65-72 degrees. To protect your floor, place your crock on a few blocks of wood.
Put the lid on and fill the moat with water.
For open crocks, you can secure some plastic wrap over the opening. Fermentation is an anaerobic process and your fermentation crock should be sealed from outside air.
During fermentation, check the water level in the crock daily to make sure it’s filled with water. You’ll slowly lose water due to evaporation.
At times, the water seems to suddenly disappear. This is due to barometric changes that can pull the water to the inside of your moat and make it look like it has all evaporated. Carefully, move the lid just a tad – don’t lift it out – and the water should flow back to the visible side of the moat.
How Long to Ferment?
For your first batch of sauerkraut, I recommend leaving it to ferment for 3 weeks at which time you can taste it and decide if you want to let it ferment longer or stop at this point and pack it into jars. Each batch is different and is impacted by the time of year (ambient temperature) that you’re are fermenting.
However, keep in mind three variables that impact how your sauerkraut turns out. OK, four if we count the quality of the ingredients. The three I look at are: Salinity, Time and Temperature.
Salinity or Amount of Salt Used
MORE salt, SLOWER the rate of fermentation and MORE days to ferment.
LESS salt, FASTER the rate of fermentation and FEWER days to ferment.
I set this variable for you, by having you add a specific amount of salt.
Don’t mess with this variable unless you live in a very warm climate and want to slow fermentation down because you’re getting moldy, mushy sauerkraut. Then, I would use slightly rounded tablespoons and ferment for a shorter time period.
Temperature

HOT temperatures, FASTER the rate of fermentation and FEWER days to ferment.
COLD temperatures, SLOWER the rate of fermentation and MORE days to ferment.
I like to ferment in a cooler location and during winter so I can ferment for a longer time which results in sauerkraut with a greater depth of flavor.
Time

FEWER days if temperatures are on the WARM side.
MORE days if temperatures are on the COOL side.
I like to ferment my sauerkraut in a crock for 4-8 weeks. I ferment for 4 weeks if I keep the crock in my house where things are a little warmer. I ferment closer to 8 weeks if I move my crock out to the garage where it’s a little cooler. See also:
How Long to Ferment Sauerkraut?
And, if you’re fermenting in a warm climate:
11 Cool Fermentation Tips for Hot Weather.
Can I Take a Peek?
Ideally, you want to maintain an anaerobic (without air) environment for your sauerkraut. Each time you peek, your are breaking the seal on your sauerkraut. However, for the first few times, it is difficult to trust that you have set up just the right environment for all the friendly bacteria to do their work for you. The greater your confidence from fermenting successfully in quart jars (small-batch method or SureFire Sauerkraut… In a Jar), the less the urge to check.
With a water-sealed crock, I would wait at least 10 days by which time a stable fermentation environment has been established. Then, if you must check things out do so, lifting out the weights and seeing how things look.
With an open crock, there is a greater chance for molds or yeasts to grow on the surface of your ferment, so it is OK to check every few days and clean off yeast that could grow on the surface.
FERMENT Notes and Tips
- Lid. If you are using an open crock and don’t have a lid for it, secure some plastic wrap over the opening instead.
- Get into the habit of giving the moat in your crock a quick check each day. It’s not often that you’ll have to add water, but it’s easy to forget it and then all of a sudden there’s no water in the moat and your crock is not longer sealed. If this happens, don’t panic. Just refill the moat with water and try to be more mindful.
- If the water in the moat seems to suddenly disappear, don’t panic. This is due to barometric changes that can pull the water to the inside of your moat and make it look like it has all evaporated. Carefully, move the lid just a tad – don’t lift it out – and the water should flow back to the visible side of the moat.
- For open crocks, white scum might form on the top of your ferment. Skim this off, wash the plate, and replace it all. Repeat daily until the scum stops forming, usually by day 10. You won’t be able to remove it all, but get what you can.
- Two-Stage Ferment. Some swear by the flavor development with a longer and cooler ferment. If you want to try this, have your crock in a warmer spot (68-72°F; 20-22°C, approximately) for the first week to 10 days then move to a cooler spot (60-65°F; 16-18°C, approximately) for the remaining time, 8-12 weeks.
- To protect your floor from condensation, raise the crock off the floor with a few blocks of wood. The bottom of most crocks is not glazed and moisture can transpire through to the floor. Not good, especially if you have wood floors.
- Music. You will hear an occasional “blop, blop” or gurgling sound. The warmer it is, the more you’ll hear this. This is normal, and is caused by carbon dioxide leaving during the fermentation process. It is one sign that fermentation has started.

After your sauerkraut has fermented to your liking, it’s time to pack the contents of your crock into jars to go into the refrigerator where it sits waiting to be effortlessly added to any meal or dish. Refrigeration slows the fermentation process and enables you to keep your sauerkraut for up to a year, sometimes even longer.
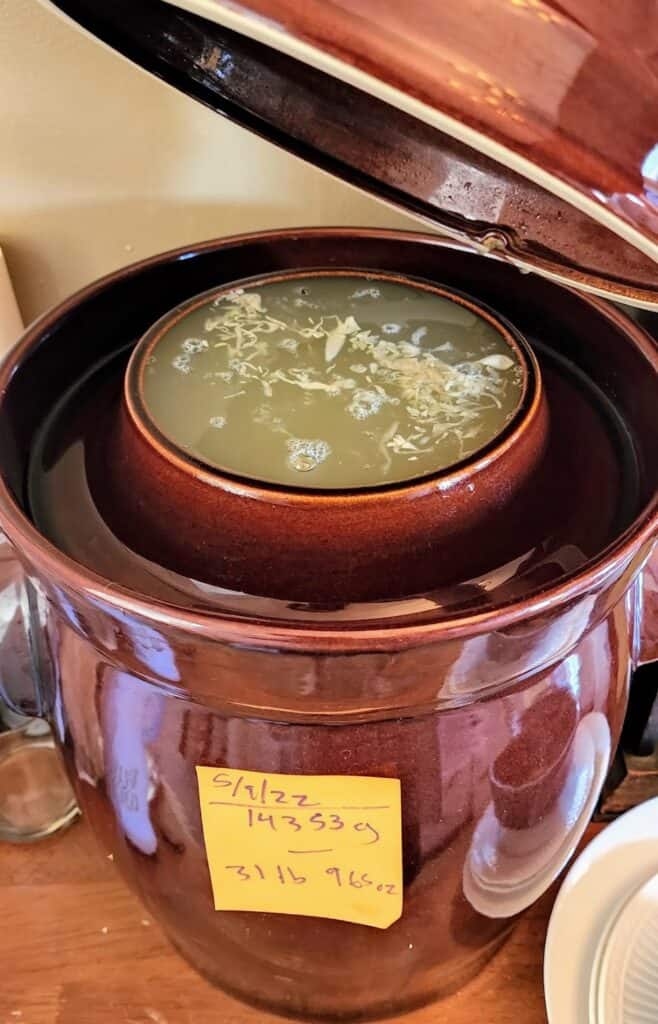
Now for the unveiling!
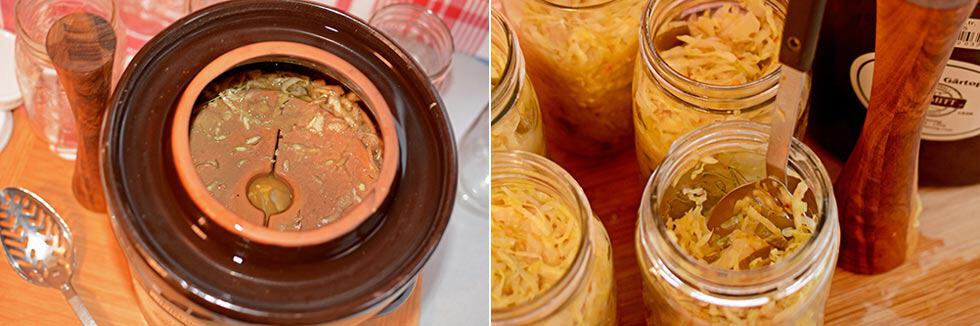
Remove the lid from your crock, and take a peek inside. It might look a little scummy on top. This is just from some of the ingredients in your sauerkraut breaking down. Hopefully, your sauerkraut is still under the brine and all is fine.
In the picture of my crock, you can see that the weights have been pushed up by the action of the fermentation process but that the sauerkraut is still under the brine. The weights for this crock aren’t as heavy as I would like, but I soon plan to test out a heavier set.
Carry your crock to the kitchen, lift out the weights (place them in the sink for washing later) and take out the whole cabbage leaves, or whatever your used as a Floaties Trap. Take the crock to the sink and pour out the water in the moat.
Give the moat a good cleaning with a damp cloth. As you’re spooning sauerkraut out of the crock, it can fall into the moat. If the moat is clean, you can retrieve this sauerkraut.
Take a pinch and taste. I sure hope it’s good! If it does not have as much crunch as you would like, make note and ferment for shorter and/or in a cooler location next time.
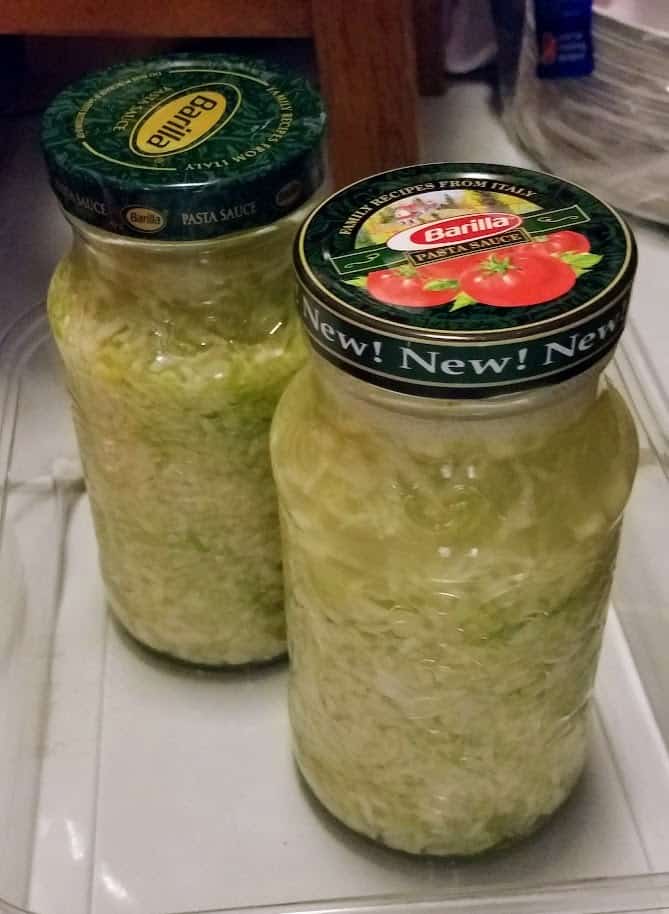
Pack Into Jars
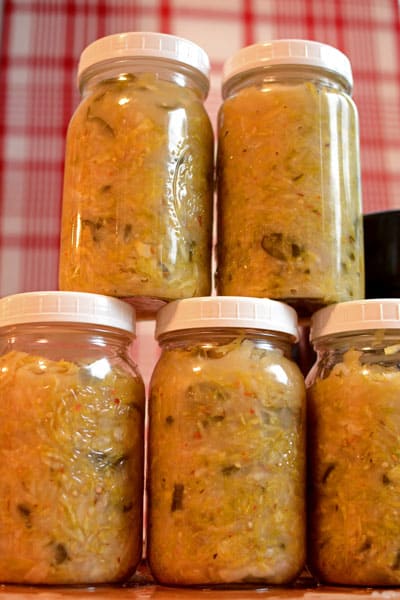
Gather up some jars to pack your sauerkraut into. Quart (liter) canning jars work well for me. If you’re gifting some of your sauerkraut, you might want to use smaller jars for that portion. You can pack about 2 pounds of sauerkraut in to a quart (liter) jar. So, if you packed 10 pounds into your crock, you’ll need 5 jars. Sorry, my mathematical brain at work :0).
I use a large slotted spoon to put a few spoonfuls into a jar and pack it down with either the spoon or a kraut pounder. Once all the jars are packed, whatever brine is left in the crock gets evenly distributed among the jars.
Use tape to label the lid of each jar with the flavor, date harvested and how long you fermented it. I also like to note that it was fermented in a crock. I might put something like “Jan16 – Firecracker – 28d – Crock.”
Stash in Your Refrigerator or Other Cold Place
When choosing where to store your sauerkraut, remember it’s alive! The warmer the temperature, the faster it will continue to ferment and the greater chance for the “bad guys” to move back in and multiply, thus ruining your sauerkraut. Refrigerate sauerkraut to avoid spoilage.
Use dish soap to thoroughly wash your crock and weights.
Congratulations! Now, comes the best part… enjoying your sauerkraut.
STORE Notes and Tips
- The ideal temperature at which to store sauerkraut is 35-38°F (2-3°C) which happens to be the typical temperature of a refrigerator. Around 38°F (3°C) degrees you won’t notice much change in the texture over a 12-month period, the typical storage length for sauerkraut. Around 45-50°F (7-10°C) you will notice your sauerkraut getting softer as the months progress.
- Not enough room in your refrigerator? Consider a second one if you have room in a garage, or the less-expensive solution? Clean up your refrigerator. There is more room in there than you realize.
Clean up and toss out old or moldy mystery jars. With today’s deeper refrigerators you’ll find a goldmine of space at the back side. This is where I can store 7-10 jars of sauerkraut. - Freezing is not recommended because it destroys the probiotics, maybe not all of the strains of bacteria but enough to make it not worth the time or effort.
- Canning is also not recommend for lacto-fermented foods. The high heat destroys most, if not all, of the beneficial bacteria.
- You may notice that there is not always brine covering your jars of sauerkraut in the refrigerator. This leaves the top portion of your sauerkraut exposed to air and loss of nutrients. I notice this happens when the sauerkraut is cold, as it seems to contract and “drink” up all the brine. You may add more brine as I used to, but I found it dilutes the flavors I work so hard to create. I just leave them be.
- Store you weights separate from your crock. Early on, I stored my weights in the crock. Bad idea! The next time I opened my crock, I was greeted by mold-encrusted weights.
Unglazed weights need to dry in open air for a good week to make sure there is no longer any moisture left in them. I do this and then store them by themselves in one of my kitchen cabinets. - Make sure your crock is dry before you put it away. With the water-sealed crocks, it is especially hard to drain all the water from the crock. Wipe it down inside to make sure you have removed all moisture.

And now for the best part: effortlessly adding the WOW! Factor to any dish or meal with that jar in your refrigerator.
When trying to incorporate sauerkraut into your diet, keep it simple. And remember, if you want to take advantage the benefits of lacto-fermented sauerkraut, don’t destroy the good enzymes and probiotics by heating your sauerkraut. It’s fine to stir sauerkraut into a warm bowl of soup or sprinkle some on the top of your meal, you just don’t want to cook or bake with it.
If you have a favorite cooked dish that uses sauerkraut, go ahead and cook the portion the recipe calls for and then add fresh sauerkraut when serving.

Condiment to the Main Meal
The easiest way to add sauerkraut to your diet is as a condiment. It pairs well with almost anything and is aids in the digestion of meats and fats.
Almost Instant Salad
In a bowl, mix lettuce, a few forkfuls of sauerkraut, some brine, a splash of olive oil, a squeeze of lemon and a fresh ground black pepper. For a more filling salad, add chunks of cheese or leftover meat.
Scrambled Eggs for Breakfast?
Add a forkful of sauerkraut, a dollop of sour cream and some diced avocado. What a delicious way to start the day.
Quick Pick-Me-Up
Have that afternoon slump and wish you could take a nap? Try a few bites of sauerkraut – yes, you can eat it right out of the jar – and see if you are soon re-energized.
Tacos
Any flavor of sauerkraut adds a whole new level of yumm! to tacos.
Hot Dog!
Last, but not least: add sauerkraut to that hot dog for the classic combination.
For more ideas see: 7 Easy Ways to Eat Sauerkraut
In addition, my eBook:
The SureFire Sauerkraut Recipe Collection includes 12 flavorful recipes and has Gourmet Pairing Options for each sauerkraut recipe. Lots to make your mouth water.
ENJOY Notes and Tips
- Keep it simple. You can come up with all sorts of creative ways to eat sauerkraut, but the easiest is either as a condiment with your meal or mixed into a salad. You’ll find it quite easy to raise the bar on your meals when you have flavorful sauerkraut on hand.
- Serve straight from the jar. Place a couple jars of sauerkraut on the table and let each member of your family use their clean fork to put some of their favorite flavor on their plate.
- Don’t like to eat cold sauerkraut? Either remember to remove it from the refrigerator an hour before the meal, or at the beginning of your meal place it on your plate and give it some time to come to room temperature. Placing it on top of a warm dish is another way to take the chill out.
- Eat your probiotic-rich sauerkraut within a year. If properly fermented, it can last much longer, but you’ll start to see browning in the top layer of the jar, especially with sauerkraut containing beets. This browning indicates loss of vitamins; mainly Vitamin C.
- Enjoy the subtle health benefits. Improved digestion, better energy and a stronger immune system can all be yours as you nourish your body with sauerkraut, the fermented foods Superstar.
- If this is the first time for you to eat sauerkraut, go slow especially if you have compromised digestion. You can start with just a sip or two of the brine and then move on to eating a small bite of the sauerkraut watching for symptoms. Take about a month to work your way up to two small (1/4 cup) servings per day.

The Book That Will Transform Your Meals, And… Your Health
Learn to make gut-healing sauerkraut to instantly add delicious flavors to your meals. Step-by-step, easy-to-follow instruction with photos and tips.
Done with failed batches? Ready to turn on YOUR Fermentation Ninja skills?
Then, download a PDF copy of my expanded recipe: How to Make Sauerkraut in a Crock, AND… enroll in my mini-email course: 5 Tips for Successful Fermentation in a Crock
Guaranteed success! All for FREE!
WOW, That Should Cover It! I hope you enjoyed learning how to make sauerkraut in a crock. You have many meals with delicious sauerkraut ahead.
What Fermentation Crock do you Own or Hope to Own? Is There Interesting History Associated With It? Share in the Comments Section
Last update on 2024-04-18 / Affiliate links / Images from Amazon Product Advertising API